环境搭建可参考Django环境搭建及开发的环境搭建部分也可参照TensorFlow官网
pip install --upgrade tensorflow
# 其它所需包
pip install --upgrade numpy pandas matplotlib
本文主要内容
TensorFlow的基础知识
TensorFlow经典的数据流图
TensorFlow的Hello World
TensorBoard
TensorFlow的操作(Operations)
TensorFlow的使用案例
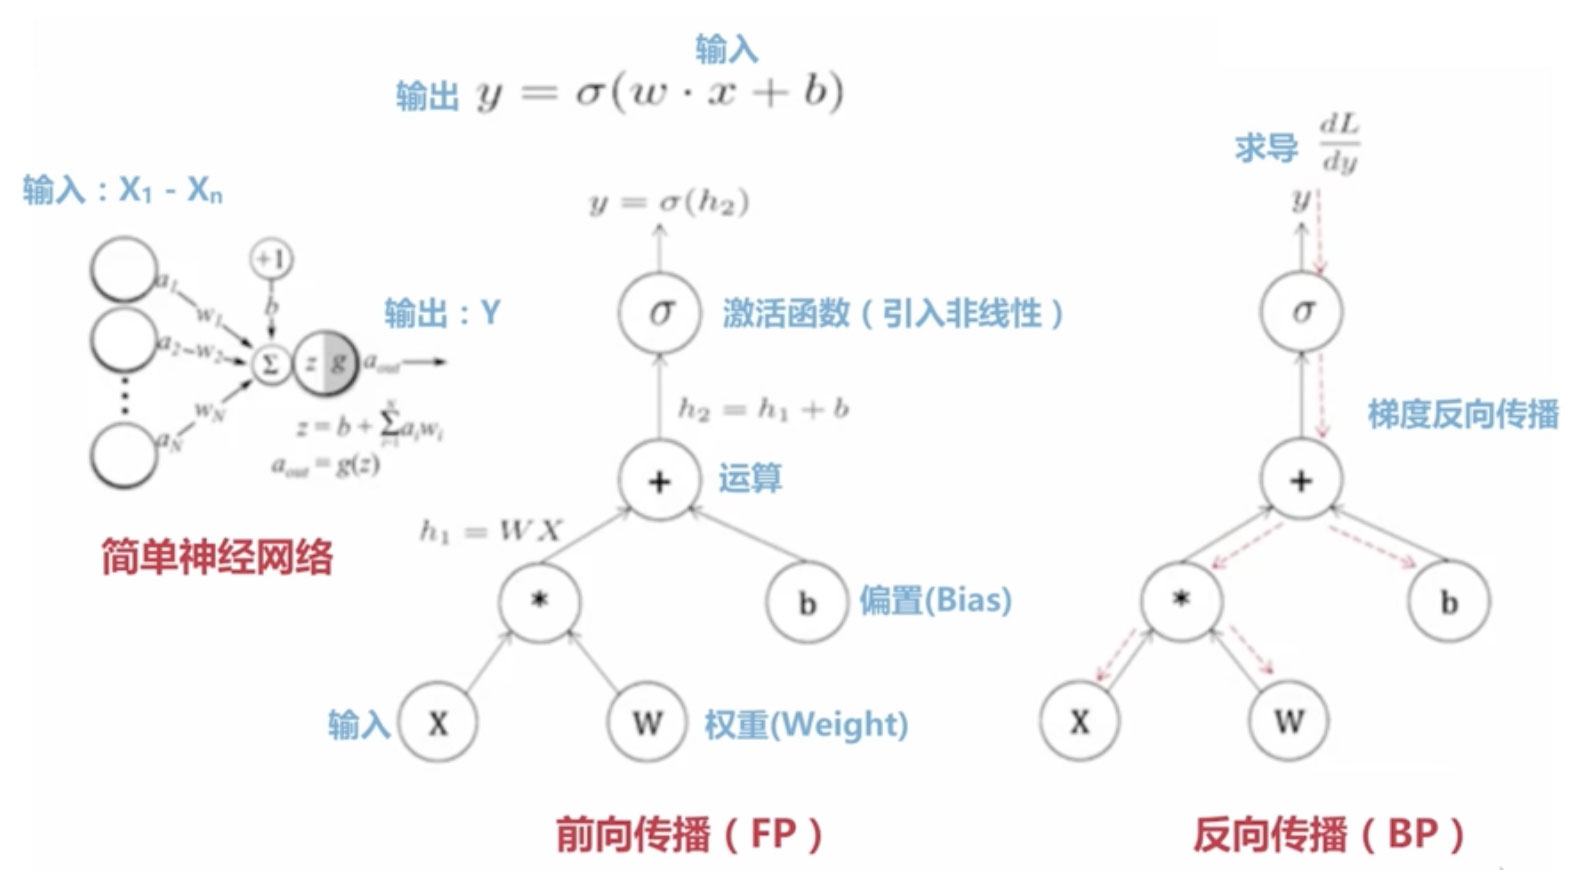
梯度下降解决线性回归
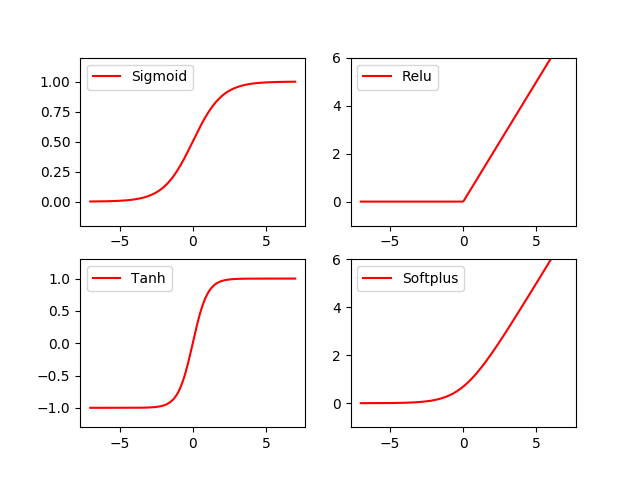
激活函数(Activation Function)
实现CNN(Convolution Neural Network)卷积神经网络
RNN-LSTM循环神经网络
TensorFlow的基础知识
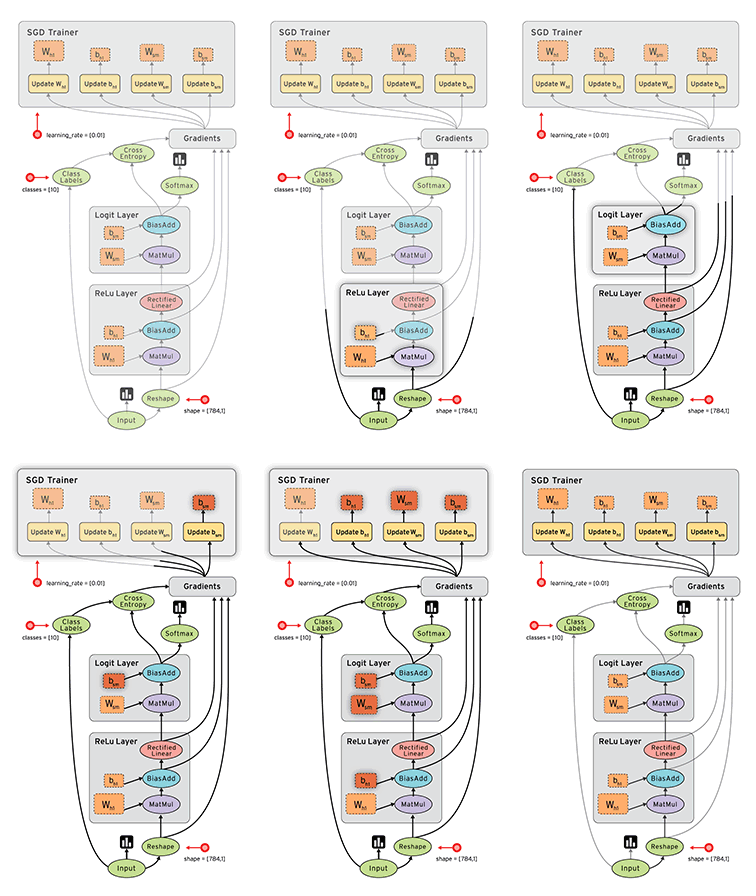
TensorFlow经典的数据流图
图中的各个节点是操作(Operation)中间的线是张量(Tensor)
TensorFlow的Hello World
import tensorflow as tf

# 创建一个常量Operation
hw = tf.constant("Hello World!")
# 启动会话
sess = tf.Session()
# 运行Graph计算图
print(sess.run(hw))
# 关闭会话
sess.close()
Tensor有以下几种constant(常量), Variable(变量), placeholder(占位符),SparseTensor(稀疏张量)
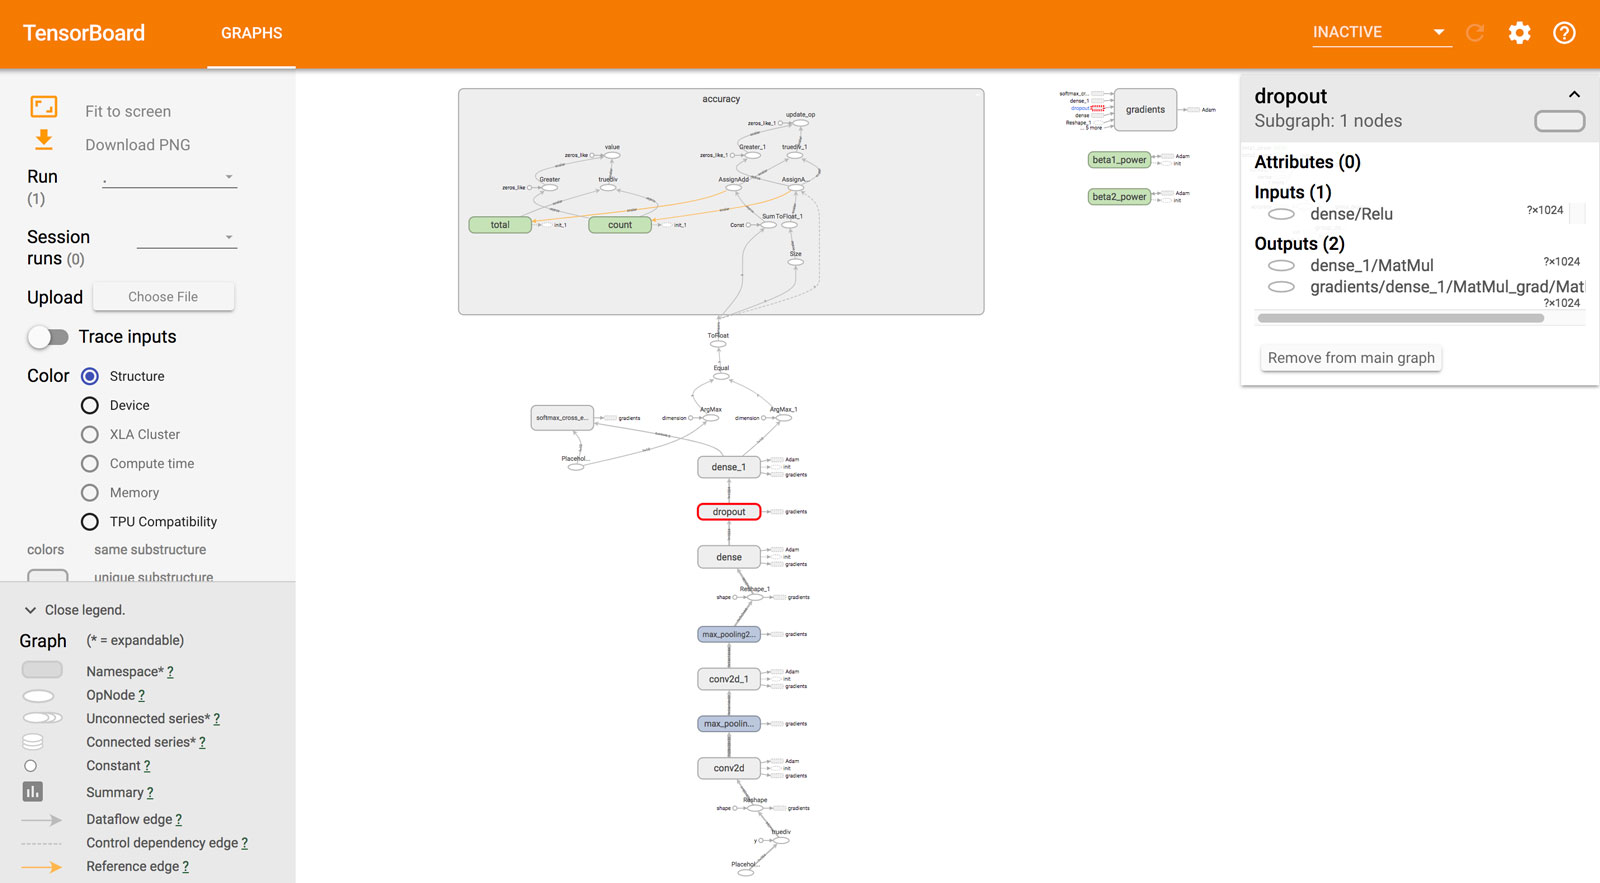
TensorBoard
# 1.用TensorFlow保存图的消息到日志中
tf.summary.FileWriter(path, sess.graph)
# 2.用TensorBoard读取并展示日志命令行
tensorboard --logdir=日志所在路径
如以下是后面卷积神经网络示例的TensorBoard
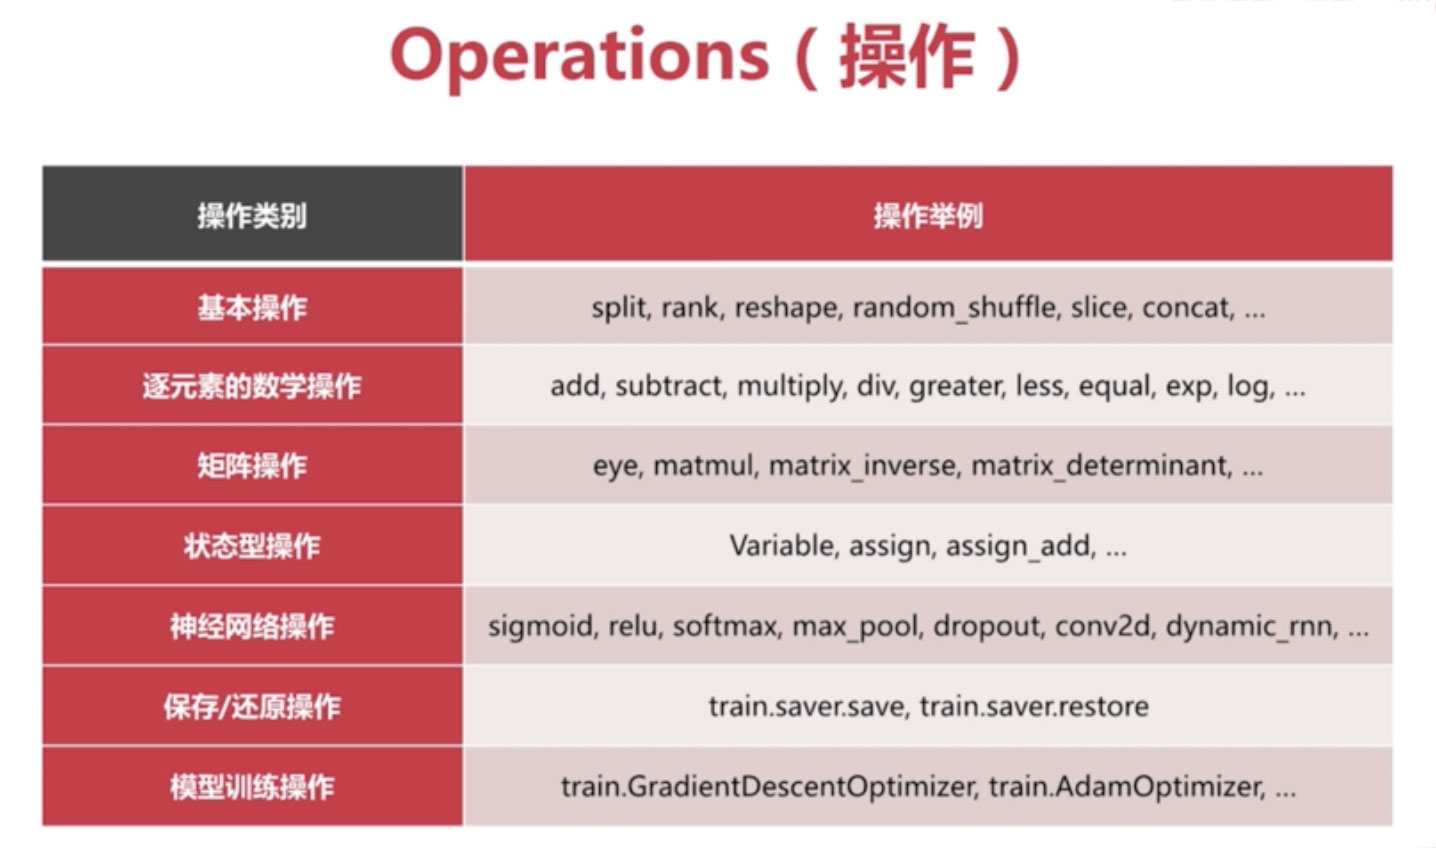
TensorFlow的操作(Operations)
TensorFlow的使用案例
梯度下降解决线性回归
import numpy as np
import matplotlib.pyplot as plt
import tensorflow as tf


# 构建数据
points_num = 100
vectors = []
# 用Numpy的正态随机分页函数生成100个点
# 这些点的(x,y)坐标值对应线性方程 y = 0.1 * x + 0.2
for i in range(points_num):
    x1 = np.random.normal(0.0, 0.66)
    y1 = x1 * 0.1 + 0.2 + np.random.normal(0.0, 0.04)
    vectors.append([x1, y1])


x_data = [v[0] for v in vectors] # 真实点的x坐标
y_data = [v[1] for v in vectors] # 真实点的y坐标

# 图像1展示100个随机数据点
plt.plot(x_data, y_data, 'r*', label="Original data") # 红色星形的点
plt.title("Linear Regression using Gradient Descent")
plt.legend()
plt.show()

# 构建线性回归模型
W = tf.Variable(tf.random_uniform([1], -1.0, 1.0)) # 初始化 Weight
b = tf.Variable(tf.zeros([1])) # 初始化 Bias
y = W * x_data + b # 模型计算出来的y

# 定义 loss function(损失函数) 或 cost function(代价函数)
# 对 Tensor的所有维度计算 ((y - y_data) ^ 2)之和 / N
loss = tf.reduce_mean(tf.square(y - y_data))

# 用梯度下降的优化器来优化我们的 loss function
optimizer = tf.train.GradientDescentOptimizer(0.5) # 设置学习率0.5
train = optimizer.minimize(loss)

# 创建会话
sess = tf.Session()

# 初始化数据流图中的所有变量
init = tf.global_variables_initializer()
sess.run(init)

# 训练 20 步
for step in range(20):
    # 优化每一步
    sess.run(train)
    # 打印出每一步的损失、权重和偏差
    print("Step=%d, Loss=%f, [Weight=%f Bias=%f]" % (step, sess.run(loss), sess.run(W), sess.run(b)) )

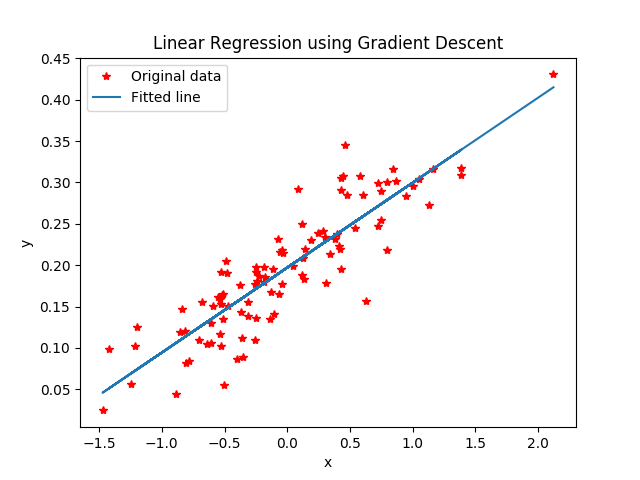
# 图像2 绘制所有的点并且绘制出最佳拟合的直线
plt.plot(x_data, y_data, 'r*', label="Original data") # 红色星形的点
plt.title("Linear Regression using Gradient Descent")
plt.plot(x_data, sess.run(W) * x_data + sess.run(b), label="Fitted line") # 拟合的线
plt.legend()
plt.xlabel('x')
plt.ylabel('y')
plt.show()

# 关闭会话
sess.close()激活函数(Activation Function)
import numpy as np
import matplotlib.pyplot as plt
import tensorflow as tf

# 创建输入数据
x = np.linspace(-7, 7, 180) # (-7, 7)之间等间隔的180个点

#激活函数的原始实现
def sigmoid(inputs):
    y = [1 / float(1 + np.exp(-x))  for x in inputs]
    return y

def relu(inputs):
    y = [x * (x>0) for x in inputs]
    return y

def tanh(inputs):
    y = [(np.exp(x) - np.exp(-x)) / float(np.exp(x) + np.exp(-x)) for x in inputs]
    return y

def softplus(inputs):
    y = [np.log(1 + np.exp(x)) for x in inputs]
    return y

# 经过 TensorFlow的激活函数处理的各个 Y值
y_sigmoid = tf.nn.sigmoid(x)
y_relu = tf.nn.relu(x)
y_tanh = tf.nn.tanh(x)
y_softplus = tf.nn.softplus(x)

# 创建会话
sess = tf.Session()

# 运行
y_sigmoid, y_relu, y_tanh, y_softplus = sess.run([y_sigmoid, y_relu, y_tanh, y_softplus])

# 创建各个激活函数的图像
plt.subplot(221)
plt.plot(x, y_sigmoid, c="red", label="Sigmoid")
plt.ylim(-0.2, 1.2)
plt.legend(loc="best")

plt.subplot(222)
plt.plot(x, y_relu, c="red", label="Relu")
plt.ylim(-1, 6)
plt.legend(loc="best")

plt.subplot(223)
plt.plot(x, y_tanh, c="red", label="Tanh")
plt.ylim(-1.3, 1.3)
plt.legend(loc="best")

plt.subplot(224)
plt.plot(x, y_softplus, c="red", label="Softplus")
plt.ylim(-1, 6)
plt.legend(loc="best")

# 显示图像
plt.show()

#关闭会话
sess.close()
深度学习的三大模型
CNNConvolution Neural Network卷积神经网络
RNNRecurrent Neural Network循环神经网络
DBNDeep Belief Network深度信念网络
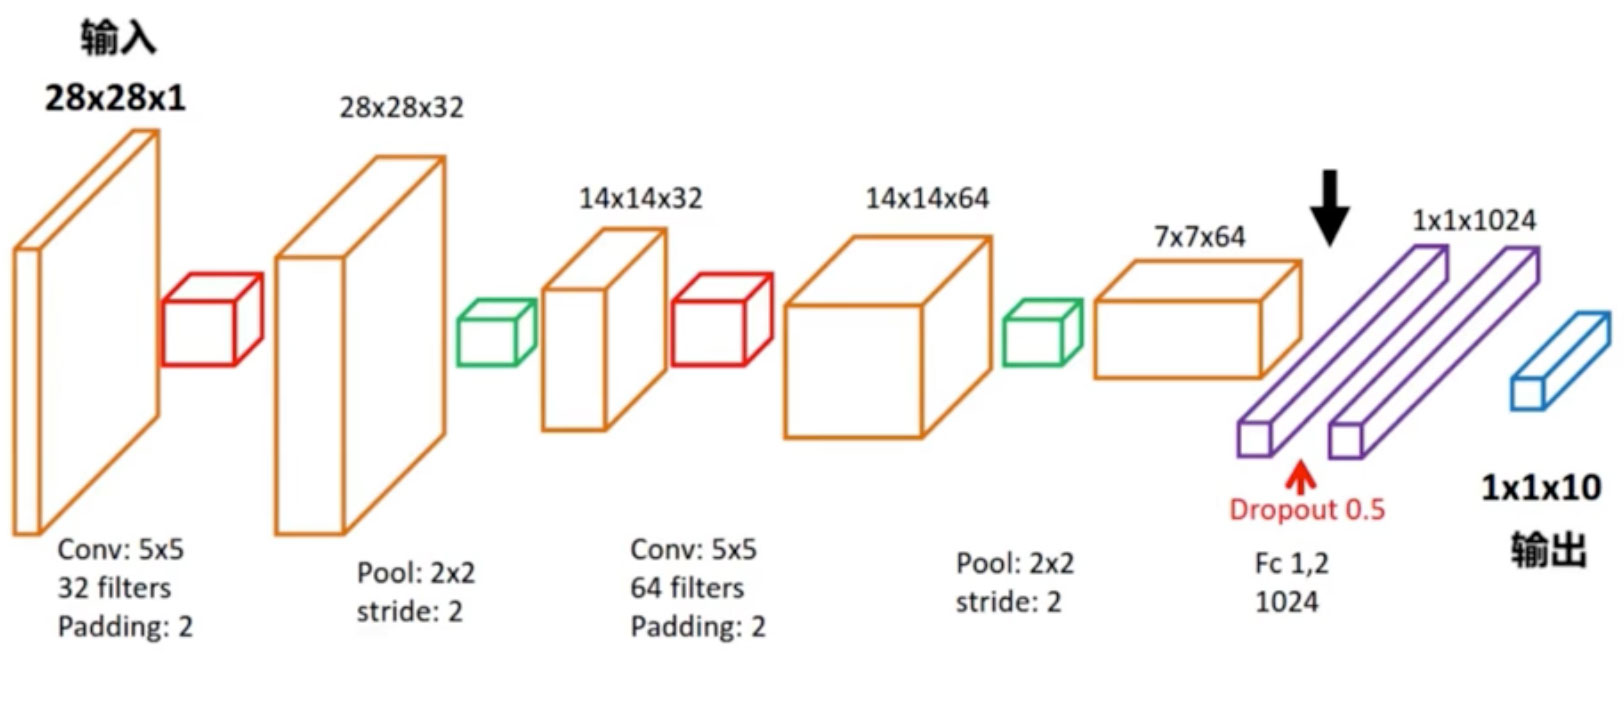
实现CNN(Convolution Neural Network)卷积神经网络
import numpy as np
import tensorflow as tf
# 下载并载入 MNIST 手写数字库(55000张28*28像素的图片)
from tensorflow.examples.tutorials.mnist import input_data

# mnist_data可自定义的数据存储目录one_hot是独热码的编码形式0-9的表示形式为0: 1000000000, 1: 0100000000...
mnist = input_data.read_data_sets('mnist_data', one_hot=True)

# None 表示张量(Tensor)的第一个维度可以是任何长度
input_x = tf.placeholder(tf.float32, [None, 28 * 28]) / 255 # 除255是因为有0-255的灰度值
output_y = tf.placeholder(tf.int32, [None, 10]) # 输出: 10个数字的标签
input_x_images = tf.reshape(input_x, [-1, 28, 28 ,1]) # 改变形状之后的输入

# 从 Test测试数据集中选取3000全手写数字的图片和对应标签
test_x = mnist.test.images[:3000] # 图片
test_y = mnist.test.labels[:3000] # 标签

# 构建卷积神经网络
# 第 1 层卷积
# output_size =1+ (input_size+2*padding-kernel_size)/stride
conv1 = tf.layers.conv2d(
    inputs=input_x_images, # 形状 [28, 28, 1]
    filters=32,            # 32个过滤器输出的深度是32
    kernel_size=[5, 5],    # 过滤器在二维的大小是5 * 5
    strides=1,             # 步长是1
    padding='same',        # same表示输出的大小不变需要在外围补0需补0两圈
    activation=tf.nn.relu  # 激活函数使用 Relu
) # 形状 [28, 28, 32]

# 第 1 层池化亚采样
pool1 = tf.layers.max_pooling2d(
    inputs=conv1,          # 形状 [28, 28, 32]
    pool_size=[2, 2],      # 过滤器在二维的大小是2 * 2
    strides=2,             # 步长是2
) # 形状 [14, 14, 32]

# 第 2 层卷积
conv2 = tf.layers.conv2d(
    inputs=pool1,          # 形状 [14, 14, 32]
    filters=64,            # 64个过滤器输出的深度是64
    kernel_size=[5, 5],    # 过滤器在二维的大小是5 * 5
    strides=1,             # 步长是1
    padding='same',        # same表示输出的大小不变需要在外围补0需补0两圈
    activation=tf.nn.relu  # 激活函数使用 Relu
) # 形状 [14, 14, 64]

# 第 2 层池化亚采样
pool2 = tf.layers.max_pooling2d(
    inputs=conv2,          # 形状 [14, 14, 64]
    pool_size=[2, 2],      # 过滤器在二维的大小是2 * 2
    strides=2,             # 步长是2
) # 形状 [7, 7, 64]

# 平坦化Flat
flat = tf.reshape(pool2, [-1, 7 * 7 * 64]) # 形状 7 * 7 * 64

# 1024 个神经元的全连接层
dense = tf.layers.dense(inputs=flat, units=1024, activation=tf.nn.relu)

# Dropout: 丢弃 50%, rate=0.5
dropout = tf.layers.dropout(inputs=dense, rate=0.5)

# 10 个神经元的全连接层此处无需激活函数来做非线性化
logits = tf.layers.dense(inputs=dropout, units=10) # 输入形状 1 * 1 * 10

# 计算误差计算 Cross entropy交叉熵再用Softmax计算百分比概率
loss = tf.losses.softmax_cross_entropy(
    onehot_labels=output_y,
    logits=logits
)

# Adam优化器来最小化误差学习率0.001
train_op = tf.train.AdamOptimizer(learning_rate=0.001).minimize(loss)

# 精度计算预测值和实际标签的匹配程度
# 返回(accuracy, update_op),会创建两个局部变量
accuracy = tf.metrics.accuracy(
    labels=tf.argmax(output_y, axis=1),
    predictions=tf.argmax(logits, axis=1),)[1]

# 创建会话
sess = tf.Session()
# 初始化全局变量和局部变量
init = tf.group(tf.global_variables_initializer(),tf.local_variables_initializer())
sess.run(init)

for i in range(20000):
    batch = mnist.train.next_batch(50) # 从 Train训练数据集取一组50个样本
    train_loss, train_op_ = sess.run([loss, train_op], {input_x: batch[0], output_y: batch[1]})
    if i % 100 == 0:
        test_accuracy = sess.run(accuracy, {input_x: test_x, output_y: test_y})
        print("Step=%d, Train loss=%.4f, [Test accuracy=%.2f]" % (i, train_loss, test_accuracy))

# 测试打印20个预测值和真实值对
test_output = sess.run(logits, {input_x: test_x[:20]})
inferenced_y = np.argmax(test_output, 1)
print(inferenced_y, 'Inferenced numbers') # 推测的数字
print(np.argmax(test_y[:20], 1), 'Real numbers') # 真实的数字
训练结果如下
Step=0, Train loss=2.3087, [Test accuracy=0.22]
Step=100, Train loss=0.1605, [Test accuracy=0.57]
...
Step=19800, Train loss=0.0000, [Test accuracy=0.98]
Step=19900, Train loss=0.0067, [Test accuracy=0.98]
[7 2 1 0 4 1 4 9 5 9 0 6 9 0 1 5 9 7 3 4] Inferenced numbers
[7 2 1 0 4 1 4 9 5 9 0 6 9 0 1 5 9 7 3 4] Real numbers
RNN-LSTM循环神经网络
RNN问题梯度消失、梯度爆炸
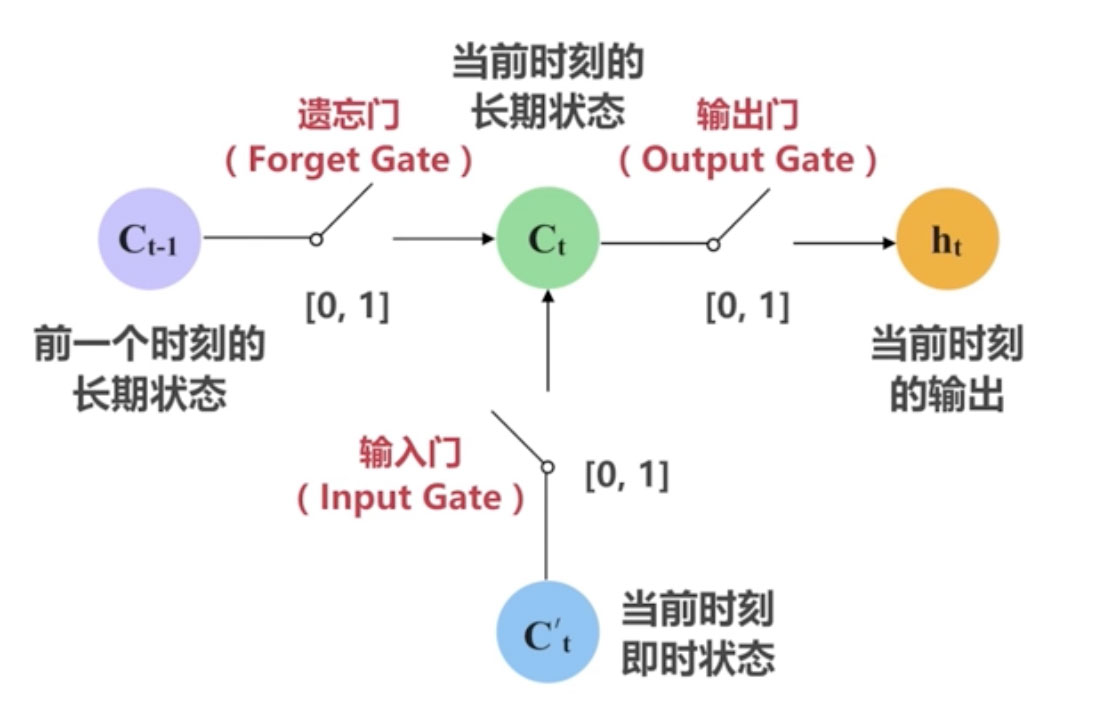
LSTM: Long Short-Term Memory
扩展阅读Understanding LSTM Networks
LSTM神经元的“三重门”机制
PTB数据集
wget http://www.fit.vutbr.cz/~imikolov/rnnlm/simple-examples.tgz
本例中使用data文件夹下的ptb.test.txtptb.train.txtptb.valid.txt三个文件
utils.py
import os, sys
import argparse
import datetime
import collections

import numpy as np
import tensorflow as tf

"""
==== 超参数Hyper parameter====
init_scale : 权重参数Weights的初始取值跨度一开始取小一些比较利于训练
learning_rate : 学习率训练时初始为 1.0
num_layers : LSTM 层的数目默认是 2
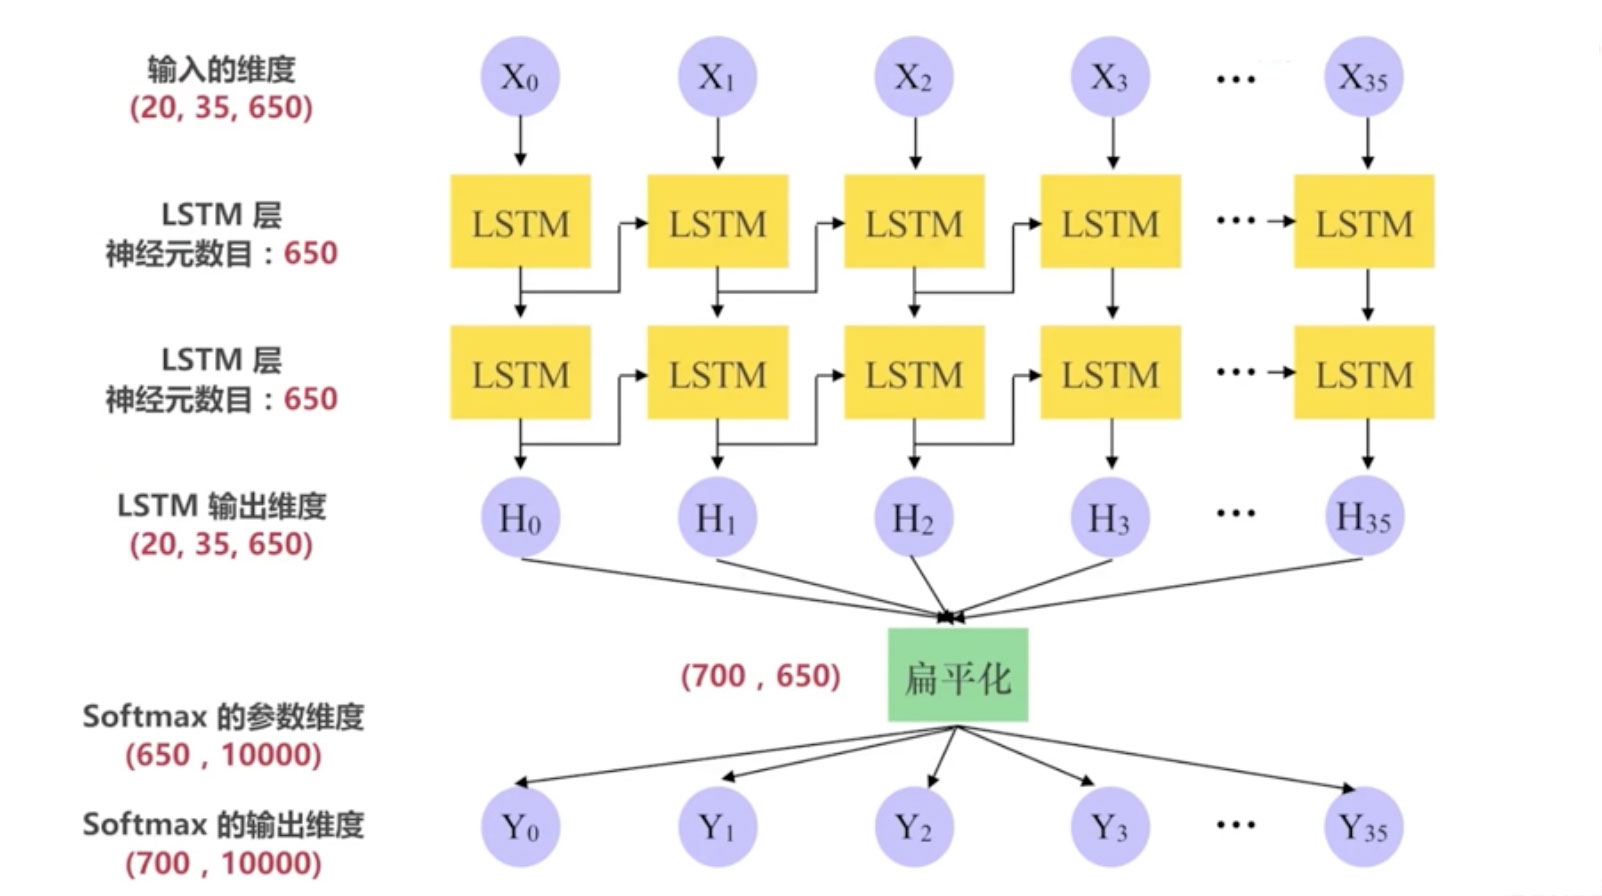
num_steps : LSTM 展开的步step数相当于每个批次输入单词的数目默认是 35
hidden_size : LSTM 层的神经元数目也是词向量的维度默认是 650
max_lr_epoch : 用初始学习率训练的 Epoch 数目默认是 10
dropout : 在 Dropout 层的留存率默认是 0.5
lr_decay : 在过了 max_lr_epoch 之后每一个 Epoch 的学习率的衰减率训练时初始为 0.93。让学习率逐渐衰减是提高训练效率的有效方法
batch_size : 批次(样本)数目。一次迭代Forword 运算用于得到损失函数以及 BackPropagation 运算用于更新神经网络参数所用的样本数目
batch_size 默认是 20。取比较小的 batch_size 更有利于 Stochastic Gradient Descent随机梯度下降防止被困在局部最小值
"""

# 数据集目录
data_path = "/Users/alan/Desktop/demo/simple-examples/data"
# 保存训练所得的模型参数文件的目录
save_path = "./save"
# 测试时读取模型参数文件的名称
load_file = "train-checkpoint-69"

parser = argparse.ArgumentParser()
parser.add_argument('--data_path', type=str, default=data_path, help='Path to data for training and testing')
parser.add_argument('--load_file', type=str, default=load_file, help='Path to checkpoint file of model variables during training')

args = parser.parse_args()
# 判断是否 Python3 版本
Py3 = sys.version_info[0] == 3

# 将文件根据语句结束标识符(<eos>)来分割
def read_words(filename):
    with tf.gfile.GFile(filename, "r") as f:
        if Py3:
            return f.read().replace("\n", "<eos>").split()
        else:
            return f.read().decode("utf-8").replace("\n", "<eos>").split()

# 构造从单词到唯一整数值的映射
def build_vocab(filename):
    data = read_words(filename)

    # 用counter统计单词出现次数并进行排序如the最多对应整数为0依此类推
    counter = collections.Counter(data)
    count_pairs = sorted(counter.items(), key= lambda x: (-x[1], x[0]))
    words, _ = list(zip(*count_pairs))

    # 单词到整数的映射
    word_to_id = dict(zip(words, range(len(words))))
    return word_to_id

# 将文件里的单词都替换成独一的整数
def file_to_word_ids(filename, word_to_id):
    data = read_words(filename)
    return [word_to_id[word] for word in data if word in word_to_id]

# 加载所有数据读取所有单词把将转成唯一对应的整数值
def load_data(data_path):
    # 三个数据集的路径
    train_path = os.path.join(data_path, "ptb.train.txt")
    valid_path = os.path.join(data_path, "ptb.valid.txt")
    test_path = os.path.join(data_path, "ptb.test.txt")

    # 建立词汇表将所有单词转为唯一对应的整数值
    word_to_id = build_vocab(train_path)

    train_data = file_to_word_ids(train_path, word_to_id)
    valid_data = file_to_word_ids(valid_path, word_to_id)
    test_data = file_to_word_ids(test_path, word_to_id)
    # 所胡独五词汇的个数
    vocab_size = len(word_to_id)

    # 反转一个词汇表以便之后从整数转为单词
    id_to_word = dict(zip(word_to_id.values(), word_to_id.keys()))

    print(word_to_id)
    print("=====================")
    print(vocab_size)
    print("=====================")
    print(train_data[:10])
    print("=====================")
    print(" ".join([id_to_word[x] for x in train_data[:10]]))
    return train_data, valid_data, test_data, vocab_size, id_to_word

# 生成批次样本
def generate_batches(raw_data, batch_size, num_steps):
    # 将数据转为 Tensor 类型
    raw_data = tf.convert_to_tensor(raw_data, name="raw_data", dtype=tf.int32)

    data_len = tf.size(raw_data)
    batch_len = data_len // batch_size

    # 将数据形状转为 [batch_size, batch_len]
    data = tf.reshape(raw_data[0: batch_size * batch_len],
                      [batch_size, batch_len])

    epoch_size = (batch_len - 1) // num_steps

    # range_input_producer 可以用多线程异步的方式从数据集里提取数据
    # 用多线程可以加快训练因为 feed_dict 的赋值方式效率不高
    # shuffle 为 False 表示不打乱数据而按照队列先进先出的方式提取数据
    i = tf.train.range_input_producer(epoch_size, shuffle=False).dequeue()

    # 假设一句话是这样 “我爱我的祖国和人民”
    # 那么如果 x 是类似这样 “我爱我的祖国”
    x = data[:, i * num_steps:(i + 1) * num_steps]
    x.set_shape([batch_size, num_steps])
    # y 就是类似这样正好是 x 的时间步长 + 1 “爱我的祖国和”
    # 因为我们的模型就是要预测一句话中每一个单词的下一个单词
    # 当然这边的例子很简单实际的数据不止一个维度
    y = data[:, i * num_steps + 1: (i + 1) * num_steps + 1]
    y.set_shape([batch_size, num_steps])

    return x, y

# 输入数据
class Input(object):
    def __init__(self, batch_size, num_steps, data):
        self.batch_size = batch_size
        self.num_steps = num_steps
        self.epoch_size = ((len(data) // batch_size) - 1) // num_steps
        # input_data 是输入targets 是期望的输出
        self.input_data, self.targets = generate_batches(data, batch_size, num_steps)
network.py
import tensorflow as tf

# 神经网络的模型
class Model(object):
    def __init__(self, input, is_training, hidden_size, vocab_size, num_layers, dropout=0.5, init_scale=0.05):
        self.is_training = is_training
        self.input_obj = input
        self.batch_size = input.batch_size
        self.num_steps = input.num_steps
        self.hidden_size = hidden_size

        # 此处操作和变量用 CPU 来计算暂无 GPU 的实现
        with tf.device("/cpu:0"):
            # 创建 词向量Word EmbeddingEmbedding 表示 Dense Vector密集向量
            # 词向量本质上是一种单词聚类Clustering的方法
            embedding = tf.Variable(tf.random_uniform([vocab_size, self.hidden_size], -init_scale, init_scale))
            inputs = tf.nn.embedding_lookup(embedding, self.input_obj.input_data)

        # 如果是训练并且dropout率小于1使输入经过一个Dropout层
        # Dropout 防止过拟合
        if is_training and dropout < 1:
            inputs = tf.nn.dropout(inputs, dropout)

        # 状态state的存储和提取
        # 第二维是 2 是因为对每一个 LSTM 单元有两个来自上一单元的输入
        # 一个是 前一时刻 LSTM 的输出 h(t-1)
        # 一个是 前一时刻的单元状态 C(t-1)
        # 这个 C 和 h 是用于构建之后的 tf.contrib.rnn.LSTMStateTuple
        self.init_state = tf.placeholder(tf.float32, [num_layers, 2, self.batch_size, self.hidden_size])

        # 每一层的状态
        state_per_layer_list = tf.unstack(self.init_state, axis=0)
        # 初始的状态包含 前一时刻 LSTM 的输出 h(t-1) 和 前一时刻的单元状态 C(t-1)用于之后的 dynamic_rnn
        rnn_tuple_state = tuple(
            [tf.contrib.rnn.LSTMStateTuple(state_per_layer_list[idx][0], state_per_layer_list[idx][1]) for idx in range(num_layers)]
        )
        # 创建一个 LSTM 层其中的神经元数目是 hidden_size 个默认 650 个
        cell = tf.contrib.rnn.LSTMCell(hidden_size)
        # 如果是训练时 并且 Dropout 率小于 1给 LSTM 层加上 Dropout 操作
        # 这里只给 输出 加了 Dropout 操作留存率(output_keep_prob)是 0.5
        # 输入则是默认的 1所以相当于输入没有做 Dropout 操作
        if is_training and dropout < 1:
            cell = tf.contrib.rnn.DropoutWrapper(cell, output_keep_prob=dropout)

        # 如果 LSTM 的层数大于 1, 则总计创建 num_layers 个 LSTM 层
        # 并将所有的 LSTM 层包装进 MultiRNNCell 这样的序列化层级模型中
        # state_is_tuple=True 表示接受 LSTMStateTuple 形式的输入状态
        if num_layers > 1:
            cell = tf.contrib.rnn.MultiRNNCell([cell for _ in range(num_layers)],
                                               state_is_tuple=True)

        # dynamic_rnn动态 RNN让不同迭代传入的 Batch 可以是长度不同的数据
        # 但同一次迭代中一个 Batch 内部的所有数据长度仍然是固定的
        # dynamic_rnn 能更好处理 padding补零的情况节约计算资源
        # 返回两个变量
        # 第一个是一个 Batch 里在时间维度默认是 35上展开的所有 LSTM 单元的输出形状默认为 [20, 35, 650]之后会经过扁平层处理
        # 第二个是最终的 state状态包含 当前时刻 LSTM 的输出 h(t) 和 当前时刻的单元状态 C(t)
        output, self.state = tf.nn.dynamic_rnn(cell, inputs, dtype=tf.float32, initial_state=rnn_tuple_state)

        # 扁平化处理改变输出形状为 (batch_size * num_steps, hidden_size)形状默认为 [700, 650]
        output = tf.reshape(output, [-1, hidden_size]) # -1 表示自动推导维度大小

        # Softmax的权重
        softmax_w = tf.Variable(tf.random_uniform([hidden_size, vocab_size], -init_scale, init_scale))
        # Softmax的偏置
        softmax_b = tf.Variable(tf.random_uniform([vocab_size], -init_scale, init_scale))

        # logits 是 Logistic Regression用于分类模型线性方程 y = W * x + b 计算的结果分值
        # 这个 logits分值之后会用 Softmax 来转成百分比概率
        # output 是输入x softmax_w 是 权重Wsoftmax_b 是偏置b
        # 返回 W * x + b 结果
        logits = tf.nn.xw_plus_b(output, softmax_w, softmax_b)

        # 将 logits 转化为三维的 Tensor为了 sequence loss 的计算
        # 形状默认为 [20, 35, 10000]
        logits = tf.reshape(logits, [self.batch_size, self.num_steps, vocab_size])

        # 计算 logits 的序列的交叉熵Cross-Entropy的损失loss
        loss = tf.contrib.seq2seq.sequence_loss(
            logits, # 形状默认为 [20, 35, 10000]
            self.input_obj.targets, # 期望输出形状默认为 [20, 35]
            tf.ones([self.batch_size, self.num_steps], dtype=tf.float32),
            average_across_timesteps=False,
            average_across_batch=True
        )

        # 更新代价Cost
        self.cost = tf.reduce_sum(loss)

        # Softmax算出来的概率
        self.softmax_out = tf.nn.softmax(tf.reshape(logits, [-1, vocab_size]))

        # 取最大概率的那个值作为预测
        self.predict = tf.cast(tf.argmax(self.softmax_out, axis=1), tf.int32)

        # 预测值和真实值目标对比
        correct_prediction = tf.equal(self.predict, tf.reshape(self.input_obj.targets, [-1]))

        # 计算预测的精度
        self.accuracy = tf.reduce_mean(tf.cast(correct_prediction, tf.float32))

        # 如果是 测试则直接退出
        if not is_training:
            return
        # 学习率,trainable=False表示“不可被训练”
        self.learning_rate = tf.Variable(0.0, trainable=False)

        # 返回所有可被训练trainable=True。如果不设定 trainable=False默认的 Variable 都是可以被训练的
        # 也就是除了不可被训练的 学习率 之外的其他变量
        tvars = tf.trainable_variables()

        # tf.clip_by_global_norm实现 Gradient Clipping梯度裁剪是为了防止梯度爆炸
        # tf.gradients 计算 self.cost 对于 tvars 的梯度求导返回一个梯度的列表
        grads, _ = tf.clip_by_global_norm(tf.gradients(self.cost, tvars), 5)

        # 优化器用 GradientDescentOptimizer梯度下降优化器
        optimizer = tf.train.GradientDescentOptimizer(self.learning_rate)

        # apply_gradients应用梯度将之前用Gradient Clipping梯度裁剪过的梯度 应用到可被训练的变量上去做梯度下降
        # apply_gradients 其实是 minimize 方法里面的第二步第一步是 计算梯度
        self.train_op = optimizer.apply_gradients(
            zip(grads, tvars),
            global_step=tf.train.get_or_create_global_step()
        )
        # 用于更新学习率
        self.new_lr = tf.placeholder(tf.float32, shape=[])
        self.lr_update = tf.assign(self.learning_rate, self.new_lr)

    # 更新 学习率
    def assign_lr(self, session, lr_value):
        session.run(self.lr_update, feed_dict={self.new_lr: lr_value})
train.py
"""
训练神经网络模型

大家之后可以加上各种的 name_scope命名空间
用 TensorBoard 来可视化

==== 一些术语的概念 ====
# Batch size : 批次(样本)数目。一次迭代Forword 运算用于得到损失函数以及 BackPropagation 运算用于更新神经网络参数所用的样本数目。Batch size 越大所需的内存就越大
# Iteration : 迭代。每一次迭代更新一次权重网络参数每一次权重更新需要 Batch size 个数据进行 Forward 运算再进行 BP 运算
# Epoch : 纪元/时代。所有的训练样本完成一次迭代

# 假如 : 训练集有 1000 个样本Batch_size=10
# 那么 : 训练完整个样本集需要 100 次 Iteration1 个 Epoch
# 但一般我们都不止训练一个 Epoch

==== 超参数Hyper parameter====
init_scale : 权重参数Weights的初始取值跨度一开始取小一些比较利于训练
learning_rate : 学习率训练时初始为 1.0
num_layers : LSTM 层的数目默认是 2
num_steps : LSTM 展开的步step数相当于每个批次输入单词的数目默认是 35
hidden_size : LSTM 层的神经元数目也是词向量的维度默认是 650
max_lr_epoch : 用初始学习率训练的 Epoch 数目默认是 10
dropout : 在 Dropout 层的留存率默认是 0.5
lr_decay : 在过了 max_lr_epoch 之后每一个 Epoch 的学习率的衰减率训练时初始为 0.93。让学习率逐渐衰减是提高训练效率的有效方法
batch_size : 批次(样本)数目。一次迭代Forword 运算用于得到损失函数以及 BackPropagation 运算用于更新神经网络参数所用的样本数目
batch_size 默认是 20。取比较小的 batch_size 更有利于 Stochastic Gradient Descent随机梯度下降防止被困在局部最小值
"""

from utils import *
from network import *


def train(train_data, vocab_size, num_layers, num_epochs, batch_size, model_save_name,
          learning_rate=1.0, max_lr_epoch=10, lr_decay=0.93, print_iter=50):
    # 训练的输入
    training_input = Input(batch_size=batch_size, num_steps=35, data=train_data)

    # 创建训练的模型
    m = Model(training_input, is_training=True, hidden_size=650, vocab_size=vocab_size, num_layers=num_layers)

    # 初始化变量的操作
    init_op = tf.global_variables_initializer()

    # 初始的学习率learning rate的衰减率
    orig_decay = lr_decay

    with tf.Session() as sess:
        sess.run(init_op)  # 初始化所有变量

        # Coordinator协调器用于协调线程的运行
        coord = tf.train.Coordinator()
        # 启动线程
        threads = tf.train.start_queue_runners(coord=coord)

        # 为了用 Saver 来保存模型的变量
        saver = tf.train.Saver() # max_to_keep 默认是 5, 只保存最近的 5 个模型参数文件

        # 开始 Epoch 的训练
        for epoch in range(num_epochs):
            # 只有 Epoch 数大于 max_lr_epoch设置为 10后才会使学习率衰减
            # 也就是说前 10 个 Epoch 的学习率一直是 1, 之后每个 Epoch 学习率都会衰减
            new_lr_decay = orig_decay ** max(epoch + 1 - max_lr_epoch, 0)
            m.assign_lr(sess, learning_rate * new_lr_decay)

            # 当前的状态
            # 第二维是 2 是因为对每一个 LSTM 单元有两个来自上一单元的输入
            # 一个是 前一时刻 LSTM 的输出 h(t-1)
            # 一个是 前一时刻的单元状态 C(t-1)
            current_state = np.zeros((num_layers, 2, batch_size, m.hidden_size))

            # 获取当前时间以便打印日志时用
            curr_time = datetime.datetime.now()

            for step in range(training_input.epoch_size):
                # train_op 操作计算被修剪clipping过的梯度并最小化 cost误差
                # state 操作返回时间维度上展开的最后 LSTM 单元的输出C(t) 和 h(t)作为下一个 Batch 的输入状态
                if step % print_iter != 0:
                    cost, _, current_state = sess.run([m.cost, m.train_op, m.state], feed_dict={m.init_state: current_state})
                else:
                    seconds = (float((datetime.datetime.now() - curr_time).seconds) / print_iter)
                    curr_time = datetime.datetime.now()
                    cost, _, current_state, acc = sess.run([m.cost, m.train_op, m.state, m.accuracy], feed_dict={m.init_state: current_state})
                    # 每 print_iter默认是 50打印当下的 Cost误差/损失和 Accuracy精度
                    print("Epoch {}, 第 {} 步, 损失: {:.3f}, 精度: {:.3f}, 每步所用秒数: {:.2f}".format(epoch, step, cost, acc, seconds))

            # 保存一个模型的变量的 checkpoint 文件
            saver.save(sess, save_path + '/' + model_save_name, global_step=epoch)
        # 对模型做一次总的保存
        saver.save(sess, save_path + '/' + model_save_name + '-final')

        # 关闭线程
        coord.request_stop()
        coord.join(threads)


if __name__ == "__main__":
    if args.data_path:
        data_path = args.data_path
    train_data, valid_data, test_data, vocab_size, id_to_word = load_data(data_path)

    train(train_data, vocab_size, num_layers=2, num_epochs=70, batch_size=20,
          model_save_name='train-checkpoint')

if __name__ == "__main__":
    if args.data_path:
        data_path = args.data_path
    train_data, valid_data, test_data, vocab_size, id_to_word = load_data(data_path)

    train(train_data, vocab_size, num_layers=2, num_epochs=70, batch_size=20,
          model_save_name='train-checkpoint')
test.py
from utils import *
from network import *

def test(model_path, test_data, vocab_size, id_to_word):
    # 测试的输入
    test_input = Input(batch_size=20, num_steps=35, data=test_data)
    # 创建测试的模型基本的超参数需要和训练时用的一致例如
    # hidden_sizenum_stepsnum_layersvocab_sizebatch_size 等等
    # 因为我们要载入训练时保存的参数的文件如果超参数不匹配 TensorFlow 会报错
    m = Model(test_input, is_training=False, hidden_size=650, vocab_size=vocab_size, num_layers=2)
    # 为了用 Saver 来恢复训练时生成的模型的变量
    saver = tf.train.Saver()

    with tf.Session() as sess:
        # Coordinator协调器用于协调线程的运行
        coord = tf.train.Coordinator()
        # 启动线程
        threads = tf.train.start_queue_runners(coord=coord)
        # 当前的状态
        # 第二维是 2 是因为测试时指定只有 2 层 LSTM
        # 第二维是 2 是因为对每一个 LSTM 单元有两个来自上一单元的输入
        # 一个是 前一时刻 LSTM 的输出 h(t-1)
        # 一个是 前一时刻的单元状态 C(t-1)
        current_state = np.zeros((2, 2, m.batch_size, m.hidden_size))
        # 恢复被训练的模型的变量
        saver.restore(sess, model_path)

        # 测试30个批次
        num_acc_batches = 30
        # 打印预测单词和实际单词的批次数
        check_batch_idx = 25
        # 超过5个批次才开始累加精度
        acc_check_thresh = 5
        # 初始精度的和用于之后算平均精度
        accuracy = 0

        for batch in range(num_acc_batches):
            if batch == check_batch_idx:
                true, pred, current_state, acc = sess.run([m.input_obj.targets, m.predict, m.state, m.accuracy],
                                                          feed_dict={m.init_state: current_state})
                pred_words = [id_to_word[x] for x in pred[:m.num_steps]]
                true_words = [id_to_word[x] for x in true[0]]
                print("True words (1st line) vs. predicted words (2nd line)")
                print(" ".join(true_words)) # 真实的单词
                print(" ".join(pred_words)) # 预测的单词
            else:
                acc, current_state = sess.run([m.accuracy, m.state],feed_dict={m.init_state: current_state})
            if batch >= accuracy:
                accuracy += acc
        # 打印平均精度
        print("Average accuracy: {:.3f}".format(accuracy / (num_acc_batches - acc_check_thresh)))
        # 关闭线程
        coord.request_stop()
        coord.join(threads)

if __name__ == "__main__":
    if args.data_path:
        data_path = args.data_path
    if args.load_file:
        load_file = args.load_file

    train_data, valid_data, test_data, vocab_size, id_to_word = load_data(data_path)

    trained_model = save_path + '/' + load_file

    test(trained_model, test_data, vocab_size, id_to_word)
在Mac上进行一次训练需耗时30多分钟写这篇文章时训练仍在进行以下是第二次训练完成后执行test.py的结果可以看到精确度还是很低的
True words (1st line) vs. predicted words (2nd line)
stock market is headed many traders were afraid to trust stock prices quoted on the big board <eos> the futures halt was even <unk> by big board floor traders <eos> it <unk> things up said
is market is n't by of said <unk> to be <eos> prices <eos> at a dollar board <eos> the dollar index that a a in a board in in said the is a that a
Average accuracy: 0.236
课程链接https://coding.imooc.com/class/176.html
本文首次发表于 Alan Hou 的个人博客
共同学习,写下你的评论
评论加载中...
作者其他优质文章


