
PC端
1、安装nfs软件[http://www.hanewin.net/]
以管理员方式运行
以管理员方式运行
以管理员方式运行
2、注册
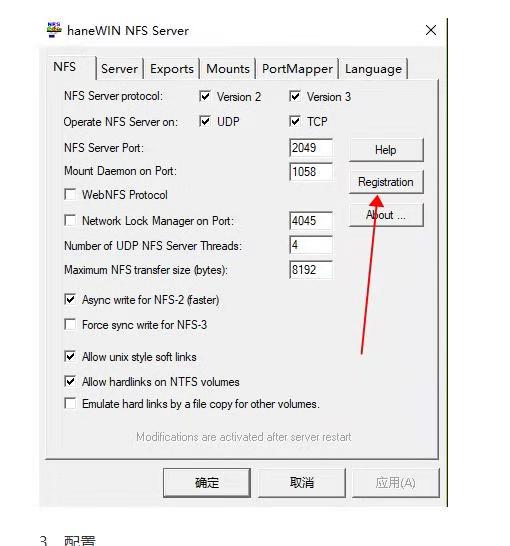
3、配置
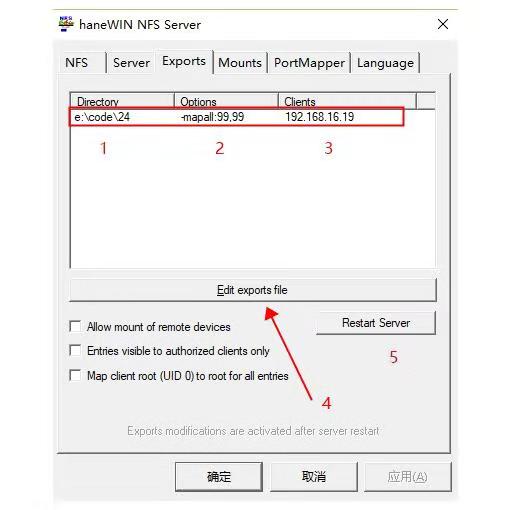
说明:
1.本地开发根目录
2.权限
3.开发环境服务器IP
4.编辑配置入口
5.重启服务按钮,每次编辑完配置需重启才能生效
4、配置demo
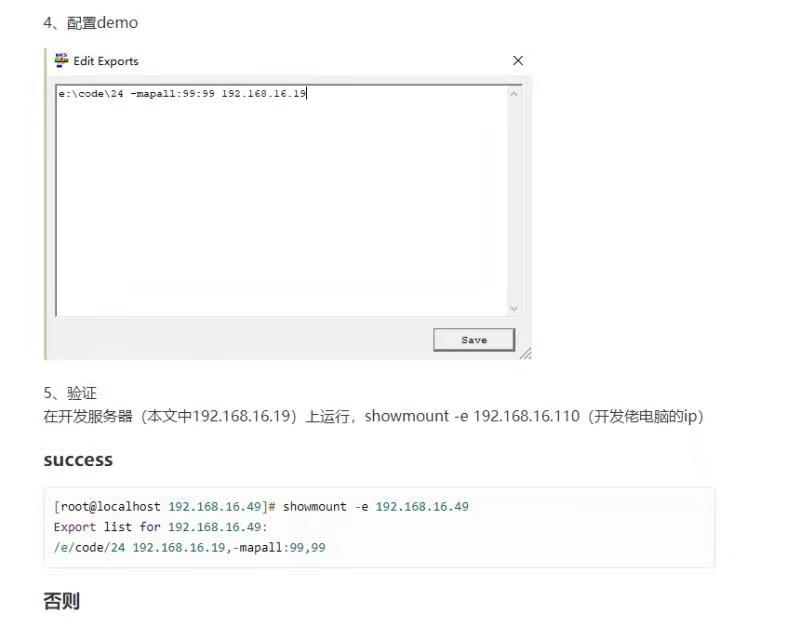
5、验证
在开发服务器(本文中192.168.16.19)上运行,showmount -e 192.168.16.110(开发佬电脑的ip)
success
[root@localhost 192.168.16.49]# showmount -e 192.168.16.49
Export list for 192.168.16.49:
/e/code/24 192.168.16.19,-mapall:99,99
否则
- 关闭电脑防火墙
- 服务器的防火墙关闭
- 文档重新撸一遍
服务器端
1、安装autofs
略,自行百度
2、vi /etc/auto.master
配置:/usr/local/scode /etc/auto.misc --timeout=2000
[root@localhost 192.168.16.49]# vi /etc/auto.master

#
# Sample auto.master file
# This is a 'master' automounter map and it has the following format:
# mount-point [map-type[,format]:]map [options]
# For details of the format look at auto.master(5).
#
/usr/local/scode /etc/auto.misc --timeout=2000
#
# NOTE: mounts done from a hosts map will be mounted with the
#       "nosuid" and "nodev" options unless the "suid" and "dev"
#       options are explicitly given.
#
/net    -hosts
#
# Include /etc/auto.master.d/*.autofs
# The included files must conform to the format of this file.
#
+dir:/etc/auto.master.d
#
# Include central master map if it can be found using
# nsswitch sources.
#
# Note that if there are entries for /net or /misc (as
# above) in the included master map any keys that are the
# same will not be seen as the first read key seen takes
# precedence.
#
#+auto.master
3、vi /etc/auto.misc
添加配置:192.168.16.49 -fstype=nfs,rw,nolock,actimeo=1 192.168.16.49:/e/code/24
[root@localhost 192.168.16.49]# vi /etc/auto.misc

#
# This is an automounter map and it has the following format
# key [ -mount-options-separated-by-comma ] location
# Details may be found in the autofs(5) manpage

cd              -fstype=iso9660,ro,nosuid,nodev :/dev/cdrom

# the following entries are samples to pique your imagination
#linux          -ro,soft,intr           ftp.example.org:/pub/linux
#boot           -fstype=ext2            :/dev/hda1
#floppy         -fstype=auto            :/dev/fd0
#floppy         -fstype=ext2            :/dev/fd0
#e2floppy       -fstype=ext2            :/dev/fd0
#jaz            -fstype=ext2            :/dev/sdc1
#removable      -fstype=ext2            :/dev/hdd
#benny
192.168.16.49  -fstype=nfs,rw,nolock,actimeo=1  192.168.16.49:/e/code/24
#parker
192.168.16.233  -fstype=nfs,rw,nolock,actimeo=1  192.168.16.233:/d/phpStudy/PHPTutorial/WWW/hczixun
#colin
192.168.16.57 -fstype=nfs,rw,nolock,actimeo=1 192.168.16.57:/d/soft/code
#zafael
192.168.16.251 -fstype=nfs,rw,nolock,actimeo=1 192.168.16.251:/e/phpStudy/PHPTutorial/WWW
#joseph
192.168.16.116 -fstype=nfs,rw,nolock,actimeo=1 192.168.16.116:/d/phpStudy/PHPTutorial/WWW
4、重启服务
systemctl restart autofs
5、验证
服务器:
[root@localhost ~]# cd /usr/local/scode/192.168.16.49 <= 开发佬电脑IP
[root@localhost 192.168.16.49]# ll
总用量 99107
drwxr-xr-x. 15 nobody nobody      4096 6月  29 17:39 h5beta
-rw-r--r--.  1 nobody nobody 101459985 6月  28 17:35 h5beta-2018.06.28.zip
drwxr-xr-x. 17 nobody nobody      4096 5月  31 20:14 houcai
drwxr-xr-x. 20 nobody nobody      4096 6月  19 19:19 houcai_h5
drwxr-xr-x.  3 nobody nobody      4096 6月   4 20:12 lavarel
drwxr-xr-x. 16 nobody nobody      4096 7月   9 17:19 zixun
drwxr-xr-x.  9 nobody nobody      4096 6月  25 14:34 zixun_h5
[root@localhost 192.168.16.49]#
电脑:进入代码存放目录
benny@DESKTOP-05SMC6H MINGW64 /e/code/24
$ ll
total 99104
drwxr-xr-x 1 benny 197121         0 6月  29 17:39 h5beta/
-rw-r--r-- 1 benny 197121 101459985 6月  28 17:35 h5beta-2018.06.28.zip
drwxr-xr-x 1 benny 197121         0 5月  31 20:14 houcai/
drwxr-xr-x 1 benny 197121         0 6月  19 19:19 houcai_h5/
drwxr-xr-x 1 benny 197121         0 6月   4 20:12 lavarel/
drwxr-xr-x 1 benny 197121         0 7月   9 17:19 zixun/
drwxr-xr-x 1 benny 197121         0 6月  25 14:34 zixun_h5/
服务器上的内容和电脑上的内容一模一样!
恭喜!!!你成功了!!!
6、nginx配置
用H5的配置举例
vi /usr/local/nginx/conf/vhost/zixun/H5.conf
只需要把root的路径稍微改一下,如图:

配置好的域名请求即可访问pc的代码
常见问题
- 要注意代码大小写,因为访问的是window上的代码
- 配置参数解下,若有问题,可调整这里的参数,修改后别忘了重启服务 systemctl restart autofs
[root@localhost 192.168.16.49]# cat /etc/autofs.conf |grep -vE "^#"
[ autofs ]
timeout = 300
negative_timeout = 180
mount_wait = 10
umount_wait = 5
browse_mode = no
mount_nfs_default_protocol = 4
logging = verbose
[ amd ]
dismount_interval = 1900
- 显示当前挂载mount -l -t nfs
[root@localhost 192.168.16.49]# mount -l -t nfs
192.168.16.233:/d/phpStudy/PHPTutorial/WWW/hczixun on /usr/local/scode/192.168.16.233 type nfs (rw,relatime,vers=3,rsize=8192,wsize=8192,namlen=255,acregmin=1,acregmax=1,acdirmin=1,acdirmax=1,hard,nolock,proto=tcp,timeo=600,retrans=2,sec=sys,mountaddr=192.168.16.233,mountvers=3,mountport=1058,mountproto=udp,local_lock=all,addr=192.168.16.233)
192.168.16.49:/e/code/24 on /usr/local/scode/192.168.16.49 type nfs (rw,relatime,vers=3,rsize=8192,wsize=8192,namlen=255,acregmin=1,acregmax=1,acdirmin=1,acdirmax=1,hard,nolock,proto=tcp,timeo=600,retrans=2,sec=sys,mountaddr=192.168.16.49,mountvers=3,mountport=1058,mountproto=udp,local_lock=all,addr=192.168.16.49)
192.168.16.251:/e/phpStudy/PHPTutorial/WWW on /usr/local/scode/192.168.16.251 type nfs (rw,relatime,vers=3,rsize=8192,wsize=8192,namlen=255,acregmin=1,acregmax=1,acdirmin=1,acdirmax=1,hard,nolock,proto=tcp,timeo=600,retrans=2,sec=sys,mountaddr=192.168.16.251,mountvers=3,mountport=1058,mountproto=udp,local_lock=all,addr=192.168.16.251)
192.168.16.116:/d/phpStudy/PHPTutorial/WWW on /usr/local/scode/192.168.16.116 type nfs (rw,relatime,vers=3,rsize=8192,wsize=8192,namlen=255,acregmin=1,acregmax=1,acdirmin=1,acdirmax=1,hard,nolock,proto=tcp,timeo=600,retrans=2,sec=sys,mountaddr=192.168.16.116,mountvers=3,mountport=1058,mountproto=udp,local_lock=all,addr=192.168.16.116)
- 删除重新挂载
umount -l 192.168.16.233:/d/phpStudy/PHPTutorial/WWW/hczixun
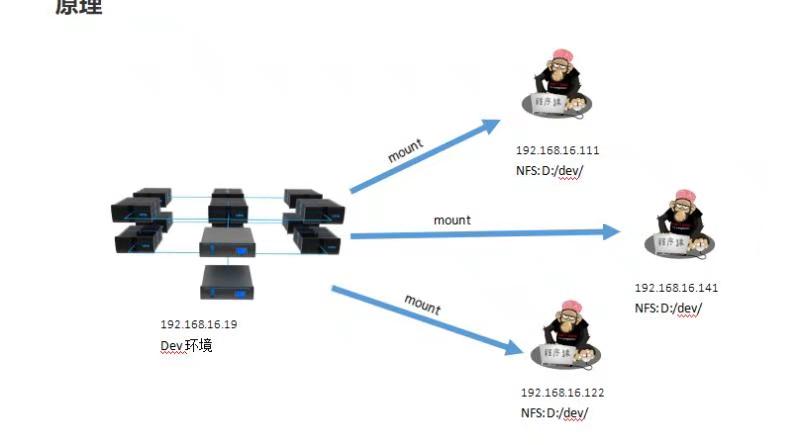
原理
点击查看更多内容
为 TA 点赞
评论
共同学习,写下你的评论
评论加载中...
作者其他优质文章
正在加载中


感谢您的支持,我会继续努力的~
扫码打赏,你说多少就多少
赞赏金额会直接到老师账户
支付方式
打开微信扫一扫,即可进行扫码打赏哦