一、python程序的运行原理
许多时候,在执行一个python文件的时候,会发现在同一目录下会出现一个__pyc__文件夹(python3)或者.pyc后缀(python2)的文件
Python在执行时,首先会将.py文件中的源代码编译成Python的byte code(字节码),然后再由Python Virtual Machine(Python虚拟机)来执行这些编译好的byte code。
1、执行流程
源代码.py ——(编译处理)——>字节码.pyc ————>python虚拟机——(编译)——>程序
2、编译
执行 python demo.py 后,将会启动 Python 的解释器,然后将 demo.py 编译成一个字节码对象 PyCodeObject。
在 Python 的世界中,一切都是对象,函数也是对象,类型也是对象,类也是对象(类属于自定义的类型,在 Python 2.2 之前,int, dict 这些内置类型与类是存在不同的,在之后才统一起来,全部继承自 object),甚至连编译出来的字节码也是对象,.pyc 文件是字节码对象(PyCodeObject)在硬盘上的表现形式。
在运行期间,编译结果也就是 PyCodeObject 对象,只会存在于内存中,而当这个模块的 Python 代码执行完后,就会将编译结果保存到了 pyc 文件中,这样下次就不用编译,直接加载到内存中。pyc 文件只是 PyCodeObject 对象在硬盘上的表现形式。
这个 PyCodeObject 对象包含了 Python 源代码中的字符串,常量值,以及通过语法解析后编译生成的字节码指令。PyCodeObject 对象还会存储这些字节码指令与原始代码行号的对应关系,这样当出现异常时,就能指明位于哪一行的代码。
3、pyc文件
一个 pyc 文件包含了三部分信息:Python 的 magic number、pyc 文件创建的时间信息,以及 PyCodeObject 对象。
magic number 是 Python 定义的一个整数值。一般来说,不同版本的 Python 实现都会定义不同的 magic number,这个值是用来保证 Python 兼容性的。比如要限制由低版本编译的 pyc 文件不能让高版本的 Python 程序来执行,只需要检查 magic number 不同就可以了。由于不同版本的 Python 定义的字节码指令可能会不同,如果不做检查,执行的时候就可能出错。
4、字节码指令
为什么 pyc 文件也称作字节码文件?因为这些文件存储的都是一些二进制的字节数据,而不是能让人直观查看的文本数据。
Python 标准库提供了用来生成代码对应字节码的工具 dis。dis 提供一个名为 dis 的方法,这个方法接收一个 code 对象,然后会输出 code 对象里的字节码指令信息。
# test1.pyimport dis

def add(a):    a = a+1
    return a

print(dis.dis(add))# 输出
 10           0 LOAD_FAST                0 (a)              3 LOAD_CONST               1 (1)              6 BINARY_ADD              7 STORE_FAST               0 (a) 11          10 LOAD_FAST                0 (a)             13 RETURN_VALUE
5、python虚拟机
demo.py 被编译后,接下来的工作就交由 Python 虚拟机来执行字节码指令了。Python 虚拟机会从编译得到的 PyCodeObject 对象中依次读入每一条字节码指令,并在当前的上下文环境中执行这条字节码指令。我们的程序就是通过这样循环往复的过程才得以执行。
更多请参考谈谈 Python 程序的运行原理
推荐python虚拟机与java虚拟机
二、进程线程
1、进程
程序仅仅只是一堆代码而已,而进程指的是程序的运行过程。需要强调的是:同一个程序执行两次,那也是两个进程。
进程:资源管理单位(容器)。
线程:最小执行单位,管理线程的是进程。
进程就是一个程序在一个数据集上的一次动态执行过程。进程一般由程序、数据集、进程控制块三部分组成。我们编写的程序用来描述进程要完成哪些功能以及如何完成;数据集则是程序在执行过程中所需要使用的资源;进程控制块用来记录进程的外部特征,描述进程的执行变化过程,系统可以利用它来控制和管理进程,它是系统感知进程存在的唯一标志。
2、线程
线程的出现是为了降低上下文切换的消耗,提高系统的并发性,并突破一个进程只能干一样事的缺陷,使到进程内并发成为可能。
线程也叫轻量级进程,它是一个基本的CPU执行单元,也是程序执行过程中的最小单元,由线程ID、程序计数器、寄存器集合和堆栈共同组成。线程的引入减小了程序并发执行时的开销,提高了操作系统的并发性能。线程没有自己的系统资源。
3、线程与进程关系
在传统操作系统中,每个进程有一个地址空间,而且默认就有一个控制线程。
多线程(即多个控制线程)的概念是,在一个进程中存在多个控制线程,控制该进程的地址空间。
进程只是用来把资源集中到一起(进程只是一个资源单位,或者说资源集合),而线程才是cpu上的执行单位。
进程和线程的关系:
(1)一个线程只能属于一个进程,而一个进程可以有多个线程,但至少有一个线程。
(2)资源分配给进程,同一进程的所有线程共享该进程的所有资源。
(3)CPU分给线程,即真正在CPU上运行的是线程。
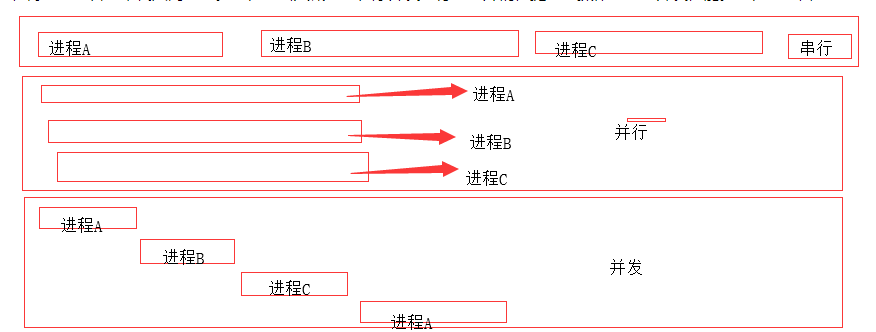
4、串行,并行与并发
比较重要的就是,无论是并行还是并发,在用户看来都是'同时'运行的,而一个cpu同一时刻只能执行一个任务。
并行:同时运行,只有具备多个cpu才能实现并行。
并发:是伪并行,即看起来是同时运行,单个cpu+多道技术。
多道技术:内存中同时存入多道(多个)程序,cpu从一个进程快速切换到另外一个,并且切换时间十分短暂,所以给人的感觉是我可以边打游戏边听歌。多个程序并行执行,其实是伪并行即并发。
5 同步与异步
同步就是指一个进程在执行某个请求的时候,若该请求需要一段时间才能返回信息,那么这个进程将会一直等待下去,直到收到返回信息才继续执行下去;异步是指进程不需要一直等下去,而是继续执行下面的操作,不管其他进程的状态。当有消息返回时系统会通知进程进行处理,这样可以提高执行的效率。
打电话时就是同步通信,发短息时就是异步通信。
二、全局解释器锁
全局解释器锁(Global Interpreter Lock):简称GIL,多进程(mutilprocess) 和 多线程(threading)的目的是用来被多颗CPU进行访问, 提高程序的执行效率。 但是多线程之间数据完整性和状态同步是一个很大的问题,所以在python内部存在一种机制(GIL),在多线程 时同一时刻只允许一个线程来访问CPU,也就是不同线程对共享资源的互斥。 在一个线程拥有了解释器的访问权之后,其他的所有线程都必须等待它释放解释器的访问权,即使这些线程的下一条指令并不会互相影响。GIL 并不是Python的特性,它是在实现Python解析器(CPython)时所引入的一个概念。因为CPython是大部分环境下默认的Python执行环境。所以在很多人的概念里CPython就是Python,也就想当然的把 GIL 归结为Python语言的缺陷。GIL并不是Python的特性,Python完全可以不依赖于GIL。例如Jython(java编写的python解释器)就不会存在GIL。
python中一个线程对应于c语言中的一个线程
GIL使得同一个时刻只有一个线程在一个cpu上执行字节码, 无法将多个线程映射到多个cpu上执行,因此python是无法利用多核CPU实现多线程的
大量的第三方包都是基于CPython编写的,所以短期内想把GIL去掉不太可能
1、GIL优缺点
缺点:多处理器退化为单处理器;
优点:避免大量的加锁解锁操作
2、GIL释放
由于CPython自带的GIL,要实现python的多线程就需要借助标准库threading
# test2.pyimport threading

total = 0def add():
    # 连续执行total的加操作
    global total    for i in range(1000000):
        total += 1def reduce():
    # 连续执行total的减操作
    global total    for i in range(1000000):
        total -= 1# 创建两个线程thread1 = threading.Thread(target=add)
thread2 = threading.Thread(target=desc)# 线程开始thread1.start()
thread2.start()# 线程结束thread1.join()
thread2.join()
print(total)
使用total作为标志,通过total的值判断线程的实现。
如果实现GIL没有释放的的话,那么两个线程先后完成,打印结果应该是0,而实际打印结果却不是0,并且每次打印结果也都不一致,说明实现了GIL主动释放掉了。
total变量是一个全局变量,其实在add与reduce内部的赋值语句total+=1与total-=1时,高级语言每一条语句在CPU上执行的时候又被对应成许多语句,比如total+=1对应成x1=total+1,total=x1,而total-=1被对应成x2=toal-1,total=x2,每一个x都是函数内部的局部变量。
注:可以对应字节码指令来理解,可以参照上面GIL中的实例使用dis模块获取字节码查看,PVM(python虚拟机)其实执行的也就是字节码指令。。
正常执行:
初始total=0add:x1 = total +1  # x1 = 1total = x1
total = 1reduce:x2 = total-1  # x2 = 0total = x2
total = 0

最终循环一次结果0
正常应该是无论多少次循环结果total都是0
多线程共享变量,两个线程交替占用cpu,:
total=0add:x1 = total + 1  # x1 = 1reduce:x2 = total - 1  # x2 = -1total = x2 # total = -1add:total = x1
total =1

最终循环结果为1
只要进行足够多的循环,total的值就会出现不可预计的结果
所以,在修改total值的时候,需要多条语句。但是执行一个线程的语句时,可能会被别的线程打断,从而一个变量被多个线程给修改乱了。因此,线程之间共享数据最大的危险在于多个线程同时改一个变量。所以在进行python多线程变成的时候,一般会进行细粒度的自定义加锁,以保证安全性。
问题:GIL至于什么时候会释放?
执行的字节码行数到达一定阈值
通过时间片划分,到达一定时间阈值
在遇到IO操作时,主动释放
更多请参考python GIL详讲
三、python多线程
对于I/O操作的时候,进程与线程的性能差别不大,甚至由于线程更轻量级,性能更高。这里的I/O包括网络I/O和文件I/O
1、实例
假如利用socket发送http请求,也就是网络I/O。爬取列表网页中的写href链接,然后获取href链接之后,在爬去链接的网页详情。
如果不适用多线程的话,程序串行的执行,结果就是要先等待列表网页获取所有的href的链接之后,才可以逐个的爬去href链接所指的网页详情,这就使得等待时间很长。
如果使用多线程编程,线程A执行第一个列表网页程序,遇到I/O操作,GIL释放,当获取到第一个href链接之后,线程B就自动的去获取href链接所指的网页详情。
2、多线程实现
# test3.pyimport timeimport threadingdef get_detail_html(url):
    print("get detail html started")
    time.sleep(2)
    print("get detail html end")def get_detail_url(url):
    print("get detail url started")
    time.sleep(4)
    print("get detail url end")if  __name__ == "__main__":    # 函数方法 arg 为函数参数
    thread1 = threading.Thread(target=get_detail_html, args=("",))
    thread2 = threading.Thread(target=get_detail_url, args=("",))

    start_time = time.time()    # 子线程1,2开始
    thread1.start()
    thread2.start()    print ("last time: {}".format(time.time()-start_time))# 执行结果get detail html started
get detail url started
last time: 0.0019958019256591797  # 忽略为0get detail html end
get detail url end
按照上面线程并行执行的逻辑应该是打印时间为2秒,但是结果却为0。
任何进程默认就会启动一个线程,该线程称为主线程,主线程又可以启动新的线程。上面的thread1与thread2就是主线程启动的两个新的线程,那么在两个子线程启动之后,主线程中其余的程序段print函数也在并行执行,所以时间为0。当两个子线程运行完毕之后,主线程退出,进程关闭,程序运行结束。才会打印出get detail html end,get detail url end。
3、守护线程
那么如何使得主线程退出的时候子线程也退出。或者说,主线程推出的时候kill掉子线程?
<1>、将子线程设置成守护线程
# test4.pyimport timeimport threadingdef get_detail_html(url):
    print("get detail html started")
    time.sleep(2)
    print("get detail html end")def get_detail_url(url):
    print("get detail url started")
    time.sleep(4)
    print("get detail url end")if  __name__ == "__main__":    # 函数方法 arg 为函数参数
    thread1 = threading.Thread(target=get_detail_html, args=("",))
    thread2 = threading.Thread(target=get_detail_url, args=("",))

    thread1.setDaemon(True)
    thread2.setDaemon(True)    # 将两个线程设置为守护线程,即主线程退出,这两个子线程也退出,kill

    start_time = time.time()     # 子程开始
    thread1.start()
    thread2.start()    #当主线程退出的时候, 子线程kill掉
    print ("last time: {}".format(time.time()-start_time))# 输出get detail html started
get detail url started
last time: 0.0
将两个线程设置为守护线程,即主线程退出,这两个守护线程也退出。打印结果中执行到print之后直接程序结束。
由于两个线程的时间不相同,那么两者有什么区别呢
<2>、先将thread1设置为守护线程
# test5.pyimport timeimport threadingdef get_detail_html(url):
    print("get detail html started")
    time.sleep(2)
    print("get detail html end")def get_detail_url(url):
    print("get detail url started")
    time.sleep(4)
    print("get detail url end")if  __name__ == "__main__":    # 函数方法 arg 为函数参数
    thread1 = threading.Thread(target=get_detail_html, args=("",))
    thread2 = threading.Thread(target=get_detail_url, args=("",))

    thread1.setDaemon(True)  # 只将thread设置为守护线程
    # thread2.setDaemon(True)

    start_time = time.time()

    thread1.start()
    thread2.start()    #当主线程退出的时候, 子线程kill掉
    print ("last time: {}".format(time.time()-start_time))# 结果 get detail html started
get detail url started
last time: 0.000997781753540039get detail html end
get detail url end
只将thread1设置为守护线程之后,由于thread2的sleep时间为4秒,所以主线程仍会等待thread2执行结束之后才退出,而thread1由于时间为2秒,所以也会打印。
<3>、先将thread2设置为守护线程
# test6.pyimport timeimport threadingdef get_detail_html(url):
    print("get detail html started")
    time.sleep(2)
    print("get detail html end")def get_detail_url(url):
    print("get detail url started")
    time.sleep(4)
    print("get detail url end")if  __name__ == "__main__":    # 函数方法 arg 为函数参数
    thread1 = threading.Thread(target=get_detail_html, args=("",))
    thread2 = threading.Thread(target=get_detail_url, args=("",))    # thread1.setDaemon(True)
    thread2.setDaemon(True)

    start_time = time.time()

    thread1.start()
    thread2.start()    print ("last time: {}".format(time.time()-start_time))# 输出get detail html started
get detail url started
last time: 0.0029969215393066406get detail html end
由于只将thread2设置为守护线程,print函数执行结束的时候会首先kill掉thread2线程。但是由于thread1线程还未结束,程序仍会等待两秒输出get detail html end才结束。
4、线程阻塞
上面说了如何在主线程结束的时候,直接kill掉子线程。那么如何使子线程执行结束才执行主线程,就是阻塞主进程。
<1>、结束两个子线程
# test7.pyimport timeimport threadingdef get_detail_html(url):
    print("get detail html started")
    time.sleep(2)
    print("get detail html end")def get_detail_url(url):
    print("get detail url started")
    time.sleep(4)
    print("get detail url end")if  __name__ == "__main__":    # 函数方法 arg 为函数参数
    thread1 = threading.Thread(target=get_detail_html, args=("",))
    thread2 = threading.Thread(target=get_detail_url, args=("",))

    start_time = time.time()    # 子线程开始
    thread1.start()
    thread2.start()    # 子线程程结束
    thread1.join()
    thread2.join()    #当主线程退出的时候, 子线程kill掉
    print ("last time: {}".format(time.time()-start_time))#输出get detail html started
get detail url started
get detail html end
get detail url end
last time: 4.001712799072266
由于调用了两个thread的join方法,主线程阻塞,当子线程结束之后,print函数执行后主线程退出,程序结束。
<2>、结束thread1线程
# test8.pyimport timeimport threadingdef get_detail_html(url):
    print("get detail html started")
    time.sleep(2)
    print("get detail html end")def get_detail_url(url):
    print("get detail url started")
    time.sleep(4)
    print("get detail url end")if  __name__ == "__main__":    # 函数方法 arg 为函数参数
    thread1 = threading.Thread(target=get_detail_html, args=("",))
    thread2 = threading.Thread(target=get_detail_url, args=("",))

    start_time = time.time()    # 子线程开始
    thread1.start()
    thread2.start()    # 1线程程结束
    thread1.join()    # thread2.join()

    #当主线程退出的时候, 子线程kill掉
    print ("last time: {}".format(time.time()-start_time))# 输出get detail html started
get detail url started
get detail html end
last time: 2.001251220703125get detail url end
由于调用了thread1的join方法,阻塞主线程,thread1直接结束之后print打印时间,但是对另一个线程没有影响。所以在打印last time: 2.001251220703125时间,等待两秒打印get detail url end,主线程才会退出。
<3>、结束thread2线程
# test9.pyimport timeimport threadingdef get_detail_html(url):
    print("get detail html started")
    time.sleep(2)
    print("get detail html end")def get_detail_url(url):
    print("get detail url started")
    time.sleep(4)
    print("get detail url end")if  __name__ == "__main__":    # 函数方法 arg 为函数参数
    thread1 = threading.Thread(target=get_detail_html, args=("",))
    thread2 = threading.Thread(target=get_detail_url, args=("",))

    start_time = time.time()    # 子线程开始
    thread1.start()
    thread2.start()    # 2线程程结束
    # thread1.join()
    thread2.join()    #当主线程退出的时候, 子线程kill掉
    print ("last time: {}".format(time.time()-start_time))# 输出get detail html started
get detail url started
get detail html end
get detail url end
last time: 4.002287864685059
由于thread2线程的sleep的时间为4秒,期间thread1已经执行完毕,所以打印时间为4秒。
5、Thread类继承式创建
同样的也可以使用类继承的方法创建线程实例,效果一样的
# test10.pyimport timeimport threadingclass GetDetailHtml(threading.Thread):
    def __init__(self, name):
        super().__init__(name=name)    def run(self):
        print("get detail html started")
        time.sleep(2)
        print("get detail html end")class GetDetailUrl(threading.Thread):
    def __init__(self, name):
        super().__init__(name=name)    def run(self):
        print("get detail url started")
        time.sleep(4)
        print("get detail url end")if  __name__ == "__main__":    # 类继承方法
    thread1 = GetDetailHtml("get_detail_html")
    thread2 = GetDetailUrl("get_detail_url")
    start_time = time.time()    # 子线程开始
    thread1.start()
    thread2.start()    # 子线程程结束
    thread1.join()
    thread2.join()    #当主线程退出的时候, 子线程kill掉
    print ("last time: {}".format(time.time()-start_time))
6、线程通信
<1>、共享变量通信
共享变量通信,是线程间通信最简单的方式,但也是最容易出问题的方式。以上面爬去页面和网页链接的实例进行扩展。在上面的实例中,因为要解决请求列表页面的时候网络时延问题,引入了多线程并行,边爬去列表页获取href,再爬取href指向的想起那个页面,下面将爬去的页面存入列表实现。
# test11.pyimport threadingimport time

detail_url_list = []  # 存储着爬取下来的href链接def get_detail_html(detail_url_list):  # 参数这里作为对全局变量的引用
    while True:        # 使用while语句使得线程持续爬去
        if len(detail_url_list):
            url = detail_url_list.pop()
            print('get detail html start')
            time.sleep(2)
            print('get detail html end')def get_detail_url(detail_url_list):
    while True:        # 使用while语句使得线程持续爬取
        print('get detail url start')
        time.sleep(4)        for i in range(20):
            detail_url_list.append('http://www.xxxx.com/{}.html'.format(i))
        print('get detail end')if __name__ == "__main__":
    thread_detail_url = threading.Thread(target=get_detail_url, args=(detail_url_list,))    for i in range(10):        # 为了模拟多个线程并发,这里创建了十个子线程
        html_thread = threading.Thread(target=get_detail_html, args=(detail_url_list,))
        html_thread.start()

    start_time = time.time()

    print("last time: {}".format(time.time() - start_time))
但是上面问题也会很明显,在GIL的示例中,total变量由于变量共享的缘故,没有按照预期的执行。而在上面的爬虫实例中,detail_url_list作为全局共享变量,pop操作,append操作,多个线程共用资源,都不是线程安全的操作,会出现问题。所以就必须给变量加上锁,保持安全性。为了摆脱这种问题,使用消息队列通信
<2>、消息队列通信
消息队列通信也就是使用Queue这个类来表示变量,从而达到线程安全,由于Queue这个类内部封装了deque,也就是python中的双端队列。双端对列本身就是安全界别很高的一种类型,实现线程间的安全操作。
# test12.py#通过queue的方式进行线程间同步from queue import Queueimport timeimport threadingdef get_detail_html(queue):
    #爬取文章详情页
    while True:
        url = queue.get()
        print("get detail html started")
        time.sleep(2)
        print("get detail html end")def get_detail_url(queue):
    # 爬取文章列表页
    while True:
        print("get detail url started")
        time.sleep(4)        for i in range(20):
            queue.put("http://projectsedu.com/{id}".format(id=i))
        print("get detail url end")if  __name__ == "__main__":
    detail_url_queue = Queue(maxsize=1000)

    thread_detail_url = threading.Thread(target=get_detail_url, args=(detail_url_queue,))    for i in range(10):
        html_thread = threading.Thread(target=get_detail_html, args=(detail_url_queue,))
        html_thread.start()

    start_time = time.time()    # detail_url_queue.task_done()
    detail_url_queue.join()    #当主线程退出的时候, 子线程kill掉
    print ("last time: {}".format(time.time()-start_time))
使用了消息队列替代共享变量
Queue([maxsize]):创建共享的进程队列,Queue是多进程安全的队列,可以使用Queue实现多进程之间的数据传递。
q.put方法用以插入数据到队列中,put方法还有两个可选参数:blocked和timeout。如果blocked为True(默认值),并且timeout为正值,该方法会阻塞timeout指定的时间,直到该队列有剩余的空间。如果超时,会抛出Queue.Full异常。如果blocked为False,但该Queue已满,会立即抛出Queue.Full异常。没有参数时,q.put的个数大于队列数时,会一直阻塞住。
q.get方法可以从队列读取并且删除一个元素。同样,get方法有两个可选参数:blocked和timeout。如果blocked为True(默认值),并且timeout为正值,那么在等待时间内没有取到任何元素,会抛出Queue.Empty异常。如果blocked为False,有两种情况存在,如果Queue有一个值可用,则立即返回该值,否则,如果队列为空,则立即抛出Queue.Empty异常。没有参数时,q.get的个数大于队列数时,会一直阻塞住。
q.put_nowait()等价于q.put(block=False)队列满时再存也会抛异常
q.get_nowait()等价于q.get(block=False)队列为空取不出时会抛异常
q.task_done():使用者使用此方法发出信号,表示q.get()的返回项目已经被处理。如果调用此方法的次数大于从队列中删除项目的数量,将引发ValueError异常
q.join():生产者调用此方法进行阻塞,直到队列中所有的项目均被处理。阻塞将持续到队列中的每个项目均调用q.task_done()方法为止
7、加锁
在上面的第一个GIL示例中,由于GIL释放的缘故,多个线程共享变量,导致total的值不像预期那样为0的问题发生,也就是如何线程同步。最简单的方式就是加锁。加锁使得一个线程在占用资源的时候,别的线程都必须等待,只有当这个线程主动释放资源的时候,其他线程才能使用资源。这样就可要保证共享变量的安全性。
# test13.pyfrom threading import Lock#在同一个线程里面,可以连续调用多次acquire, 一定要注意acquire的次数要和release的次数相等total = 0lock = Lock()def add():    global lock
    global total    for i in range(1000000):        lock.acquire()   # 加锁
        total += 1
        lock.release()  # 释放锁def desc():    global total    global lock
    for i in range(1000000):        lock.acquire()  # 加锁
        total -= 1
        lock.release()  # 释放锁import threading

thread1 = threading.Thread(target=add)
thread2 = threading.Thread(target=desc)

thread1.start()
thread2.start()

thread1.join()
thread2.join()

print(total)# 输出在等待了一段时间后输出00 # total的打印结果为0加锁的时候要保证加上锁执行完成之后,就要释放掉,不然会一直占用资源。
加锁的结果使得在执行total-=1或者total+=1的赋值语句的时候,该赋值语句对应的多条字节码指令执行完之后,才会其他进程执行修改total值。该线程占用了锁,所以其他线程不能修改total值,只有当该释放了锁,其他线程才能修改total值,不会造成修改共享变量的冲突。这是加锁的好处,那么代价也十分明显
加锁缺点:
加锁性能
死锁风险
补充:另外自己加的锁使用户级别的与GIL不同。
<1>、性能问题
本来的多线程,由于加锁的缘故,首先是阻止了多线程并发执行,包含锁的某段代码实际上只能以单线程模式执行。并且由于来回切换线程的缘故,程序性能变得低下
将test2.py改成如下
# test14.pytotal = 0def add():
    global total    for i in range(1000000):
        total += 1def desc():
    global total    for i in range(1000000):
        total -= 1import threadingimport time
start_time = time.time()

add()
desc()

print(total)

print("last time: {}".format(time.time() - start_time))# 输出0last time: 0.314816951751709
这是简单的单线程程序,持续时间为0.3秒。没有使用thread多线程
下面使用threading多线程,并且加锁
# test15.pyfrom threading import Lock

total = 0lock = Lock()def add():    global lock
    global total    for i in range(1000000):        lock.acquire()
        total += 1
        lock.release()def desc():    global total    global lock
    for i in range(1000000):        lock.acquire()
        total -= 1
        lock.release()

import threading
import time

start_time = time.time()

thread1 = threading.Thread(target=add)
thread2 = threading.Thread(target=desc)

thread1.start()
thread2.start()

thread1.join()
thread2.join()

print(total)
print("last time: {}".format(time.time() - start_time))# 输出0last time: 5.062084674835205
使用了多线程,为了保证共享变量的安全性操作,线程同步,加锁导致类似单线程,程序的运行时间达到了5秒钟。可见线程之间的切换十分浪费时间。所以说,CPython的GIL本意是用来保护所有全局的解释器和环境状态变量的,如果去掉GIL,就需要更多的更细粒度的锁对解释器的众多全局状态进行保护。做过测试将GIL去掉,加入更细粒度的锁。但是实践检测对单线程来说,性能更低。
<2>、死锁风险
来看下面例子
这里为了在一个线程中多次调用lock,使用可重入的锁Rlock对象
Lock与Rlock区别:
RLock允许在同一线程中被多次acquire。而Lock却不允许这种情况。注意:如果使用RLock,那么acquire和release必须成对出现,即调用了n次acquire,必须调用n次的release才能真正释放所占用的琐。
# test15.pyfrom threading import RLock  # 可重入的锁total = 0lock = RLock()def add():    global lock
    global total    for i in range(1000000):        lock.acquire()        lock.acquire()  # 这里加了两次锁
        total += 1
        lock.release()def desc():    global total    global lock
    for i in range(1000000):        lock.acquire()
        total -= 1
        lock.release()

import threading
import time

start_time = time.time()

thread1 = threading.Thread(target=add)
thread2 = threading.Thread(target=desc)

thread1.start()
thread2.start()

thread1.join()
thread2.join()

print(total)
print("last time: {}".format(time.time() - start_time))
由于在add函数中加了两次锁lock.acquire(),结果就是线程永远都不获释放掉共享变量。一直占用资源,其他的线程请求资源没有结果,多个线程挂起,既不能执行,也无法结束,一直处于等待状态,造成死锁,只能靠操作系统强制终止。最终程序也没有任何结果输出。
所以在同一个线程里面,可以连续调用多次acquire, 一定要注意acquire的次数要和release的次数相等
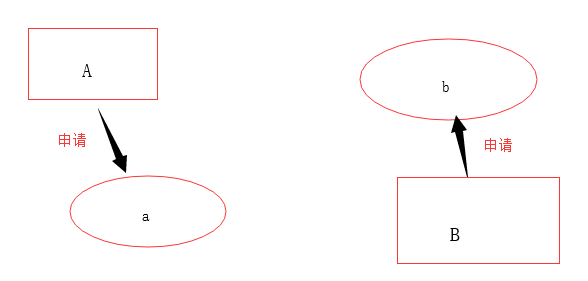
还有就是,线程的相互等待,假如内存中又两中资源a和b,而线程A(a,b)和线程B(a,b)都申请资源。
第一步
线程A先申请a资源,线程B先申请b资源,因此没有问题
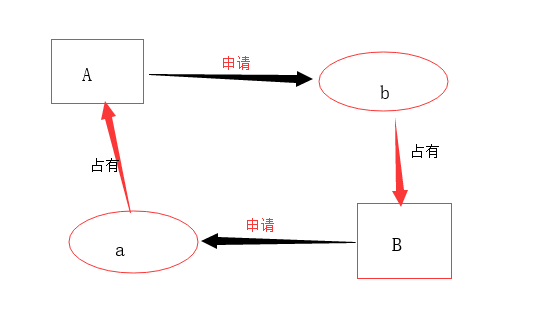
第二步
由于a,b均已被A,B占用,并且A申请b,B申请b,在位获得新的资源的时候两者都不会退出对现有资源的占用,这就造成了两个线程相互等待,并且这种等待会一直持续下去,造成死锁。
8、线程复杂通信
在上面看到线程进行通信的时候需要加锁,如果如何使用锁进行线程的对话功能,例如
线程A:hello,你好啊
线程B:你好
线程A:吃饭了吗
线程B:吃过了,你呢
线程A:我也吃过了,咱们去搞PVM吧
线程B:ok,走吧
<1>、简单锁
像上面,就是简单的线程通信,如果使用简单的Rlock锁
import threadingclass ThreadA(threading.Thread):
    def __init__(self, lock):        super().__init__(name="线程A")        self.lock = lock    def run(self):        self.lock.acquire()
        print("{} : hello, 你好 ".format(self.name))        self.lock.release()        self.lock.acquire()
        print("{} : 吃过饭了吗 ".format(self.name))        self.lock.release()        self.lock.acquire()
        print("{} : 我也吃过了,咱们去找PVM吧".format(self.name))        self.lock.release()class ThreadB(threading.Thread):
    def __init__(self, lock):        super().__init__(name="线程B")        self.lock = lock    def run(self):        self.lock.acquire()
        print("{} : 你好 ".format(self.name))        self.lock.release()        self.lock.acquire()
        print("{} : 吃过了,你呢".format(self.name))        self.lock.release()        self.lock.acquire()
        print("{} : ok,走吧 ".format(self.name))        self.lock.release()if __name__ == "__main__":

    lock = threading.RLock()

    a_thread = ThreadA(lock)
    b_thread = ThreadB(lock)

    a_thread.start()
    b_thread.start()# 输出线程A : hello, 你好
线程A : 吃过饭了吗
线程A : 我也吃过了,咱们去找PVM吧
线程B : 你好
线程B : 吃过了,你呢
线程B : ok,走吧
显然没有完成线程通信的基本功能。
<2>、threading.Condition()
解决方案:在线程复杂通信时使用threading.Condition(),可以把Condiftion理解为一把高级的琐,它提供了比Lock, RLock更高级的功能,允许我们能够控制复杂的线程同步问题。threadiong.Condition在内部维护一个琐对象(默认是RLock),可以在创建Condigtion对象的时候把琐对象作为参数传入。Condition也提供了acquire, release方法,其含义与琐的acquire, release方法一致,其实它只是简单的调用内部琐对象的对应的方法而已。Condition还提供wait方法、notify方法、notifyAll方法。这些方法只有在占用琐(acquire)之后才能调用,否则将会报RuntimeError异常。
方法介绍:
acquire()/release():获得/释放 Lock
wait([timeout]):线程挂起,直到收到一个notify通知或者超时(可选的,浮点数,单位是秒s)才会被唤醒继续运行。wait()必须在已获得Lock前提下才能调用,否则会触发RuntimeError。调用wait()会释放Lock,直至该线程被Notify()、NotifyAll()或者超时线程又重新获得Lock.
notify(n=1):通知其他线程,那些挂起的线程接到这个通知之后会开始运行,默认是通知一个正等待该condition的线程,最多则唤醒n个等待的线程。notify()必须在已获得Lock前提下才能调用,否则会触发RuntimeError。notify()不会主动释放Lock。
notifyAll(): 如果wait状态线程比较多,notifyAll的作用就是通知所有线程
源码分析:
# 部分源码_PyRLock = _RLockclass Condition:

    def __init__(self, lock=None):        if lock is None:
            lock = RLock()        self._lock = lock        # Export the lock's acquire() and release() methods
        self.acquire = lock.acquire        self.release = lock.release    def __enter__(self):        return self._lock.__enter__()    def __exit__(self, *args):        return self._lock.__exit__(*args)
进入Condition这个类中查看源码发现,在默认的情况下,Condition是封装的锁对象是Rlock,另外Condition类实现了__enter__,__exit__两个特殊方法,由鸭子类型可知,说明可以像上下文管理器一样使用它。
而在__enter__与__exit__两个特殊方法中分别调用了self.acquire()与self.release()两个方法,所以说不使用with上下文管理器的话也可以直接使用acquire()与release()两个方法进行加锁释放锁。
解决实例:
class ThreadA(threading.Thread):
    def __init__(self, cond):        super().__init__(name="线程A")        self.cond = cond    def run(self):
        with self.cond:
            print("{} : hello, 你好 ".format(self.name))  # 4
            self.cond.notify()  # 5
            self.cond.wait()  # 6

            print("{} : 吃过饭了吗 ".format(self.name))            self.cond.notify()            self.cond.wait()

            print("{} : 我也吃过了,咱们去找PVM吧".format(self.name))            self.cond.notify()            self.cond.wait()class ThreadB(threading.Thread):
    def __init__(self, cond):        super().__init__(name="线程B")        self.cond = cond    def run(self):
        with self.cond:
            self.cond.wait()  # 2
            print("{} : 你好 ".format(self.name))  # 7
            self.cond.notify()            self.cond.wait()
            print("{} : 吃过了,你呢".format(self.name))            self.cond.notify()            self.cond.wait()
            print("{} : ok,走吧 ".format(self.name))            self.cond.notify()if __name__ == "__main__":

    cond = threading.Condition()

    b_thread = ThreadB(cond)
    a_thread = ThreadA(cond)

    b_thread.start()  # 1
    a_thread.start()  # 3# 输出结果线程A : hello, 你好
线程B : 你好
线程A : 吃过饭了吗
线程B : 吃过了,你呢
线程A : 我也吃过了,咱们去找PVM吧
线程B : ok,走吧
完成线程之间的复杂通信。
这里需要注意的是:两个线程之间的开启先后顺序。b线程需要先于a线程开启。原因:
1 先开启b线程
2 wait方法会首先上一把锁,线程处于阻塞态
3 开启a线程
4 打印 线程A:hello,你好啊
5 这个时候cond对象调用notify方法,会释放掉之前上的锁
6 调用wait方法,为自己又上了一把锁
7 由于notify方法已经打开了锁,或继续执行,打印 线程B:你好
其实wait方法会维持一个锁,而这个锁只有notify方法才能打开。如果a线程先开启,则是调用了wait方法维持了一把锁,并没有其他的线程会调用notify方法释放这把锁。则最终只会输出 线程A : hello, 你好 ,而线程一直处于死锁状态。
补充:Condition对象会维持两层锁,而不是两个锁,更不是简单的一个锁。在开启或者关闭上下文管理器对象的时候__enter__,__exit__方法会开启释放掉底层锁(直接使用acquire()与release()两个方法也行),这一层锁是一个。而在持续连续调用的wait和notify方法则是对第二层锁进行操作,而这一层所在Condition对象内部是封装到一个双端队列中,在每次调用wait的时候分配一把锁并放入到cond的等待队列中,等到notify方法的唤醒。可以进入Condition源码查看
9、Semaphore(信号量)
同时只有n个线程可以获得semaphore,即可以限制最大连接数为n),也就是线程最大并发量的控制。
Semaphore管理一个内置的计数器,每当调用acquire()时内置计数器-1;调用release() 时内置计数器+1;计数器不能小于0;当计数器为0时,acquire()将阻塞线程直到其他线程调用release()。
信号量使得一个程序中有很多个线程,但是只有n多个线程获得信号量,处于运行态
class HtmlSpider(threading.Thread):
    def __init__(self, url, sem):        super().__init__()        self.url = url        self.sem = sem    def run(self):
        time.sleep(2)
        print("got html text success, time is {}".format(time.ctime()))        self.sem.release()class UrlProducer(threading.Thread):
    def __init__(self, sem):        super().__init__()        self.sem = sem    def run(self):        for i in range(20):            self.sem.acquire()
            html_thread = HtmlSpider("https://baidu.com/{}".format(i), self.sem)
            html_thread.start()if __name__ == "__main__":
    sem = threading.Semaphore(4)  # 每次只有4个线程获取信号量
    url_producer = UrlProducer(sem)
    url_producer.start()
在上面示例中,模拟爬虫,创建20个子线程爬取html页面,如果不是用信号量,二十条数据一次返回。使用信号量,使得每次只有4个线程运行。
# 输出结果

got html text success, time is Tue Nov 20 17:17:55 2018got html text success, time is Tue Nov 20 17:17:55 2018got html text success, time is Tue Nov 20 17:17:55 2018got html text success, time is Tue Nov 20 17:17:55 2018got html text success, time is Tue Nov 20 17:17:57 2018got html text success, time is Tue Nov 20 17:17:57 2018got html text success, time is Tue Nov 20 17:17:57 2018got html text success, time is Tue Nov 20 17:17:57 2018got html text success, time is Tue Nov 20 17:17:59 2018got html text success, time is Tue Nov 20 17:17:59 2018got html text success, time is Tue Nov 20 17:17:59 2018got html text success, time is Tue Nov 20 17:17:59 2018got html text success, time is Tue Nov 20 17:18:01 2018got html text success, time is Tue Nov 20 17:18:01 2018got html text success, time is Tue Nov 20 17:18:01 2018got html text success, time is Tue Nov 20 17:18:01 2018got html text success, time is Tue Nov 20 17:18:03 2018got html text success, time is Tue Nov 20 17:18:03 2018got html text success, time is Tue Nov 20 17:18:03 2018got html text success, time is Tue Nov 20 17:18:03 2018
每个两秒打印一次结果,一次四条数据。总共二十个。
10、线程池
Python标准库为我们提供了threading和multiprocessing模块编写相应的多线程/多进程代码,但是当项目达到一定的规模,频繁创建/销毁进程或者线程是非常消耗资源的,这个时候我们就要编写自己的线程池/进程池,以空间换时间。但从Python3.2开始,标准库为我们提供了concurrent.futures模块,它提供了ThreadPoolExecutor和ProcessPoolExecutor两个类,实现了对threading和multiprocessing的进一步抽象,对编写线程池/进程池提供了直接的支持。
concurrent.futures模块的基础是Exectuor,Executor是一个抽象类,它不能被直接使用。但是它提供的两个子类ThreadPoolExecutor和ProcessPoolExecutor却是非常有用,顾名思义两者分别被用来创建线程池和进程池的代码。我们可以将相应的tasks直接放入线程池/进程池,不需要维护Queue来操心死锁的问题,线程池/进程池会自动帮我们调度。
Future你可以把它理解为一个在未来完成的操作,这是异步编程的基础,传统编程模式下比如我们操作queue.get的时候,在等待返回结果之前会产生阻塞,cpu不能让出来做其他事情,而Future的引入帮助我们在等待的这段时间可以完成其他的操作。
<1>、使用submit来操作线程池/进程池:
from concurrent.futures import ThreadPoolExecutorimport urllib.request
URLS = ['http://www.163.com', 'https://www.baidu.com/', 'https://github.com/']def load_url(url):
    with urllib.request.urlopen(url, timeout=60) as conn:
        print('%r page is %d bytes' % (url, len(conn.read())))

executor = ThreadPoolExecutor(max_workers=3)for url in URLS:
    future = executor.submit(load_url,url)
    print(future.done())

print('主线程')# 运行结果:FalseFalseFalse主线程'https://www.baidu.com/' page is 227 bytes'https://github.com/' page is 75633 bytes'http://www.163.com' page is 703974 bytes
根据运行结果,使用submit方法来往线程池中加入一个task,submit返回一个Future对象,对于Future对象可以简单地理解为一个在未来完成的操作。由于线程池异步提交了任务,主线程并不会等待线程池里创建的线程执行完毕,所以执行了print('主线程'),相应的线程池中创建的线程并没有执行完毕,故future.done()返回结果为False。
<2>、 用map来操作线程池/进程池:
from concurrent.futures import ThreadPoolExecutorimport urllib.request
URLS = ['http://www.163.com', 'https://www.baidu.com/', 'https://github.com/']def load_url(url):
    with urllib.request.urlopen(url, timeout=60) as conn:
        print('%r page is %d bytes' % (url, len(conn.read())))

executor = ThreadPoolExecutor(max_workers=3)

executor.map(load_url,URLS)

print('主线程')# 结果主线程'https://www.baidu.com/' page is 227 bytes'https://github.com/' page is 75633 bytes'http://www.163.com' page is 703974 bytes
从运行结果可以看出,map是按照URLS列表元素的顺序返回的,并且写出的代码更加简洁直观,可以根据具体的需求任选一种。
<3>、wait
wait方法接会返回一个tuple(元组),tuple中包含两个set(集合),一个是completed(已完成的)另外一个是uncompleted(未完成的)。使用wait方法的一个优势就是获得更大的自由度,它接收三个参数FIRST_COMPLETED, FIRST_EXCEPTION 和ALL_COMPLETE,默认设置为ALL_COMPLETED
如果采用默认的ALL_COMPLETED,程序会阻塞直到线程池里面的所有任务都完成,再执行主线程:
from concurrent.futures import ThreadPoolExecutor,wait,as_completedimport urllib.request
URLS = ['http://www.163.com', 'https://www.baidu.com/', 'https://github.com/']def load_url(url):
    with urllib.request.urlopen(url, timeout=60) as conn:
        print('%r page is %d bytes' % (url, len(conn.read())))

executor = ThreadPoolExecutor(max_workers=3)

f_list = []for url in URLS:
    future = executor.submit(load_url,url)
    f_list.append(future)
print(wait(f_list))

print('主线程')# 输出'https://www.baidu.com/' page is 227 bytes'https://github.com/' page is 75627 bytes'http://www.163.com' page is 703988 bytes
DoneAndNotDoneFutures(done={<Future at 0x2ab6ea89d30 state=finished returned NoneType>, <Future at 0x2ab6ea89240 state=finished returned NoneType>, <Future at 0x2ab6e93f7b8 state=finished returned NoneType>}, not_done=set())
主线程
如果采用FIRST_COMPLETED参数,程序并不会等到线程池里面所有的任务都完成:
from concurrent.futures import ThreadPoolExecutor,wait,as_completedimport urllib.request
URLS = ['http://www.163.com', 'https://www.baidu.com/', 'https://github.com/']def load_url(url):
    with urllib.request.urlopen(url, timeout=60) as conn:
        print('%r page is %d bytes' % (url, len(conn.read())))

executor = ThreadPoolExecutor(max_workers=3)

f_list = []for url in URLS:
    future = executor.submit(load_url,url)
    f_list.append(future)
print(wait(f_list,return_when='FIRST_COMPLETED'))

print('主线程')# 输出'https://www.baidu.com/' page is 227 bytes
DoneAndNotDoneFutures(done={<Future at 0x2cd5581a240 state=finished returned NoneType>}, not_done={<Future at 0x2cd5581ad30 state=running>, <Future at 0x2cd556cf7f0 state=running>})
主线程'http://www.163.com' page is 703991 bytes'https://github.com/' page is 75625 bytes
<4>、回调函数
import requestsimport timefrom concurrent.futures import ThreadPoolExecutordef get(url):
    print('GET {}'.format(url))
    response = requests.get(url)
    time.sleep(2)    if response.status_code == 200:  # 200代表状态:下载成功了
        return {'url': url, 'content': response.text}def parse(res):
    print('%s parse res is %s' % (res['url'], len(res['content'])))    return '%s parse res is %s' % (res['url'], len(res['content']))def save(res):
    print('save', res)def task(res):
    res = res.result()
    par_res = parse(res)
    save(par_res)if __name__ == '__main__':
    urls = [        'http://www.cnblogs.com',        'https://www.python.org',        'https://www.openstack.org',
    ]

    pool = ThreadPoolExecutor(2)    for i in urls:
        pool.submit(get, i).add_done_callback(task)        '''
        这里的回调函数拿到的是一个对象。得
        先把返回的res得到一个结果。即在前面加上一个res.result()
        谁好了谁去掉回调函数
        回调函数也是一种编程思想。不仅在线程池用,在进程池也用
        '''
    pool.shutdown()  # 相当于进程池里的close和join# 输出GET http://www.cnblogs.com
GET https://www.python.org
https://www.python.org parse res is 50114save https://www.python.org parse res is 50114GET https://www.openstack.org
https://www.openstack.org parse res is 63253save https://www.openstack.org parse res is 63253http://www.cnblogs.com parse res is 40382save http://www.cnblogs.com parse res is 40382
共同学习,写下你的评论
评论加载中...
作者其他优质文章