Certificate Pinning是什么,有什么用?
Certificate Pinning,或者有叫作SSL Pinning/TLS Pinning的,都是指的同一个东西,中文翻译成证书锁定,最大的作用就是用来抵御针对CA的攻击。在实际当中,它一般被用来阻止man-in-the-middle(中间人攻击)。
说起中间人攻击,可能不是那么直观,但是这一类工具我们可能经常会用到,如Mac平台的Charles和Windows平台的Fiddler。如果一个应用使用了Certificate Pinning技术,那么你使用前边说的工具是无法直接来调试/监控应用的网络流量的。
当应用通过HTTPS握手连接到Fidder/Charles时,应用会检查请求的response的证书,如果发现与预设的不一致,会拒绝后续的网络请求,从而增加应用与服务器的安全通信。
关于root系统可以突破上述的限制,则是另外一个话题,这里不做讨论。
为什么要用,我可以不用吗?
没有绝对的安全,用或者不用都是权衡各种利弊,最后的一个妥协的结果。
认为不应该使用的理由是:
- 一般来说,操作系统自己的trust store就可以信赖了
- 如果使用,应用需要在证书过期前更新证书,重新发版
- …
认为应该使用的,可能是
- 万一操作系统被破解,怎么办?就像上边提到的一样
- 反正我的应用需要经常迭代,没关系
- …
- 公司的安全部门要求应用里边做Certificate Pinning (有些能自己掌控的就不要依赖被人的意味)
接下里,我们假定经过了各种权衡之后,我们同意后者。那么要怎么做呢?
好的,要怎么实现呢?
在做之前,我们先了解一下我们可以根据什么来Pinning?一般来说,可以直接Pin证书,或者Pin证书的public key。
这里以Android平台为例子,看看我们一般都是怎么做的。
"学院派"实现 - Pin证书
// Load CAs from an InputStream
// (could be from a resource or ByteArrayInputStream or ...)
val cf: CertificateFactory = CertificateFactory.getInstance("X.509")
// From https://www.washington.edu/itconnect/security/ca/load-der.crt
val caInput: InputStream = BufferedInputStream(FileInputStream("load-der.crt"))
val ca: X509Certificate = caInput.use {
    cf.generateCertificate(it) as X509Certificate
}
System.out.println("ca=" + ca.subjectDN)

// Create a KeyStore containing our trusted CAs
val keyStoreType = KeyStore.getDefaultType()
val keyStore = KeyStore.getInstance(keyStoreType).apply {
    load(null, null)
    setCertificateEntry("ca", ca)
}

// Create a TrustManager that trusts the CAs inputStream our KeyStore
val tmfAlgorithm: String = TrustManagerFactory.getDefaultAlgorithm()
val tmf: TrustManagerFactory = TrustManagerFactory.getInstance(tmfAlgorithm).apply {
    init(keyStore)
}

// Create an SSLContext that uses our TrustManager
val context: SSLContext = SSLContext.getInstance("TLS").apply {
    init(null, tmf.trustManagers, null)
}

// Tell the URLConnection to use a SocketFactory from our SSLContext
val url = URL("https://certs.cac.washington.edu/CAtest/")
val urlConnection = url.openConnection() as HttpsURLConnection
urlConnection.sslSocketFactory = context.socketFactory
val inputStream: InputStream = urlConnection.inputStream
copyInputStreamToOutputStream(inputStream, System.out)
其实是固定的写法,基本流程就是(其实注释已经很清楚了):
- 加载证书文件,并使用
CertificateFactory生成一个X509Certificate的实例 - 创建一个
KeyStore实例,并把前边的X509Certificate实例加进去,并起一个别名
注意,这里其实是可以加多个证书进去的,但是注意别名不要重复,因为底层实现是使用一个
Map存储别名与证书的
- 创建一个
TrustManager,并且使用前边的KeyStore实例进行初始化 - 创建一个
SSLContext,并且使用前边的TrustManager实例进行初始化 - 最后,使用
SSLContext创建一个SSLSocketFactory实例,并且把它赋值给我们用于https的请求连接对象HttpsURLConnection
特别简单的配置文件实现 - Pin证书/Public Key
在Android 7.0之后,Android支持一种特别方便的实现,只需要在Manifest文件的
android:networkSecurityConfig属性加上对应的配置文件即可。这种方式支持证书文件和public key(sha256 hash)两种形式。
配置文件长这个样子
<?xml version="1.0" encoding="utf-8"?>
<network-security-config>
	<!-- Support certificate file, in der or pem format -->
    <domain-config>
        <domain includeSubdomains="true">example.com</domain>
        <trust-anchors>
            <certificates class="lazyload" src="data:image/png;base64,iVBORw0KGgoAAAANSUhEUgAAAAEAAAABCAYAAAAfFcSJAAAAAXNSR0IArs4c6QAAAARnQU1BAACxjwv8YQUAAAAJcEhZcwAADsQAAA7EAZUrDhsAAAANSURBVBhXYzh8+PB/AAffA0nNPuCLAAAAAElFTkSuQmCC" data-original="@raw/my_ca"/>
        </trust-anchors>
    </domain-config>

    <!-- Support sha256 hash of subject public key -->
    <domain-config>
        <domain includeSubdomains="true">example.com</domain>
        <pin-set expiration="2018-01-01">
            <pin digest="SHA-256">7HIpactkIAq2Y49orFOOQKurWxmmSFZhBCoQYcRhJ3Y=</pin>
            <!-- backup pin -->
            <pin digest="SHA-256">fwza0LRMXouZHRC8Ei+4PyuldPDcf3UKgO/04cDM1oE=</pin>
        </pin-set>
    </domain-config>
</network-security-config>
OkHttp的实现 - Pin Public Key
Android领域很多和网络相关的Library都支持
OkHttp作为底层的网络请求引擎。所以我们可以看看OkHttp里边是怎么实现的。OkHttp也可以通过
sslSocketFactory()来实现第一种的Pinning,不过我们可以通过其专门提供的CertificatePinner更加方便的实现Pinning。
看一下例子:
String hostname = "publicobject.com";
CertificatePinner certificatePinner = new CertificatePinner.Builder()
    .add(hostname, "sha256/AAAAAAAAAAAAAAAAAAAAAAAAAAAAAAAAAAAAAAAAAAA=")
    .build();
OkHttpClient client = OkHttpClient.Builder()
    .certificatePinner(certificatePinner)
    .build();

Request request = new Request.Builder()
    .url("https://" + hostname)
    .build();
client.newCall(request).execute();
题外话:
publicobject.com其实是OkHttp的作者Jesse Wilson自己的网站。
作者在Google的时候创建了OkHttp,后边去了Square,把它“发扬光大”。随后被Google拿过去作为Android系统底层网络请求的底层实现了。
那么如何拿到上面所需要的hash值呢?官方给的一个方法是,先填写一个错的hash值,然后根据随后的exception的stack trace message,得到对应的hash值。
其实也可以通过openssl提供的命令直接从der或者pem格式的证书中计算出来,由于命令相对复杂一些,我写了一个简单的脚本封装了一下,支持两种格式的证书。
Pinning是如何工作的?
那么上述的那些实现底层是如何工作的,怎么样保证Pinning呢?网上其实有比较详细讲解其工作原理的,但是可能偏理论化。这里以OkHttp为例,看一下它是如何实现的。
我分析的版本是4.0.1,其他版本可能略有不同,但是大体流程是一样的。
这里我画了一个简单的调用时序图(有些地方省略了,主要看一下它的调用流程),它可以帮助我们明白OkHttp到底是在什么时候进行Pinning的。
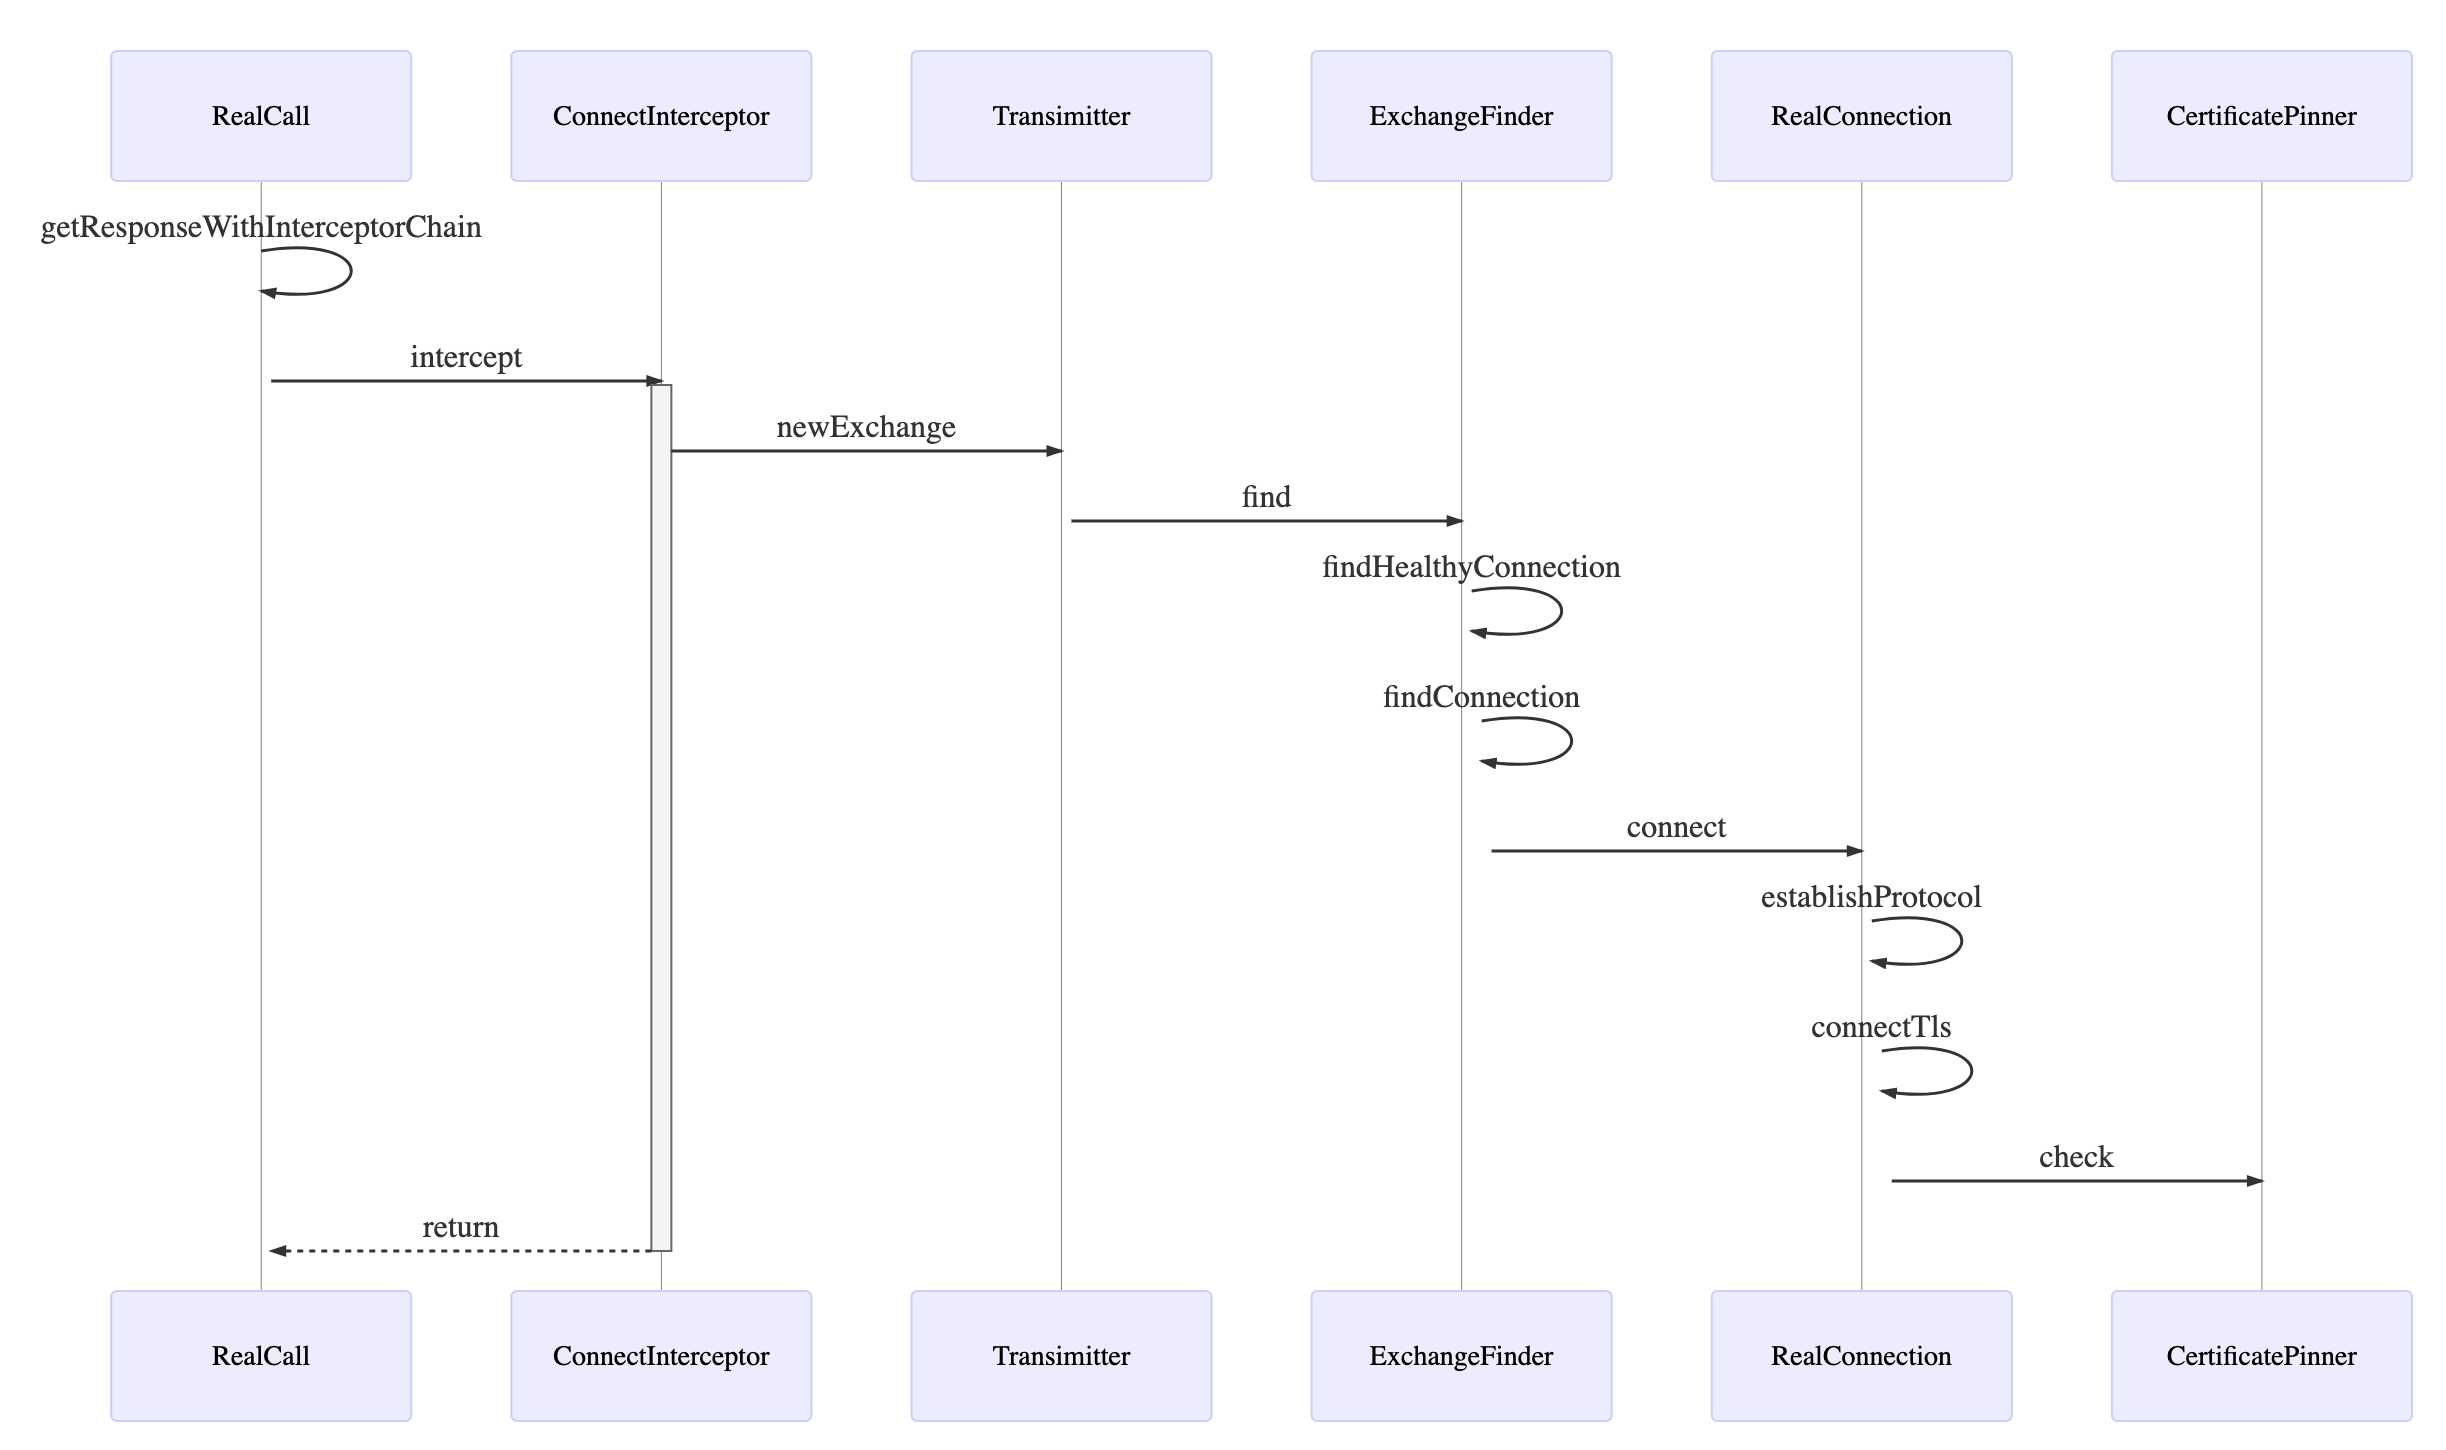
我们可以看到,是在运行到预设的ConnectInterceptor时,进行Pinning的。
这里主要看一下RealConnection.connectTls方法的实现
  @Throws(IOException::class)
  private fun connectTls(connectionSpecSelector: ConnectionSpecSelector) {
    val address = route.address
    val sslSocketFactory = address.sslSocketFactory
    var success = false
    var sslSocket: SSLSocket? = null
    try {
      // Create the wrapper over the connected socket.
      sslSocket = sslSocketFactory!!.createSocket(
          rawSocket, address.url.host, address.url.port, true /* autoClose */) as SSLSocket

      // Configure the socket's ciphers, TLS versions, and extensions.
      val connectionSpec = connectionSpecSelector.configureSecureSocket(sslSocket)
      if (connectionSpec.supportsTlsExtensions) {
        Platform.get().configureTlsExtensions(sslSocket, address.url.host, address.protocols)
      }

      // Force handshake. This can throw!
      sslSocket.startHandshake()
      // block for session establishment
      val sslSocketSession = sslSocket.session
      val unverifiedHandshake = sslSocketSession.handshake()

      // Verify that the socket's certificates are acceptable for the target host.
      if (!address.hostnameVerifier!!.verify(address.url.host, sslSocketSession)) {
        val peerCertificates = unverifiedHandshake.peerCertificates
        if (peerCertificates.isNotEmpty()) {
          val cert = peerCertificates[0] as X509Certificate
          throw SSLPeerUnverifiedException("""
              |Hostname ${address.url.host} not verified:
              |    certificate: ${CertificatePinner.pin(cert)}
              |    DN: ${cert.subjectDN.name}
              |    subjectAltNames: ${OkHostnameVerifier.allSubjectAltNames(cert)}
              """.trimMargin())
        } else {
          throw SSLPeerUnverifiedException(
              "Hostname ${address.url.host} not verified (no certificates)")
        }
      }

      // Check that the certificate pinner is satisfied by the certificates presented.
      address.certificatePinner!!.check(address.url.host,
          unverifiedHandshake.peerCertificates)

      // Success! Save the handshake and the ALPN protocol.
      val maybeProtocol = if (connectionSpec.supportsTlsExtensions) {
        Platform.get().getSelectedProtocol(sslSocket)
      } else {
        null
      }
      socket = sslSocket
      source = sslSocket.source().buffer()
      sink = sslSocket.sink().buffer()
      handshake = unverifiedHandshake
      protocol = if (maybeProtocol != null) Protocol.get(maybeProtocol) else Protocol.HTTP_1_1
      success = true
    } finally {
      if (sslSocket != null) {
        Platform.get().afterHandshake(sslSocket)
      }
      if (!success) {
        sslSocket?.closeQuietly()
      }
    }
  }
关于这个图的绘制,我把它的源代码也分享出来,有兴趣的朋友可以试试 Mermaid Live Editor。
这个方法也是整个调用连的核心,在这里OkHttp创建了Socket连接,然后在执行完SSLSocket的握手创建SSLSession,从其里边拿到一个Certificate数组(getPeerCertificates),然后以此计算每个证书的subjectPublicKeyInfo的sha256 hash值,与预设的值做比较,如果有一个符合的,则验证通过,否则,则会抛一个SSLPeerUnverifiedException异常告知开发者。
如果要打破砂锅问到底,那么就需要去看JDK中关于
SSLSocket的实现代码了。
小结
稍微总结一下,我们依次
- 了解了为什么要做Pinning,即它可以解决什么问题
- Pinning也不是完美的,它也有它的弊端,还要根据自己的实际情况来决定是否使用
- 以Android平台为例,列举了三种常见的实现方法
- 以OkHttp为例,稍微深入了解了它是如何实现的
关于在其他平台,比如iOS, Flutter可以去网上搜索相关的解决方案。
参考资料
共同学习,写下你的评论
评论加载中...
作者其他优质文章