在前端开发中,我们经常能听到 redux 等状态管理的词汇。
但是对于我这种搞移动端出身的人,对这些词汇就不是很熟悉。
Flutter 作为借鉴了很多 React 思想的语言,自然也会有相对应的状态管理。
那什么是状态管理?为什么需要状态管理?
什么是状态管理?
个人认为 状态管理解决的是组件之间的通讯以及状态集中管理和分发的问题
举个例子:
比如我多个页面同时使用了 User 对象,当我其中一个地方改了以后,想要其他的地方也都要更改,那这个时候就需要状态管理来集中管理数据。
为什么需要状态管理?
前面已经说过一点,另一点:
我们已经使用过 StatefulWidget,也知道它维护了一个 State,也就是当前 Widget的状态。
当我们需要改变 Widget 的状态的时候,就需要 setState(),这样就会重新走一遍 build 方法来重绘。
当页面简单的时候还好说,如果页面复杂了,我们每次点击、或者滑动都要来进行整个页面的 build 吗?
很明显,这样不符合常理。
相信很多人已经听过 provide redux… 等等状态管理的方案,
那么 Scoped_Model 是什么?
Scoped_Model
先看一下Scoped_Model GitHub 文档上的内容:
A set of utilities that allow you to easily pass a data Model from a parent Widget down to it’s descendants. In addition, it also rebuilds all of the children that use the model when the model is updated. This library was originally extracted from the Fuchsia codebase.
一组实用程序,允许您轻松地将数据模型从父窗口小部件传递给它的后代。此外,它还重建了模型更新时使用模型的所有子代。这个库最初是从 Fuchsia 基代码中提取的。
和其他的状态管理一样,它也是使用的 InheritedWidget, 利用 InheritedWidget 来管理使用了该数据的Widget。
这样就可以在数据改变的时候更新该 Widget 了。
简单使用 Scoped_Model
来看一下官方给出的Demo:
1.  `import  'package:flutter/material.dart';`

2.  `import  'package:scoped_model/scoped_model.dart';`

3.

4.  `void main()  {`

5.   `runApp(MyApp(`

6.   `model:  CounterModel(),`

7.   `));`

8.  `}`

9.

10.  `class  MyApp  extends  StatelessWidget  {`

11.   `final  CounterModel model;`

12.

13.   `const  MyApp({Key key,  @required  this.model})  :  super(key: key);`

14.

15.   `@override`

16.   `Widget build(BuildContext context)  {`

17.   `// At the top level of our app, we'll, create a ScopedModel Widget. This`

18.   `// will provide the CounterModel to all children in the app that request it`

19.   `// using a ScopedModelDescendant.`

20.   `return  ScopedModel<CounterModel>(`

21.   `model: model,`

22.   `child:  MaterialApp(`

23.   `title:  'Scoped Model Demo',`

24.   `home:  CounterHome('Scoped Model Demo'),`

25.   `),`

26.   `);`

27.   `}`

28.  `}`

29.

30.  `// Start by creating a class that has a counter and a method to increment it.`

31.  `//`

32.  `// Note: It must extend from Model.`

33.  `class  CounterModel  extends  Model  {`

34.   `int _counter =  0;`

35.

36.   `int  get counter => _counter;`

37.

38.   `void increment()  {`

39.   `// First, increment the counter`

40.   `_counter++;`

41.

42.   `// Then notify all the listeners.`

43.   `notifyListeners();`

44.   `}`

45.  `}`

46.

47.  `class  CounterHome  extends  StatelessWidget  {`

48.   `final  String title;`

49.

50.   `CounterHome(this.title);`

51.

52.   `@override`

53.   `Widget build(BuildContext context)  {`

54.   `return  Scaffold(`

55.   `appBar:  AppBar(`

56.   `title:  Text(title),`

57.   `),`

58.   `body:  Center(`

59.   `child:  Column(`

60.   `mainAxisAlignment:  MainAxisAlignment.center,`

61.   `children:  <Widget>[`

62.   `Text('You have pushed the button this many times:'),`

63.   `// Create a ScopedModelDescendant. This widget will get the`

64.   `// CounterModel from the nearest parent ScopedModel<CounterModel>.`

65.   `// It will hand that CounterModel to our builder method, and`

66.   `// rebuild any time the CounterModel changes (i.e. after we`

67.   ``// `notifyListeners` in the Model).``

68.   `ScopedModelDescendant<CounterModel>(`

69.   `builder:  (context, child, model)  {`

70.   `return  Text(`

71.   `model.counter.toString(),`

72.   `style:  Theme.of(context).textTheme.display1,`

73.   `);`

74.   `},`

75.   `),`

76.   `],`

77.   `),`

78.   `),`

79.   `// Use the ScopedModelDescendant again in order to use the increment`

80.   `// method from the CounterModel`

81.   `floatingActionButton:  ScopedModelDescendant<CounterModel>(`

82.   `builder:  (context, child, model)  {`

83.   `return  FloatingActionButton(`

84.   `onPressed: model.increment,`

85.   `tooltip:  'Increment',`

86.   `child:  Icon(Icons.add),`

87.   `);`

88.   `},`

89.   `),`

90.   `);`

91.   `}`

92.  `}`
代码有点长,但是没关系,大部分都是注释,不管那么多,
我们直接copy代码到项目中,运行看一下效果: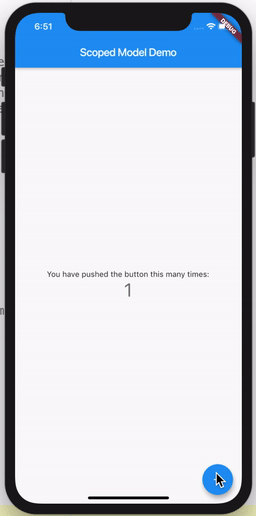
效果非常简单,和我们刚开始学Flutter一样的例子。
下面就解释一下代码,
可以看到,首先是把 ScopedModel 放在了APP 最顶部来初始化:
1.  `class  MyApp  extends  StatelessWidget  {`

2.   `final  CounterModel model;`


4.   `const  MyApp({Key key,  @required  this.model})  :  super(key: key);`


6.   `@override`

7.   `Widget build(BuildContext context)  {`

8.   `// At the top level of our app, we'll, create a ScopedModel Widget. This`

9.   `// will provide the CounterModel to all children in the app that request it`

10.   `// using a ScopedModelDescendant.`

11.   `return  ScopedModel<CounterModel>(`

12.   `model: model,`

13.   `child:  MaterialApp(`

14.   `title:  'Scoped Model Demo',`

15.   `home:  CounterHome('Scoped Model Demo'),`

16.   `),`

17.   `);`

18.   `}`

19.  `}`


随后定义了一个 CounterModel:

1.  `// Start by creating a class that has a counter and a method to increment it.`

2.  `//`

3.  `// Note: It must extend from Model.`

4.  `class  CounterModel  extends  Model  {`

5.   `int _counter =  0;`

6.

7.   `int  get counter => _counter;`

8.

9.   `void increment()  {`

10.   `// First, increment the counter`

11.   `_counter++;`

12.

13.   `// Then notify all the listeners.`

14.   `notifyListeners();`

15.   `}`

16.  `}`
注释上面写的很清楚,必须继承自 Model。
为什么?我们看Model源码:
1.  `abstract  class  Model  extends  Listenable  {`

2.   `final  Set<VoidCallback> _listeners =  Set<VoidCallback>();`

3.   `int _version =  0;`

4.   `int _microtaskVersion =  0;`

5.

6.   `/// [listener] 将在Model更改时调用。`

7.   `@override`

8.   `void addListener(VoidCallback listener)  {`

9.   `_listeners.add(listener);`

10.   `}`

11.

12.   `/// [listener] 移除时调用。`

13.   `@override`

14.   `void removeListener(VoidCallback listener)  {`

15.   `_listeners.remove(listener);`

16.   `}`

17.

18.   `/// Returns the number of listeners listening to this model.`

19.   `int  get listenerCount => _listeners.length;`

20.

21.   `/// 仅当Model已更改时由[model]调用。`

22.   `@protected`

23.   `void notifyListeners()  {`

24.   `// 我们安排一个微任务来消除可能同时发生的多个更改。`

25.   `if  (_microtaskVersion == _version)  {`

26.   `_microtaskVersion++;`

27.   `scheduleMicrotask(()  {`

28.   `_version++;`

29.   `_microtaskVersion = _version;`

30.

31.   `// Convert the Set to a List before executing each listener. This`

32.   `// prevents errors that can arise if a listener removes itself during`

33.   `// invocation!`

34.   `_listeners.toList().forEach((VoidCallback listener)  => listener());`

35.   `});`

36.   `}`

37.   `}`

38.  `}`
可以看到,Model 继承了 Listenable,所以我们在自己定义 Model 的时候才可以调用 notifyListeners()方法。
最后在需要该 Model的地方使用 ScopedModelDescendant 来获取。
1.  `ScopedModelDescendant<CounterModel>(`

2.   `builder:  (context, child, model)  {`

3.   `return  Text(`

4.   `model.counter.toString(),`

5.   `style:  Theme.of(context).textTheme.display1,`

6.   `);`

7.   `},`

8.  `),`
有人可能觉得这种方式不是很优雅,代码太多。
官方也提供了另一种方法: ScopedModel.of<CounterModel>(context)。
状态的集中管理以及 Widget更新
官方示例只是提供一个简单的例子,并不能展现出它的威力,
所以我们自己写一个示例。
该示例在多个页面同时使用同一个数据,然后在其中一个页面更新数据。
这样就达到了我们所谓状态的集中管理。
效果如下: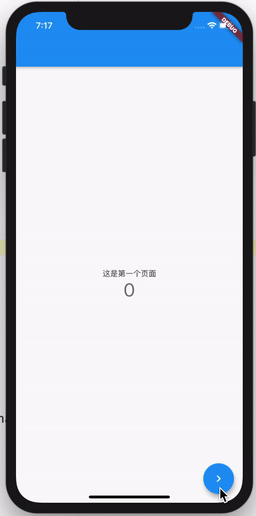
主要代码如下:
1.  `// 点击事件`

2.  `@override`

3.  `Widget build(BuildContext context)  {`

4.   `return  FloatingActionButton(`

5.   `onPressed:  ScopedModel.of<ScopedCounter>(context).increment,`

6.   `tooltip:  'Increment',`

7.   `child:  const  Icon(Icons.add),`

8.   `);`

9.  `}`

10.

11.

12.  `// 接收事件`

13.  `class  CounterLabel  extends  StatelessWidget  {`

14.   `const  CounterLabel({Key key})  :  super(key: key);`

15.

16.   `@override`

17.   `Widget build(BuildContext context)  {`

18.   `print("third counter label build");`

19.   `final counter =  ScopedModel.of<ScopedCounter>(context, rebuildOnChange:  true);`

20.   `return  Column(`

21.   `mainAxisSize:  MainAxisSize.min,`

22.   `mainAxisAlignment:  MainAxisAlignment.center,`

23.   `children:  <Widget>[`

24.   `const  Text(`

25.   `'You have pushed the button this many times:',`

26.   `),`

27.   `Text(`

28.   `'${counter.count}',`

29.   `style:  Theme.of(context).textTheme.display1,`

30.   `),`

31.   `],`

32.   `);`

33.   `}`

34.  `}`
可以看到我们的 Widget 都是无状态的,也就是说我们确实达到了数据更新就更新UI的要求。
那么我们再打印log 看一下,是否只是更新了 使用该 Model 的 Widget。
还是整个Page 都 build 了。
我们在 Page 的 build方法中打印:
1.  `class  MyHomePage  extends  StatelessWidget  {`

2.   `const  MyHomePage({Key key})  :  super(key: key);`

3.   `@override`

4.   `Widget build(BuildContext context)  {`

5.   `print("home page build");`

6.   `}`

7.  `}`

8.

9.  `........  // 第二第三页同理`

10.  `print("second home page build");`

11.  `print("third counter label build");`


然后在 CounterLabel 中 打印

1.  `class  CounterLabel  extends  StatelessWidget  {`

2.   `const  CounterLabel({Key key})  :  super(key: key);`

3.

4.   `@override`

5.   `Widget build(BuildContext context)  {`

6.   `print("home counter label build");`

7.   `}`

8.  `}`

9.

10.  `........  // 第二第三页同理`

11.  `print("second counter label build");`

12.  `print("third counter label build");`
运行效果如下:
可以看到,确实只更新了使用该 Model 的 Widget。
总结
在Flutter 中状态管理有很多,redux、fish_redux 等等等等。
而Scoped_Model 是我用过最简单,最舒服的一种。
因为我是搞移动开发的,所以我会选择 Scoped_Model。
下一篇简单讲讲 Scoped_Model 的原理。
共同学习,写下你的评论
评论加载中...
作者其他优质文章