终于把基本的组件扯完了,真的是多如牛毛。现在让我们来看一下控件如何实现交互
最后会实现一个简单的有点笔触效果的画布,来说明如何使用手势交互。
1.从RaisedButton看事件交互
Flutter的组件中有很多是有点击事件的,比如按钮,这里简单翻一下源码。
1.1:RaisedButton的使用
下面是RaisedButton的简单使用,点击按钮会打印日志
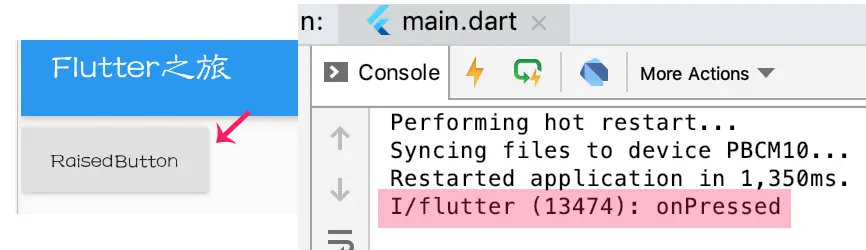
var show = RaisedButton(
  child: Text("RaisedButton", style: TextStyle(fontSize: 12),),
  onPressed: () {
    print("onPressed");
  },
);
1.2:溯源之旅
核心是追一下onPressed的根源在哪里,并简单画个图示意一下。

---->[flutter/lib/src/material/raised_button.dart:101]-------
class RaisedButton extends MaterialButton{
    const RaisedButton({
    Key key,
    @required VoidCallback onPressed,
    //首先onPressed是一个VoidCallback对象,从名称来看是一个空回调
    //略...
    }): super(
        key: key,
        onPressed: onPressed,//调用父类的onPressed
}

---->[flutter/lib/src/material/material_button.dart:40]-------
class MaterialButton extends StatelessWidget {
  //在build方法中onPressed传给了RawMaterialButton
  @override
  Widget build(BuildContext context) {
    return RawMaterialButton(

      onPressed: onPressed,
        //略...
    );
  }
}

---->[flutter/lib/src/material/material_button.dart:40]-------
class RawMaterialButton extends StatefulWidget {
    @override
  _RawMaterialButtonState createState() => _RawMaterialButtonState();
}

class _RawMaterialButtonState extends State<RawMaterialButton> {
//在RawMaterialButton创建的时候,onPressed使用在InkWell上
@override
Widget build(BuildContext context) {
  final Widget result = Focus(
        //略...
        child: InkWell(
          onTap: widget.onPressed,

}

---->[flutter/lib/src/material/ink_well.dart:813]-------
class InkWell extends InkResponse {
  const InkWell({
    GestureTapCallback onTap,
  }) : super(
    onTap: onTap,//onTap传给了父类
}

---->[flutter/lib/src/material/ink_well.dart:184]-------
class InkResponse extends StatefulWidget {
     @override
  _InkResponseState<InkResponse> createState() => _InkResponseState<InkResponse>();
}

class _InkResponseState<T extends InkResponse> extends
        State<T> with AutomaticKeepAliveClientMixin<T> {
  @override
  Widget build(BuildContext context) {
    return Listener(
        //略...
      child: GestureDetector(//通过onTap回调_handleTap方法
        onTap: enabled ? () => _handleTap(context) : null,

    }

  void _handleTap(BuildContext context) {
    //略...
    if (widget.onTap != null) {
      if (widget.enableFeedback)
        Feedback.forTap(context);
      widget.onTap();//最终OnTap调用的位置
    }
  }
}
于是我们发现了一个掌控事件的幕后大佬:
GestureDetector
2.GestureDetector事件处理
首先本质上要认清,GestureDetector是一个无状态的Widget
2.1:响应事件的盒子
既然GestureDetector的onTap可以传入一个函数作为回调处理,那何妨一试
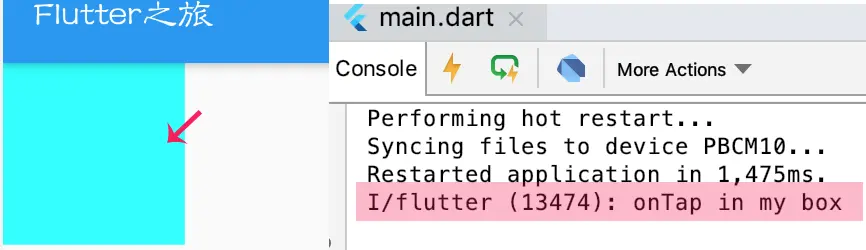
var box = Container(
  color: Colors.cyanAccent,
  width: 100,
  height: 100,
);
var show = GestureDetector(
  child: box,
  onTap: () {
    print("onTap in my box");
  },
);
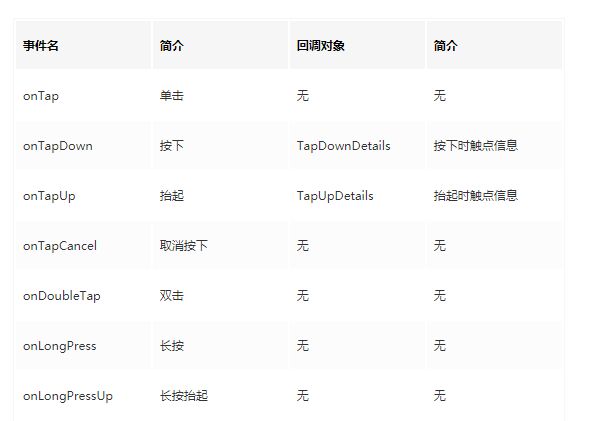
2.2:事件一览(第一波):葫芦七兄弟
首先介绍的的是常用的这七个,根据名字来看应该都不难理解
 var box = Container(
   color: Colors.cyanAccent,
   width: 100,
   height: 100,
 );

 var show = GestureDetector(
     child: box,
     onTap: () {
       print("onTap in my box");
     },
     onTapDown: (pos) {
       print(
           "落点----(x,y):(${pos.globalPosition.dx},${pos.globalPosition.dy})");
     },
     onTapUp: (pos) {
       print(
           "抬起点----(x,y):(${pos.globalPosition.dx},${pos.globalPosition.dy})");
     },
     onTapCancel: () {
       print("onTapCancel in my box");
     },
     onDoubleTap: () {
       print("onDoubleTap in my box");
     },
     onLongPress: () {
       print("onLongPress in my box");
     },
     onLongPressUp: () {
       print("onLongPressUp in my box");      });
这里有两点说一下:1.双击时不会触发点击事件
2.关于onTapCancel,什么是点击取消?
---->[情景1:普通上滑]----
I/flutter (13474): 落点----(x,y):(55.61517333984375,157.59931437174478)
I/flutter (13474): onTapCancel in my box

---->[情景2:长按]----
I/flutter (13474): 落点----(x,y):(52.28492228190104,140.27338663736978)
I/flutter (13474): onTapCancel in my box
I/flutter (13474): onLongPress in my box
I/flutter (13474): onLongPressUp in my box
2.3:事件一览(第二波):十兄弟
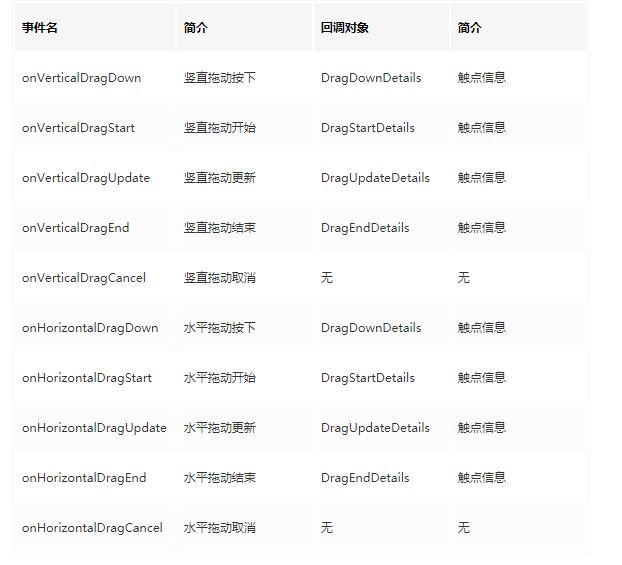
这里对竖直的五个进行测试,水平的五个也类似
var show = GestureDetector(
    child: box,
    onVerticalDragDown: (pos) {
      print(
          "竖直拖拽按下----(x,y):(${pos.globalPosition.dx},${pos.globalPosition.dy})");
    },
    onVerticalDragStart: (pos) {
      print(
          "开始竖直拖拽----(x,y):(${pos.globalPosition.dx},${pos.globalPosition.dy})");
    },
    onVerticalDragUpdate: (pos) {
      print(
          "竖直拖拽更新----(x,y):(${pos.globalPosition.dx},${pos.globalPosition.dy})");
    },
    onVerticalDragEnd: (pos) {
      print(
          "竖直拖拽结束速度----(x,y):(${pos.velocity.pixelsPerSecond.dx},${pos.velocity.pixelsPerSecond.dy})");
    },
    onVerticalDragCancel: () {
      print("onVerticalDragCancel in my box");
    });
这里我想左上角快速滑动了一下,日志为:
I/flutter (13474): 竖直拖拽按下----(x,y):(68.27012125651042,171.9265340169271)
I/flutter (13474): 开始竖直拖拽----(x,y):(68.27012125651042,171.9265340169271)
I/flutter (13474): 竖直拖拽更新----(x,y):(64.60684712727864,167.26185099283853)
I/flutter (13474): 竖直拖拽更新----(x,y):(57.94634501139323,159.26526896158853)
I/flutter (13474): 竖直拖拽更新----(x,y):(49.95374552408854,148.93635050455728)
I/flutter (13474): 竖直拖拽更新----(x,y):(39.62997182210287,137.60785929361978)
I/flutter (13474): 竖直拖拽更新----(x,y):(28.640146891276043,125.6129862467448)
I/flutter (13474): 竖直拖拽更新----(x,y):(16.31822458902995,113.6181131998698)
I/flutter (13474): 竖直拖拽结束速度----(x,y):(-1476.3951158711095,-1569.520405720337)
注意一下,通过测试发现,如果
只有竖直方向的处理,那么即使水平滑动也会触发回调
但是竖直的水平同时出现时,会自动判断你的滑动方向来进行相应的回调。
另外源码说了:两者最好不要一起用。如果想简单的使用,可以用pan
  /// Horizontal and vertical drag callbacks cannot be used simultaneously(同时地)
  /// because a combination(组成) of a horizontal and vertical drag is a pan. Simply
  /// use the pan callbacks instead.
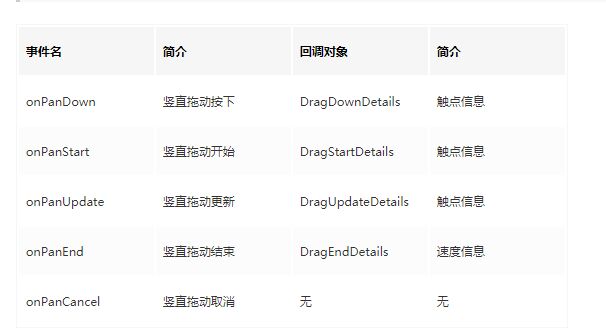
2.4:事件一览(第三波):五火教主
别怕,如上面所说,这也五个是拖动事件,只不过没有方向区分而言
var box = Container(
  color: Colors.cyanAccent,
  width: 200,
  height: 200,
);
var show = GestureDetector(
  child: box,
  onPanDown: (pos) {
    print(
        "拖拽按下----(x,y):(${pos.globalPosition.dx},${pos.globalPosition.dy})");
  },
  onPanStart: (pos) {
    print(
        "开始拖拽----(x,y):(${pos.globalPosition.dx},${pos.globalPosition.dy})");
  },
  onPanUpdate: (pos) {
    print(
        "拖拽更新----(x,y):(${pos.globalPosition.dx},${pos.globalPosition.dy})");
  },
  onPanEnd: (pos) {
    print(
        "拖拽结束速度----(x,y):(${pos.velocity.pixelsPerSecond.dx},${pos.velocity.pixelsPerSecond.dy})");
  },
  onPanCancel: () {
    print("onPanCancel in my box");
  },
);
2.5:事件一览(第四波):三足鼎立
源码中说:
Pan和scale回调不能同时使用,因为scale是Pan的超集。简单的话,使用scale回调函数即可。
在使用上和前面的拖动时间基本一致,这里就不再赘述。
var box = Container(
  color: Colors.cyanAccent,
  width: 200,
  height: 200,
);
var show = GestureDetector(
  child: box,
  onScaleStart: (pos) {
    print(
        "onScaleStart----(x,y):(${pos.focalPoint.dx},${pos.focalPoint.dy})");
  },
  onScaleUpdate: (pos) {
    print(
        "onScaleUpdate----(x,y):(${pos.focalPoint.dx},${pos.focalPoint.dy})");
  },
  onScaleEnd: (pos) {
    print(
        "onScaleEnd----(x,y):(${pos.velocity.pixelsPerSecond.dx},${pos.velocity.pixelsPerSecond.dy})");
  },
);
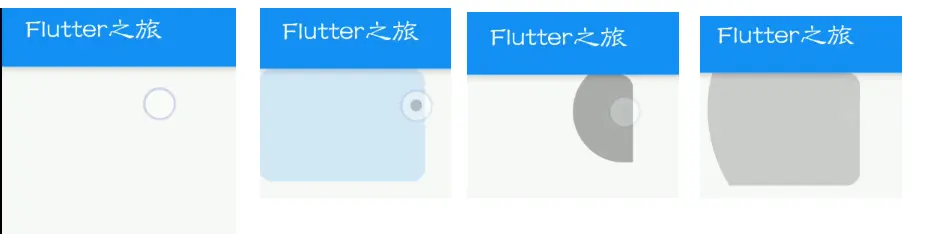
2.6:关于InkWell
InkWell也是一个拥有事件处理能力的组件,只不过支持的事件比较少
常用包括点击,双击,长按,按下,特点是有水波纹效果(注:Container背景色会掩盖水波纹)。
var box = Container(
  width: 120,
  height: 120*0.681,
);
var show = InkWell
(
  child: box,
  focusColor: Colors.red,//聚焦时颜色
  hoverColor: Colors.yellow,//炫富色??
  splashColor: Colors.grey,//水波纹色
  highlightColor: Colors.blue,//长按时会显示该色
  borderRadius: BorderRadius.all(Radius.elliptical(10, 10)),
  onTap: () {
    print("OnTap in InkWell");
  },
);
3.手绘板 v0.01
3.0:前置准备
需要的知识点:Flutter中的手势交互,主要是移动相关
1.一条线是点的集合,绘板需要画n条线,所以是点的集合的集合 _lines
2.组件为有状态组件,_lines为状态量,在移动时将点加入当前所画的线
3.当抬起时说明一条线完毕,应该拷贝入_lines,并清空当前线作为下一条
4.绘制单体类有颜色,大小,位置三个属性,类名TolyCircle

class TolyDrawable {
  Color color;//颜色
  Offset pos;//位置
  TolyDrawable(this.color,this.pos);
}

class TolyCicle extends TolyDrawable{
  double radius;//大小
  TolyCicle(Color color, Offset pos,{this.radius=1}) : super(color, pos);
}
3.1:准备画板Paper
这里传入lines作为线集,遍历线再遍历点
class Paper extends CustomPainter{

  Paper({
    @required this.lines,
  }) {
    _paint = Paint()..style=PaintingStyle.stroke
      ..strokeCap = StrokeCap.round;
  }

  Paint _paint;
  final List<List<TolyCicle>> lines;

  @override
  void paint(Canvas canvas, Size size) {
    for (int i = 0; i < lines.length; i++) {
      drawLine(canvas,lines[i]);
    }

  @override
  bool shouldRepaint(CustomPainter oldDelegate) {
    return true;
  }
  ///根据点位绘制线
  void drawLine(Canvas canvas,List<TolyCicle> positions) {
    for (int i = 0; i < positions.length - 1; i++) {
      if (positions[i] != null && positions[i + 1] != null)
        canvas.drawLine(positions[i].pos, positions[i + 1].pos,
        _paint..strokeWidth=positions[i].radius);
    }
  }
}
3.2:绘板组件
这样就可以了,这里还有很多待完善的地方,不过作为手势的交互应用的例子还是不错的

class TolyCanvas extends StatefulWidget{
  @override
  State<StatefulWidget> createState() => _TolyCanvasState();

}

class _TolyCanvasState extends State<TolyCanvas> {
  var _positions=<TolyCicle>[];
  var _lines=<List<TolyCicle>>[];
  Offset _oldPos;//记录上一点

  @override
  Widget build(BuildContext context) {

    var body=CustomPaint(
      painter: Paper(lines: _lines),
    );

    var scaffold = Scaffold(
      body: body,
    );

    var result =GestureDetector(
      child: scaffold,
      onPanDown: _panDown,
      onPanUpdate: _panUpdate,
      onPanEnd: _panEnd,
      onDoubleTap: (){
        _lines.clear();
        _render();
      },
    );
    return result;
  }

  /// 按下时表示新添加一条线,并记录上一点位置
  void _panDown(DragDownDetails details) {
    print(details.toString());
    _lines.add(_positions);

    var x=details.globalPosition.dx;
    var y=details.globalPosition.dy;
    _oldPos= Offset(x, y);

  }

  ///渲染方法,将重新渲染组件
  void _render(){
    setState(() {

    });
  }
  ///移动中,将点添加到点集中
  void _panUpdate(DragUpdateDetails details) {
    var x=details.globalPosition.dx;
    var y=details.globalPosition.dy;
    var curPos = Offset(x, y);
    if ((curPos-_oldPos).distance>3) {//距离小于3不处理,避免渲染过多
      var len = (curPos-_oldPos).distance;
      var width =40* pow(len,-1.2);//TODO 处理不够顺滑,待处理
      var tolyCicle = TolyCicle(Colors.blue, curPos,radius:width);
      _positions.add(tolyCicle);
      _oldPos=curPos;
      _render();
    }

  }
  /// 抬起后,将旧线拷贝到线集中
  void _panEnd(DragEndDetails details) {
    var oldBall = <TolyCicle>[];
    for (int i = 0; i < _positions.length; i++) {
      oldBall.add(_positions[i]);
    }
    _lines.add(oldBall);
    _positions.clear();

  }
}
共同学习,写下你的评论
评论加载中...
作者其他优质文章