为什么要使用对象池
对象池优化是游戏开发中非常重要的优化方式,也是影响游戏性能的重要因素之一。
在游戏中有许多对象在不停的创建与移除,比如角色攻击子弹、特效的创建与移除,NPC的被消灭与刷新等,在创建过程中非常消耗性能,特别是数量多的情况下。
对象池技术能很好解决以上问题,在对象移除消失的时候回收到对象池,需要新对象的时候直接从对象池中取出使用。
优点是减少了实例化对象时的开销,且能让对象反复使用,减少了新内存分配与垃圾回收器运行的机会。
Cocos官方文档说明的使用方式
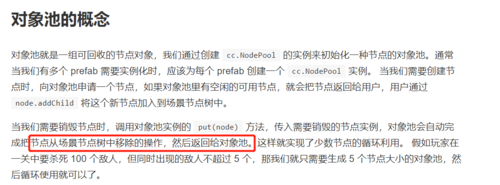
- 这样的一个对象池,其实严格意义上来说更像是节点池,因为它已经处理了节点移除等操作。
- 无法将普通的TS对象放入cc.NodePool 进行管理。那么当我们需要对普通的TS对象进行管理的时候还是需要自己再写一个对象池。
- 好处就是回收节点的时候不需要对节点做任何操作。
- 将节点添加到场景中时不需要考虑是否存在的问题,直接addChild就可以了,因为存在于对象池中的节点必定是从场景中移除的节点。
- 在使用的过程中频繁移除和添加有性能问题。
针对以上问题,我分享一下自己使用对象池的经验。
对象池的封装
- 节点对象池
import { IPool } from "./IPool";
export default class CCNodePool implements IPool{

    private pool: cc.NodePool;

    private resItem: cc.Prefab;

    private name: string = ''

    /**
     *
     * @param prefab 预制体
     * @param conut 初始化个数
     */
    constructor(name: string, resItem: cc.Prefab, conut: number) {
        this.name = name
        this.pool = new cc.NodePool();
        this.resItem = resItem;
        for (let i = 0; i < conut; i++) {
            let obj: cc.Node = this.getNode(); // 创建节点
            this.pool.put(obj); // 通过 putInPool 接口放入对象池
        }
    }

    getName() {
        return this.name
    }

    get() {
        let go: cc.Node = this.pool.size() > 0 ? this.pool.get() : this.getNode();
        return go;
    }

    getNode() {
        if(this.resItem){
            return cc.instantiate(this.resItem);
        }else{
            console.error(' 预制体没有赋值 ')
            return null;
        }
    }

    size() {
        return this.pool.size();
    }

    put(go: cc.Node) {
        this.pool.put(go);
    }

    clear() {
        this.pool.clear();
    }

}
- 非节点对象池
export default class TSObjectPool<T> {

    private pool:any [] = []

    private className:string;

    constructor(className:string,type: { new(): T ;},count:number = 0){
        this.className = className;
        for (let index = 0; index < count; index++) {
            this.pool.push(new type());
        }
    }

    getClassName(){
        return this.className;
    }

    get<T>(type: { new(): T ;} ): T {
        let go = this.pool.length > 0 ? this.pool.shift() : null;
        if(!go){
            go = new type();
        }
        return go;
    }

    put(instance:T){
        this.pool.push(instance);

    }

    clear(){
        this.pool = [];
    }

}
对象池管理器
不论是节点对象池还是非节点对象池。我都习惯通过一个管理器封装起来使用。
这样的好处就是集中管理,修改时也非常方便。
- 节点对象池管理器
import CCNodePool from "./CCNodePool";
import SelfPool from "./SelfPool";

export default class CCPoolManager {

    private static ins: CCPoolManager;

    static instance(): CCPoolManager {
        if (!this.ins) {
            this.ins = new CCPoolManager();
        }
        return this.ins;
    }


    //对象池表
    private pools = {};
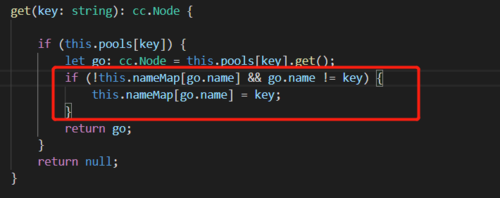
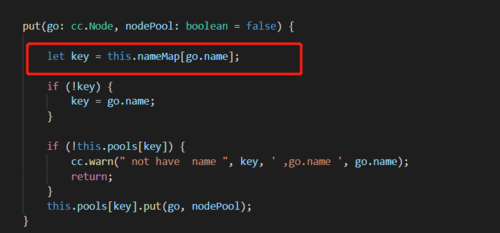
    // 对象名称 和给定 key的 映射表 这样在回收对象的时候就不需要传入key了。通过节点的name就可以找到key。
    private nameMap = {};

    init(key: string, resItem: cc.Prefab, count: number) {

        if (!this.pools[key]) {
            this.pools[key] = new SelfPool(new CCNodePool(key, resItem, count))
        }

    }

    getPool(key: string) {
        return this.pools[key].getPool();
    }

    get(key: string): cc.Node {

        if (this.pools[key]) {
            let go: cc.Node = this.pools[key].get();
            if (!this.nameMap[go.name] && go.name != key) {
                this.nameMap[go.name] = key;
            }
            return go;
        }
        return null;
    }


    put(go: cc.Node, nodePool: boolean = false) {

        let key = this.nameMap[go.name];

        if (!key) {
            key = go.name;
        }

        if (!this.pools[key]) {
            cc.warn(" not have  name ", key, ' ,go.name ', go.name);
            return;
        }
        this.pools[key].put(go, nodePool);
    }

    clear(name: string) {
        if (this.pools[name]) {
            this.pools[name].clear();
            this.pools[name] = null;
        }
    }
    clealAll() {
        for (const key in this.pools) {
            this.clear(key);
        }
        this.pools = {};
    }
}
- 非节点对象池管理器
import TSObjectPool from "./TSObjectPool";
export default class TSPoolManager {
    //对象池表
    private pools = {}


    private static ins: TSPoolManager;

    static instance(): TSPoolManager {
        if (!this.ins) {
            this.ins = new TSPoolManager();
        }
        return this.ins;
    }


    init<T>(key: string, type: { new(): T; }, count: number = 1): void {
        if (!this.pools[key]) {
            this.pools[key] = new TSObjectPool(key, type, count);
        }
    }
    /**
     * 获得被销毁的对象
     * @param key
     */
    get<T>(key: string, type: { new(): T; }, count: number = 1): T {
        if (!this.pools[key]) {
            this.pools[key] = new TSObjectPool(key, type, count);
        }
        return this.pools[key].get(type);
    }

    put(key: string, obj) {
        let pool = this.pools[key]
        if (pool) {
            pool.put(obj);
        }
    }
}
通用对象池
对象由外部创建。不用考虑是否为预制体创建的节点对象。
- 对象池
export default class ObjectPool<T>{

    private buffList: T[] = []

    private key: string;

    constructor(key: string) {
        this.key = key;
    }

    get(func: () => T) {
        let item = this.buffList.length > 0 ? this.buffList.shift() : func();
        return item;
    }

    put(obj: T) {
        this.buffList.push(obj)
    }

    size() {
        return this.buffList.length
    }

    destroy() {
        this.buffList.length = 0;

    }
}
- 对象池管理器
import ObjectPool from "./ObjectPool";
import TSMap from "../struct/TSMap";

export default class PoolManager {

    private static ins: PoolManager
    static instance() {
        if (!this.ins) {
            this.ins = new PoolManager();
        }
        return this.ins;
    }

    private map: TSMap<string, ObjectPool<any>> = new TSMap();

    get(key: any, func: () => any) {
        if (!this.map.has(key)) {
            this.map.set(key, new ObjectPool(key))
        }
        return this.map.get(key).get(func)
    }

    put(key: any, obj: any) {
        if (this.map.has(key)) {
            this.map.get(key).put(obj)
        } else {
        }
    }

    size(key: string) {
        if (this.map.has(key)) {
            return this.map.get(key).size()
        }
        return 0;
    }

    destroy() {
        this.map.clear();
    }


}
针对Cocos对象池的优化
针对Cocos的这一性能问题,我利用装饰模式,自定义了SelfPool类改变了获取和回收时的操作。
import CCNodePool from "./CCNodePool";
import { IPool } from "./IPool";
/**
 * 使用opacity方式隐藏对象
 */
export default class SelfPool implements IPool{

    private list:cc.Node[] = []

    private pool:CCNodePool;

    constructor(pool:CCNodePool){
        this.pool = pool;
    }

    get(){
        let go:cc.Node =  this.list.length > 0 ? this.list.shift() : this.pool.get();
        go.opacity  = 255;
        return go;
    }

    getPool(){
        return this.pool
    }

    size(){
        return this.pool.size() + this.list.length;
    }

    /**
     *
     * @param go
     * @param nodePool 是否放入NodePool中
     */
    put(go:cc.Node,nodePool:boolean = false){
        if(nodePool){
            this.pool.put(go)
        }else{
            this.list.push(go);
            go.stopAllActions();
            go.opacity  = 0;
        }

    }

    clear(){
        this.pool.clear();
        this.list.length = 0;
    }
}
在对象池初始化的时候做了这样的处理
如果不想使用隐藏方式,可以去掉这一层封装,接口都是一样的。
对象池回收的偷懒方式
在回收对象时的一贯操作是put(key,obj)
如果obj肯定拥有name或者其他某个可以标识类别的属性,可以将key与name做一个映射。通过name直接获得key,从而找到对应的对象池,那么在put的时候也就不需要传入key了。
结语
以上就是我在游戏开发中使用对象池的几种的方式,分享出来,供大家参考使用。
点击查看更多内容
为 TA 点赞
评论
共同学习,写下你的评论
评论加载中...
作者其他优质文章
正在加载中
感谢您的支持,我会继续努力的~
扫码打赏,你说多少就多少
赞赏金额会直接到老师账户
支付方式
打开微信扫一扫,即可进行扫码打赏哦


