1. 概述
HTML自带的表单没有样式可言,非常难看。
Bootstrap提供了样式优雅大方的表单,拿来即用,非常nice。本篇就来讲解下Bootstrap框架下表单样式的设置方法。
2. HTML表单样式
我们先来看下HTML自带的表单是啥样的。
  			<form action="#">
                <label for="user-name">姓名</label>
                <input type="text" id="user-name">
                <label for="user-age">年龄</label>
                <input type="text" id="user-age">
                <label for="user-phone">手机号</label>
                <input type="text" id="user-phone">
                <input type="submit" value="提交">
            </form>
效果如下,样式真是马马虎虎。
3. Bootstrap默认表单
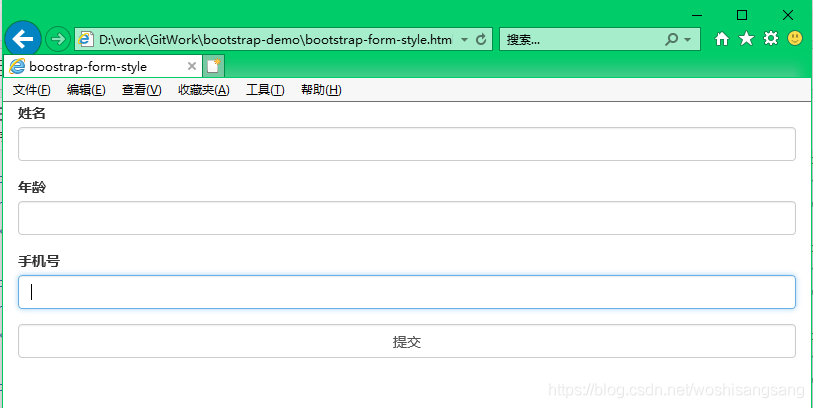
如果使用Bootstrap设置表单,只需要将表单控件放入.form-group类的div中,并对表单控件添加.form-control类。
需要注意的是,Boostrap默认表单使垂直表单,即从上往下排列显示。
代码:
				<form action="#">
                    <div class="form-group">
                        <label for="user-name">姓名</label>
                        <input type="text" id="user-name" class="form-control">
                    </div>
                    <div class="form-group">
                        <label for="user-age">年龄</label>
                        <input type="text" id="user-age" class="form-control">
                    </div>
                    <div class="form-group">
                        <label for="user-phone">手机号</label>
                        <input type="text" id="user-phone" class="form-control">
                    </div>
                    <div class="form-group">
                        <input type="submit" value="提交" class="form-control">
                    </div>
                </form>
效果如下,样式还是非常大气的。
4. Bootstrap水平表单
默认的垂直表单看起来并不习惯,绝大多数表单还是习惯使用水平表单的形式,即文字和控件是水平排列的。
可以通过三个步骤,将表单转换为水平表单。
- 为
<form>标签添加.form-horizontal类 - 为
<label>标签添加.control-label类 - 添加网格类,使标签文字和控件水平排列。
代码如下:
		   <!-- 水平表单 -->
           <div class="col-md-12">
               <form action="#" class="form-horizontal">
                   <div class="form-group">
                       <label for="user-name" class="control-label col-md-3">姓名</label>
                       <div class="col-md-9">
                           <input type="text" id="user-name" class="form-control">
                       </div>
                   </div>
                   <div class="form-group">
                       <label for="user-age" class="control-label col-md-3">年龄</label>
                       <div class="col-md-9">
                           <input type="text" id="user-age" class="form-control">
                       </div>
                   </div>
                   <div class="form-group">
                       <label for="user-phone" class="control-label col-md-3">手机号</label>
                       <div class="col-md-9">
                           <input type="text" id="user-phone" class="form-control">
                       </div>
                   </div>
                   <div class="form-group">
                       <div class="col-md-3"></div>
                       <div class="col-md-9">
                           <input type="submit" style="width:200px;" value="提交" class="form-control">
                       </div>
                   </div>
               </form>
           </div>
效果如下,非常符合正常表单的使用习惯了。
5. Bootstrap内联表单
有时候我们希望表单的元素全部排列在一行上,也就是所谓的内联表单。
为<form>标签设置.form-inline类即可将表单设置为内联表单,代码如下:
			<!-- 内联表单 -->
            <div class="col-md-12">
                <form action="#" class="form-inline">
                    <div class="form-group">
                        <label for="user-name">姓名</label>
                        <input type="text" id="user-name" class="form-control">
                    </div>
                    <div class="form-group">
                        <label for="user-age">年龄</label>
                        <input type="text" id="user-age" class="form-control">
                    </div>
                    <div class="form-group">
                        <label for="user-phone">手机号</label>
                        <input type="text" id="user-phone" class="form-control">
                    </div>
                    <div class="form-group">
                        <input type="submit" value="提交" class="form-control">
                    </div>
                </form>
            </div>
效果如下:
6. 小结
本篇介绍了Bootstrap表单常用的三种样式的实现方法,可以根据实际情况选用。
点击查看更多内容
为 TA 点赞
评论
共同学习,写下你的评论
评论加载中...
作者其他优质文章
正在加载中
感谢您的支持,我会继续努力的~
扫码打赏,你说多少就多少
赞赏金额会直接到老师账户
支付方式
打开微信扫一扫,即可进行扫码打赏哦


