在笔者之前的解析RPN和ROI-Pooling的博客中,已经给大家详细解析了目标检测Faster R-CNN框架中的两大核心部件。纵观整个Faster R-CNN代码,比较难和经典的部分除了上述两大模块,还有根据RPN输出的前景分数选择出roi和为选择出的roi置ground truth类别和坐标变换的代码。在本篇博客中,笔者就这两部分代码为大家做出解析。
首先是如何选择出合适的rois,该代码文件是proposal_layer.py;其次是如何为选择出的rois找到训练所需的ground truth类别和坐标变换信息,该代码文件是proposal_target_layer.py。在正式开始之前,还是按照惯例做出说明:
1. 笔者解析的代码是tensorflow下实现的Faster R-CNN,工程链接https://github.com/kevinjliang/tf-Faster-RCNN,代码文件路径分别是Networks/proposal_layer.py和Networks/proposal_target_layer.py。不过,请大家不用担心,这两个文件也是基于原作,和Ross Girshick的py-faster-rcnn中的代码几乎一致。
2. 请大家在看代码解析之前完全明了Faster R-CNN的工作原理,尤其是在RPN输出结果后,如何选择proposal的部分,有以下几个途径:
1) 直接进行Faster R-CNN论文阅读,选择proposal的部分主要集中在论文3.3节和实验部分:https://arxiv.org/abs/1506.01497
2) 可以参阅笔者的blog:实例分割模型Mask R-CNN详解:从R-CNN,Fast R-CNN,Faster R-CNN再到Mask R-CNN
3) 可以看一篇知乎专栏:一文读懂Faster R-CNN
3. 笔者在解析代码的过程中做到尽量详实,如果觉得代码解析有问题或者存在疏漏的读者朋友,欢迎在评论区指出讨论,笔者不胜感激。
下面开始干货:
首先,笔者先解析一下proposal_layer.py,完成的功能是根据RPN的输出结果,提取出所需的目标框(roi)。按照惯例,笔者先放出代码解析:
# -*- coding: utf-8 -*-
"""
Created on Mon Jan  2 19:25:41 2017

@author: Kevin Liang (modifications)

Proposal Layer: Applies the Region Proposal Network's (RPN) predicted deltas to
each of the anchors, removes unsuitable boxes, and then ranks them by their
"objectness" scores. Non-maximimum suppression removes proposals of the same
object, and the top proposals are returned.

Adapted from the official Faster R-CNN repo:
https://github.com/rbgirshick/py-faster-rcnn/blob/master/lib/rpn/proposal_layer.py
"""

# --------------------------------------------------------
# Faster R-CNN
# Copyright (c) 2015 Microsoft
# Licensed under The MIT License [see LICENSE for details]
# Written by Ross Girshick and Sean Bell
# --------------------------------------------------------

import numpy as np
import tensorflow as tf

from Lib.bbox_transform import bbox_transform_inv, clip_boxes #bbox_transform_inv改变初始框的坐标,clip_boxes把超出图像边界的框限制在图像边界内
from Lib.faster_rcnn_config import cfg #配置文件
from Lib.generate_anchors import generate_anchors #生成初始框
from Lib.nms_wrapper import nms #去掉多余的重叠的框


#使用tf.py_func接口,方便进行numpy运算
def proposal_layer(rpn_bbox_cls_prob, rpn_bbox_pred, im_dims, cfg_key, _feat_stride, anchor_scales):
    return tf.reshape(tf.py_func(_proposal_layer_py,[rpn_bbox_cls_prob, rpn_bbox_pred, im_dims[0], cfg_key, _feat_stride, anchor_scales], [tf.float32]),[-1,5])


def _proposal_layer_py(rpn_bbox_cls_prob, rpn_bbox_pred, im_dims, cfg_key, _feat_stride, anchor_scales):
    '''
    # Algorithm:
    #
    # for each (H, W) location i
    #   generate A anchor boxes centered on cell i
    #   apply predicted bbox deltas at cell i to each of the A anchors
    # clip predicted boxes to image
    # remove predicted boxes with either height or width < threshold
    # sort all (proposal, score) pairs by score from highest to lowest
    # take top pre_nms_topN proposals before NMS
    # apply NMS with threshold 0.7 to remaining proposals
    # take after_nms_topN proposals after NMS
    # return the top proposals (-> RoIs top, scores top)

    '''
    _anchors = generate_anchors(scales=np.array(anchor_scales)) #生成9个锚点,shape: [9,4]
    _num_anchors = _anchors.shape[0] #_num_anchors值为9
    rpn_bbox_cls_prob = np.transpose(rpn_bbox_cls_prob,[0,3,1,2]) #将RPN输出的分类信息维度变成[N,C,H,W]
    rpn_bbox_pred = np.transpose(rpn_bbox_pred,[0,3,1,2]) #将RPN输出的边框变换信息维度变成[N,C,H,W]

    # Only minibatch of 1 supported 核验一下batch_size必须等于1
    assert rpn_bbox_cls_prob.shape[0] == 1, \
        'Only single item batches are supported'

    if cfg_key == 'TRAIN': #如果是在训练的话
        pre_nms_topN  = cfg.TRAIN.RPN_PRE_NMS_TOP_N #12000
        post_nms_topN = cfg.TRAIN.RPN_POST_NMS_TOP_N #2000
        nms_thresh    = cfg.TRAIN.RPN_NMS_THRESH #0.7
        min_size      = cfg.TRAIN.RPN_MIN_SIZE #16
    else: # cfg_key == 'TEST':  如果是在测试的话
        pre_nms_topN  = cfg.TEST.RPN_PRE_NMS_TOP_N #6000
        post_nms_topN = cfg.TEST.RPN_POST_NMS_TOP_N #300
        nms_thresh    = cfg.TEST.RPN_NMS_THRESH #0.7
        min_size      = cfg.TEST.RPN_MIN_SIZE #16


    # the first set of _num_anchors channels are bg probs
    # the second set are the fg probs, which we want
	#按照通道C取出RPN预测的框属于前景的分数,请注意,在18个channel中,前9个是框属于背景的概率,后9个才是属于前景的概率
    scores = rpn_bbox_cls_prob[:, _num_anchors:, :, :]
	#bbox_deltas代表了RPN输出的各个框的坐标变换信息
    bbox_deltas = rpn_bbox_pred

    # 1. Generate proposals from bbox deltas and shifted anchors
    height, width = scores.shape[-2:] #在这里得到了rpn输出的H和W,

    # Enumerate all shifts
    shift_x = np.arange(0, width) * _feat_stride #shape: [width,]
    shift_y = np.arange(0, height) * _feat_stride #shape: [height,]
    shift_x, shift_y = np.meshgrid(shift_x, shift_y) #生成网格 shift_x shape: [height, width], shift_y shape: [height, width]
    shifts = np.vstack((shift_x.ravel(), shift_y.ravel(),
                        shift_x.ravel(), shift_y.ravel())).transpose() # shape[height*width, 4]

    # Enumerate all shifted anchors:
    #
    # add A anchors (1, A, 4) to
    # cell K shifts (K, 1, 4) to get
    # shift anchors (K, A, 4)
    # reshape to (K*A, 4) shifted anchors
    A = _num_anchors # A = 9
    K = shifts.shape[0] # K=height*width(特征图上的)
    anchors = _anchors.reshape((1, A, 4)) + \
              shifts.reshape((1, K, 4)).transpose((1, 0, 2)) #shape[K,A,4] 得到所有的初始框
    anchors = anchors.reshape((K * A, 4)) #把初始框的数组维度改变一下,变成[K×A,4]

    # Transpose and reshape predicted bbox transformations to get them
    # into the same order as the anchors:
    #
    # bbox deltas will be (1, 4 * A, H, W) format
    # transpose to (1, H, W, 4 * A)
    # reshape to (1 * H * W * A, 4) where rows are ordered by (h, w, a)
    # in slowest to fastest order
	#将RPN输出的边框变换信息维度变回[N,H,W,C],再改变一下维度,变成[1×H×W×A,4]
    bbox_deltas = bbox_deltas.transpose((0, 2, 3, 1)).reshape((-1, 4))

    # Same story for the scores:
    #
    # scores are (1, A, H, W) format
    # transpose to (1, H, W, A)
    # reshape to (1 * H * W * A, 1) where rows are ordered by (h, w, a)
	#将RPN输出的分类信息维度变回[N,H,W,C],再改变一下维度,变成[1×H×W×A,1]
    scores = scores.transpose((0, 2, 3, 1)).reshape((-1, 1))

    # Convert anchors into proposals via bbox transformations
	#在这里结合RPN的输出变换初始框的坐标,得到第一次变换坐标后的proposals
    proposals = bbox_transform_inv(anchors, bbox_deltas)

    # 2. clip predicted boxes to image
	#在这里讲超出图像边界的proposal进行边界裁剪,使之在图像边界之内
    proposals = clip_boxes(proposals, im_dims)

    # 3. remove predicted boxes with either height or width < threshold
	#排除掉长或者宽太小的框,keep下标指的是需要保留的长宽合适的框的索引
    keep = _filter_boxes(proposals, min_size)
    proposals = proposals[keep, :]
    scores = scores[keep]

    # 4. sort all (proposal, score) pairs by score from highest to lowest
    # 5. take top pre_nms_topN (e.g. 6000)
	#对框按照前景分数进行排序,order中指示了框的下标
    order = scores.ravel().argsort()[::-1]
    if pre_nms_topN > 0:
        order = order[:pre_nms_topN] #选择前景分数排名在前pre_nms_topN(训练时为12000,测试时为6000)的框
    proposals = proposals[order, :] #保留了前pre_nms_topN个框的坐标信息
    scores = scores[order] #保留了前pre_nms_topN个框的分数信息

    # 6. apply nms (e.g. threshold = 0.7)
    # 7. take after_nms_topN (e.g. 300)
    # 8. return the top proposals (-> RoIs top)
	#使用nms算法排除重复的框
    keep = nms(np.hstack((proposals, scores)), nms_thresh)
    if post_nms_topN > 0:
        keep = keep[:post_nms_topN] #选择前景分数排名在前post_nms_topN(训练时为2000,测试时为300)的框
    proposals = proposals[keep, :] #保留了前post_nms_topN个框的坐标信息
    scores = scores[keep] #保留了前post_nms_topN个框的分数信息

    # Output rois blob
    # Our RPN implementation only supports a single input image, so all
    # batch inds are 0
	#因为要进行roi_pooling,在保留框的坐标信息前面插入batch中图片的编号信息。此时,由于batch_size为1,因此都插入0
    batch_inds = np.zeros((proposals.shape[0], 1), dtype=np.float32)
    blob = np.hstack((batch_inds, proposals.astype(np.float32, copy=False)))
    return blob


def _filter_boxes(boxes, min_size): #_filter_boxes函数过滤掉proposals中边框长宽太小的框
    """Remove all boxes with any side smaller than min_size."""
    ws = boxes[:, 2] - boxes[:, 0] + 1 #得到所有框的宽
    hs = boxes[:, 3] - boxes[:, 1] + 1 #得到所有框的长
    keep = np.where((ws >= min_size) & (hs >= min_size))[0] #返回满足长宽均在阈值之上的框的下标
    return keep
我们来梳理一下proposal_layer的思路:
1) 由于proposal_layer是训练和测试时都需要执行的,只是说在训练和测试时选择的roi的个数不一致,因此在代码的开头部分进行了相应的赋值。
2) 得到了所有的从未经过坐标变换的初始框,存在anchors中。
3) 由bbox_transform_inv函数结合RPN的输出对所有初始框进行了坐标变换。bbox_transform_inv函数如下所示:
def bbox_transform_inv(boxes, deltas):
    '''
    Applies deltas to box coordinates to obtain new boxes, as described by
    deltas
    '''
    if boxes.shape[0] == 0:
        return np.zeros((0, deltas.shape[1]), dtype=deltas.dtype)

    boxes = boxes.astype(deltas.dtype, copy=False)

	#获得初始proposal的中心和长宽信息
    widths = boxes[:, 2] - boxes[:, 0] + 1.0
    heights = boxes[:, 3] - boxes[:, 1] + 1.0
    ctr_x = boxes[:, 0] + 0.5 * widths
    ctr_y = boxes[:, 1] + 0.5 * heights

	#获得坐标变换信息
    dx = deltas[:, 0::4]
    dy = deltas[:, 1::4]
    dw = deltas[:, 2::4]
    dh = deltas[:, 3::4]

	#得到改变后的proposal的中心和长宽信息
    pred_ctr_x = dx * widths[:, np.newaxis] + ctr_x[:, np.newaxis]
    pred_ctr_y = dy * heights[:, np.newaxis] + ctr_y[:, np.newaxis]
    pred_w = np.exp(dw) * widths[:, np.newaxis]
    pred_h = np.exp(dh) * heights[:, np.newaxis]

	#将改变后的proposal的中心和长宽信息还原成左上角和右下角的版本
    pred_boxes = np.zeros(deltas.shape, dtype=deltas.dtype)
    # x1
    pred_boxes[:, 0::4] = pred_ctr_x - 0.5 * pred_w
    # y1
    pred_boxes[:, 1::4] = pred_ctr_y - 0.5 * pred_h
    # x2
    pred_boxes[:, 2::4] = pred_ctr_x + 0.5 * pred_w
    # y2
    pred_boxes[:, 3::4] = pred_ctr_y + 0.5 * pred_h

    return pred_boxes
4) 使用clip_boxes函数将改变坐标信息后超过图像边界的框的边框裁剪一下,使之在图像边界之内。clip_boxes函数如下所示:
def clip_boxes(boxes, im_shape):
    """
    Clip boxes to image boundaries.
    """

	#严格限制proposal的四个角在图像边界内
    # x1 >= 0
    boxes[:, 0::4] = np.maximum(np.minimum(boxes[:, 0::4], im_shape[1] - 1), 0)
    # y1 >= 0
    boxes[:, 1::4] = np.maximum(np.minimum(boxes[:, 1::4], im_shape[0] - 1), 0)
    # x2 < im_shape[1]
    boxes[:, 2::4] = np.maximum(np.minimum(boxes[:, 2::4], im_shape[1] - 1), 0)
    # y2 < im_shape[0]
    boxes[:, 3::4] = np.maximum(np.minimum(boxes[:, 3::4], im_shape[0] - 1), 0)
    return boxes
5) 用_filter_boxes函数排除掉了长宽过小的框,_filter_boxes函数见上面的proposal_layer代码解析最下方。
6) 对所有的框按照前景分数进行排序,选择排序后的前pre_nms_topN和框。
7) 对于上一步选择出来的框,用nms算法根据阈值排除掉重叠的框。
8) 对于剩下的框,选择post_nms_topN个最终的框。
9) 在所有选出的框,即roi的前面插入在训练batch中的索引,由于batch size为1,因此都插入0。
梳理了根据RPN输出的分数选择框(roi)的操作,我们来看一下该代码中有哪些值得注意的地方。就笔者认为,proposal_layer中只有一个地方需要注意,就是:
#按照通道C取出RPN预测的框属于前景的分数,请注意,在18个channel中,前9个是框属于背景的概率,后9个才是属于前景的概率
    scores = rpn_bbox_cls_prob[:, _num_anchors:, :, :]
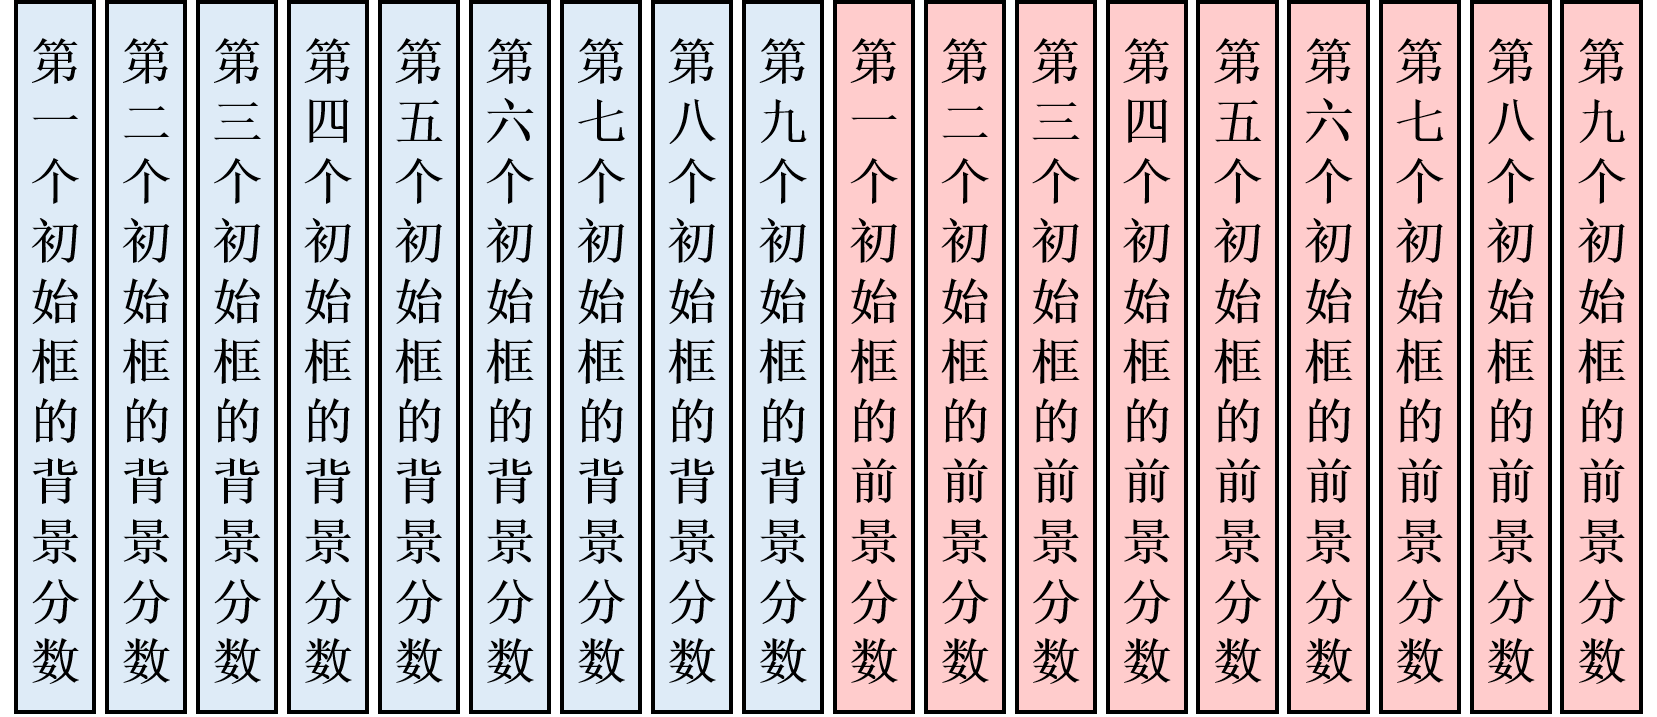
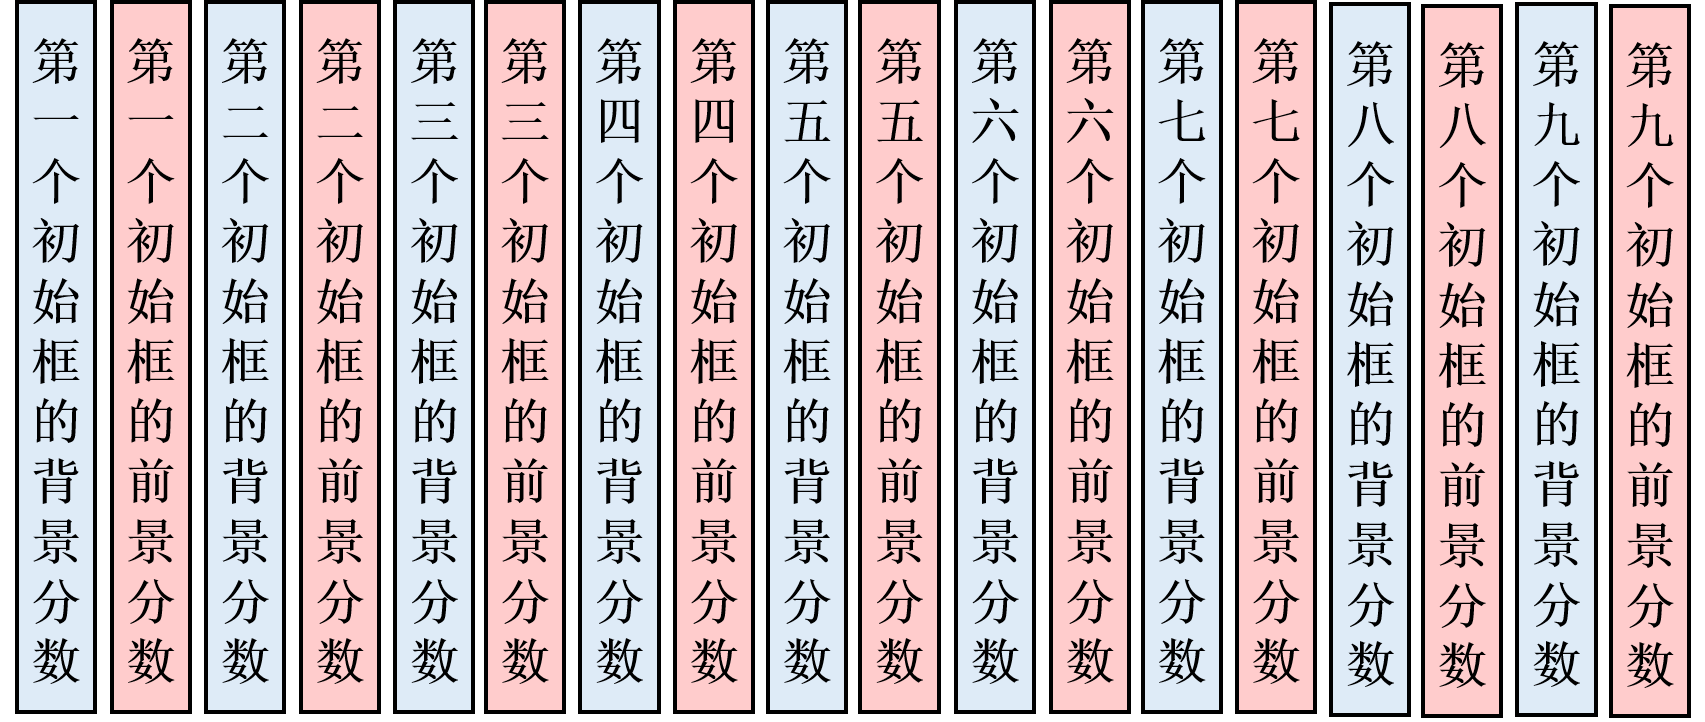
请大家注意,在选择RPN输出的前景分数的时候,是选择输出的18个通道中的后9个。在这里,笔者要提醒大家,对于RPN输出的判断分类(前后景)的分支,是输出18个通道的(9×2)。这18个数表示了9个初始框的各自的前景分数和背景分数,而这18个值的排序,是下图所示的:
按照上图所示排列,才能取出后9个值,表示选出9个框的前景分类分数。笔者在这里同时提醒大家注意,这18个值不是按照下图所示的:
在解析完了proposal_layer.py文件之后,我们来看一看在训练的时候如何为选出的框(roi)置ground truth类别和坐标变换信息。先放出proposal_target_layer.py文件的解析:
# -*- coding: utf-8 -*-
"""
Created on Tue Jan  3 22:30:23 2017

@author: Kevin Liang (modifications)

Adapted from the official Faster R-CNN repo:
https://github.com/rbgirshick/py-faster-rcnn/blob/master/lib/rpn/proposal_target_layer.py
"""

# --------------------------------------------------------
# Faster R-CNN
# Copyright (c) 2015 Microsoft
# Licensed under The MIT License [see LICENSE for details]
# Written by Ross Girshick and Sean Bell
# --------------------------------------------------------

import numpy as np
import numpy.random as npr
import tensorflow as tf

from Lib.bbox_overlaps import bbox_overlaps #计算框与框的重合度
from Lib.bbox_transform import bbox_transform #计算基础框与目标框之间的位置映射
from Lib.faster_rcnn_config import cfg #配置文件

#接收三个参数:按照前景分数选择出来的待进行分类的框,ground truth框,分类类别数目
#假设按照前景分数选择出来的待进行分类的框个数为N,ground truth框个数为M
def proposal_target_layer(rpn_rois, gt_boxes,_num_classes):
    '''
    Make Python version of _proposal_target_layer_py below Tensorflow compatible
    '''
    rois,labels,bbox_targets,bbox_inside_weights,bbox_outside_weights = tf.py_func(_proposal_target_layer_py,[rpn_rois, gt_boxes,_num_classes],[tf.float32,tf.int32,tf.float32,tf.float32,tf.float32])

    rois = tf.reshape(rois,[-1,5] , name = 'rois') #将rois转化为tensor,维度变成[-1,5]
    labels = tf.convert_to_tensor(tf.cast(labels,tf.int32), name = 'labels') #将类别标签转化为tensor,并且类型变成tf.int32
    bbox_targets = tf.convert_to_tensor(bbox_targets, name = 'bbox_targets') #将坐标变换标签转化为tensor
    bbox_inside_weights = tf.convert_to_tensor(bbox_inside_weights, name = 'bbox_inside_weights') #将bbox_inside_weights转化为tensor
    bbox_outside_weights = tf.convert_to_tensor(bbox_outside_weights, name = 'bbox_outside_weights') #将bbox_outside_weights转化为tensor

    return rois, labels, bbox_targets, bbox_inside_weights, bbox_outside_weights

#_proposal_target_layer_py函数返回主要结果
def _proposal_target_layer_py(rpn_rois, gt_boxes,_num_classes):
    """
    Assign object detection proposals to ground-truth targets. Produces proposal
    classification labels and bounding-box regression targets.
    """

    # Proposal ROIs (0, x1, y1, x2, y2) coming from RPN
    # (i.e., rpn.proposal_layer.ProposalLayer), or any other source
    all_rois = rpn_rois #all_rois表示选择出来的N个待进行分类的框的坐标信息 shape [N,5]

    # Include ground-truth boxes in the set of candidate rois
	#将ground truth框加入到待分类的框里面(相当于增加正样本个数)
    zeros = np.zeros((gt_boxes.shape[0], 1), dtype=gt_boxes.dtype)
	#all_rois输出维度(N+M,5),前一维表示是从RPN的输出选出的框和ground truth框合在一起了
    all_rois = np.vstack(
        (all_rois, np.hstack((zeros, gt_boxes[:, :-1])))
    )#先在每个ground truth框前面插入0(这样才能和N个从RPN的输出选出的框对齐),然后把ground truth框插在最后

    # Sanity check: single batch only 确认一下batch size为1
    assert np.all(all_rois[:, 0] == 0), \
            'Only single item batches are supported'

    num_images = 1
    rois_per_image = cfg.TRAIN.BATCH_SIZE // num_images #cfg.TRAIN.BATCH_SIZE为128
	#cfg.TRAIN.FG_FRACTION为0.25,即在一次分类训练中前景框只能有32个
    fg_rois_per_image = np.round(cfg.TRAIN.FG_FRACTION * rois_per_image).astype(np.int32)

    # Sample rois with classification labels and bounding box regression
    # targets
	#_sample_rois选择进行分类训练的框,并求取他们类别和坐标的ground truth和计算边框损失loss时需要的bbox_inside_weights
    labels, rois, bbox_targets, bbox_inside_weights = _sample_rois(
        all_rois, gt_boxes, fg_rois_per_image,
        rois_per_image, _num_classes)

    rois = rois.reshape(-1,5) #将返回的rois的维度变成[-1,5]
    labels = labels.reshape(-1,1) #将返回的rois的ground truth类别的维度变成[-1,5]
    bbox_targets = bbox_targets.reshape(-1,_num_classes*4) #将返回的rois的ground truth坐标的维度变成[-1,_num_classes*4]
    bbox_inside_weights = bbox_inside_weights.reshape(-1,_num_classes*4) #将返回的bbox_inside_weights维度变成[-1,_num_classes*4]

	#置bbox_outside_weights,shape [-1,_num_classes*4]。其中,bbox_inside_weights大于0的位置为1,其余为0
    bbox_outside_weights = np.array(bbox_inside_weights > 0).astype(np.float32)

    return np.float32(rois),labels,bbox_targets,bbox_inside_weights,bbox_outside_weights #返回各个值

def _get_bbox_regression_labels(bbox_target_data, num_classes): #求得最终计算loss时使用的ground truth边框回归值和bbox_inside_weights
    """Bounding-box regression targets (bbox_target_data) are stored in a
    compact form N x (class, tx, ty, tw, th)
    This function expands those targets into the 4-of-4*K representation used
    by the network (i.e. only one class has non-zero targets).
    Returns:
        bbox_target (ndarray): N x 4K blob of regression targets
        bbox_inside_weights (ndarray): N x 4K blob of loss weights
    """
    clss = bbox_target_data[:, 0] #在这里先得到用来训练的每个roi的类别
    bbox_targets = np.zeros((clss.size, 4 * num_classes), dtype=np.float32) #用全0初始化一下边框回归的ground truth值。针对每个roi,对每个类别都置4个坐标回归值
    bbox_inside_weights = np.zeros(bbox_targets.shape, dtype=np.float32) #用全0初始化一下bbox_inside_weights
    inds = np.where(clss > 0)[0] #找到属于前景的rois
    for ind in inds: #针对每一个前景roi:
        cls = clss[ind] #找到从属的类别
        start = int(4 * cls) #找到从属的类别对应的坐标回归值的起始位置
        end = start + 4 #找到从属的类别对应的坐标回归值的结束位置
        bbox_targets[ind, start:end] = bbox_target_data[ind, 1:] #在对应类的坐标回归上置相应的值
        bbox_inside_weights[ind, start:end] = (1, 1, 1, 1) #将bbox_inside_weights上的对应类的坐标回归值置1
    return bbox_targets, bbox_inside_weights


def _compute_targets(ex_rois, gt_rois, labels):
    """Compute bounding-box regression targets for an image."""

    assert ex_rois.shape[0] == gt_rois.shape[0] #确保roi的数目和对应的ground truth框的数目相等
    assert ex_rois.shape[1] == 4 #确保roi的坐标信息传入的是4个
    assert gt_rois.shape[1] == 4 #确保ground truth框的坐标信息传入的是4个

    targets = bbox_transform(ex_rois, gt_rois) #为rois找到坐标变换值
    if cfg.TRAIN.BBOX_NORMALIZE_TARGETS_PRECOMPUTED: #如果需要将框的坐标归一化,就执行if中的代码
        # Optionally normalize targets by a precomputed mean and stdev
        targets = ((targets - np.array(cfg.TRAIN.BBOX_NORMALIZE_MEANS))
                / np.array(cfg.TRAIN.BBOX_NORMALIZE_STDS))
    return np.hstack(
            (labels[:, np.newaxis], targets)).astype(np.float32, copy=False) #将roi对应的类别插在前面

def _sample_rois(all_rois, gt_boxes, fg_rois_per_image, rois_per_image, num_classes):
    """Generate a random sample of RoIs comprising foreground and background
    examples.
    """
    # overlaps: (rois x gt_boxes)
	#计算所有roi和ground truth框之间的重合度
	#只取坐标信息,roi中取第二到第五个数,ground truth框中取第一到第四个数
    overlaps = bbox_overlaps(
        np.ascontiguousarray(all_rois[:, 1:5], dtype=np.float),
        np.ascontiguousarray(gt_boxes[:, :4], dtype=np.float))
    gt_assignment = overlaps.argmax(axis=1) #对于每个roi,找到对应的gt_box坐标 shape: [len(all_rois),]
    max_overlaps = overlaps.max(axis=1) #对于每个roi,找到与gt_box重合的最大的overlap shape: [len(all_rois),]
    labels = gt_boxes[gt_assignment, 4] #对于每个roi,找到归属的类别: [len(all_rois),]

    # Select foreground RoIs as those with >= FG_THRESH overlap
    fg_inds = np.where(max_overlaps >= cfg.TRAIN.FG_THRESH)[0] #找到属于前景的rois(就是与gt_box覆盖超过0.5以上的)
    # Guard against the case when an image has fewer than fg_rois_per_image
    # foreground RoIs
    fg_rois_per_this_image = min(fg_rois_per_image, fg_inds.size) #求得一个训练batch中前景的个数
    # Sample foreground regions without replacement
    if fg_inds.size > 0:
        fg_inds = npr.choice(fg_inds, size=fg_rois_per_this_image, replace=False) #如果需要的话,就随机地排除一些前景框

    # Select background RoIs as those within [BG_THRESH_LO, BG_THRESH_HI)
    bg_inds = np.where((max_overlaps < cfg.TRAIN.BG_THRESH_HI) &
                       (max_overlaps >= cfg.TRAIN.BG_THRESH_LO))[0] #找到属于背景的rois(就是与gt_box覆盖介于0和0.5之间的)
    # Compute number of background RoIs to take from this image (guarding
    # against there being fewer than desired)
    bg_rois_per_this_image = rois_per_image - fg_rois_per_this_image #求得一个训练batch中的理论背景的个数
    bg_rois_per_this_image = min(bg_rois_per_this_image, bg_inds.size) #求得一个训练batch中的事实背景的个数
    # Sample background regions without replacement
    if bg_inds.size > 0:
        bg_inds = npr.choice(bg_inds, size=bg_rois_per_this_image, replace=False) #如果需要的话,就随机地排除一些背景框

    # The indices that we're selecting (both fg and bg)
    keep_inds = np.append(fg_inds, bg_inds) #记录一下最终保留的框
    # Select sampled values from various arrays:
    labels = labels[keep_inds] #记录一下最终保留的框对应的label
    # Clamp labels for the background RoIs to 0
    labels[fg_rois_per_this_image:] = 0 #把背景框的坐标置0
    rois = all_rois[keep_inds] #取到最终保留的rois

    bbox_target_data = _compute_targets(
        rois[:, 1:5], gt_boxes[gt_assignment[keep_inds], :4], labels) #得到最终保留的框的类别ground truth值和坐标变换ground truth值

    bbox_targets, bbox_inside_weights = \
        _get_bbox_regression_labels(bbox_target_data, num_classes) #得到最终计算loss时使用的ground truth边框回归值和bbox_inside_weights

    return labels, rois, bbox_targets, bbox_inside_weights
然后,我们来整理一下proposal_target_layer的思路:
1) 在_proposal_target_layer_py函数中,首先将ground truth框加入了根据RPN输出选择出的框,相当于增加前景的数量,此时,roi的数量变成了N(根据RPN的输出选出的)+M(ground truth框)。
2) 进入_sample_rois函数,首先计算所有的roi和ground truth框的重合度(IoU),然后对于每个roi,找到对应的ground truth框和正确的类别标签。
3) 为一个训练batch,在全部roi中选择前景框(前景框不能太多,最多只能占训练batch的1/4)和背景框。
4) 为进行该batch训练的框置分类标签,并通过_compute_targets函数计算坐标回归标签。
5) 通过_get_bbox_regression_labels函数将坐标回归标签扩充,变成训练所需的格式。
在整理了proposal_target_layer的思路之后,我们来看一下代码中有哪些需要注意的地方。笔者认为,代码中需要注意的地方一共有两个:
1) 正样本最多只占一个batch中最大图片数量的1/4。如果一个batch最大容量是128,那么,正样本最多就只有32个。
num_images = 1
    rois_per_image = cfg.TRAIN.BATCH_SIZE // num_images #cfg.TRAIN.BATCH_SIZE为128
	#cfg.TRAIN.FG_FRACTION为0.25,即在一次分类训练中前景框只能有32个
    fg_rois_per_image = np.round(cfg.TRAIN.FG_FRACTION * rois_per_image).astype(np.int32)
正负样本还是通过IoU来判断的,如果与ground truth框重叠在0.5及以上,就是正样本;如果IoU介于0和0.5之间,就是负样本。
2) 在最终训练边框回归的时候,是针对每个类别,单独安排坐标回归标签。如果某一个roi属于a类,那么坐标回归标签就被安排在对应a类的位置上面。该功能由_get_bbox_regression_labels函数完成。为啥要这么做呢?因为对于每一个roi而言,Fast R-CNN的边框回归部分输出的是num_classes*4个通道。
# Bounding Box refinement
            with tf.variable_scope('bbox'):
                self.rcnn_bbox_layers = Layers(hidden)
self.rcnn_bbox_layers.fc(output_nodes=self.num_classes*4, activation_fn=None) 到这里,proposal_layer和proposal_target_layer的代码解析就已经接近尾声了。总的来说,两个文件的代码还是写得比较有技巧和高效的。这两个函数为RPN和Fast R-CNN之间建立了桥梁,同时也是Faster R-CNN中比较难的代码,笔者也衷心希望自己的解析能对大家有帮助。
对于上述的代码分析,如果各位读者朋友们认为存在疏漏,欢迎在评论区指出与讨论,笔者不胜感激。
共同学习,写下你的评论
评论加载中...
作者其他优质文章


