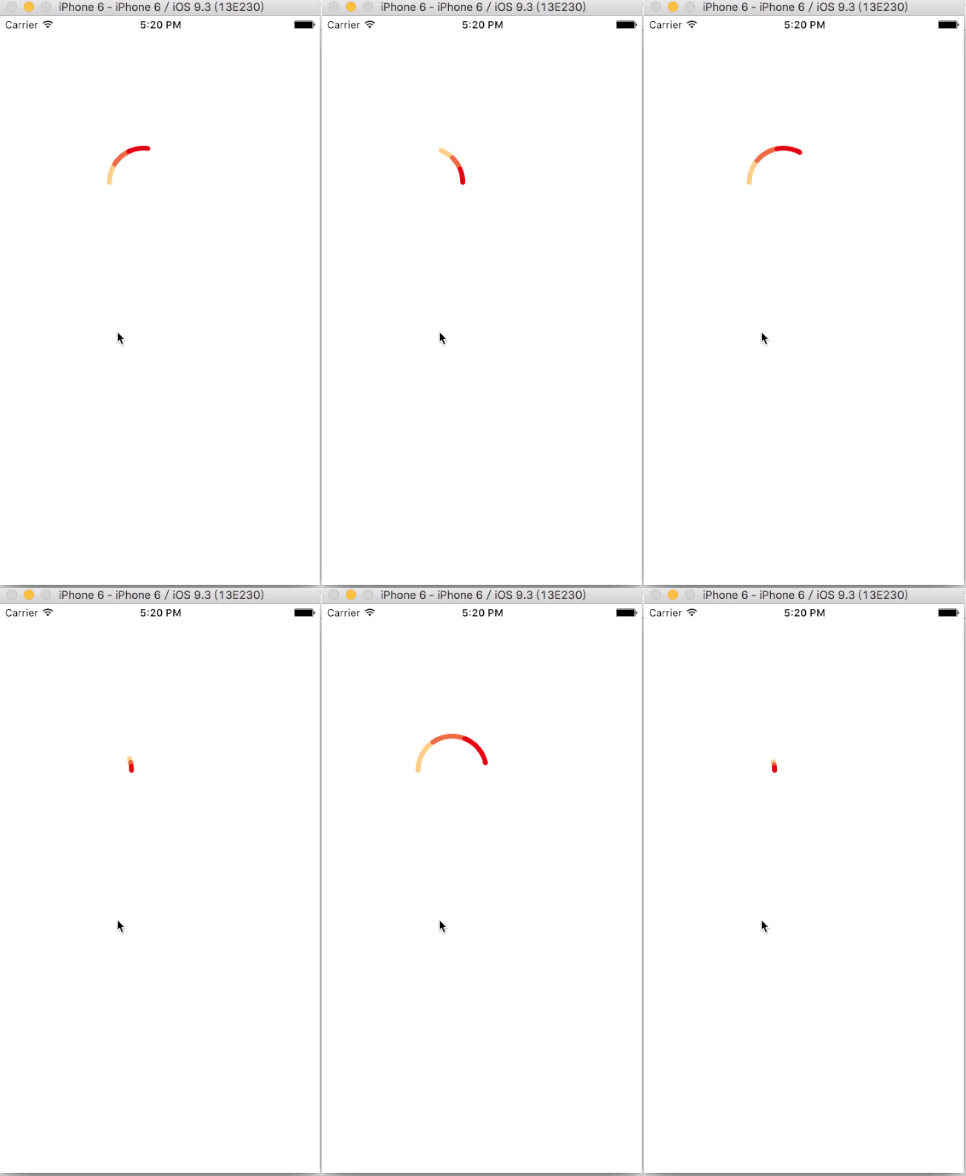
详情参见GitHub,一个像蚱蜢一样跳跃的加载动画
原理:
首先,要完成这个动画,我们需要分析它有哪些需求:
- 需要有三种颜色的线段(当然是贝塞尔曲线)
- 动画的完成,使用核心动画无法完成
- 这个动画是周期性的
基于需求1,我们没有办法使用CAShapeLayer,因为CAShapeLayer画的图形,只有一种颜色,或者是渲染出来的过渡色,不能做到上面的三种颜色。所以我们使用Core Graphics自己绘制线段
那么我们怎么样让动画动起来呢?使用CADisplayLink。这种接近硬件刷新级别的计时器,可以让我们制作流畅的动画,我们内部维护一个最大值为1000的数字,随着定时器的滴答来“自加”。
在1000个计数周期中,整个动画完成单次循环。
下面我们对动画进行分解。
1)首先是弧形
路线是一个半圆,角度从-PI到0。一次动画循环,分为两部分。我们设这两部分是动画进度的percent0~0.5,和进度的percent0.5~1。
上半部分,弧形从-PI角度为起点,角度递增,到percent0.5的时候,正好是一个上半圆。
下半部分,弧形从完整上半圆开始(-PI起点,0终点),开始起点不断增加,到percent 1的时候,弧度夹脚为0,都落在了0角度。
2) 其次是平移
我们可以看到,整个动画似乎是在往前走,原因是,在percent 0的时候,弧度的起点在中心位置,等到percent 0.5的时候,弧度的圆心在中心位置,当percent 1的时候,弧度的终点在中心位置。不断的循环,给人向前跑的假象。
其实画图讲解更好,但是实在太麻烦了,大家可以自己动手画画,其实并不难~~
代码:
动画使用了Core Graphics和贝塞尔曲线来完成:
加载view的实现代码:
//
//  GrasshopperLoadingView.m
//  GrasshopperLoading
//
//  Created by Realank on 16/4/18.
//  Copyright © 2016年 realank. All rights reserved.
//

#import "GrasshopperLoadingView.h"
#import <math.h>
#define LINE_WIDTH 6

@interface GrasshopperLoadingView ()

@property (nonatomic, weak) CADisplayLink *link;
@property (nonatomic, assign) NSInteger count;

@end

@implementation GrasshopperLoadingView

- (id)initWithFrame:(CGRect)frame {

    self = [super initWithFrame:frame];
    if (self) {
        // Initialization code.
    }
    self.backgroundColor=[UIColor clearColor];
    _count = 0;

    CADisplayLink *link = [CADisplayLink displayLinkWithTarget:self selector:@selector(clockTick)];
    [link addToRunLoop:[NSRunLoop mainRunLoop] forMode:NSDefaultRunLoopMode];
    _link = link;

    return self;
}

- (void)dealloc {
    [self deleteTimer];
    NSLog(@"dealloc");
}

- (void)deleteTimer{
    if (_link) {
        [_link invalidate];
        _link = nil;
    }

}

- (void)clockTick{
    if (self.superview) {
        _count += 15;
        if (_count > 1000) {
            _count = 0;
        }
        [self setNeedsDisplay];
    }else{
        [self deleteTimer];
    }

}

// Only override drawRect: if you perform custom drawing.
// An empty implementation adversely affects performance during animation.
- (void)drawRect:(CGRect)rect {

    UIGraphicsGetCurrentContext();

    CGFloat percent = _count / 1000.0;
    CGFloat r = MAX(rect.size.width, rect.size.height) / 2 - 10;;
    CGPoint center = CGPointMake(rect.size.width/2, rect.size.height - 5);
    center.x = center.x - 2 * r * (percent - 0.5);
    NSArray* pathArr = [self pathesForLoadingCenter:center andR:r andPercent:percent];
    if (pathArr.count == 3) {
        [[self colorWithR:251 G:205 B:137] setStroke];
        [pathArr[0] stroke];
        [[self colorWithR:237 G:105 B:65] setStroke];
        [pathArr[1] stroke];
        [[self colorWithR:230 G:0 B:18] setStroke];
        [pathArr[2] stroke];
    }

}

- (UIColor*)colorWithR:(CGFloat)r G:(CGFloat)g B:(CGFloat)b {
    return [UIColor colorWithRed:r/255.0 green:g/255.0 blue:b/255.0 alpha:1];
}

- (NSArray*)pathesForLoadingCenter:(CGPoint)center andR:(CGFloat)r andPercent:(CGFloat)percent{

    CGFloat startAngle = 0;
    CGFloat endAngle = 0;
    if (percent < 0.01) {
        percent = 0.01;
    }else if(fabs(percent- 0.5) < 0.01){
        percent = 0.5;
    }else if(percent > 0.99){
        percent = 0.99;
    }

    if (percent <= 0.5) {
        startAngle = -M_PI;
//        CGFloat x = 2 * r * percent * 2;
//        endAngle = startAngle + [self angleForDeltaX:(x - r) andR:r];
        endAngle = startAngle + M_PI * percent * 2;

    }else {
        endAngle = 0;
//        CGFloat x = 2 * r * (percent- 0.5) * 2;
//        startAngle = -M_PI + [self angleForDeltaX:(x - r) andR:r];
        startAngle = -M_PI + M_PI * (percent-0.5) * 2;
    }

    CGFloat segmentAngle = (endAngle - startAngle) / 3;

    NSMutableArray* pathArr = [NSMutableArray array];
    [pathArr addObject:[self arcPathAtCenter:center andR:r startAngle:startAngle endAngle:startAngle + segmentAngle withColor:[UIColor redColor]]];
    [pathArr addObject:[self arcPathAtCenter:center andR:r startAngle:startAngle + segmentAngle endAngle:startAngle + 2 * segmentAngle withColor:[UIColor redColor]]];
    [pathArr addObject:[self arcPathAtCenter:center andR:r startAngle:startAngle + 2 * segmentAngle endAngle:startAngle + 3 * segmentAngle withColor:[UIColor redColor]]];

    return [pathArr copy];
}

- (CGFloat)angleForDeltaX:(CGFloat)deltaX andR:(CGFloat)r{

    if (deltaX < -r || deltaX > r) {
        NSLog(@"错误");
        return 0;
    }
    if (deltaX < 0) {
        deltaX = - deltaX;
        return acos(deltaX / r);
    }else if (deltaX == 0) {
        return M_PI_2;
    }else{
        return M_PI - acos(deltaX / r);
    }

    return 0;
}

-(UIBezierPath*)arcPathAtCenter:(CGPoint)center andR:(CGFloat)r startAngle:(CGFloat)startAngle endAngle:(CGFloat)endAngle  withColor:(UIColor*)color{
    UIBezierPath *aPath = [UIBezierPath bezierPathWithArcCenter:center radius:r startAngle:startAngle endAngle:endAngle clockwise:YES];
    aPath.lineWidth = LINE_WIDTH;
    aPath.lineJoinStyle = kCGLineJoinRound;
    aPath.lineCapStyle = kCGLineCapRound;
    return aPath;
}

@end
使用方法:
//
//  ViewController.m
//  GrasshopperLoading
//
//  Created by Realank on 16/4/18.
//  Copyright © 2016年 realank. All rights reserved.
//

#import "ViewController.h"
#import "GrasshopperLoadingView.h"

@interface ViewController ()

@end

@implementation ViewController

- (void)viewDidLoad {
    [super viewDidLoad];
    // Do any additional setup after loading the view, typically from a nib.
    GrasshopperLoadingView *view = [[GrasshopperLoadingView alloc]initWithFrame:CGRectMake(100, 100, 100, 100)];
    [self.view addSubview:view];

}

- (void)didReceiveMemoryWarning {
    [super didReceiveMemoryWarning];
    // Dispose of any resources that can be recreated.
}

@end
点击查看更多内容
31人点赞
评论
共同学习,写下你的评论
评论加载中...
作者其他优质文章
正在加载中
感谢您的支持,我会继续努力的~
扫码打赏,你说多少就多少
赞赏金额会直接到老师账户
支付方式
打开微信扫一扫,即可进行扫码打赏哦


