使用IDEA创建spring boot项目与项目解析(炒鸡简单一学就会)
各位看官老婆大家好,这篇介绍使用IDEA创建spring boot项目的过程和项目的特点~
一.新建项目
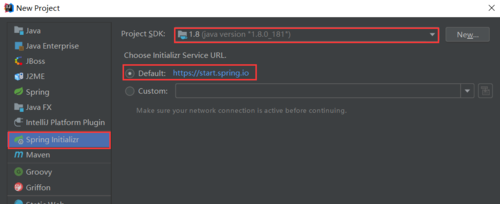
①在New Project 中选择Spring Initializr(弹簧初始化程序)
②JDK版本建议选择1.8,待会儿要和下面的一步保持一致
③初始化服务的URL,选择default那个就行
④next

⑤group自己填咯
⑥artifact项目名字自己起咯
⑦Java Version选择8,承接上一步的1.8
⑧next
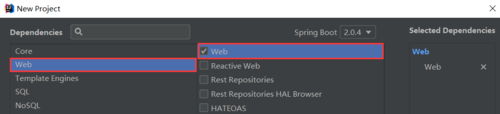
⑨左侧选择web,在中间的web前打勾
⑩next

这里就是项目的命名和指定项目路径,你问我为啥又命名一次,我也想知道
(~ ̄ ̄)~
接着finish创建完成
我们来看看这香气逼人的新项目
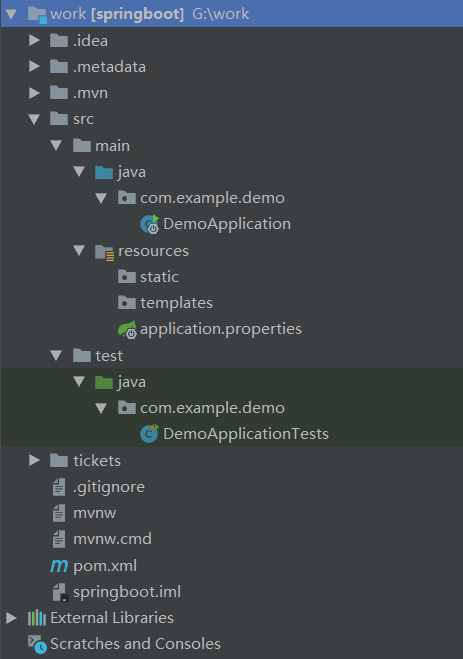
SpringbootApplication: 一个带有 main() 方法的类,用于启动应用程序
SpringbootApplicationTests:一个空的 Junit 测试了,它加载了一个使用 Spring Boot 字典配置功能的 Spring 应用程序上下文
application.properties:一个空的 properties 文件,可以根据需要添加配置属性
pom.xml: Maven 构建说明文件
二.新建HelloController
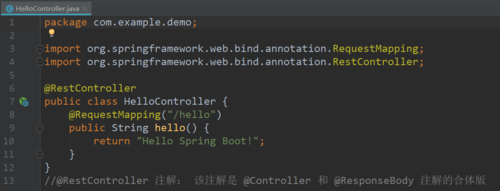
import org.springframework.web.bind.annotation.RequestMapping;
import org.springframework.web.bind.annotation.RestController;

@RestController
public class HelloController {
    @RequestMapping("/hello")
    public String hello() {
        return "Hello Spring Boot!";
    }
}
//@RestController 注解: 该注解是 @Controller 和 @ResponseBody 注解的合体版
三.启动springboot
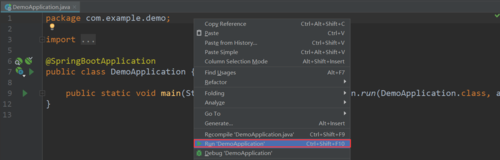
在DemoApplicatin中右键点击Run,由于springboot自带Tomcat,所以无需手动配置;也可以点击右上角的绿色播放按钮来启动。
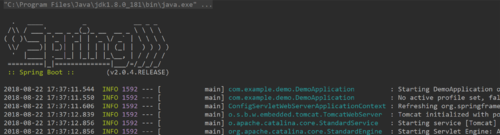
控制台输出是这样的,花花绿绿的还有spring的logo。
浏览器地址栏输入localhost:8080/hello,显示出欢迎界面,访问成功。
*springboot其他启动方式(番外):
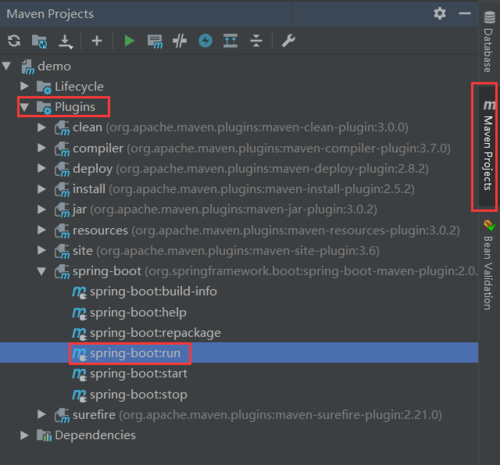
1.侧边栏中的run选项
2.侧边栏中的package选项
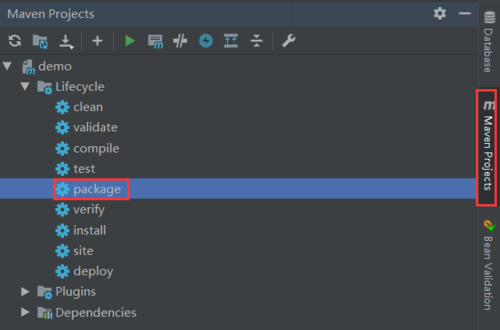
生成jar包后,cmd中运行jar -jar 项目名.jar,运行后便可浏览器访问localhost:8080/hello
四.Spring Boot项目解析
1.pom.xml
较以往不同的是,springboot的pom文件多出了<parent>标签,该标签配置了springboot的父级依赖。有了这个,当前的项目才是 Spring Boot 项目,spring-boot-starter-parent 是一个特殊的 starter ,它用来提供相关的 Maven 默认依赖,使用它之后,常用的包依赖就可以省去 version 标签。
<parent>
    <groupId>org.springframework.boot</groupId>
    <artifactId>spring-boot-starter-parent</artifactId>
    <version>2.0.4.RELEASE</version>
    <relativePath/> <!-- lookup parent from repository -->
</parent>
2.应用入口类
Spring Boot 项目通常有一个名为 *Application 的入口类,入口类里有一个 main 方法, 这个 main 方法其实就是一个标准的 Javay 应用的入口方法。
@SpringBootApplication 是 Spring Boot 的核心注解,它是一个组合注解,该注解组合了:@Configuration、@EnableAutoConfiguration、@ComponentScan; 若不是用 @SpringBootApplication 注解也可以使用这三个注解代替。
其中,@EnableAutoConfiguration 让 Spring Boot 根据类路径中的 jar 包依赖为当前项目进行自动配置,例如,添加了 spring-boot-starter-web 依赖,会自动添加 Tomcat 和 Spring MVC 的依赖,那么 Spring Boot 会对 Tomcat 和 Spring MVC 进行自动配置。
Spring Boot 还会自动扫描 @SpringBootApplication 所在类的同级包以及下级包里的 Bean ,所以入口类建议就配置在 grounpID + arctifactID 组合的包名下
3.Spring Boot 的配置文件(这个是重点,赶紧用本本记下来~)
springboot使用的是全局配置文件,名为application.properties。Spring Boot 不仅支持常规的 properties 配置文件,还支持 yaml 语言的配置文件。yaml 是以数据为中心的语言,在配置数据的时候具有面向对象的特征。
这是application.properties的写法,类似于Java中的方法调用
server.port=8989
server.servlet.context-path=/hello
这是application.yml的写法,树状结构,最后一个key的值之前要加一个空格
server:
   port: 8989
server:
   servlet:
      context-path: /hello
两种配置文件只需更改后缀名即可使用,不过不要忘记更改写法。
4.Spring Boot 热部署
当发现任何类发生了改变,就会通过 JVM 类加载的方式,加载最新的类到虚拟机中,这样就不需要重新启动也能看到修改后的效果了。
往 pom.xml 中添加一个依赖
<dependency>
    <groupId>org.springframework.boot</groupId>
    <artifactId>spring-boot-devtools</artifactId>
    <optional>true</optional> <!-- 这个需要为 true 热部署才有效 -->
</dependency>
重新启动 Spring Boot ,然后修改任意代码,就能观察到控制台的自动重启现象。
5.Spring Boot 使用
1)集成 MyBatis
修改 pom.xml 增加对 MySql和 MyBatis 的支持
<!-- mybatis -->
<dependency>
    <groupId>org.mybatis.spring.boot</groupId>
    <artifactId>mybatis-spring-boot-starter</artifactId>
    <version>1.1.1</version>
</dependency>
<!-- mysql -->
<dependency>
    <groupId>mysql</groupId>
    <artifactId>mysql-connector-java</artifactId>
    <version>5.1.21</version>
</dependency>
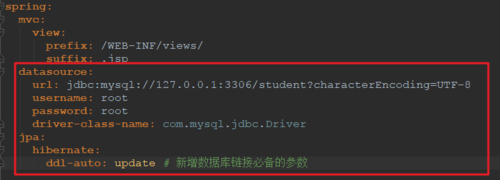
2)新增数据库链接参数
3)创建 Student 实体类和 StudentMapper 映射类
新建一个【pojo】包,然后在其下创建一个 Student 类
public class Student {
    private Integer id;
    private Integer student_id;
    private String name;
    private Integer age;
    private String sex;
    private Date birthday;
    /* getter and setter */
}
新建一个【mapper】包,然后在其下创建一个 StudentMapper 映射类:
@Mapper
public interface StudentMapper {
    @Select("SELECT * FROM student")
   List<Student> findAll();
}
4)编写 StudentController
@Controller
public class StudentController {
    @Autowired
    StudentMapper studentMapper;

    @RequestMapping("/listStudent")
    public String listStudent(Model model) {
    List<Student> students = studentMapper.findAll();
    model.addAttribute("students", students);

    return "listStudent";
    }
}
5)编写 listStudent.jsp 文件
<%@ page language="java" contentType="text/html; charset=UTF-8" pageEncoding="UTF-8"%>
<%@ taglib uri="http://java.sun.com/jsp/jstl/core" prefix="c"%>
<table align='center' border='1' cellspacing='0'>
    <tr>
        <td>id</td>
        <td>name</td>
    </tr>
    <c:forEach items="${students}" var="s" varStatus="st">
        <tr>
            <td>${s.id}</td>
            <td>${s.name}</td>
        </tr>
    </c:forEach>
</table>
6)重启服务器运行
完毕
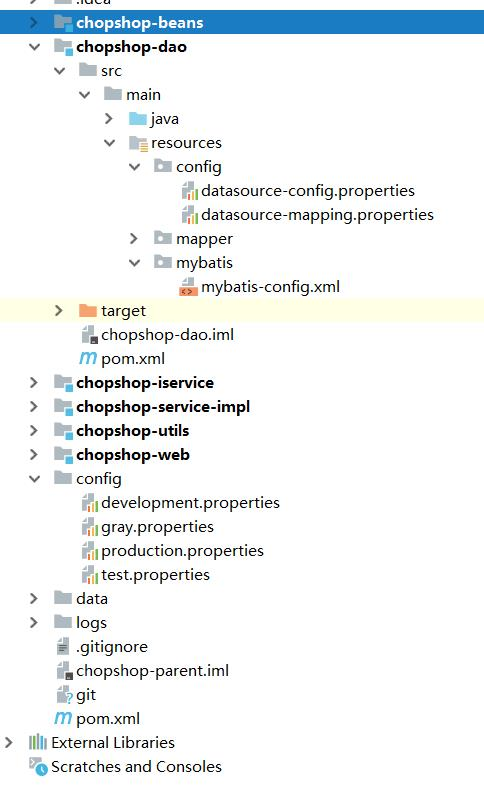
感谢@不能游的鱼指出本文的错误(@Mapperpublic其实是public没有换行),我在此表示感谢~附上spring boot在实际项目中的结构。
以上就是本篇带给大家的springboot项目创建和解析的相关知识,感谢大家的阅读~!

共同学习,写下你的评论
评论加载中...
作者其他优质文章