

-
实例化Bean的三种方式:构造方法、静态方法、实例方法
查看全部 -
通过注解实现Bean的初始化和销毁的逻辑处理(三种方式)
@PostConstruct:自定义初始化方法的标签。
@PreDestroy:自定销毁方法的标签。
方式一:Bean类实现InitializingBean、DisposableBean,并实现afterPropertiesSet()和destroy()。
代码:
@Component(value="bean2")
public class Bean2 implements InitializingBean,DisposableBean {
@Override
public void destroy() throws Exception {
System.out.println("Bean的销毁逻辑方法执行了");
}
@Override
public void afterPropertiesSet() throws Exception {
System.out.println("Bean的初始化逻辑方法执行了");
}
}
测试:
@Test
public void test(){
AbstractApplicationContext ac=new AnnotationConfigApplicationContext(Configuration2.class);
Bean2 bean=ac.getBean("bean2",Bean2.class);
System.out.println(bean);
ac.close();
}
结果:
Bean的初始化逻辑方法执行了
springinit_destory.Bean2@46a7cbfd
Bean的销毁逻辑方法执行了
方式二:不用实现接口,自定义方法,初始化方法添加@PostConstruct
销毁方法添加@PreDestroy。
@Component(value="bean2")
public class Bean2 {
@PostConstruct
public void onInit(){
System.out.println("Bean的初始化逻辑方法执行了");
}
@PreDestroy
public void destory(){
System.out.println("Bean的销毁逻辑方法执行了");
}
}
方式三:Bean的管理不通过@Component,而是通过@Bean,提供方法管理,Bean里提供的初始化和销毁方法不用添加注解,而是通过@Bean(initMethod=“初始化方法名”destroyMethod=“销毁方法名”)。
代码:
@Configuration
public class Configuration2 {
@Bean(initMethod="onInit",destroyMethod="destory",name="bean2")
public Bean2 bean(){
return new Bean2();
}
}
查看全部 -
通过注解设定Bean的作用域Scope
一、Singleton作用域、prototype作用域、Web环境作用域(request作用域、session作用域、application作用域、websocket作用域)
@Scope(value=""):实现实例化Bean的作用域功能。
实现Bean的多例模式:
Bean代码:
@Component(value="bean1")
@Scope(value="prototype")
public class Bean11 {
}
Configuration代码:
@Configuration
@ComponentScan("springscope")
public class Configuration11 {
@Bean(name="bean2")
@Scope(value="prototype")
public Bean11 getBean(){
return new Bean11();
}
}
测试代码:
@Test
public void test(){
ApplicationContext ac=new AnnotationConfigApplicationContext(Configuration11.class);
for(int i=0;i<10;i++){
Bean11 bean=ac.getBean("bean1", Bean11.class);
System.out.println(bean);
}
System.out.println("=================================");
for(int i=0;i<10;i++){
Bean11 bean1=ac.getBean("bean2",Bean11.class);
System.out.println(bean1);
}
}
结果:
springscope.Bean11@7cd3258f
springscope.Bean11@a470f4f
springscope.Bean11@3f3e10ce
springscope.Bean11@3c164d2
springscope.Bean11@dc218eb
springscope.Bean11@41f1f35b
springscope.Bean11@739ffd2f
springscope.Bean11@ca753f7
springscope.Bean11@3d79839e
springscope.Bean11@74b01999
=================================
springscope.Bean11@672add5f
springscope.Bean11@2f2bbce3
springscope.Bean11@607df346
springscope.Bean11@6ceeaa27
springscope.Bean11@28e51e50
springscope.Bean11@5a292b29
springscope.Bean11@44d0befd
springscope.Bean11@64aaf756
springscope.Bean11@145462bc
springscope.Bean11@301e2f11
二、自定义作用域
步骤1:根据spring.xml中自定义作用域配置,应该先实例化MyScope,所以先通过注解方式来实例化MyScope。代码:
@Bean
public MyScope myScope(){
return new MyScope();
}
步骤2:根据spring.xml中自定义作用域配置,通过注解再实例化一个CustomScopeConfigurer,再通过该对象的addScope(String scopeName,Scope scope)方法来实现xml中的<map>标签的功能。
代码:
@Bean
public CustomScopeConfigurer customScopeConfigurer(){
CustomScopeConfigurer csc=new CustomScopeConfigurer();
csc.addScope("myScope",myScope());
return csc;
}
问题:CustomScopeConfigurer该对象没有addScope方法。
通过注解实现方法注入:(Bean的作用域为singleton,AnotherBean的作用域为prototype?)?
查看全部 -
SpringIOC注解基本使用(spring2.5后支持注解来管理javaBean)
@Configuration:该注解标识在类上,然后就可以通过AnnotationConfigApplicationContext(***.class)来获取spring上下文环境(相当于xml的功能)。
@Bean:与xml配置文件<bean>标签一个用处,<bean>标签的id相当于获得@Bean(name="Id名"),
如果不使用name,Id名为方法名称。
@Component:告知spring管理这个类,还可以通过该注解的value属性指定Bean的Id。
@Controller:被标注在Controller层。
@Service:被标注在Service层。
@Repository:被标注在Dao层
与Spring.xml相比不同点:
1、不用配置xml文件
2、提供一个配置类,并采用注解,来获取Bean
3、获取spring上下文的对象不同,注解使用AnnotationConfigApplicationContext(***.class)获取spring上下文。
步骤1:提供一个配置类,并在类上添加@Configuration注解,并提供一个返回Bean对象的方法,并在该方法上添加注解。(如果@Bean没指定name属性,则Id为方法名)
步骤2:提供一个要创建的Bean的类。
如何进行简化:当要获取多个Bean时,则要编写多个@Bean注解和获取Bean方法?
步骤1:在配置类中添加@ComponentScan(value=“扫描的路径”)注解。
@ComponentScan()注解的作用:扫描带有注解@Component的Class,Spring将管理这些Class。
步骤2:Bean的类上加注解@Component,它的Bean的Id是类名的首字母小写的全称,如果不想使用这种方式,则使用@Component(value=“Id名”)。
spring.xml中开启包扫描:<context:component-scan base-package="扫描的包路径"/>
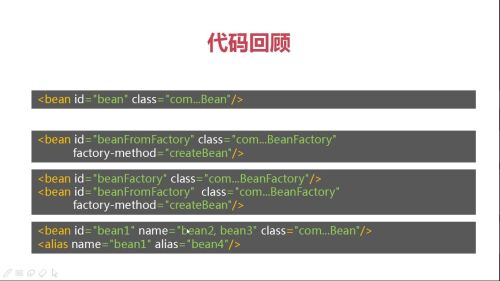
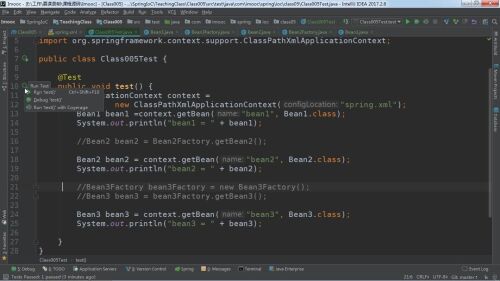
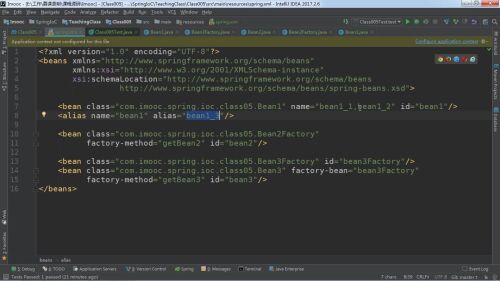
如何给Bean取别名(一个Bean对应多个Id名)?
因为Bean()注解里的name属性是String类型的数组,所以可以通过它来指定Bean的多个Id。注意:@Component里的value是字符串类型,只能有一个BeanId。
spring.xml给Bean取别名?
<bean id="bean1" name="bean2,bean3" class="..."/>
<alias name="bean1" alias="bean4"/>
查看全部 -
Bean属性继承
应用场景:
场景一:ParentClass(属性1,属性2,属性3,get和set方法)
子类1(属性4,属性5)
子类2(属性6,属性7)
场景2:子类1和子类2没有父类,而是有一些相同的属性。
类1:(属性1,属性2,属性3,属性4,属性5)
类2:(属性1,属性2,属性3,属性6,属性7)
这两个场景下,通过Spring注入类1和类2的所有属性,一般如下:
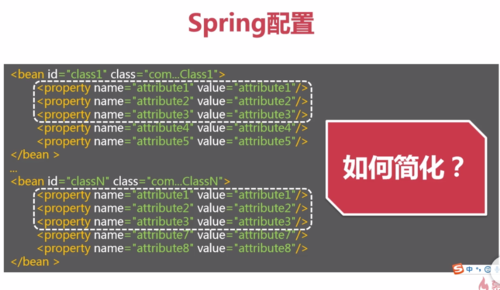
abstract="true":设置<bean>标签只是定义性的,不会对它进行实例化操作。
parent属性:在Bean的子类bean标签添加,值为父类的Id。
Spring配置代码:
<!-- 如果Class1和Class2属性1、2、3相同 -->
步骤1: <bean id="bean" class="main.java.com.Bean继承属性.ParentClass" abstract="true">
<property name="attribute1" value="attribute1"></property>
<property name="attribute2" value="attribute2"></property>
<property name="attribute3" value="attribute3"></property>
</bean>
步骤2: <bean id="bean1" class="main.java.com.Bean继承属性.Class1" parent="bean">
<property name="attribute4" value="attribute4"></property>
<property name="attribute5" value="attribute5"></property>
</bean>
<bean id="bean2" class="main.java.com.Bean继承属性.Class2" parent="bean">
<property name="attribute6" value="attribute6"></property>
<property name="attribute7" value="attribute7"></property>
</bean>
测试:
@Test
public void test(){
ApplicationContext ac=new ClassPathXmlApplicationContext("spring-extends.xml");
Class1 c1=ac.getBean("bean1", Class1.class);
Class2 c2=ac.getBean("bean2",Class2.class);
System.out.println(c1);
System.out.println(c2);
}
结果:
Class1 [attribute1=attribute1, attribute2=attribute2, attribute3=attribute3, attribute4=attribute4, attribute5=attribute5]
Class1 [attribute1=attribute1, attribute2=attribute2, attribute3=attribute3, attribute6=attribute6, attribute7=attribute7]
应用场景2:类1和类2不继承某一父类,只是存在相同属性。
spring配置:
<!-- 如果Class1和Class2属性1、2、3相同 -->
步骤1: <bean id="bean" abstract="true">
<property name="attribute1" value="attribute1"></property>
<property name="attribute2" value="attribute2"></property>
<property name="attribute3" value="attribute3"></property>
</bean>
步骤2: <bean id="bean1" class="main.java.com.Bean继承属性.Class1" parent="bean">
<property name="attribute4" value="attribute4"></property>
<property name="attribute5" value="attribute5"></property>
</bean>
<bean id="bean2" class="main.java.com.Bean继承属性.Class2" parent="bean">
<property name="attribute6" value="attribute6"></property>
<property name="attribute7" value="attribute7"></property>
</bean>
查看全部 -
Bean初始化及销毁逻辑处理(在singleton作用域上进行讲解)
Bean初始化——如果需要在Bean实例化时执行一些逻辑,Spring提供了两种方法:(有一个javaBean,该Bean作用,连接数据库,例如session,断开数据库连接,该Bean被创建之后,执行数据库连接的过程)
方法1:bean标签里的init-method属性,该值为Bean的某一方法,Spring实例化时,会调用Bean的该方法。
方法2:让Bean实现InitializingBean接口,Spring在实例化该Bean时,检测到Bean实现了该接口,就会调用该接口所定义的相应方法。
Bean销毁——如果需要在Bean销毁之前执行一些逻辑,有两种方法。
方法1:bean标签里的destory-method属性,该值为Bean的某一方法,Spring销毁该Bean时,会调用Bean的该方法。
方法2:让Bean实现DisposableBean接口,Spring在销毁该Bean时,检测到Bean实现了该接口,就会调用该接口所定义的相应方法。
案例1:通过bean标签的init-method和destory-method属性来指定Bean初始化逻辑和销毁逻辑。
代码:
public class Bean {
public void onInit(){
System.out.println("Bean的初始化逻辑方法被执行了");
}
public void onDestory(){
System.out.println("Bean的销毁逻辑方法被执行了");
}
}
测试代码:
@Test
public void test(){
ApplicationContext ac=new ClassPathXmlApplicationContext("spring-initAnddestory.xml");
Bean bean=ac.getBean("bean", Bean.class);
System.out.println(bean);
}
结果:bean的销毁方法没执行,因为当前是单例模式,所以Bean的初始化是在Spring上下文实例化完成的,Bean的销毁是在Spring上下文的销毁过程中执行Bean的销毁。(Spring上下文的销毁定义到AbstractApplicationContext中)
Bean的初始化逻辑方法被执行了
main.java.com.Bean初始化及销毁.Bean@b8a1063
spring配置:
<bean class="main.java.com.Bean初始化及销毁.Bean" id="bean" init-method="onInit" destroy-method="onDestory">
改进:
@Test
public void test(){
AbstractApplicationContext ac=new ClassPathXmlApplicationContext("spring-initAnddestory.xml");
Bean bean=ac.getBean("bean", Bean.class);
System.out.println(bean);
ac.close();
}
注意:如果所有的Bean都有相同名称的初始化方法和相同名称的销毁方法,可以在<beans default-init-method="onInit" default-destory-method="onDestory">,含义:所有的bean都有初始化方法和销毁方法。
案例2:实现相应接口,并实现相应方法
代码:
public class Bean implements InitializingBean,DisposableBean{
@Override
public void destroy() throws Exception {
System.out.println("Bean的销毁逻辑方法被执行了");
}
@Override
public void afterPropertiesSet() throws Exception {
System.out.println("Bean的初始化逻辑方法被执行了");
}
}
spring配置:
<bean class="main.java.com.Bean初始化及销毁.Bean" id="bean"></bean>
测试:
@Test
public void test(){
AbstractApplicationContext ac=new ClassPathXmlApplicationContext("spring-initAnddestory.xml");
Bean bean=ac.getBean("bean", Bean.class);
System.out.println(bean);
ac.close();
}
查看全部 -
spring通过xml实现自定义作用域(自定义双例模式作用域)
SimpleThreadScope:Spring内置作用域。
编写自定义作用域:
步骤1:实现Scope接口(org.springframework.beans.factory.config),主要关注实现的get方法和remove方法。
get方法:按照name参数,按照我们自己定义的规则,去返回一个Bean,如果我们定义的规则里,Bean不存在,那么将通过objectFactory去创建一个Bean。
双例模式:一个bean的Id对应两个实例,实现双例模式,需要两个Map集合,Map<String,Object> map1=new HashMap<String,Object>();Map<String,Object> map2=new HashMap<String,Object>();。
get方法:
public Object get(String name, ObjectFactory<?> objectFactory) {
if(!map1.containsKey(name)){ //判断map1是否包含名为name的Bean实例
Object o=objectFactory.getObject();//如果不存在则创建一个ObjectFactory规则Bean
map1.put(name, o); //并把这个Bean放入集合,并命名为name
return o;
}
if(!map2.containsKey(name)){ //map2同map1操作
Object o=objectFactory.getObject();
map2.put(name, o);
return o;
}
//如果map1和map2都包含这个Bean,也就是说Spring上下文通过Id获取有两个实例,则返回一个0或1
int i=new Random().nextInt(2);
if(i==0){
return map1.get(name);//如果是0,则返回对象1
}else{
return map2.get(name);//如果是0,则返回对象2
}
}
remove方法:和get方法相反,按照name参数,去移除一个Bean。
public Object remove(String name) {
if(map1.containsKey(name)){
Object o=map1.get(name);
map1.remove(name);
return o;
}
if(map2.containsKey(name)){
Object o=map2.get(name);
map2.remove(name);
return o;
}
return null; //说明没拿到任何实例
}
xml配置:
<bean id="myScope" class="main.java.com.自定义作用域.MyScope" >
</bean>
<bean class="org.springframework.beans.factory.config.CustomScopeConfigurer">
<property name="scopes">
<map>
<entry key="myscope" value-ref="myScope"></entry>
</map>
</property>
</bean>
测试代码:
@Test
public void testBean(){
ApplicationContext ac=new ClassPathXmlApplicationContext("spring-zidingyi.xml");
for(int i=0;i<10;i++){
Bean bean=ac.getBean(“myScope”", Bean.class);
System.out.println(bean);
}
}
Spring提供的另外一个作用域:SimpleThreadScope(同一线程,Spring上下文会分配同一实例,不同线程,则获得不同实例。
srping配置:
<bean id="myScope" class="main.java.com.自定义作用域.MyScope" ></bean>
<bean id="simpleThreadScope" class="org.springframework.context.support.SimpleThreadScope"></bean>
<bean class="org.springframework.beans.factory.config.CustomScopeConfigurer">
<property name="scopes">
<map>
<entry key="myscope" value-ref="myScope"></entry>
<entry key="simpleThreadScope" value-ref="simpleThreadScope"></entry>
</map>
</property>
</bean>
<bean id="bean11" class="main.java.com.自定义作用域.Bean" scope="simpleThreadScope"></bean>
测试代码:
public void testBean(){
final ApplicationContext ac=new ClassPathXmlApplicationContext("spring-zidingyi.xml");
for(int i=0;i<10;i++){
new Thread(new Runnable(){
@Override
public void run() {
Bean bean=ac.getBean("bean11", Bean.class);
System.out.println(bean);
}
}).start();
}
}
}
查看全部 -
IoC:控制反转
控制什么?
控制对象的创建及销毁(生命周期)
反转什么?
将对象的控制权交给Ioc容器
查看全部 -
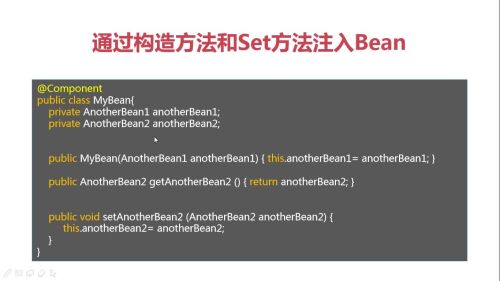
通过构造方法和set方法注入Bean
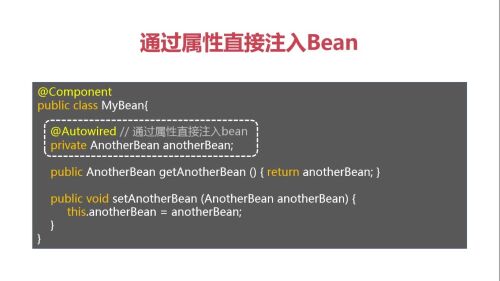
通过属性直接注入Bean
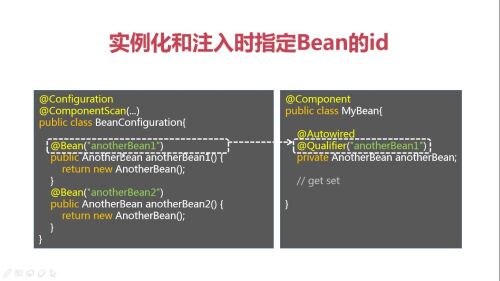
实例化和注入时指定Bean的ID
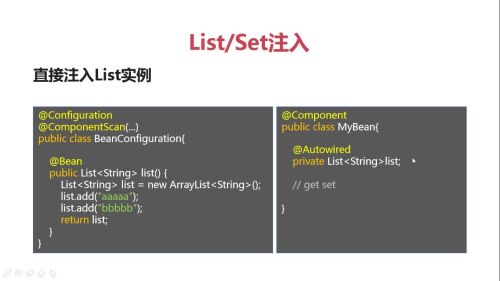
List/set注入
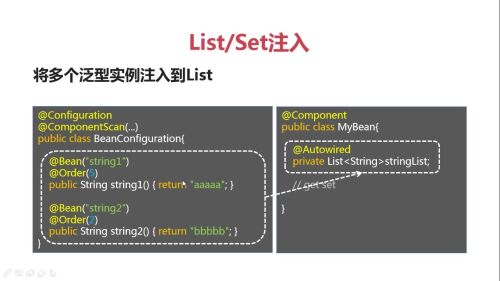
将多个泛型实例注入到List
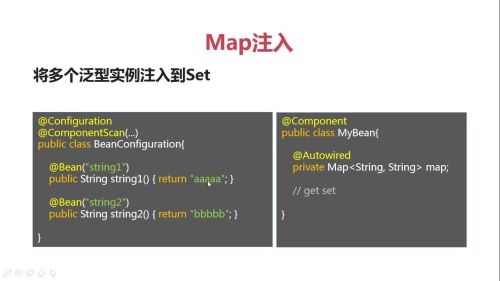
Map注入

将多个泛型实例注入到set
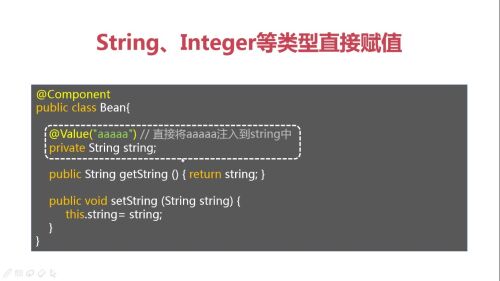
String、Integer等类型直接赋值注入
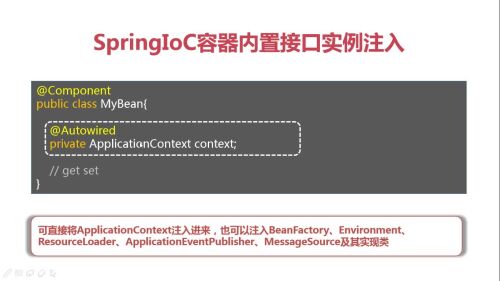
Spring IoC容器内置接口实例注入
 查看全部
查看全部 -
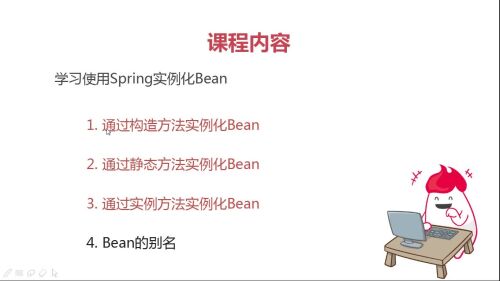
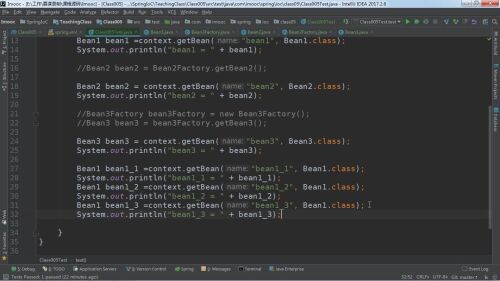
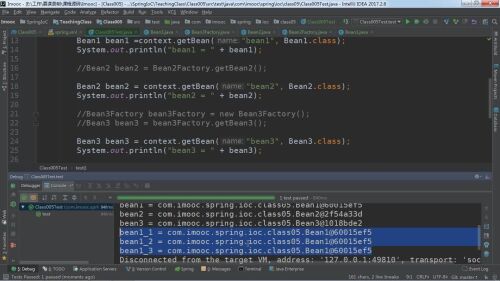
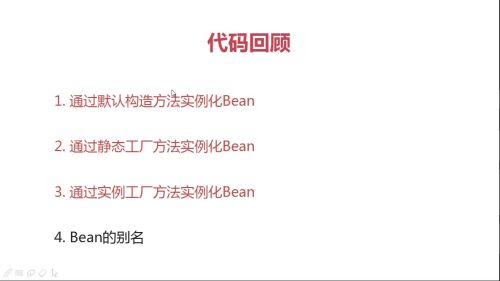
使用spring实例化bean
通过构造方法
静态方法
实例方法
bean的别名
 查看全部
查看全部 -
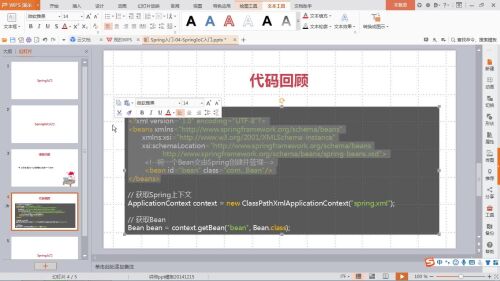
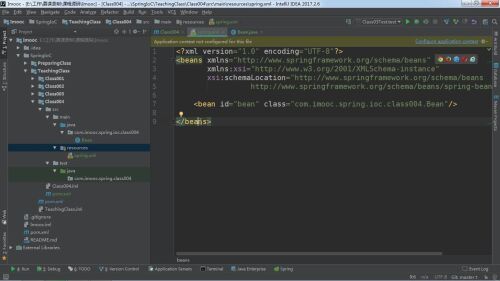
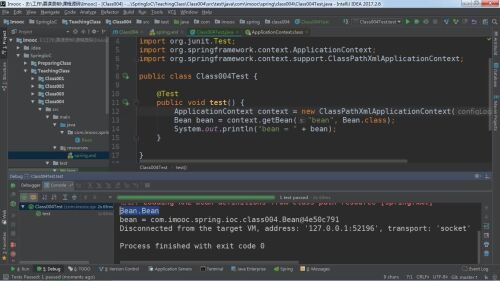
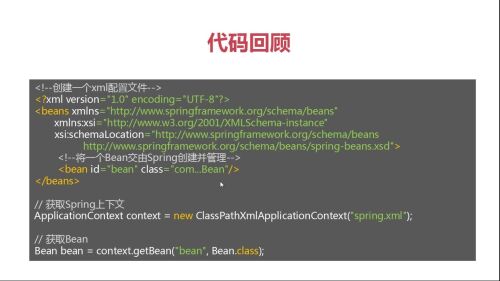
spring ioc
创建一个xml配置文件
获取spring上下文
获取bean
查看全部 -
约定:
所有的bean的生命周期交给ioc容器管理
被依赖的bean通过构造方法注入
被依赖的bean需要优先创建
查看全部 -
ioc
控制: 控制对象的创建及销毁
反转:将对象的创建权交给IOC容器
查看全部 -
查看全部
-
1-4 Spring IoC入门
 查看全部
查看全部


举报