


 马超老师 ·
悬浮窗:PopupWindow
Android 提供了很多种消息弹窗,其中用的最多的是上一节讲到的 AlertDialog,当然如果需要定制自己的对话框风格或者某些场景下 AlertDialog 无法满足你的需求时,就可以考虑用 PopupWindow 悬浮窗了。很多初学者容易把 AlertDialog 和 PopupWindow 搞混淆,在你看完这两节内容之后就能够彻底明白两者的不同使用场景了。
1. PopupWindow 的特性
为了对比它与 AlertDialog 的差异,特此贴上 Google 官方文档的描述:
This class represents a popup window that can be used to display an arbitrary view. The popup window is a floating container that appears on top of the current activity.
用人话翻译一下:
PopupWindow 是一个可以用来展示任意 View 的弹窗,并且它可以在当前正在运行的 Activity 之上的任意位置悬浮。
从上面我们可以提取出三点信息:
- 悬浮在当前运行的 Activity 之上(这一点和 AlertDialog 类似)
- 可以通过编写 View 布局,自定义弹窗的样式(AlertDialog 也可以实现,不过通常我们不这么用)
- 可以悬浮在任意位置
其中第一点和 AlertDialog 一样,但是第二第三点需要注意,AlertDialog 通常有固定的样式,并且默认在屏幕中央,当我们需要自定义样式或者设置弹窗位置的时候,PopupWindow 就可以非常轻松的帮助我们实现。
注意, 虽然 AlertDialog 也可以实现修改样式和展示位置,但相对来讲 AlertDialog 更偏向于一个提醒弹窗,很多时候我们不需要去定制样式或者修改展示位置,并且从代码上来讲 PopupWindow 做定制化更加简单方便。
2. PopupWindow 的常用 API
- setContentView(View contentView):
设置 PopupWindow 上显示的 View - getContentView():
获得 PopupWindow 上显示的 View - showAsDropDown(View anchor):
在控件 anchor 的正左下方展示 - showAsDropDown(View anchor, int xoff, int yoff):
在控件 anchor 的正左下方位置,横向偏移 xoff、纵向偏移 yoff 展示 - **showAtLocation(View parent, int gravity, int x, int y): **
设置在父控件重心位置,横向偏移 x,纵向偏移 y 处展示。这里的 gravity 和 Layout 里面的 gravity 类似,可以设置成Gravity.TOP或者Gravity.RIGHT等 - setWidth:
设置弹窗的宽度,和 View 设置宽度一样,支持直接写具体数值,也可以用WRAP_CONTENT或者MATCH_PARENT - setHeight::
设置弹窗的高度,使用方法和setWidth一样,这两个参数也可以通过 PopupWindow 的构造器设置 - setAnimationStyle(int):
设置弹窗的动画特效 - setOutsideTouchable(boolean touchable):
设置 PopupWindow 之外的区域是否可点击,通常点击弹窗外的区域会让弹窗消失 - setBackgroundDrawable(Drawable background):
设置弹窗的背景资源,可以传入一个 Drawable 资源
注意: 这几个方法都比较好理解,其中需要注意的是最后两个:setOutsideTouchable、setBackgroundDrawable。从字面上理解,setOutsideTouchable就是控制是否在点击弹窗区域以外时关闭弹窗,但实际上它的生效需要配合setBackgroundDrawable使用,简而言之就是需要同时使用这两个方法才能实现点击外围区域关闭弹窗,代码如下:
    // 设置点击弹窗以外区域关闭弹窗
    popWindow.setBackgroundDrawable(new BitmapDrawable());
    popWindow.setOutsideTouchable(true)
两句代码缺一不可,具体原因可以参考 PopupWindow 源代码中preparePopup()方法的实现。
3. PopupWindow 的使用方法
PopupWindow 的使用比较简单,基本遵循以下步骤:
- 获取用于 PopupWindow 弹窗的 View;
- 创建 PopupWindow 实例,在构造器中传入 View 及宽高;
- 通过第 2 小节的方法设置 PopupWindow 的各种参数;
- 确定 PopupWindow 的位置并展示。
接下来我们就通过以上步骤完成一个简单的 PopupWindow 弹窗。
3.1 编写布局文件
由于 PopupWindow 需要设置一个 View 样式,所以除了 Activity 之外还要给 PopupWindow 增加一个布局。
3.1.1 Activity 的布局
布局文件非常简单,甚至可以沿用上一节 AlertDialog 的布局,只需要在屏幕中央放置一个 Button 用于触发 PopupWindow 即可,如下:
<?xml version="1.0" encoding="utf-8"?>
<LinearLayout xmlns:android="http://schemas.android.com/apk/res/android"
    android:layout_width="match_parent"
    android:layout_height="match_parent"
    android:gravity="center"
    android:padding="10dp" >

    <Button
        android:id="@+id/show"
        android:layout_width="wrap_content"
        android:layout_height="wrap_content"
        android:text="弹出一个PopupWindow" />

</LinearLayout>
3.1.2 PopupWindow 的布局
PopupWindow 的布局大家可以根据自己的需求任意定义,没有什么特别的要求,也体现了 PopupWindow 的灵活性,这里就放置一个 TextView 和一个 Button 用于关闭,如下:
<?xml version="1.0" encoding="utf-8"?>
<LinearLayout xmlns:android="http://schemas.android.com/apk/res/android"
    android:orientation="vertical" android:layout_width="match_parent"
    android:layout_height="match_parent"
    android:gravity="center"
    android:background="#000"
    android:padding="10dp">
    <TextView
        android:textSize="20sp"
        android:layout_width="wrap_content"
        android:layout_height="wrap_content"
        android:text="底部弹出的PopupWindow"
        android:textColor="@android:color/holo_red_dark"/>
    <Button
        android:layout_width="wrap_content"
        android:layout_height="wrap_content"
        android:text="关闭"
        android:id="@+id/close"/>
</LinearLayout>
3.2 编写 MainActivity
我们为布局中的 Button 增加点击监听器,在回调接口里通过以上步骤创建一个 PopupWindow 并弹出:
package com.emercy.myapplication;

import android.app.Activity;
import android.content.Context;
import android.os.Bundle;
import android.view.Gravity;
import android.view.LayoutInflater;
import android.view.View;
import android.view.ViewGroup.LayoutParams;
import android.widget.Button;
import android.widget.PopupWindow;

public class MainActivity extends Activity {

	@Override
	protected void onCreate(Bundle savedInstanceState) {
		super.onCreate(savedInstanceState);
		setContentView(R.layout.activity_main);

		Button showPopupBtn = (Button) findViewById(R.id.show);

		showPopupBtn.setOnClickListener(new View.OnClickListener() {
			@Override
			public void onClick(View v) {
				// 1、获取用于 PopupWindow 的弹窗view
				LayoutInflater layoutInflater = (LayoutInflater) getSystemService(Context.LAYOUT_INFLATER_SERVICE);
				View customView = layoutInflater.inflate(R.layout.notification, null);
				View layout = layoutInflater.inflate(R.layout.activity_main, null);

				// 2、创建 PopupWindow 实例,传入 View 及宽高
				final PopupWindow popupWindow = new PopupWindow(customView, LayoutParams.WRAP_CONTENT, LayoutParams.WRAP_CONTENT);

				// 3、展示
				popupWindow.showAtLocation(layout, Gravity.BOTTOM, 0, 0);

				customView.findViewById(R.id.close).setOnClickListener(new View.OnClickListener() {
					@Override
					public void onClick(View v) {
						popupWindow.dismiss();
					}
				});
			}
		});
	}
}
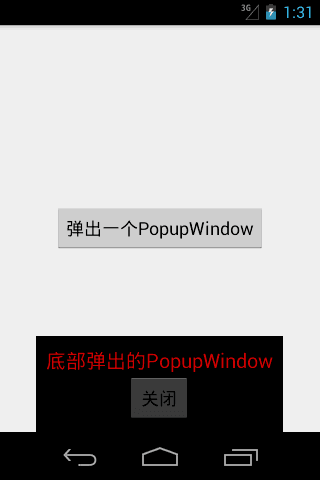
点击“弹出一个PopupWindow”,就可以在底部弹出悬浮框了,点击“关闭”即可关闭悬浮框:
4. 小结
本节讲了一个和 AlertDialog 非常类似的控件,他们都可以在当前的 Activity 上弹出一个提示框。不同的是 PopupWindow 可以更轻松的设置自定义样式以及弹出的位置,另外如果希望在点击弹窗之外的区域的时候能够关闭弹窗,需要同时设置setOutsideTouchable和setBackgroundDrawable两个属性,最后PopupWindow 的具体用法可以参考第 3 小节的使用步骤。到这里整个提示类控件就告一段落了,关于这几个提示类控件的用法其实大同小异,都比较简单,主要需要大家理解的是它们不同的功能特点及业务场景,今后在实际工作中能够运用的得体,让 App 更好的为用户服务。

 2026 imooc.com All Rights Reserved |