图像加载的方式:
Android开发中消耗内存较多一般都是在图像上面,本文就主要介绍怎样正确的展现图像减少对内存的开销,有效的避免oom现象。首先我们知道我的获取图像的来源一般有三种源头:1.从网络加载2.从文件读取3.从资源文件加载
针对这三种情况我们一般使用BitmapFactory的:decodeStream,decodeFile,decodeResource,这三个函数来获取到bitmap然后再调用ImageView的setImageBitmap函数进行展现。
我们的内存去哪里了(为什么被消耗了这么多):
其实我们的内存就是去bitmap里了,BitmapFactory的每个decode函数都会生成一个bitmap对象,用于存放解码后的图像,然后返回该引用。如果图像数据较大就会造成bitmap对象申请的内存较多,如果图像过多就会造成内存不够用自然就会出现out of memory的现象。
怎样才是正确的加载图像:
我们知道我们的手机屏幕有着一定的分辨率(如:840*480),图像也有自己的像素(如高清图片:1080*720)。如果将一张840*480的图片加载铺满840*480的屏幕上这就是最合适的了,此时显示效果最好。如果将一张1080*720的图像放到840*480的屏幕并不会得到更好的显示效果(和840*480的图像显示效果是一致的),反而会浪费更多的内存。
我们一般的做法是将一张网络获取的照片或拍摄的照片放到一个一定大小的控件上面进行展现。这里就以nexus 5x手机拍摄的照片为例说明,其摄像头的像素为1300万(拍摄图像的分辨率为4032×3024),而屏幕的分辨率为1920x1080。其摄像头的分辨率要比屏幕的分辨率大得多,如果不对图像进行处理就直接显示在屏幕上,就会浪费掉非常多的内存(如果内存不够用直接就oom了),而且并没有达到更好的显示效果。
为了减少内存的开销,我们在加载图像时就应该参照控件(如:263pixel*263pixel)的宽高像素来获取合适大小的bitmap。
下面就一边看代码一边讲解:
?
01 02 03 04 05 06 07 08 09 10 11 12 13 14 15 16 17 | public static Bitmap getFitSampleBitmap(String file_path, int width, int height) {
BitmapFactory.Options options = new BitmapFactory.Options();
options.inJustDecodeBounds = true;
BitmapFactory.decodeFile(file_path, options);
options.inSampleSize = getFitInSampleSize(width, height, options);
options.inJustDecodeBounds = false;
return BitmapFactory.decodeFile(file_path, options);
}
public static int getFitInSampleSize(int reqWidth, int reqHeight, BitmapFactory.Options options) {
int inSampleSize = 1;
if (options.outWidth > reqWidth || options.outHeight > reqHeight) {
int widthRatio = Math.round((float) options.outWidth / (float) reqWidth);
int heightRatio = Math.round((float) options.outHeight / (float) reqHeight);
inSampleSize = Math.min(widthRatio, heightRatio);
}
return inSampleSize;
}
|
BitmapFactory提供了BitmapFactory.Option,用于设置图像相关的参数,在调用decode的时候我们可以将其传入来对图像进行相关设置。这里我们主要介绍option里的两个成员:inJustDecodeBounds(Boolean类型) 和inSampleSize(int类型)。
inJustDecodeBounds :如果设置为true则表示decode函数不会生成bitmap对象,仅是将图像相关的参数填充到option对象里,这样我们就可以在不生成bitmap而获取到图像的相关参数了。
inSampleSize:表示对图像像素的缩放比例。假设值为2,表示decode后的图像的像素为原图像的1/2。在上面的代码里我们封装了个简单的getFitInSampleSize函数(将传入的option.outWidth和option.outHeight与控件的width和height对应相除再取其中较小的值)来获取一个适当的inSampleSize。
在设置了option的inSampleSize后我们将inJustDecodeBounds设置为false再次调用decode函数时就能生成bitmap了。
同理我们编写decodeResource的重载函数
?
1 2 3 4 5 6 7 8 | public static Bitmap getFitSampleBitmap(Resources resources, int resId, int width, int height) {
BitmapFactory.Options options = new BitmapFactory.Options();
options.inJustDecodeBounds = true;
BitmapFactory.decodeResource(resources, resId, options);
options.inSampleSize = getFitInSampleSize(width, height, options);
options.inJustDecodeBounds = false;
return BitmapFactory.decodeResource(resources, resId, options);
}
|
这里需要注意的是如果我们decodeFile解析的文件是外部存储里的文件,我们需要在Manifists加上文件的读写权限,不然获取的bitmap会为null.
?
1 2 | <uses-permission android:name="android.permission.READ_EXTERNAL_STORAGE"/>
<uses-permission android:name="android.permission.WRITE_EXTERNAL_STORAGE" />
|
然后是decodeStream的相关重载:
?
01 02 03 04 05 06 07 08 09 10 11 12 13 14 15 16 17 18 19 20 21 22 23 24 25 26 | public static Bitmap getFitSampleBitmap(InputStream inputStream, int width, int height) throws Exception {
BitmapFactory.Options options = new BitmapFactory.Options();
options.inJustDecodeBounds = true;
byte[] bytes = readStream(inputStream);
//BitmapFactory.decodeStream(inputStream, null, options);
BitmapFactory.decodeByteArray(bytes, 0, bytes.length, options);
options.inSampleSize = getFitInSampleSize(width, height, options);
options.inJustDecodeBounds = false;
// return BitmapFactory.decodeStream(inputStream, null, options);
return BitmapFactory.decodeByteArray(bytes, 0, bytes.length, options);
}
/*
* 从inputStream中获取字节流 数组大小
* */
public static byte[] readStream(InputStream inStream) throws Exception {
ByteArrayOutputStream outStream = new ByteArrayOutputStream();
byte[] buffer = new byte[1024];
int len = 0;
while ((len = inStream.read(buffer)) != -1) {
outStream.write(buffer, 0, len);
}
outStream.close();
inStream.close();
return outStream.toByteArray();
}
|
我们发现在处理stream的时候我们并不是同之前一样通过调用两次decodeStream函数来进行设置的,而是将stream转化成byte[],然后在两次调用decodeByteArray。其原因是:如果我们两次调用按照两次调用decodeStream的方式,会发现我们得到到bitmap为null
内存对比
这样我们加载相关代码就完成了,最后我们通过一个demo来对比下正确加载图像和不处理的加载图像时的内存消耗吧,这里我们就写一个手机拍摄头像的程序吧。
还是一样一边看代码一边讲解吧:
?
01 02 03 04 05 06 07 08 09 10 11 12 13 14 15 16 17 18 19 20 21 22 23 24 25 26 27 28 29 | <?xml version="1.0" encoding="utf-8"?>
<LinearLayout xmlns:android="http://schemas.android.com/apk/res/android"
xmlns:app="http://schemas.android.com/apk/res-auto"
xmlns:tools="http://schemas.android.com/tools"
android:layout_width="match_parent"
android:layout_height="match_parent"
android:orientation="vertical"
android:gravity="center_horizontal"
tools:context=".Activity.MainActivity">
<android.support.v7.widget.Toolbar
android:id="@+id/toolbar"
android:layout_width="match_parent"
android:layout_height="?attr/actionBarSize"
android:background="?attr/colorPrimary"
app:popupTheme="@style/AppTheme.PopupOverlay" />
<ImageView
android:layout_margin="32dp"
android:id="@+id/img_preview"
android:layout_width="100dp"
android:layout_height="100dp"
android:class="lazyload" src="data:image/png;base64,iVBORw0KGgoAAAANSUhEUgAAAAEAAAABCAYAAAAfFcSJAAAAAXNSR0IArs4c6QAAAARnQU1BAACxjwv8YQUAAAAJcEhZcwAADsQAAA7EAZUrDhsAAAANSURBVBhXYzh8+PB/AAffA0nNPuCLAAAAAElFTkSuQmCC" data-original="@drawable/res_photo"
/>
<Button
android:id="@+id/btn_take_photo"
android:layout_width="wrap_content"
android:layout_height="wrap_content"
android:text="TAKE PHOTO"/>
</LinearLayout>
|
界面很简单:就是一个用拍照的Button和一个用于显示头像的ImageView,其中ImageView大小为100dp*100dp.
java代码:
?
01 02 03 04 05 06 07 08 09 10 11 12 13 14 15 16 17 18 19 20 21 22 23 24 25 26 27 28 29 30 31 32 33 34 35 36 37 38 39 40 41 42 43 44 45 46 47 48 49 50 51 52 53 54 55 56 57 58 59 60 61 62 63 64 65 66 67 68 69 70 71 72 73 | public class MainActivity extends AppCompatActivity implements View.OnClickListener {
private Button mTakePhoneButton;
private ImageView mPreviewImageView;
public static final int TAKE_PHOTO = 0;
private String photoPath = Environment.getExternalStorageDirectory() + "/outout_img.jpg";
private Uri imageUri;
@Override
protected void onCreate(Bundle savedInstanceState) {
super.onCreate(savedInstanceState);
setContentView(R.layout.activity_main);
Toolbar toolbar = (Toolbar) findViewById(R.id.toolbar);
setSupportActionBar(toolbar);
init();
mTakePhoneButton.setOnClickListener(this);
}
private void init() {
mTakePhoneButton = (Button) findViewById(R.id.btn_take_photo);
mPreviewImageView = (ImageView) findViewById(R.id.img_preview);
}
@Override
public void onClick(View v) {
switch (v.getId()) {
case R.id.btn_take_photo:
File file = new File(photoPath);
try {
if (file.exists()) {
file.delete();
}
file.createNewFile();
} catch (IOException e) {
e.printStackTrace();
}
imageUri = Uri.fromFile(file);
Intent intent = new Intent(MediaStore.ACTION_IMAGE_CAPTURE);
intent.putExtra(MediaStore.EXTRA_OUTPUT, imageUri);
startActivityForResult(intent, TAKE_PHOTO);
break;
}
}
@Override
protected void onActivityResult(int requestCode, int resultCode, Intent data) {
switch (requestCode) {
case TAKE_PHOTO:
if (resultCode == RESULT_OK) {
if (ContextCompat.checkSelfPermission(this, Manifest.permission.WRITE_EXTERNAL_STORAGE)
!= PackageManager.PERMISSION_GRANTED) {
//申请WRITE_EXTERNAL_STORAGE权限
ActivityCompat.requestPermissions(this, new String[]{Manifest.permission.WRITE_EXTERNAL_STORAGE},
0);
}
Bitmap bitmap = null;
int requestWidth = mPreviewImageView.getWidth();
int requestHeight = mPreviewImageView.getHeight();
//不处理直接加载
// bitmap = BitmapFactory.decodeFile(photoPath);
//缩放后加载:从file中加载
bitmap = BitmapUtils.getFitSampleBitmap(photoPath,
requestWidth, requestHeight);
mPreviewImageView.setImageBitmap(bitmap);
}
break;
}
}
}
|
这里简单的实现了一个调用相机的功能,点击button调用系统自带相机,然后再onActivityResult里加载拍摄的照片。
这里我们重点关注加载照片的部分:
?
01 02 03 04 05 06 07 08 09 10 | Bitmap bitmap = null;
int requestWidth = mPreviewImageView.getWidth();
int requestHeight = mPreviewImageView.getHeight();
//不处理直接加载
// bitmap = BitmapFactory.decodeFile(photoPath);
//缩放后加载:从file中加载
bitmap = BitmapUtils.getFitSampleBitmap(photoPath,
requestWidth, requestHeight);
mPreviewImageView.setImageBitmap(bitmap);
|
这里提供了两种加载照片的方式:1.不做任何处理直接加载。2.就是调用我们之前写的代码缩放后加载(这里的BitmapUtils就是将之前的代码封装成的一个工具类)。
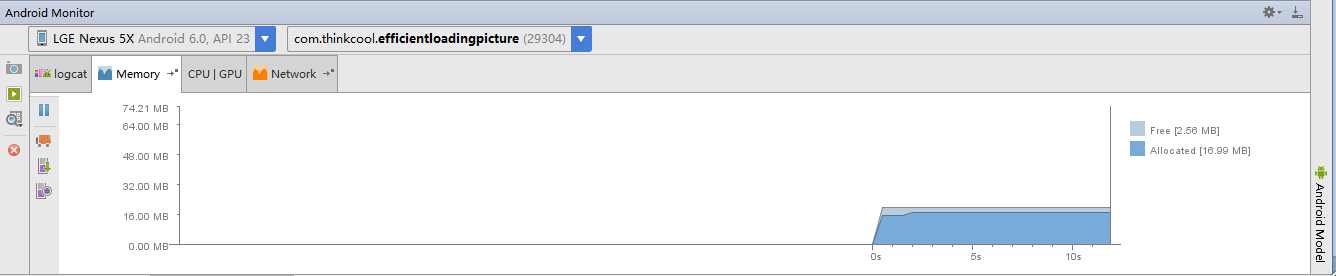
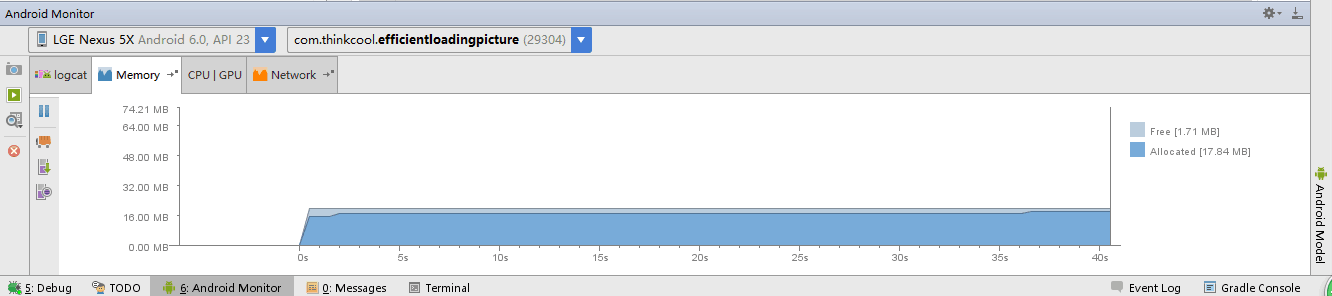
最后我们看看在两种方式下分别的内存消耗对比图吧:
调用BitmapUtils加载的:
没拍摄照片前:

拍摄照片后:
直接加载的方式:
没拍摄照片前:
拍摄照片后:
相信看到内存对比图后也不用我再多说什么了吧,最后将所有代码上传至GitHub:包含了所有加载函数,还有拍摄相机的demo,其中github里的代码比文章里的要多一些,里面还分别测试了从stream里和rersouces里加载图片ps:对于不同手机运行直接加载图像方式的时候可能会不能正在运行,直接就oom了。
原文链接:http://www.apkbus.com/blog-705730-60771.html