一、功能描述
网关重点功能之一鉴权,需要实现对不同的客户端进行授权访问,禁止访问未经授权的路由地址,且需要对无权访问的请求,返回通用的格式。
比如网关有1-10个可用路由,客户端A只能访问1-5,客户端B只能访问6-10,这时我们就无法通过Ocelot配置授权来进行自定义认证,这块就需要我们增加自定义的认证管道来实现功能,尽量不影响网关已有的功能。
下面我们就该功能如何实现展开讲解,希望大家先理解下功能需求,然后在延伸到具体实现。
二、数据库设计
我在第三章 网关篇-数据库存储配置(1)中讲解了我们网关配置信息设计,本篇将在那个基础上增加客户端认证需要用到的表的相关设计,设计客户端授权结构如下。其中客户端使用的IdentityServer4客户端表结构。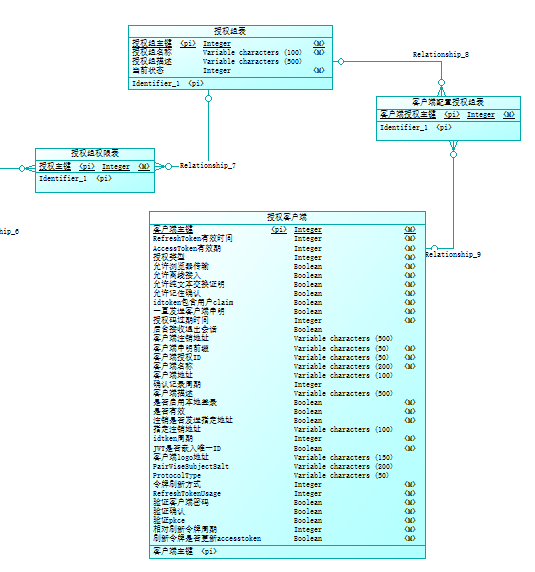
设计好概念模型后,我们生成物理模型,然后生成数据库脚本。
设计思想为可以添加自定义的授权组,为每一个授权分配能够访问的路由,然后为网关授权的客户端分配一个或多个授权组,每次客户端请求时,如果路由设置了授权访问,就校验客户端是否存在路由访问权限,如果无访问权限,直接返回401未授权提醒。
感觉是不是很简单呢?有了这个自定义的客户端认证,那么我们后端服务可以专注于自己的业务逻辑而无需再过多了进行权限处理了。
三、功能实现
1、功能开启配置
网关应该支持自定义客户端授权中间件是否启用,因为一些小型项目是不需要对每个客户端进行单独授权的,中型和大型项目才有可能遇到自定义配置情况,所以我们需要在配置文件增加配置选项。在AhphOcelotConfiguration.cs配置类中增加属性,默认不开启,而且需要知道客户端标识名称。
/// <summary>/// 金焰的世界/// 2018-11-15/// 是否启用客户端授权,默认不开启/// </summary>public bool ClientAuthorization { get; set; } = false;/// <summary>/// 金焰的世界/// 2018-11-15/// 客户端授权缓存时间,默认30分钟/// </summary>public int ClientAuthorizationCacheTime { get; set; } = 1800;/// <summary>/// 金焰的世界/// 2018-11-15/// 客户端标识,默认 client_id/// </summary>public string ClientKey { get; set; } = "client_id";那我们如何把自定义的授权增加到网关流程里呢?这块我们就需要订制自己的授权中间件。
2、实现客户端授权中间件
首先我们定义一个自定义授权中间件AhphAuthenticationMiddleware,需要继承OcelotMiddleware,然后我们要实现Invoke方法,详细代码如下。
using Ctr.AhphOcelot.Configuration;using Microsoft.AspNetCore.Http;using Ocelot.Configuration;using Ocelot.Logging;using Ocelot.Middleware;using System;using System.Collections.Generic;using System.Linq;using System.Net;using System.Text;using System.Threading.Tasks;namespace Ctr.AhphOcelot.Authentication.Middleware{    /// <summary>
    /// 金焰的世界
    /// 2018-11-15
    /// 自定义授权中间件
    /// </summary>
    public class AhphAuthenticationMiddleware : OcelotMiddleware
    {        private readonly OcelotRequestDelegate _next;        private readonly AhphOcelotConfiguration _options;        private readonly IAhphAuthenticationProcessor _ahphAuthenticationProcessor;        public AhphAuthenticationMiddleware(OcelotRequestDelegate next,
            IOcelotLoggerFactory loggerFactory,
            IAhphAuthenticationProcessor ahphAuthenticationProcessor,
            AhphOcelotConfiguration options)
            : base(loggerFactory.CreateLogger<AhphAuthenticationMiddleware>())        {
            _next = next;
            _ahphAuthenticationProcessor = ahphAuthenticationProcessor;
            _options = options;
        }        public async Task Invoke(DownstreamContext context)        {            if (!context.IsError && context.HttpContext.Request.Method.ToUpper() != "OPTIONS" && IsAuthenticatedRoute(context.DownstreamReRoute))
            {                if (!_options.ClientAuthorization)
                {
                    Logger.LogInformation($"未启用客户端授权管道");                    await _next.Invoke(context);
                }                else
                {
                    Logger.LogInformation($"{context.HttpContext.Request.Path} 是认证路由. {MiddlewareName} 开始校验授权信息");                    #region 提取客户端ID
                    var clientId = "client_cjy";                    var path = context.DownstreamReRoute.UpstreamPathTemplate.OriginalValue; //路由地址
                    var clientClaim = context.HttpContext.User.Claims.FirstOrDefault(p => p.Type == _options.ClientKey);                    if (!string.IsNullOrEmpty(clientClaim?.Value))
                    {//从Claims中提取客户端id
                        clientId = clientClaim?.Value;
                    }                    #endregion
                    if (await _ahphAuthenticationProcessor.CheckClientAuthenticationAsync(clientId, path))
                    {                        await _next.Invoke(context);
                    }                    else
                    {//未授权直接返回错误
                        var errResult = new ErrorResult() { errcode=401, errmsg= "请求地址未授权" };                        var message = errResult.ToJson();
                        context.HttpContext.Response.StatusCode = (int)HttpStatusCode.OK;                        await context.HttpContext.Response.WriteAsync(message);                        return;
                    }
                }
            }            else
            {                await _next.Invoke(context);
            }

        }        private static bool IsAuthenticatedRoute(DownstreamReRoute reRoute)        {            return reRoute.IsAuthenticated;
        }
    }
}有了这个中间件,那么如何添加到Ocelot的管道里呢?这里就需要查看Ocelot源代码了,看是如何实现管道调用的,OcelotMiddlewareExtensions实现管道部分如下,BuildOcelotPipeline里具体的流程。其实我在之前的Ocelot源码解读里也讲解过原理了,奈斯,既然找到了,那么我们就加入我们自定义的授权中间件即可。
public static async Task<IApplicationBuilder> UseOcelot(this IApplicationBuilder builder, OcelotPipelineConfiguration pipelineConfiguration){    var configuration = await CreateConfiguration(builder);

    ConfigureDiagnosticListener(builder);    return CreateOcelotPipeline(builder, pipelineConfiguration);
}private static IApplicationBuilder CreateOcelotPipeline(IApplicationBuilder builder, OcelotPipelineConfiguration pipelineConfiguration){    var pipelineBuilder = new OcelotPipelineBuilder(builder.ApplicationServices);

    pipelineBuilder.BuildOcelotPipeline(pipelineConfiguration);    var firstDelegate = pipelineBuilder.Build();    /*
            inject first delegate into first piece of asp.net middleware..maybe not like this
            then because we are updating the http context in ocelot it comes out correct for
            rest of asp.net..
            */

    builder.Properties["analysis.NextMiddlewareName"] = "TransitionToOcelotMiddleware";

    builder.Use(async (context, task) =>
                {                    var downstreamContext = new DownstreamContext(context);                    await firstDelegate.Invoke(downstreamContext);
                });    return builder;
}添加使用自定义授权中间件扩展AhphAuthenticationMiddlewareExtensions,代码如下。
using Ocelot.Middleware.Pipeline;using System;using System.Collections.Generic;using System.Text;namespace Ctr.AhphOcelot.Authentication.Middleware{    /// <summary>
    /// 金焰的世界
    /// 2018-11-15
    /// 使用自定义授权中间件
    /// </summary>
    public static class AhphAuthenticationMiddlewareExtensions
    {        public static IOcelotPipelineBuilder UseAhphAuthenticationMiddleware(this IOcelotPipelineBuilder builder)        {            return builder.UseMiddleware<AhphAuthenticationMiddleware>();
        }
    }
}有了这个中间件扩展后,我们就在管道的合适地方加入我们自定义的中间件。我们添加我们自定义的管道扩展OcelotPipelineExtensions,然后把自定义授权中间件加入到认证之后。
using System;using System.Threading.Tasks;using Ctr.AhphOcelot.Authentication.Middleware;using Ocelot.Authentication.Middleware;using Ocelot.Authorisation.Middleware;using Ocelot.Cache.Middleware;using Ocelot.Claims.Middleware;using Ocelot.DownstreamRouteFinder.Middleware;using Ocelot.DownstreamUrlCreator.Middleware;using Ocelot.Errors.Middleware;using Ocelot.Headers.Middleware;using Ocelot.LoadBalancer.Middleware;using Ocelot.Middleware;using Ocelot.Middleware.Pipeline;using Ocelot.QueryStrings.Middleware;using Ocelot.RateLimit.Middleware;using Ocelot.Request.Middleware;using Ocelot.Requester.Middleware;using Ocelot.RequestId.Middleware;using Ocelot.Responder.Middleware;using Ocelot.WebSockets.Middleware;namespace Ctr.AhphOcelot.Middleware{    /// <summary>
    /// 金焰的世界
    /// 2018-11-15
    /// 网关管道扩展
    /// </summary>
    public static class OcelotPipelineExtensions
    {        public static OcelotRequestDelegate BuildAhphOcelotPipeline(this IOcelotPipelineBuilder builder,
            OcelotPipelineConfiguration pipelineConfiguration)        {            // This is registered to catch any global exceptions that are not handled
            // It also sets the Request Id if anything is set globally
            builder.UseExceptionHandlerMiddleware();            // If the request is for websockets upgrade we fork into a different pipeline
            builder.MapWhen(context => context.HttpContext.WebSockets.IsWebSocketRequest,
                app =>
                {
                    app.UseDownstreamRouteFinderMiddleware();
                    app.UseDownstreamRequestInitialiser();
                    app.UseLoadBalancingMiddleware();
                    app.UseDownstreamUrlCreatorMiddleware();
                    app.UseWebSocketsProxyMiddleware();
                });            // Allow the user to respond with absolutely anything they want.
            builder.UseIfNotNull(pipelineConfiguration.PreErrorResponderMiddleware);            // This is registered first so it can catch any errors and issue an appropriate response
            builder.UseResponderMiddleware();            // Then we get the downstream route information
            builder.UseDownstreamRouteFinderMiddleware();            //Expand other branch pipes
            if (pipelineConfiguration.MapWhenOcelotPipeline != null)
            {                foreach (var pipeline in pipelineConfiguration.MapWhenOcelotPipeline)
                {
                    builder.MapWhen(pipeline);
                }
            }            // Now we have the ds route we can transform headers and stuff?
            builder.UseHttpHeadersTransformationMiddleware();            // Initialises downstream request
            builder.UseDownstreamRequestInitialiser();            // We check whether the request is ratelimit, and if there is no continue processing
            builder.UseRateLimiting();            // This adds or updates the request id (initally we try and set this based on global config in the error handling middleware)
            // If anything was set at global level and we have a different setting at re route level the global stuff will be overwritten
            // This means you can get a scenario where you have a different request id from the first piece of middleware to the request id middleware.
            builder.UseRequestIdMiddleware();            // Allow pre authentication logic. The idea being people might want to run something custom before what is built in.
            builder.UseIfNotNull(pipelineConfiguration.PreAuthenticationMiddleware);            // Now we know where the client is going to go we can authenticate them.
            // We allow the ocelot middleware to be overriden by whatever the
            // user wants
            if (pipelineConfiguration.AuthenticationMiddleware == null)
            {
                builder.UseAuthenticationMiddleware();
            }            else
            {
                builder.Use(pipelineConfiguration.AuthenticationMiddleware);
            }            //添加自定义授权中间 2018-11-15 金焰的世界
            builder.UseAhphAuthenticationMiddleware();            // Allow pre authorisation logic. The idea being people might want to run something custom before what is built in.
            builder.UseIfNotNull(pipelineConfiguration.PreAuthorisationMiddleware);            // Now we have authenticated and done any claims transformation we
            // can authorise the request
            // We allow the ocelot middleware to be overriden by whatever the
            // user wants
            if (pipelineConfiguration.AuthorisationMiddleware == null)
            {
                builder.UseAuthorisationMiddleware();
            }            else
            {
                builder.Use(pipelineConfiguration.AuthorisationMiddleware);
            }            // Allow the user to implement their own query string manipulation logic
            builder.UseIfNotNull(pipelineConfiguration.PreQueryStringBuilderMiddleware);            // Get the load balancer for this request
            builder.UseLoadBalancingMiddleware();            // This takes the downstream route we retrieved earlier and replaces any placeholders with the variables that should be used
            builder.UseDownstreamUrlCreatorMiddleware();            // Not sure if this is the best place for this but we use the downstream url
            // as the basis for our cache key.
            builder.UseOutputCacheMiddleware();            //We fire off the request and set the response on the scoped data repo
            builder.UseHttpRequesterMiddleware();            return builder.Build();
        }        private static void UseIfNotNull(this IOcelotPipelineBuilder builder,
            Func<DownstreamContext, Func<Task>, Task> middleware)        {            if (middleware != null)
            {
                builder.Use(middleware);
            }
        }
    }
}
有了这个自定义的管道扩展后,我们需要应用到网关启动里,修改我们创建管道的方法如下。
private static IApplicationBuilder CreateOcelotPipeline(IApplicationBuilder builder, OcelotPipelineConfiguration pipelineConfiguration){    var pipelineBuilder = new OcelotPipelineBuilder(builder.ApplicationServices);    //pipelineBuilder.BuildOcelotPipeline(pipelineConfiguration);
    //使用自定义管道扩展 2018-11-15 金焰的世界
    pipelineBuilder.BuildAhphOcelotPipeline(pipelineConfiguration);    var firstDelegate = pipelineBuilder.Build();    /*
            inject first delegate into first piece of asp.net middleware..maybe not like this
            then because we are updating the http context in ocelot it comes out correct for
            rest of asp.net..
            */

    builder.Properties["analysis.NextMiddlewareName"] = "TransitionToOcelotMiddleware";

    builder.Use(async (context, task) =>
                {                    var downstreamContext = new DownstreamContext(context);                    await firstDelegate.Invoke(downstreamContext);
                });    return builder;
}
现在我们完成了网关的扩展和应用,但是是否注意到了,我们的网关接口还未实现呢?什么接口呢?
IAhphAuthenticationProcessor这个接口虽然定义了,但是一直未实现,现在开始我们要实现下这个接口,我们回看下我们使用这个接口的什么方法,就是检查客户端是否有访问路由的权限。
3、结合数据库实现校验及缓存
每次请求都需要校验客户端是否授权,如果不缓存此热点数据,那么对网关开销很大,所以我们需要增加缓存。
新建AhphAuthenticationProcessor类来实现认证接口,代码如下。
using Ctr.AhphOcelot.Configuration;using Ocelot.Cache;using System;using System.Collections.Generic;using System.Text;using System.Threading.Tasks;namespace Ctr.AhphOcelot.Authentication{    /// <summary>
    /// 金焰的世界
    /// 2018-11-15
    /// 实现自定义授权处理器逻辑
    /// </summary>
    public class AhphAuthenticationProcessor : IAhphAuthenticationProcessor
    {        private readonly IClientAuthenticationRepository _clientAuthenticationRepository;        private readonly AhphOcelotConfiguration _options;        private readonly IOcelotCache<ClientRoleModel> _ocelotCache;        public AhphAuthenticationProcessor(IClientAuthenticationRepository clientAuthenticationRepository, AhphOcelotConfiguration options, IOcelotCache<ClientRoleModel> ocelotCache)        {
            _clientAuthenticationRepository = clientAuthenticationRepository;
            _options = options;
            _ocelotCache = ocelotCache;
        }        /// <summary>
        /// 校验当前的请求地址客户端是否有权限访问
        /// </summary>
        /// <param name="clientid">客户端ID</param>
        /// <param name="path">请求地址</param>
        /// <returns></returns>
        public async Task<bool> CheckClientAuthenticationAsync(string clientid, string path)        {            var enablePrefix = _options.RedisKeyPrefix + "ClientAuthentication";            var key = AhphOcelotHelper.ComputeCounterKey(enablePrefix, clientid, "", path);            var cacheResult = _ocelotCache.Get(key, enablePrefix);            if (cacheResult!=null)
            {//提取缓存数据
                return cacheResult.Role;
            }            else
            {//重新获取认证信息
                var result = await _clientAuthenticationRepository.ClientAuthenticationAsync(clientid, path);                  //添加到缓存里
                  _ocelotCache.Add(key, new ClientRoleModel() { CacheTime = DateTime.Now,Role=result }, TimeSpan.FromMinutes(_options.ClientAuthorizationCacheTime), enablePrefix);                return result;
            }
        }
    }
}
代码很简单,就是从缓存中查找看是否有数据,如果存在直接返回,如果不存在,就从仓储中提取访问权限,然后写入缓存,写入缓存的时间可由配置文件写入,默认为30分钟,可自行根据业务需要修改。
现在我们还需要解决2个问题,这个中间件才能正常运行,第一IClientAuthenticationRepository接口未实现和注入;第二IOcelotCache<ClientRoleModel>未注入,那我们接下来实现这两块,然后就可以测试我们第一个中间件啦。
新建SqlServerClientAuthenticationRepository类,来实现IClientAuthenticationRepository接口,实现代码如下。
using Ctr.AhphOcelot.Authentication;using Ctr.AhphOcelot.Configuration;using System;using System.Collections.Generic;using System.Data.SqlClient;using System.Text;using System.Threading.Tasks;using Dapper;namespace Ctr.AhphOcelot.DataBase.SqlServer{    /// <summary>
    /// 金焰的世界
    /// 2018-11-16
    /// 使用sqlserver实现客户端授权仓储
    /// </summary>
    public class SqlServerClientAuthenticationRepository : IClientAuthenticationRepository
    {        private readonly AhphOcelotConfiguration _option;        public SqlServerClientAuthenticationRepository(AhphOcelotConfiguration option)        {
            _option = option;
        }        /// <summary>
        /// 校验获取客户端是否有访问权限
        /// </summary>
        /// <param name="clientid">客户端ID</param>
        /// <param name="path">请求路由</param>
        /// <returns></returns>
        public async Task<bool> ClientAuthenticationAsync(string clientid, string path)        {            using (var connection = new SqlConnection(_option.DbConnectionStrings))
            {                string sql = @"SELECT COUNT(1) FROM  AhphClients T1 INNER JOIN AhphClientGroup T2 ON T1.Id=T2.Id INNER JOIN AhphAuthGroup T3 ON T2.GroupId = T3.GroupId INNER JOIN AhphReRouteGroupAuth T4 ON T3.GroupId = T4.GroupId INNER JOIN AhphReRoute T5 ON T4.ReRouteId = T5.ReRouteId WHERE Enabled = 1 AND ClientId = @ClientId AND T5.InfoStatus = 1 AND UpstreamPathTemplate = @Path";                var result= await connection.QueryFirstOrDefaultAsync<int>(sql, new { ClientId = clientid, Path = path });                return result > 0;
            }
        }
    }
}现在需要注入下实现,这块应该都知道在哪里加入了吧?没错ServiceCollectionExtensions扩展又用到啦,现在梳理下流程感觉是不是很清晰呢?
builder.Services.AddSingleton<IClientAuthenticationRepository, SqlServerClientAuthenticationRepository>();builder.Services.AddSingleton<IAhphAuthenticationProcessor, AhphAuthenticationProcessor>();
再添加缓存的注入实现,到此我们的第一个中间件全部添加完毕了,现在可以开始测试我们的中间件啦。
builder.Services.AddSingleton<IOcelotCache<ClientRoleModel>, InRedisCache<ClientRoleModel>>();
4、测试授权中间件
我们先在数据库插入客户端授权脚本,脚本如下。
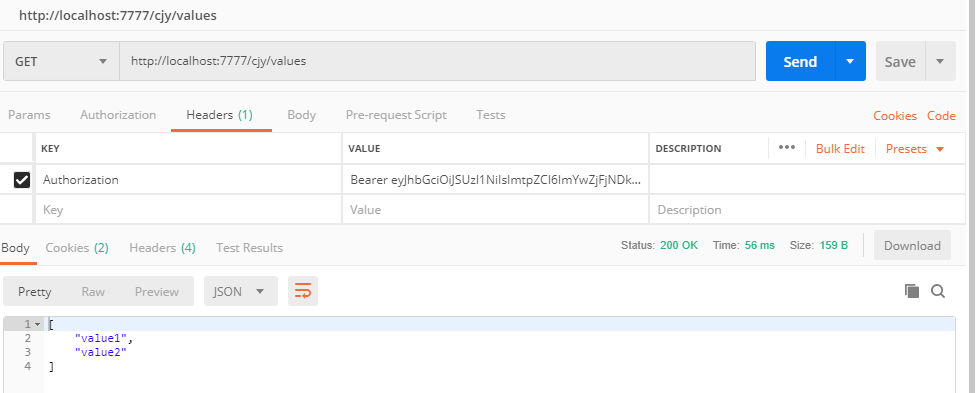
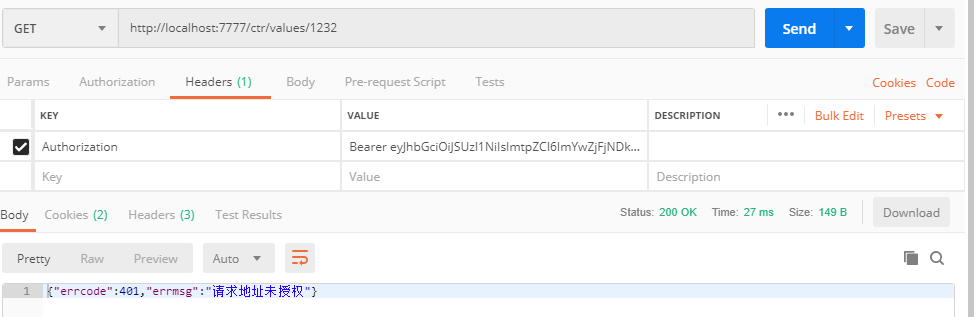
--插入测试客户端INSERT INTO AhphClients(ClientId,ClientName) VALUES('client1','测试客户端1')INSERT INTO AhphClients(ClientId,ClientName) VALUES('client2','测试客户端2')--插入测试授权组INSERT INTO AhphAuthGroup VALUES('授权组1','只能访问/cjy/values路由',1);INSERT INTO AhphAuthGroup VALUES('授权组2','能访问所有路由',1);--插入测试组权限INSERT INTO AhphReRouteGroupAuth VALUES(1,1);INSERT INTO AhphReRouteGroupAuth VALUES(2,1);INSERT INTO AhphReRouteGroupAuth VALUES(2,2);--插入客户端授权INSERT INTO AhphClientGroup VALUES(1,1);INSERT INTO AhphClientGroup VALUES(2,2);--设置测试路由只有授权才能访问UPDATE AhphReRoute SET AuthenticationOptions='{"AuthenticationProviderKey": "TestKey"}' WHERE ReRouteId IN(1,2);这块设置了客户端2可以访问路由/cjy/values,客户端1可以访问路由/cjy/values 和 /ctr/values/{id},开始使用PostMan来测试这个中间件看是否跟我设置的一毛一样,各种dotnet run启动吧。启动前别忘了在我们网关配置文件里,设置启动客户端授权 option.ClientAuthorization = true;,是不是很简单呢?
为了测试授权效果,我们需要把网关项目增加认证,详细看代码,里面就是定义了授权认证,启动我们默认的认证地址。
var authenticationProviderKey = "TestKey";
Action<IdentityServerAuthenticationOptions> gatewayoptions = o =>{
o.Authority = "http://localhost:6611";
o.ApiName = "gateway";
o.RequireHttpsMetadata = false;
};

services.AddAuthentication()
.AddIdentityServerAuthentication(authenticationProviderKey, gatewayoptions);
测试结果如下,达到我们预期目的。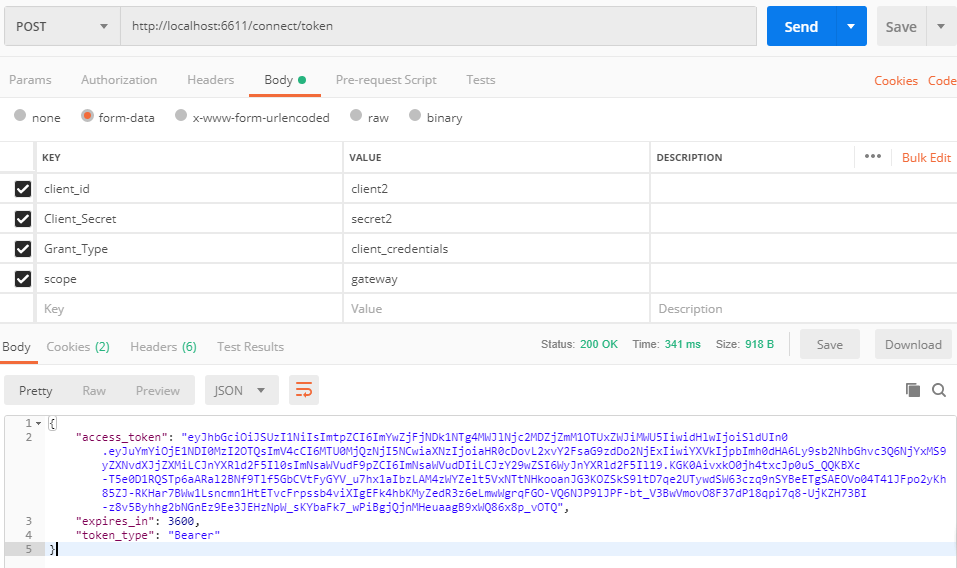
终于完成了我们的自定义客户端授权啦,此处应该掌声不断。
5、增加mysql支持
看过我前面的文章应该知道,支持mysql太简单啦,直接重写IClientAuthenticationRepository实现,然后注入到UseMySql里,问题就解决啦。感觉是不是不可思议,这就是.netcore的魅力,简单到我感觉到我再贴代码就是侮辱智商一样。
6、重构认证失败输出,保持与Ocelot一致风格
前面我们定义了未授权使用自定义的ClientRoleModel输出,最后发现这样太不优雅啦,我们需要简单重构下,来保持与Ocelot默认管道一致风格,修改代码如下。
//var errResult = new ErrorResult() { errcode=401, errmsg= "请求地址未授权" };//var message = errResult.ToJson();//context.HttpContext.Response.StatusCode = (int)HttpStatusCode.OK;//await context.HttpContext.Response.WriteAsync(message);//return;var error = new UnauthenticatedError($"请求认证路由 {context.HttpContext.Request.Path}客户端未授权");
Logger.LogWarning($"路由地址 {context.HttpContext.Request.Path} 自定义认证管道校验失败. {error}");
SetPipelineError(context, error);
再测试下未授权,返回状态为401,强迫症患者表示舒服多了。
四、总结及预告
本篇我们讲解的是网关如何实现自定义客户端授权功能,从设计到实现一步一步详细讲解,虽然只用一篇就写完了,但是涉及的知识点还是非常多的,希望大家认真理解实现的思想,看我是如何从规划到实现的,为了更好的帮助大家理解,从本篇开始,我的源代码都是一个星期以后再开源,大家可以根据博客内容自己手动实现下,有利于消化,如果在操作中遇到什么问题,可以加.NET Core项目实战交流群(QQ群号:637326624)咨询作者。
下一篇开始讲解自定义客户端限流,在学习下篇前可以自己先了解下限流相关内容,然后自己试着实现看看,带着问题学习可能事半功倍哦。
共同学习,写下你的评论
评论加载中...
作者其他优质文章