时间轴、纯js日历特效
在制作页面的过程中,时长遇到要按时间顺序显示一些事件信息的需求,时间轴便是展示这类信息的最佳显现方式。
时间轴实例
首先时间基础结构
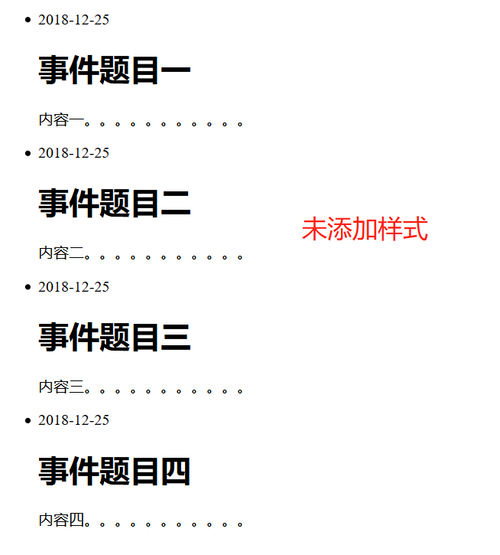
<ul class
="timeLine">
   <li>
       <time datetime="2018-12-25">2018-12-25</time>
       <h1>事件题目一</h1>
       <p>内容一。。。。。。。。。。。</p>
   </li>
    <li>
        <time datetime="2018-12-25">2018-12-25</time>
        <h1>事件题目二</h1>
        <p>内容二。。。。。。。。。。。</p>
    </li>
    <li>
        <time datetime="2018-12-25">2018-12-25</time>
        <h1>事件题目三</h1>
        <p>内容三。。。。。。。。。。。</p>
    </li>
    <li>
        <time datetime="2018-12-25">2018-12-25</time>
        <h1>事件题目四</h1>
        <p>内容四。。。。。。。。。。。</p>
    </li>
</ul>
以下是css样式


<style>
*{
margin: 0;
padding: 0;
box-sizing: border-box;
}
p{
width: 100%;
height: auto;
word-wrap:break-word;
word-break:break-all;
overflow: hidden;
text-indent: 1em;
}
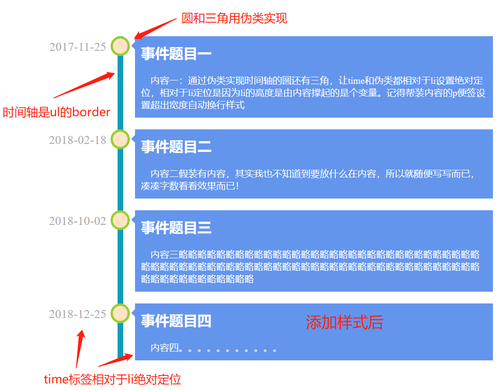
.timeLine{
margin-top: 10%;
margin-left: 30%;
border-left: 10px solid #0e9db6;
}
.timeLine li{
list-style: none;
display: block;
width: 90%;
clear: both;
position: relative;
background-color: cornflowerblue;
margin-left: 20px;
margin-bottom: 20px;
padding: 12px 10px;
box-sizing: border-box;
}
.timeLine li:before{
content: '';
display: block;
border-radius: 50%;
background-color: bisque;
width: 25px;
height: 25px;
border: 4px solid yellowgreen;
position: absolute;
left: -42px;
top:0;
}
.timeLine li time{
left: -28%;
top: 5px;
width: 20%;
position: absolute;
font-size: 21px;
color: #AAA;
text-align: right;
}
.timeContent>li h1{
font-size: 24px;
margin-bottom: 20px;
}
.timeContent{
color: white;
}
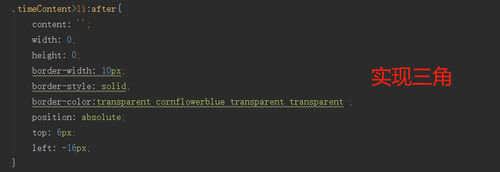
.timeContent>li:after{
content: '';
width: 0;
height: 0;
border-width: 10px;
border-style: solid;
border-color:transparent cornflowerblue transparent transparent ;
position: absolute;
top: 6px;
left: -16px;
}
</style>除了时间轴,日历也是项目时长用到的内容,网上也很多实用的插件,但是了解里面的原理也是很不错的学习过程。
日历实例
首先编写静态样式
<style>
*{
margin: 0;
padding: 0;
}
a{
text-decoration: none;
}
ol,ul,li{
list-style: none;
}
.calendar{
width: 450px;
height: 360px;
background-color: #ffffff ;
box-shadow: 0px 1px 1px rgba(0,0,0,.1);
border:15px solid gray;
padding: 10px;
box-sizing: border-box;
margin: 0 auto;
}
.title{
position: relative;
}
.title h1,.title h2{
text-align: center;
}
.PrevMonth,.NextMonth{
position: absolute;
top:50%;
font-size: 38px;
line-height: 40px;
margin-top: -20px;
}
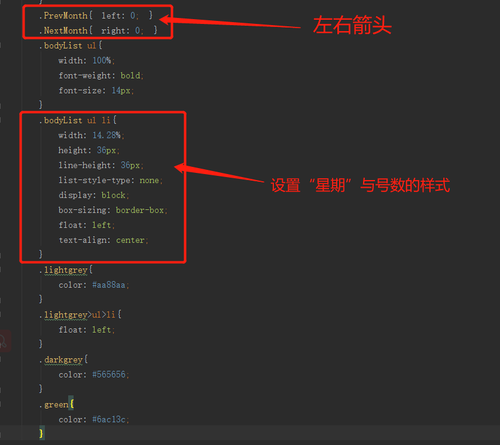
.PrevMonth{ left: 0; }
.NextMonth{ right: 0; }
.bodyList ul{
width: 100%;
font-weight: bold;
font-size: 14px;
}
.bodyList ul li{
width: 14.28%;
height: 36px;
line-height: 36px;
list-style-type: none;
display: block;
box-sizing: border-box;
float: left;
text-align: center;
}
.lightgrey{
color: #aa88aa;
}
.lightgrey>ul>li{
float: left;
}
.darkgrey{
color: #565656;
}
.green{
color: #6ac13c;
}
.greenbox{
border:1px solid #6ac13c;
background-color: #e9f8df;
}
</style>
</head>
<body>
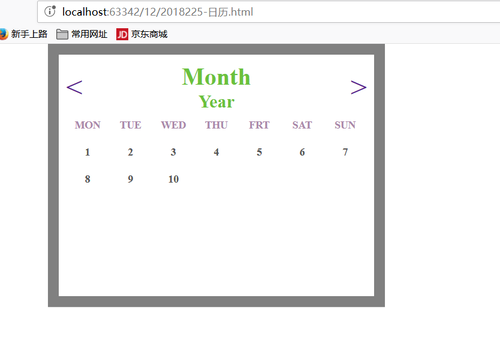
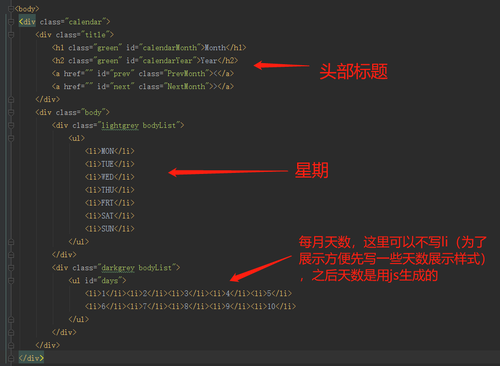
<div class="calendar">
<div class="title">
<h1 class="green" id="calendarMonth">Month</h1>
<h2 class="green" id="calendarYear">Year</h2>
<a href="" id="prev" class="PrevMonth"><</a>
<a href="" id="next" class="NextMonth">></a>
</div>
<div class="body">
<div class="lightgrey bodyList">
<ul>
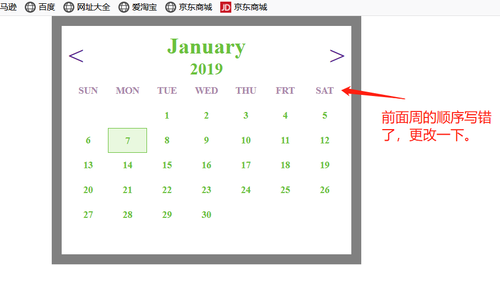
<li>SUN</li>
<li>MON</li>
<li>TUE</li>
<li>WED</li>
<li>THU</li>
<li>FRT</li>
<li>SAT</li>
</ul>
</div>
<div class="darkgrey bodyList">
<ul id="days">
<li>1</li><li>2</li><li>3</li><li>4</li><li>5</li>
<li>6</li><li>7</li><li>8</li><li>9</li><li>10</li>
</ul>
</div>
</div>
</div>编写完静态样式,就可以开始写js效果了,首先要先分析需要什么功能
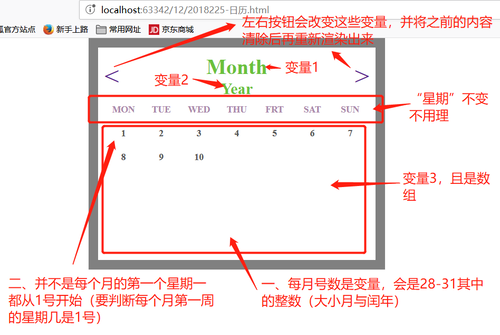
从界面入手分析,我们最少需要获取三个变量“月份”、“年份”、“月的天数”,且在获取到这些变量之后,我们要先清除原来的内容后将新的内容渲染上去。
首先创建变量
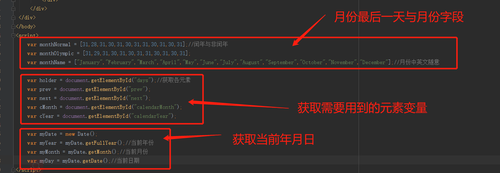
var monthNormal = [31,28,31,30,31,30,31,31,30,31,30,31];//闰年与非闰年
var monthOlympic = [31,29,31,30,31,30,31,31,30,31,30,31];
var monthName = ["January","February","March","April","May","June","July","August","September","October","November","December"];//月份中英文随意

var holder = document.getElementById("days");
var prev = document.getElementById("prev");
var next = document.getElementById("next");
var cMonth = document.getElementById("calendarMonth");
var cYear = document.getElementById("calendarYear");

var myDate = new Date();
var myYear = myDate.getFullYear();//当前年份
var myMonth = myDate.getMonth();//当前月份
var myDay = myDate.getDate();//当前日期
首先处理获取不同月份1号是星期几与闰年的问题
function dayStart(month,year){//获取某年某月第一天是星期几
    var tmpDate = new Date(year,month,1);//一月是0,十二月是11。如果不是要固定取第一天,可以再加一个天数的参数。
    console.log(tmpDate);
    return(tmpDate.getDay());//返回0-6,对应周日至周六
}
function dayMonth(month,year){//通过年份除以4是否整除判断是否为闰年,并返回该月总天数
    var tmp = year % 4;
    if(tmp == 0){
        return (monthOlympic[month]);//返回上面monthOlympic数组对应月份的最后一天
    }else {
        return(monthNormal[month]);//返回上面monthNormal数组对应月份的最后一天
    }
}
function refreshDate(){
    var str = "";
    var totalDay = dayMonth(myMonth,myYear);//获取该月总天数
    var firstDay = dayStart(myMonth,myYear);//获取该月第一天是星期几
    var myclass;
    for(var i=0;i<firstDay;i++){//创建空白节点
        str += "<li></li>";
    }
    for(var i=1;i<totalDay;i++){
        if(i == myDay && myYear == myDate.getFullYear() && myMonth ==myDate.getMonth()){//如果是当前日期改变样式
            myclass = "class='green greenBox'";//当前日期样式
        }else{
            myclass = "class='green'";//普通日期样式
        }
        str += "<li "+ myclass + ">"+i+"</li>";
    }
    holder.innerHTML = str;//渲染日期
    cMonth.innerHTML = monthName[myMonth];//渲染月份
    cYear.innerHTML = myYear;//渲染年份
}
refreshDate();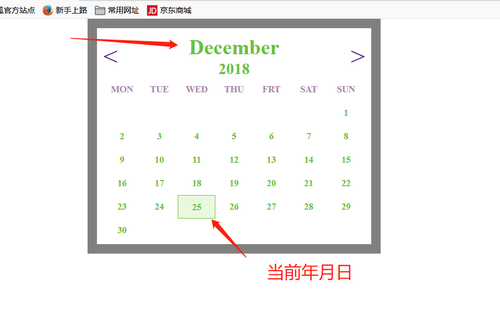
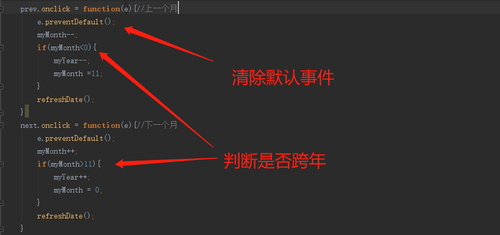
prev.onclick = function(e){//上一个月
    e.preventDefault();
    myMonth--;
    if(myMonth<0){
        myYear--;
        myMonth =11;
    }
    refreshDate();
}
next.onclick = function(e){//下一个月
    e.preventDefault();
    myMonth++;
    if(myMonth>11){
        myYear++;
        myMonth = 0;
    }
    refreshDate();
}
最后附上Data函数内容,详细用法自行百度哈哈。
Date() 获取时间对象
var timeDate = new Date();
timeDate.toLocaleTimeString() 根据本地时间把Date对象的时间部分转换为字符串
timeDate.getYear(); //获取当前年份(2位)
timeDate.getFullYear(); //获取完整的年份(4位,1970-????)
timeDate.getMonth(); //获取当前月份(0-11,0代表1月)
timeDate.getDate(); //获取当前日(1-31)
timeDate.getDay(); //获取当前星期X(0-6,0代表星期天)
timeDate.getTime(); //获取当前时间(从1970.1.1开始的毫秒数)
timeDate.getHours(); //获取当前小时数(0-23)
timeDate.getMinutes(); //获取当前分钟数(0-59)
timeDate.getSeconds(); //获取当前秒数(0-59)
timeDate.getMilliseconds(); //获取当前毫秒数(0-999)
timeDate.toLocaleDateString(); //获取当前日期
var mytime=timeDate.toLocaleTimeString(); //获取当前时间
timeDate.toLocaleString( ); //获取日期与时间
共同学习,写下你的评论
评论加载中...
作者其他优质文章