ETL项目1:大数据采集,清洗,处理:使用MapReduce进行离线数据分析完整项目
思路分析:
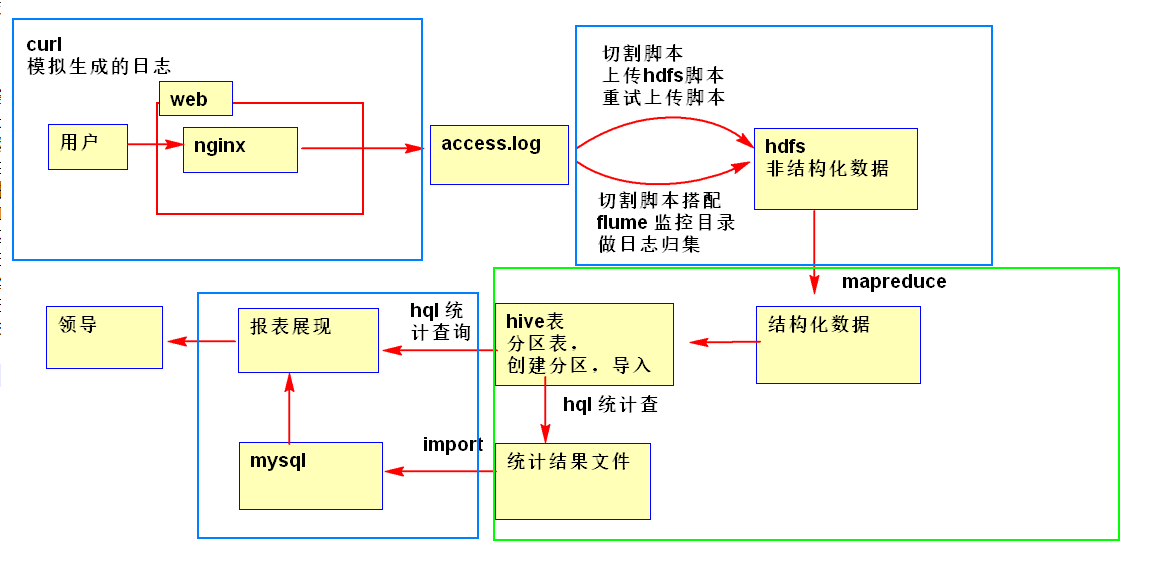
1.1 log日志生成

用curl模拟请求,nginx反向代理80端口来生成日志.

#! /bin/bashfunction get_user_agent(){

    a0='User-Agent:MQQBrowser/26 Mozilla/5.0 (Linux; U; Android 2.3.7; zh-cn; MB200 Build/GRJ22; CyanogenMod-7) AppleWebKit/533.1 (KHTML, like Gecko) Version/4.0 Mobile Safari/533.1'
    a1='User-Agent:Mozilla/5.0 (Windows NT 10.0; WOW64) AppleWebKit/537.36 (KHTML, like Gecko) Chrome/63.0.3239.132 Safari/537.36'
    a2='User-Agent:Mozilla/5.0 (Windows NT 6.1; WOW64) AppleWebKit/534.57.2 (KHTML, like Gecko) Version/5.1.7 Safari/534.57.2'
    a3='User-Agent:Mozilla/5.0 (compatible; MSIE 9.0; Windows NT 6.1; WOW64; Trident/5.0; QQBrowser/7.0.3698.400)'
    a4='User-Agent:Mozilla/5.0 (Windows NT 6.1; WOW64) AppleWebKit/537.1 (KHTML, like Gecko) Chrome/21.0.1180.71 Safari/537.1 LBBROWSER'
    a5='User-Agent:Mozilla/5.0 (iPhone; U; CPU iPhone OS 4_3_3 like Mac OS X; en-us) AppleWebKit/533.17.9 (KHTML, like Gecko) Version/5.0.2 Mobile/8J2 Safari/6533.18.5'
    a6='User-Agent:Mozilla/5.0 (iPhone; U; CPU iPhone OS 4_3_3 like Mac OS X; en-us) AppleWebKit/533.17.9 (KHTML, like Gecko) Version/5.0.2 Mobile/8J2 Safari/6533.18.5'
    a7='User-Agent:Mozilla/5.0 (iPhone; U; CPU iPhone OS 4_3_3 like Mac OS X; en-us) AppleWebKit/533.17.9 (KHTML, like Gecko) Version/5.0.2 Mobile/8J2 Safari/6533.18.5'
    a8='User-Agent:Mozilla/5.0 (Linux; U; Android 2.2.1; zh-cn; HTC_Wildfire_A3333 Build/FRG83D) AppleWebKit/533.1 (KHTML, like Gecko) Version/4.0 Mobile Safari/533.1'
    a9='User-Agent:Mozilla/5.0 (Linux; U; Android 2.2.1; zh-cn; HTC_Wildfire_A3333 Build/FRG83D) AppleWebKit/533.1 (KHTML, like Gecko) Version/4.0 Mobile Safari/533.1'
    a10='User-Agent:Mozilla/5.0 (Linux; U; Android 2.2.1; zh-cn; HTC_Wildfire_A3333 Build/FRG83D) AppleWebKit/533.1 (KHTML, like Gecko) Version/4.0 Mobile Safari/533.1'
    a11='User-Agent:Mozilla/5.0 (Linux; U; Android 2.2.1; zh-cn; HTC_Wildfire_A3333 Build/FRG83D) AppleWebKit/533.1 (KHTML, like Gecko) Version/4.0 Mobile Safari/533.1'
    a12='User-Agent:MQQBrowser/26 Mozilla/5.0 (Linux; U; Android 2.3.7; zh-cn; MB200 Build/GRJ22; CyanogenMod-7) AppleWebKit/533.1 (KHTML, like Gecko) Version/4.0 Mobile Safari/533.1'
    a13='User-Agent:MQQBrowser/26 Mozilla/5.0 (Linux; U; Android 2.3.7; zh-cn; MB200 Build/GRJ22; CyanogenMod-7) AppleWebKit/533.1 (KHTML, like Gecko) Version/4.0 Mobile Safari/533.1'
    a14='User-Agent:MQQBrowser/26 Mozilla/5.0 (Linux; U; Android 2.3.7; zh-cn; MB200 Build/GRJ22; CyanogenMod-7) AppleWebKit/533.1 (KHTML, like Gecko) Version/4.0 Mobile Safari/533.1'

    agent_arr=("$a0" "$a1" "$a2" "$a3" "$a4" "$a5" "$a6" "$a7" "$a8" "$a9" "$a10" "$a11" "$a12" "$a13" "$a14")
    echo "${agent_arr[$((RANDOM % 14  ))]}"}


#获取小时,将09 转化为9function get_hour(){
    hour=`date  +%H`
    [ ${hour:0:1} -eq '0' ] && echo ${hour:1:1} || echo $hour
}

#uid1--10000,循环一次,没有国家,每10秒请求一次function send_1_10000_for1_sleep10_notwithcountry(){
    i=1
    break_num=1;    while [ true ]    do
        #if i > 10000; i = 1        if [ $i -gt 1000  ]; then
            i=1;
            # break_num++
            ((break_num++))
            if [ $break_num -eq 2  ]; then
                exit;            fi
        fi

        #造值i的md5,作为uid
        uid=`echo $i | md5sum | awk '{print $1}'`

        #user-agent
        user_agent=`get_user_agent`
        echo "user_agent:$user_agent"

        /usr/bin/curl -s -o /dev/null -H "${user_agent}" "http://nn1.hadoop:80?uid=${uid}"

        #i++
        ((i++))        sleep 2

    done}

#uid5000--15000,循环一次,每10秒请求一次,每500条有一个带有country参数的请求function send_5000_15000_for1_sleep6_withcountry500(){
    i=500
    break_num=1;    while [ true ]    do
        #if i > 10000; i = 1        if [ $i -gt 1500  ]; then
            i=1;
            # break_num++
            ((break_num++))
            if [ $break_num -eq 2  ]; then
                exit;            fi
        fi

        #造值i的md5,作为uid
        uid=`echo $i | md5sum | awk '{print $1}'`

        #user-agent
        user_agent=`get_user_agent`        echo "user_agent:$user_agent"


        #每500个发一次带有country的参数        if [ $((i%50)) -eq 0 ];then
            #国家码
            c_arr=('CN' 'CN' 'CN' 'CN' 'CN' 'US' 'GE' 'GB' 'FR' 'KR' 'AR' 'RU' 'SE' 'SG')
            country=${c_arr[$((RANDOM % 14  ))]}
            #echo "country:$country"


            /usr/bin/curl -s -o /dev/null -H "${user_agent}" "http://nn1.hadoop:80?uid=${uid}&country=${country}"

        else
            /usr/bin/curl -s -o /dev/null -H "${user_agent}" "http://nn1.hadoop:80?uid=${uid}"

        fi

        #i++
        ((i++))        sleep 2

    done}

#uid1000--20000,循环一次,有国家,每3秒请求一次function send_1_20000_for1_sleep3_withcountry(){
    i=1
    break_num=0;    while [ true ]    do
        #if i > 10000; i = 1        if [ $i -gt 2000  ]; then
            i=1;
            # break_num++
            ((break_num++))
            if [ $break_num -eq 2  ]; then
                exit;            fi
        fi

        #造值i的md5,作为uid
        uid=`echo $i | md5sum | awk '{print $1}'`

        #国家码
        c_arr=('CN' 'CN' 'CN' 'CN' 'CN' 'US' 'GE' 'GB' 'FR' 'KR' 'AR' 'RU' 'SE' 'SG')
        country=${c_arr[$((RANDOM % 14  ))]}        echo "country:$country"


        #user-agent
        user_agent=`get_user_agent`
        echo "user_agent:$user_agent"

        /usr/bin/curl -s -o /dev/null -H "${user_agent}" "http://nn1.hadoop:80?uid=${uid}&country=${country}"

        #i++
        ((i++))        sleep 1

    done}


`send_1_10000_for1_sleep10_notwithcountry`
`send_5000_15000_for1_sleep6_withcountry500`
`send_1_20000_for1_sleep3_withcountry`
1.2 日志切割
#! /bin/bash

#log_cut.sh#切割access.log,并调用put_hdfs.sh 上传到hdfs上

#获取前5分钟的时间戳function get_timestamp(){
    num=$1
    echo `date -d ${num}' mins ago' +%Y%m%d%H%M%S`
}


#确定当前脚本的位置
cd `dirname $0`
script_base_path=`pwd`

#加载log_cut_config 文件
. ${script_base_path}/log_cut_config

#校验log_cut_config 文件的param 是否有空的,如果有,就终止脚本
#1:无效;0:有效
params_invalid=0if [ "${ACCESS_LOG_PATH}x" == "x" ]; then
    params_invalid=1fiif [ "${NGINX_LOG_BASE_PATH}x" == "x" ]; then
    params_invalid=1fiif [ "${NGINX_LOG_WORK_PATH}x" == "x" ]; then
    params_invalid=1fiif [ "${NGINX_LOG_BAK_PATH}x" == "x" ]; then
    params_invalid=1fiif [ "${NGINX_LOG_GENERATELOG_PATH}x" == "x" ]; then
    params_invalid=1fiif [ "${NGINX_LOG_HDFS_BASE_PATH}x" == "x" ]; then
    params_invalid=1fiif [ "${LOG_USER}x" == "x" ]; then
    params_invalid=1fi#如果有参数没配置,就停止脚本if [ ${params_invalid} -eq 1 ]; then
    echo "log_cut_config script config params error"
    exitfi#校验目录存不存在,如果不存在创建,并且设置hadoop用户组权限
#日志切割工作目录if [ ! -d ${NGINX_LOG_WORK_PATH} ]; then
    mkdir -p ${NGINX_LOG_WORK_PATH}    chown hadoop:hadoop ${NGINX_LOG_WORK_PATH}fi#日志切割备份目录if [ ! -d ${NGINX_LOG_BAK_PATH} ]; then
    mkdir -p ${NGINX_LOG_BAK_PATH}    chown hadoop:hadoop ${NGINX_LOG_BAK_PATH}fi#日志切割日志生成目录if [ ! -d ${NGINX_LOG_GENERATELOG_PATH} ]; then
    mkdir -p ${NGINX_LOG_GENERATELOG_PATH}    chown hadoop:hadoop ${NGINX_LOG_GENERATELOG_PATH}fi#切割后的文件名称:nginxaccess_${IP}_${TIMESTAMP}.log
IP=`hostname -i`
TIMESTAMP=`get_timestamp 5`
file_name=nginxaccess_${IP}_${TIMESTAMP}.log

#mv操作mv ${ACCESS_LOG_PATH} ${NGINX_LOG_WORK_PATH}/${file_name}

#kill -USR nginx master进程,让nginx重新生成日志
PID=`ps -aux | grep nginx | grep master | grep -v grep | awk '{print $2}'`if [ "${PID}x" != "x" ]; then
    kill -USR1 $PIDfi#压缩切割后的文件 xxx.log  --> xxx.log.gz/usr/bin/gzip ${NGINX_LOG_WORK_PATH}/${file_name}

#设置压缩文件的用户组权限为hadoopchown hadoop:hadoop ${NGINX_LOG_WORK_PATH}/${file_name}.gz

#备份work/xxx.log.gz  到bak/ 目录下cp ${NGINX_LOG_WORK_PATH}/${file_name}.gz ${NGINX_LOG_BAK_PATH}

#上传到hdfs上,以hadoop 用户调用 put_hdfs.sh 脚本su - ${LOG_USER} << EOF

nohup ${script_base_path}/put_hdfs.sh ${script_base_path}/log_cut_config >> ${NGINX_LOG_GENERATELOG_PATH}/put_hdfs.log 2>&1 &exit

EOF


#删除2天前的备份文件,  21号的删19号的
delet_date=`date -d 2' day ago' +%Y%m%d`rm -rf ${NGINX_LOG_BAK_PATH}/nginxaccess_${IP}_${delet_date}*.gz
1.3 上传日志到HDFS
#! /bin/bash

# 上传/work/目录下的.log.gz 文件到hdfs上
# put_hdfs.sh 分5步,其中 step2 被分成3步,每个循环执行一次
# 如果put数据成功,会执行到step5;
#如果put数据失败,会执行到step3 就结束echo "==>step1: start"#/data/hainiu/nginx_log_bak/script/log_cut_config
log_cut_config_file=$*. ${log_cut_config_file}


#统计put错误次数
put_errror_count=0hdfs_put_path=#遍历/work 目录for file in `ls ${NGINX_LOG_WORK_PATH}`do
    #file: nginxaccess_192.168.142.160_20181221111243.log.gz

    #20181221111243.log.gz
    tmp=${file##*_}
    #201812
    year_month=${tmp:0:6}
    #21
    day=${tmp:6:2}
    #/data/hainiu/nginx_log/201812/21
    hdfs_put_path=${NGINX_LOG_HDFS_BASE_PATH}/${year_month}/${day}
    echo "==>step2-1: 创建hdfs目录"
    #创建hdfs目录
    mkdir_result=`/usr/local/hadoop/bin/hadoop fs -mkdir -p ${hdfs_put_path} 2>&1`    if [ "${mkdir_result}x" != "x" ]; then
        #如果报错是报 mkdir: `/mr': File exists ,也不算错
        if [ "${mkdir_result##*: }" != "File exists" ]; then
            echo "/usr/local/hadoop/bin/hadoop fs -mkdir -p ${hdfs_put_path} error"
            echo "error detail:${mkdir_result}"
            exit        fi
    fi
    echo "==>step2-2: put文件到hdfs上"
    #put文件到hdfs上
    #put /data/hainiu/nginx_log_bak/work/xxx /data/hainiu/nginx_log/201812/21

    put_result=`/usr/local/hadoop/bin/hadoop fs -put -f ${NGINX_LOG_WORK_PATH}/${file} ${hdfs_put_path} 2>&1`

    #put命令返回结果不为空,就代表报错,累加错误次数    if [ "${put_result}x" != "x" ]; then
        ((put_errror_count++))        echo "hadoop fs -put -f ${NGINX_LOG_WORK_PATH}/${file} ${hdfs_put_path} error"
        echo "detail info:${put_result}"

    else
        #删除已上传hdfs的文件        echo "==>step2-3: 删除已上传hdfs的文件"

        rm -f ${NGINX_LOG_WORK_PATH}/${file}    fidoneecho "==>step3: 如果错误次数大于0,说明有错误的,需要调用retry_put.sh 重试"#如果错误次数大于0,说明有错误的,需要调用retry_put.sh 重试if [ $put_errror_count -gt 0 ]; then
    #retry_put.sh 脚本是否在执行,如果在执行,不进行重试;如果没执行,就进行重试
    retry_pid=`ps -aux | grep retry_put.sh | grep -v grep | awk '{print $2}'`    if [ "${retry_pid}x" != "x" ]; then
        exit    fi

    echo "======> 调用重试脚本"
    #调用重试脚本retry_put.sh
    #nohup ${script_base_path}/retry_put.sh ${script_base_path}/log_cut_config >> ${NGINX_LOG_GENERATELOG_PATH}/retry_put.log 2>&1 &

    #停止运行当前脚本
    exit
else

    echo "==>step4: 如果所有都上传成功,就在hdfs上生成个标记成功的文件_SUCCESS_TIMESTAMP"
    #如果所有都上传成功,就在hdfs上生成个标记成功的文件_SUCCESS_TIMESTAMP
    TIMESTAMP=`date +%Y%m%d%H%M%S`
    success_filename=_SUCCESS_${TIMESTAMP}

    touchz_result=`/usr/local/hadoop/bin/hadoop fs -touchz ${hdfs_put_path}/${success_filename} 2>&1`    if [ "${touchz_result}x" != "x" ]; then
        echo "hadoop fs -touchz ${hdfs_put_path}/${success_filename} error"

        echo "error detail: ${touchz_result}"

    fi
    fiecho "==>step5: end"
1.4 错误重试
#!/bin/bash

#retry_put.sh 脚本,可以重试3次,每次重试调用put_hdfs.sh # put_hdfs.sh 分5步,其中 step2 被分成3步,每个循环执行一次
# 如果遇到step3:说明重试上传到hdfs文件成功
# 如果遇到step4、step5:说明三次重试失败

#/data/hainiu/nginx_log_bak/script/log_cut_configecho "==>step1: start"log_cut_config_file=$*. ${log_cut_config_file}

script_base_path=${NGINX_LOG_BASE_PATH}/scriptfor((i=1;i<=3;i++))do
    echo "==>step2-1: 判断put_hdfs.sh 是否在执行,如果在,就中断重试;否则调用重试"
    #判断put_hdfs.sh 是否在执行,如果在,就中断重试;否则调用重试
    put_hdfs_pid=`ps -aux | grep put_hdfs.sh | grep -v grep | awk '{print $2}'`    if [ "${put_hdfs_pid}x" != "x" ]; then
        echo "put_hdfs.sh running, exit"
        exit    fi

    echo "==>step2-2: 等待put_hdfs.sh 脚本完成,是个阻塞的调用"
    #等待put_hdfs.sh 脚本完成,是个阻塞的调用
    ${script_base_path}/put_hdfs.sh ${script_base_path}/log_cut_config >> ${NGINX_LOG_GENERATELOG_PATH}/put_hdfs.log 2>&1

    echo "==>step2-3: put_hdfs.sh 执行完,判断 work目录下是否还有.log.gz 文件"
    arr=(`ls ${NGINX_LOG_WORK_PATH} | grep .log.gz$`)
    arr_lenth=${#arr[*]}    if [ $arr_lenth -eq 0 ]; then
        echo "==>step3: 重试put_hdfs.sh 成功"
        exit    else
        sleep 5
    fidone#如果重试三次都失败了,需要生成put错误日志echo "==>step4: 重试失败,,打印失败列表"echo "失败列表:"arr=(`ls ${NGINX_LOG_WORK_PATH} | grep .log.gz$`)
for file in ${arr[*]}do
    echo $filedoneecho "==>step5: end"
2.1 需求分析
进行nginx日志的ETL
要求对过去一天hdfs上的nginx日志进行ETL取出其中有价值的字段并格式化成hive表能用的结构化数据
提示:
1)使用MR进行数据的格式化;
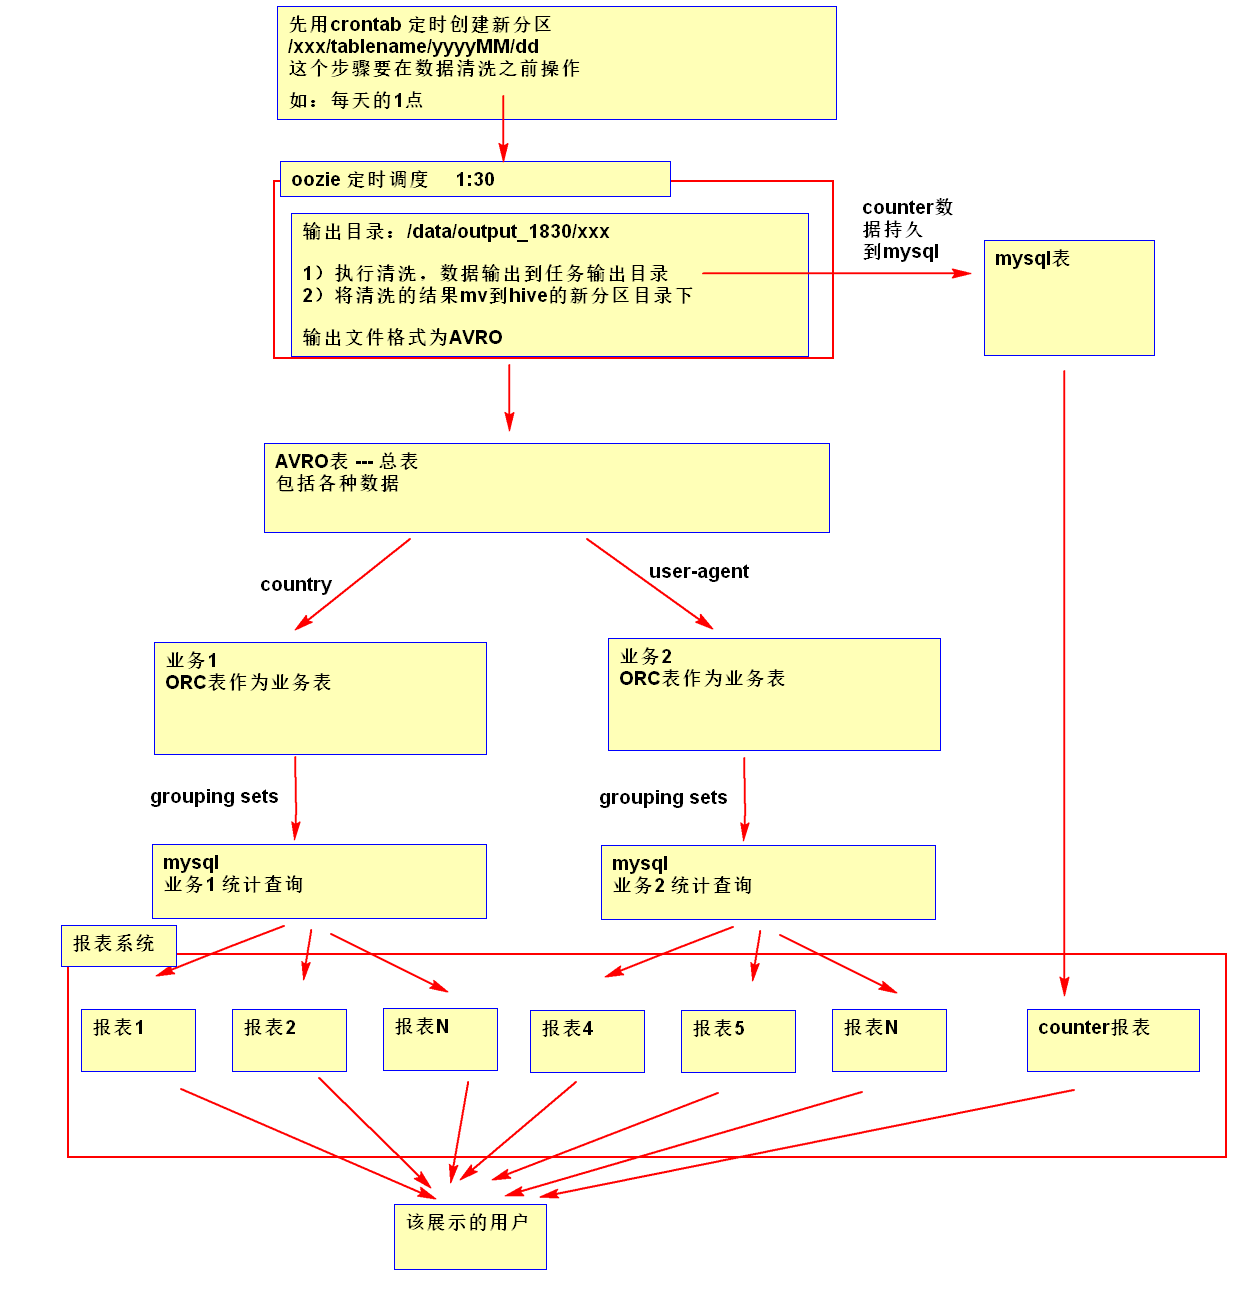
2)使用OOZIE配置任务的调度和依赖;
3)使用linux的crontab配置hive表的分区添加;
4)MR输出的数据格式使用AVRO,AVRO 表当做一个总表;
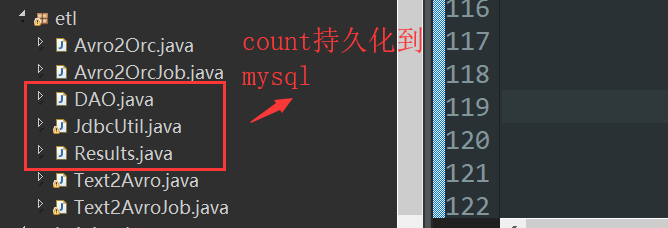
5)将MR任务的counter统计结果存储到MYSQL中并使用报表系统进行展示;
6)根据业务场景将avro表转成业务使用的ORC表;
7)使用hive进行多维度的统计将结果存储到mysql中并使用报表系统进行展示;
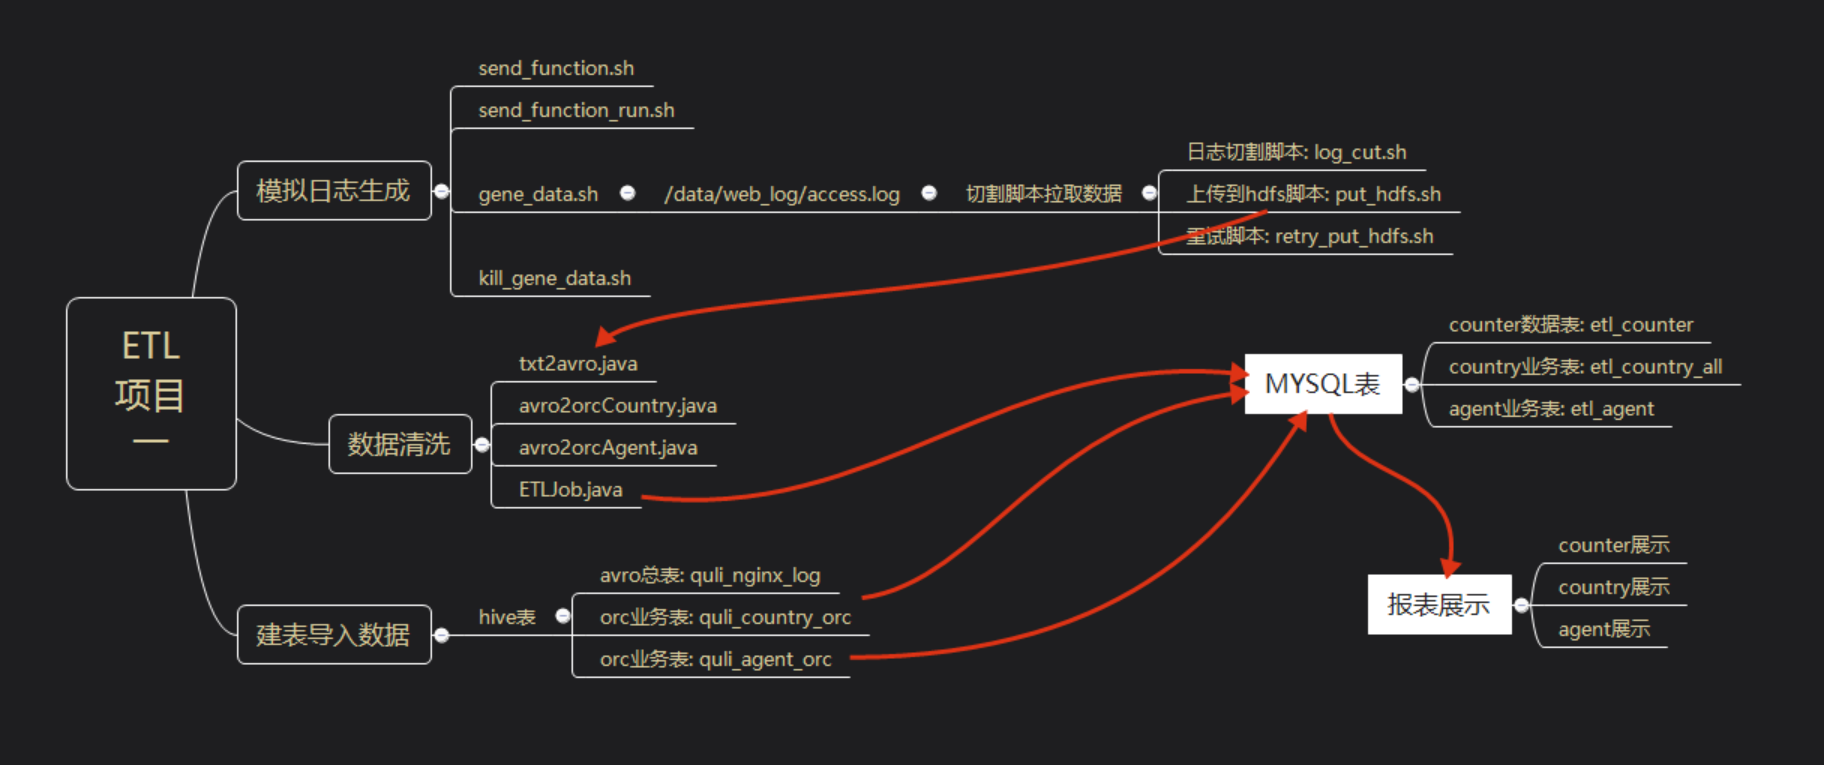
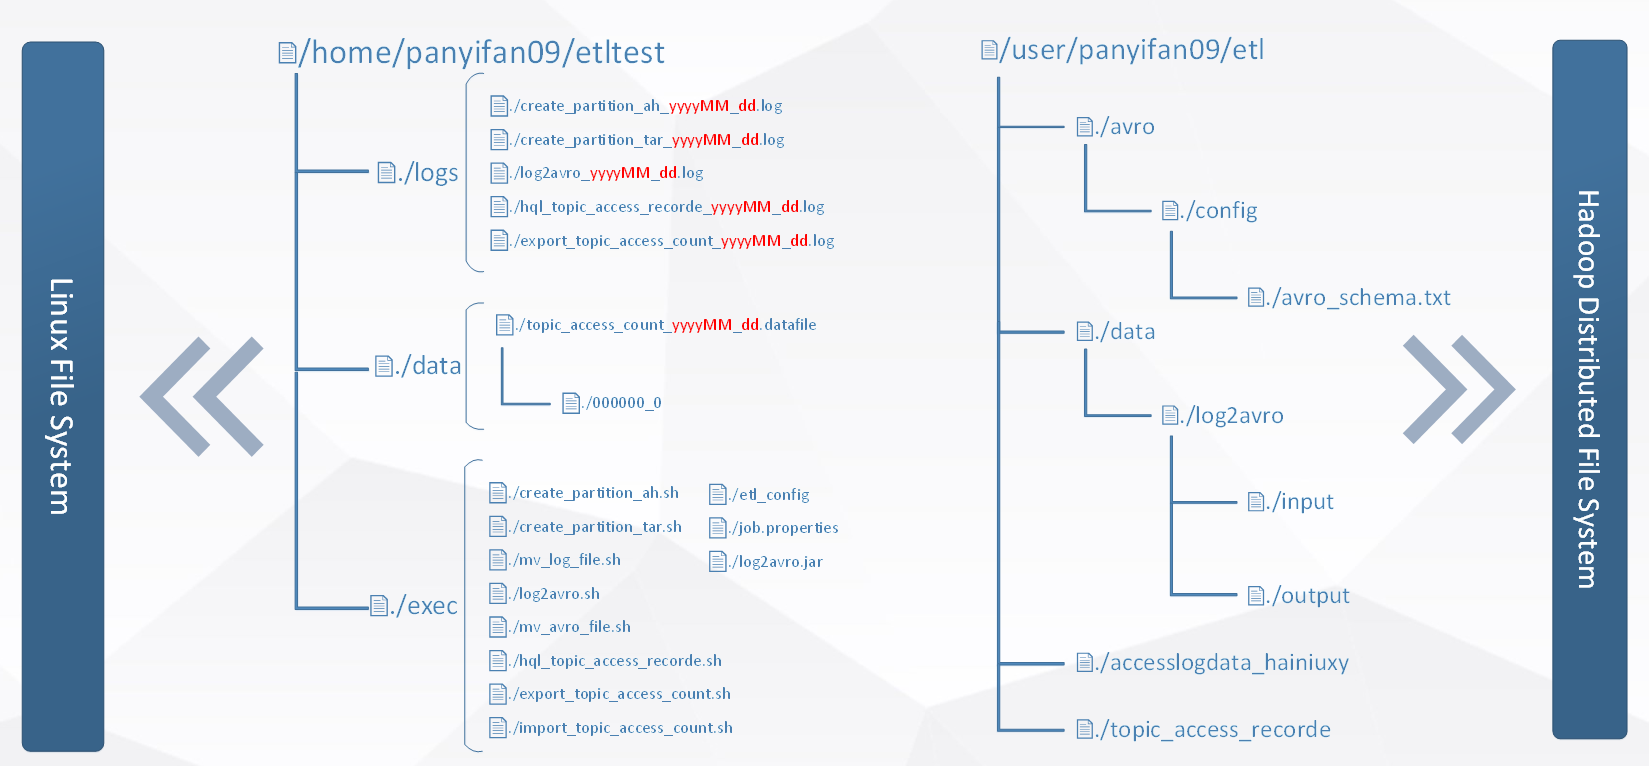
3.1 目录规划
3.2 数据清洗MapReduce
由于这个项目的请求是自己模拟生成的,所以不准备把重点放在这,先熟悉整个流程,在下个博客中我将会重点清洗真实的日志
avro的Schema
{    "type": "record",    "name": "RunRecord",    "namespace": "com.hainiu",    "fields": [{            "name": "uip",            "type": "string",            "default": "null"
        },{            "name": "datetime",            "type": "string",            "default": "null"
        }, {            "name": "method",            "type": "string",            "default": "null"
        }, {            "name": "uid",            "type": "string",            "default": "null"
        },{            "name": "country",            "type": "string",            "default": "null"
        }, {            "name": "http",            "type": "string",            "default": "null"
        } ,{            "name": "status1",            "type": "string",            "default": "null"
        }, {            "name": "status2",            "type": "string",            "default": "null"
        }, {            "name": "usagent",            "type": "string",            "default": "null"
        }
    ]
}
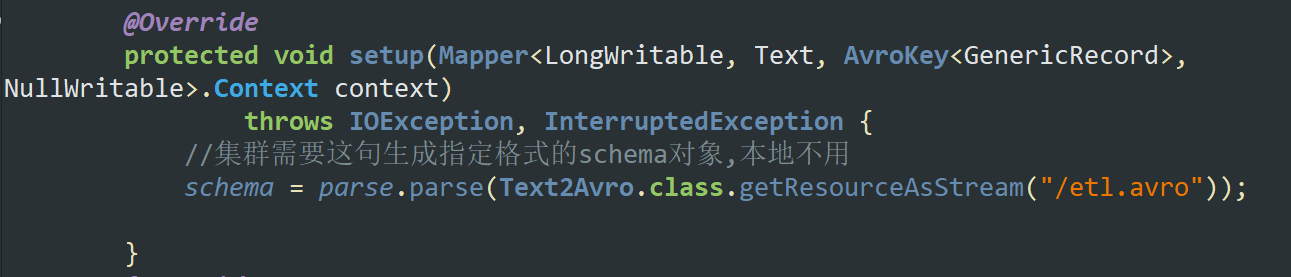
注意:本地多线程环境测试setup不用加载schema
但是集群多机环境需要
4.1 上集群跑shell
准备工作:创建avro,orc表
--avro--CREATE external TABLE IF NOT EXISTS etlavro007
PARTITIONED BY (`month` string, `day` string)
ROW FORMAT SERDE 'org.apache.hadoop.hive.serde2.avro.AvroSerDe'WITH SERDEPROPERTIES ('avro.schema.url'='/user/suyuan09/etl/avro/config/etl.avro')
STORED AS INPUTFORMAT 'org.apache.hadoop.hive.ql.io.avro.AvroContainerInputFormat'OUTPUTFORMAT 'org.apache.hadoop.hive.ql.io.avro.AvroContainerOutputFormat'LOCATION '/user/suyuan09/etl/etlavro007';--orc--CREATE external TABLE `etlorc007`(
`uip` string COMMENT 'from deserializer',
`datetime` string COMMENT 'from deserializer',
`uid` string COMMENT 'from deserializer',
`country` string COMMENT 'from deserializer',
`usagent` string COMMENT 'from deserializer')
PARTITIONED BY (`month` string, `day` string)
ROW FORMAT SERDE
'org.apache.hadoop.hive.ql.io.orc.OrcSerde' STORED AS INPUTFORMAT
'org.apache.hadoop.hive.ql.io.orc.OrcInputFormat' OUTPUTFORMAT
'org.apache.hadoop.hive.ql.io.orc.OrcOutputFormat'LOCATION '/user/suyuan09/etlorc/etlorc007'TBLPROPERTIES ('orc.compress'='SNAPPY','orc.create.index'='true');
自动shell创建分区,执行mr,移动到表目录下,hive->data,data->mysql
#生成avro,orc分区表
#注意 不要用hadoop命令删除分区目录,再次执行脚本不会创建
fenqu.sh#!/bin/bash
source /etc/profile
yymm=`date +%Y%m`dd=`date +%d`/usr/local/hive/bin/hive -e "use suyuan09;alter table etlavro007 add IF NOT EXISTS partition(month='${yymm}',day='${dd}');"/usr/local/hive/bin/hive -e "use suyuan09;alter table etlorc007 add IF NOT EXISTS partition(month='${yymm}',day='${dd}');"------------------------

---avro---#把log挪到指定目录
log_avro.sh#! /bin/bash
source /etc/profile
yymm=`date +%Y%m`dd=`date +%d`
hdfs_path=/user/suyuan09/etl/logavro/${yymm}/${dd}
mkdir_result=`/usr/local/hadoop/bin/hadoop fs -mkdir -p ${hdfs_path} 2>&1`if [ "${mkdir_result}x" != "x" ]; then
    #如果报错是报 mkdir: `/mr': File exists ,也不算错
    if [ "${mkdir_result##*: }" != "File exists" ]; then
        echo "/usr/local/hadoop/bin/hadoop fs -mkdir -p ${hdfs_path} error"
        echo "error detail:${mkdir_result}"
        exit    fifi/usr/local/hadoop/bin/hadoop fs -cp hdfs://ns1/data/hainiu/nginx_log/${yymm}/${dd}/nginxaccess_*.gz  hdfs://ns1${hdfs_path}-------------#运行mr
avromr.sh#! /bin/bash
source /etc/profile
#`cd /home/hadoop/etl/jar`
mmdd=`date +%m%d`
yymm=`date +%Y%m`dd=`date +%d`
hdfs_path=/user/suyuan09/etl/logavro/${yymm}/${dd}
avro_path=/user/suyuan09/etl/avropath/${yymm}/${dd}
`/usr/local/hadoop/bin/hadoop  jar /home/hadoop/etl/jar/181210_hbase-1.0.0-symkmk123.jar etltext2avro -Dtask.id=${mmdd} -Dtask.input.dir=${hdfs_path} -Dtask.base.dir=${avro_path}`-------------


--orc--#把avro结果挪到指定目录

avro2orc.sh#! /bin/bash
source /etc/profile
mmdd=`date +%m%d`
yymm=`date +%Y%m`dd=`date +%d`
orc_path=/user/suyuan09/etl/avro2orc/${yymm}/${dd}
mkdir_result=`/usr/local/hadoop/bin/hadoop fs -mkdir -p ${orc_path} 2>&1`if [ "${mkdir_result}x" != "x" ]; then
    #如果报错是报 mkdir: `/mr': File exists ,也不算错
    if [ "${mkdir_result##*: }" != "File exists" ]; then
        echo "/usr/local/hadoop/bin/hadoop fs -mkdir -p ${orc_path} error"
        echo "error detail:${mkdir_result}"
        exit    fifi/usr/local/hadoop/bin/hadoop fs -cp hdfs://ns1/user/suyuan09/etl/avropath/${yymm}/${dd}/etltext2avro_${mmdd}/part-*.avro  hdfs://ns1${orc_path}------------

 #运行orcmr   /user/suyuan09/etl/avro2orc/201812/25/part-m-00000.avro
orcmr.sh#! /bin/bash
source /etc/profile
mmdd=`date +%m%d`
yymm=`date +%Y%m`dd=`date +%d`
avro_path=/user/suyuan09/etl/avro2orc/${yymm}/${dd}
orc_path=/user/suyuan09/etl/orcpath/${yymm}/${dd}
`/usr/local/hadoop/bin/hadoop  jar /home/hadoop/etl/jar/181210_hbase-1.0.0-symkmk123.jar etlavro2orc -Dtask.id=${mmdd} -Dtask.input.dir=${avro_path} -Dtask.base.dir=${orc_path}`--------------------#把orc挪到分区目录

#! /bin/bash
source /etc/profile
mmdd=`date +%m%d`
yymm=`date +%Y%m`dd=`date +%d`/usr/local/hadoop/bin/hadoop fs -cp hdfs://ns1/user/suyuan09/etl/orcpath/${yymm}/${dd}/etlAvro2Orc_${mmdd}/part-*  hdfs://ns1/user/suyuan09/etlorc/etlorc007/month=${yymm}/day=${dd}---------#自动从hive到mysql脚本
hive2mysql.sh#! /bin/bash
source /etc/profile
yymmdd=`date +%Y%m%d`/usr/local/hive/bin/hive  -e "use suyuan09;SELECT COALESCE(uip, 'ALL'),
COALESCE(SUBSTR(datetime,1,12), 'ALL'),
count(*) FROM etlorc007 GROUP BY uip, SUBSTR(datetime,1,12) GROUPING SETS ( (uip,SUBSTR(datetime,1,12)),uip,SUBSTR(datetime,1,12),() );" > /home/hadoop/etl/orc2mysql/my${yymmdd}---------------------------------#data->mysql脚本
data2mysql.sh#! /bin/bash
source /etc/profile
yymmdd=`date +%Y%m%d`
#mysql -h 172.33.101.123 -P 3306 -u tony -pYourPassword -D YourDbName <<EOF/bin/mysql -h192.168.65.160 -p3306 -ureport_user -p12345678 -Dreport <<EOF

LOAD DATA LOCAL INFILE "/home/hadoop/etl/orc2mysql/my${yymmdd}" INTO TABLE suyuan09_etl_orc2mysql FIELDS TERMINATED BY '\t';

EOF
4.2oozie设置任务链
coordinator.xml
修改/examples/apps/cron-schedule中的coordinator.xml
修改frequency中的定时方式
修改timezone为GMT+0800
修改完成后上传到hdfs指定位置
job.properties
修改namenode、jobTracker、queueName、exampleRoot
修改定时调度的起始时间start和终止时间end
修改workflowAppUri,指定workflow.xml文件的路径为ssh
workflow.xml
添加shell脚本工作流
将创建分区脚本,执行mapreduce任务脚本,mv数据脚本,多维度查询脚本,导入数据到mysql脚本 按照顺序依次添加到工作流中
修改完成后上传到hdfs指定位置
workflow.xml<workflow-app xmlns="uri:oozie:workflow:0.2" name="ssh-wf">
    <start to="fenqu"/>

    <action name="fenqu">
        <ssh xmlns="uri:oozie:ssh-action:0.1">
            <host>hadoop@nn1.hadoop</host>
            <command>/home/hadoop/etl/fenqu.sh</command>
            <!--<args>"Hello Oozie!"</args>-->
        </ssh>
        <ok to="log_avro"/>
        <error to="fail"/>
    </action>


    <action name="log_avro">
        <ssh xmlns="uri:oozie:ssh-action:0.1">
            <host>hadoop@nn1.hadoop</host>
            <command>/home/hadoop/etl/log_avro.sh</command>
            <!--<args>"Hello Oozie!"</args>-->
        </ssh>
        <ok to="avromr"/>
        <error to="fail"/>
    </action>

    <action name="avromr">
        <ssh xmlns="uri:oozie:ssh-action:0.1">
            <host>hadoop@nn1.hadoop</host>
            <command>/home/hadoop/etl/avromr.sh</command>
            <!--<args>"Hello Oozie!"</args>-->
        </ssh>
        <ok to="fail"/>
        <error to="avro2orc"/>
    </action>

    <action name="avro2orc">
        <ssh xmlns="uri:oozie:ssh-action:0.1">
            <host>hadoop@nn1.hadoop</host>
            <command>/home/hadoop/etl/avro2orc.sh</command>
            <!--<args>"Hello Oozie!"</args>-->
        </ssh>
        <ok to="orcmr"/>
        <error to="fail"/>
    </action>

       <action name="orcmr">
        <ssh xmlns="uri:oozie:ssh-action:0.1">
            <host>hadoop@nn1.hadoop</host>
            <command>/home/hadoop/etl/orcmr.sh</command>
            <!--<args>"Hello Oozie!"</args>-->
        </ssh>
        <ok to="fail"/>
        <error to="orc2etl"/>
    </action>

       <action name="orc2etl">
        <ssh xmlns="uri:oozie:ssh-action:0.1">
            <host>hadoop@nn1.hadoop</host>
            <command>/home/hadoop/etl/orc2etl.sh</command>
            <!--<args>"Hello Oozie!"</args>-->
        </ssh>
        <ok to="hive2mysql"/>
        <error to="fail"/>
    </action>

       <action name="orc2etl2">
        <ssh xmlns="uri:oozie:ssh-action:0.1">
            <host>hadoop@nn1.hadoop</host>
            <command>/home/hadoop/etl/orc2etl.sh</command>
            <!--<args>"Hello Oozie!"</args>-->
        </ssh>
        <ok to="hive2mysql"/>
        <error to="fail"/>
    </action>

       <action name="hive2mysql">
        <ssh xmlns="uri:oozie:ssh-action:0.1">
            <host>hadoop@nn1.hadoop</host>
            <command>/home/hadoop/etl/hive2mysql.sh</command>
            <!--<args>"Hello Oozie!"</args>-->
        </ssh>
        <ok to="data2mysql"/>
        <error to="fail"/>
    </action>

        <action name="data2mysql">
        <ssh xmlns="uri:oozie:ssh-action:0.1">
            <host>hadoop@nn1.hadoop</host>
            <command>/home/hadoop/etl/data2mysql.sh</command>
            <!--<args>"Hello Oozie!"</args>-->
        </ssh>
        <ok to="end"/>
        <error to="fail"/>
    </action>

    <kill name="fail">
        <message>SSH action failed, error message[${wf:errorMessage(wf:lastErrorNode())}]</message>
    </kill>

    <end name="end"/></workflow-app>
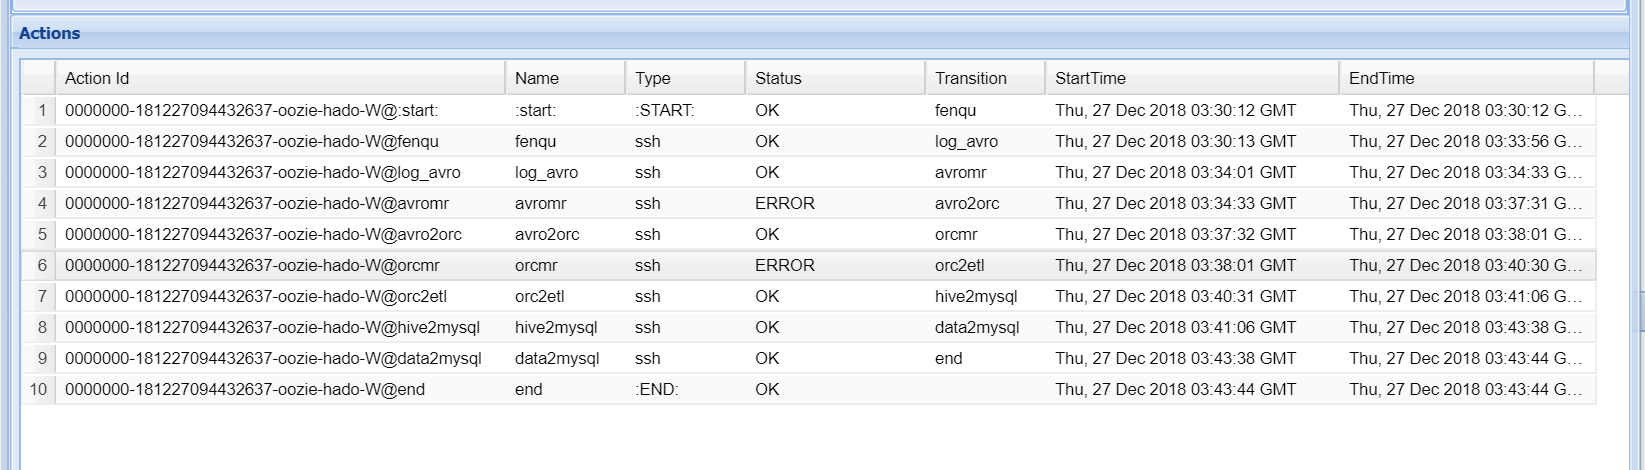
其中,由于我自己集群oozie执行MapReduce会判错,但是在yarn上看执行是successd的.结果也生成了.
所以基于oozie的原理是有向无环图.所以把OK->fail,error->下一个执行的任务.
我大胆猜测并成功了.
5.1报表展示
借助开源报表显示 https://github.com/xianrendzw/EasyReport
这里由于这个项目侧重点在一个ETL流程的串起整体运作,在下一个项目我将侧重在web的显示上.
共同学习,写下你的评论
评论加载中...
作者其他优质文章