OkHttp拦截器
拦截器是OkHttp中提供的一种强大机制,它可以实现网络监听、请求以及响应重写、请求失败重试等功能。
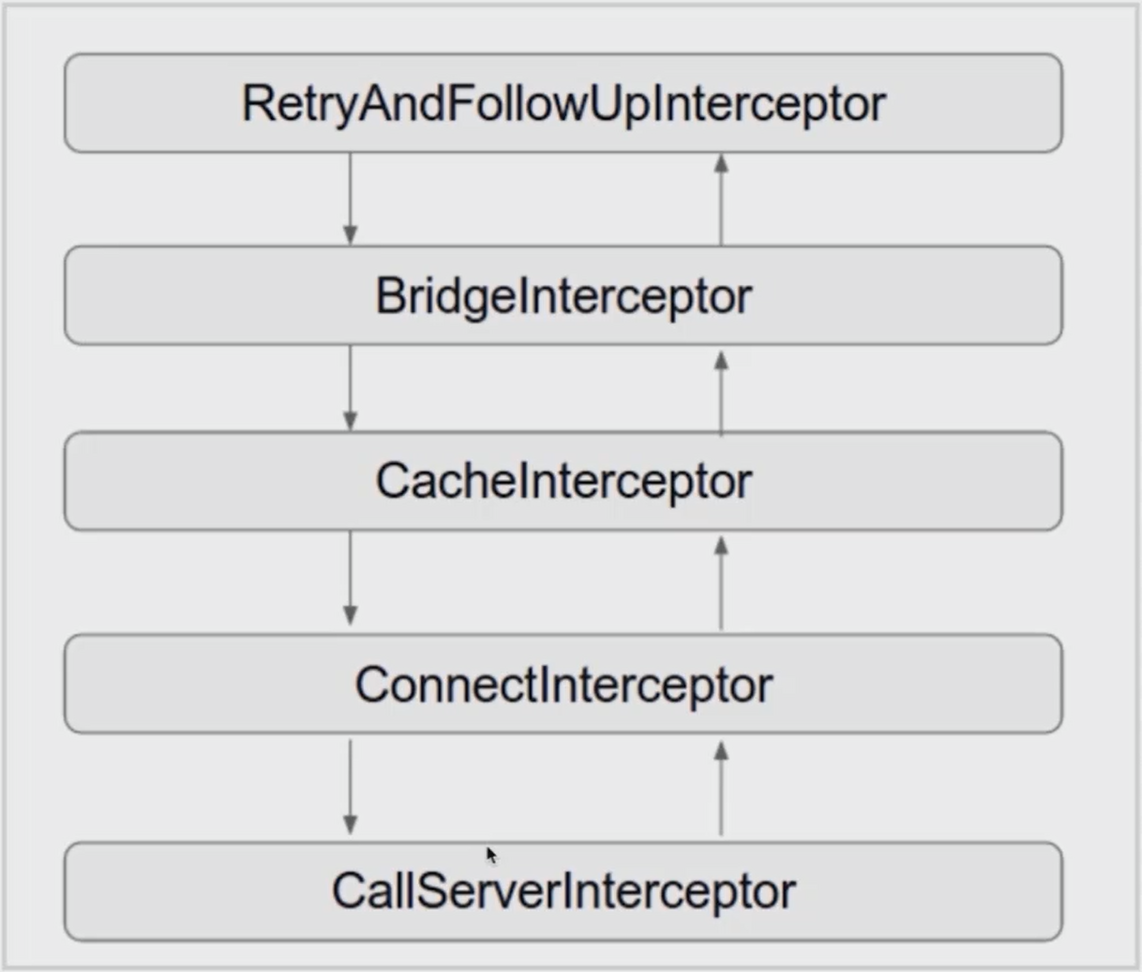
如上图所示,这就OkHttp内部提供给我们的拦截器,就是当我们发起一个http请求的时候,OkHttp就会通过这个拦截器链来执行http请求。其中包括:
- RetryAndFollowUpInterceptor 重试和重定向拦截器
- BridgeInterceptor :桥接和适配拦截器
- CacheInterceptor :缓存拦截器
- ConnectInterceptor :链接拦截器
- CallServerInterceptor :请求和处理响应拦截器
BridgeInterceptor和 CacheInterceptor 主要是用来补充用户请求创建当中缺少的一些必需的http请求头和处理缓存的功能。
ConnectInterceptor 主要是负责建立可用的链接,CallServerInterceptor 主要是负责将http请求写进网络的IO流当中,并且从网络IO流当中读取服务端返回给客户端的数据。
源码分析
getResponseWithInterceptorChain()
上篇文章 OkHttpClient源码分析(一)——同步、异步请求的执行流程和源码分析 有提及到一个很重要的方法getResponseWithInterceptorChain(),同步请求的话,是在RealCall类中的excute()方法中调用到该方法,而异步请求是在RealCall的内部类AsyncCal中的excute()方法中调用,查看该方法的源码:
Response getResponseWithInterceptorChain() throws IOException {
    // Build a full stack of interceptors.
    List<Interceptor> interceptors = new ArrayList<>();
    interceptors.addAll(client.interceptors());
    interceptors.add(retryAndFollowUpInterceptor);
    interceptors.add(new BridgeInterceptor(client.cookieJar()));
    interceptors.add(new CacheInterceptor(client.internalCache()));
    interceptors.add(new ConnectInterceptor(client));
    if (!forWebSocket) {
      interceptors.addAll(client.networkInterceptors());
    }
    interceptors.add(new CallServerInterceptor(forWebSocket));

    Interceptor.Chain chain = new RealInterceptorChain(interceptors, null, null, null, 0,
        originalRequest, this, eventListener, client.connectTimeoutMillis(),
        client.readTimeoutMillis(), client.writeTimeoutMillis());

    return chain.proceed(originalRequest);
}
一、方法里初始化了一个Interceptor的集合,添加了OkHttpClient中配置的拦截器集合,然后依次添加了上述提及到的那五个拦截器;
二、创建一个拦截器链RealInterceptorChain,并执行拦截器链的proceed()方法;
查看RealInterceptorChain类的proceed()方法:
 public Response proceed(Request request, StreamAllocation streamAllocation, HttpStream httpStream,
      Connection connection) throws IOException {

      ...

      // Call the next interceptor in the chain.
    RealInterceptorChain next = new RealInterceptorChain(
        interceptors, streamAllocation, httpStream, connection, index + 1, request);
    Interceptor interceptor = interceptors.get(index);
    Response response = interceptor.intercept(next);

    ...
 }
其中,核心的代码就在这里,这里再次创建了RealInterceptorChain对象,此时创建的是下一个拦截器链,传入的是index + 1,并通过调用当前Interceptor的intercept()方法,将下一个拦截器链传入,得到Response对象,至于拦截器的intercept()方法,下面将会分析。
RetryAndFollowUpInterceptor
主要作用是负责网络请求失败重连,需要注意的是,并不是所有的网络请求失败以后都可以进行重连,它是有一定的限制范围的,OkHttp内部会帮我们检测网络异常和响应码的判断,如果都在它的限制范围内的话,就会进行网络重连。
源码主要看intercept()方法:
@Override public Response intercept(Chain chain) throws IOException {
    Request request = chain.request();

    streamAllocation = new StreamAllocation(
        client.connectionPool(), createAddress(request.url()));

    int followUpCount = 0;
    Response priorResponse = null;
    ...
}
这里创建了一个StreamAllocation对象,StreamAllocation对象是用来建立执行Http请求所需要的网络组件的,从它名字可以看出,它是用来分配stream的,主要是用于获取连接服务端的connection和用于与服务端进行数据传输的输入输出流 。
详细的逻辑都在intercept()方法中的while循环中,这里不做详细介绍,主要是介绍其中的这个:
 while (true) {
    ...

    try {
        response = ((RealInterceptorChain) chain).proceed(request, streamAllocation, null, null);
        releaseConnection = false;
      }

      ...

    if (++followUpCount > MAX_FOLLOW_UPS) {
        streamAllocation.release();
        throw new ProtocolException("Too many follow-up requests: " + followUpCount);
    }

    ...
 }
这里我们可以发现,RealInterceptorChain调用proceed()方法,方法里又创建了一个RealInterceptorChain对象(下一个拦截器链 index + 1),然后通过index获取到当前执行到的拦截器,调用拦截器的intercept()方法,这里intercept()方法中,再次调用了RealInterceptorChain的proceed()方法,形成了递归。
以上代码是对重试的次数进行判断,由此可知,并不是无限次的进行网络重试,而是有一定的重试次数的,MAX_FOLLOW_UPS 是一个常量,值为20,也就是说最多进行20次重试,如果还不成功的话,就会释放StreamAllocation对象和抛出ProtocolException异常。
总结:
- 创建StreamAllocation对象
- 调用RealInterceptorChain.proceed()进行网络请求
- 根据异常结果或响应结果判断是否要进行重新请求
- 调用下一个拦截器,对response进行处理,返回给上一个拦截器
BridgeInterceptor
同样也是看核心方法intercept():
@Override public Response intercept(Chain chain) throws IOException {
    Request userRequest = chain.request();
    Request.Builder requestBuilder = userRequest.newBuilder();

    ...

    if (userRequest.header("Host") == null) {
      requestBuilder.header("Host", hostHeader(userRequest.url(), false));
    }

    if (userRequest.header("Connection") == null) {
      requestBuilder.header("Connection", "Keep-Alive");
    }

    ...

    Response networkResponse = chain.proceed(requestBuilder.build());

    ...

    if (transparentGzip
        && "gzip".equalsIgnoreCase(networkResponse.header("Content-Encoding"))
        && HttpHeaders.hasBody(networkResponse)) {
      GzipSource responseBody = new GzipSource(networkResponse.body().source());
      Headers strippedHeaders = networkResponse.headers().newBuilder()
          .removeAll("Content-Encoding")
          .removeAll("Content-Length")
          .build();
      responseBuilder.headers(strippedHeaders);
      String contentType = networkResponse.header("Content-Type");
      responseBuilder.body(new RealResponseBody(contentType, -1L, Okio.buffer(responseBody)));
    }

    return responseBuilder.build();
  }
这里并没有贴上整个方法的代码,省略了部分,主要的操作就是为发起的Request请求添加请求头信息,其中同样也调用了proceed()方法递归调用下个拦截器,最后面是针对经过gzip压缩过的Response进行解压处理,这里通过判断是否支持gzip压缩且请求头里面的"Content-Encoding"的value是否是"gzip"来判断是否需要进行gzip解压。
总结:
- 负责将用户构建的Request请求转化为能够进行网络访问的请求;
- 将这个符合网络请求的Request进行网络请求;
- 将网络请求回来的的相应Response转化为用户可用的Response
下一篇将为大家介绍OkHttp的缓存机制,感兴趣的朋友可以继续阅读:
共同学习,写下你的评论
评论加载中...
作者其他优质文章