8、递归锁
在线程间共享多个资源的时候,如果两个线程分别占有一部分资源并且同时等待对方的资源,就会造成死锁,因为系统判断这部分资源都在使用,所有这两个线程在无外力作用下将一直等待下去。

1 #!/usr/bin/env python 2 # -*- coding:utf-8 -*- 3 import threading 4 import time 5 6 7 class MyThread(threading.Thread): 8 9 def actionA(self):10 r_lock.acquire()11 print(self.name, 'gotA', time.ctime()) # 重写线程后的self.name --->线程的名字12 time.sleep(2)13 r_lock.acquire()14 print(self.name, 'gotB', time.ctime())15 time.sleep(1)16 r_lock.release()17 r_lock.release()18 19 def actionB(self):20 r_lock.acquire()21 print(self.name, 'gotB', time.ctime()) # 重写线程后的self.name --->线程的名字22 time.sleep(2)23 r_lock.acquire()24 print(self.name, 'gotA', time.ctime())25 time.sleep(1)26 r_lock.release()27 r_lock.release()28 29 def run(self):30 self.actionA()31 self.actionB()32 33 34 if __name__ == '__main__':35 r_lock = threading.RLock()36 li = []37 for t in range(3):38 t = MyThread()39 t.start()40 li.append(t)41 42 for i in li:43 i.join()44 45 print('end')
为了支持在同一线程中多次请求同一资源,Python提供了“可重入锁”:threading.Rlock。Rlock内部维护着一个Lock和counter变量,counter记录了acquire的次数,从而使得资源可以被多次acquire。直到一个线程所有的acquire都被release,其他的线程才能获得资源。
9、同步对象(Event)
An event is a simple synchronization object;the event represents an internal flag,
and threads can wait for the flag to be set, or set or clear the flag themselves.
event = threading.Event()
# a client thread can wait for the flag to be set
event.wait()
# a server thread can set or reset it
event.set()
event.clear()
If the flag is set, the wait method doesn’t do anything.
If the flag is cleared, wait will block until it becomes set again.
Any number of threads may wait for the same event.
1 #!/usr/bin/env python 2 # -*- coding:utf-8 -*- 3 import threading 4 import time 5 6 7 class Boss(threading.Thread): 8 def run(self): 9 print('Boss:今天加班到22:00!\r\n')10 print(event.isSet()) # False11 event.set()12 time.sleep(6)13 print('Boss:可以下班了,明天放假!\r\n')14 print(event.isSet())15 event.set()16 17 18 class Worker(threading.Thread):19 def run(self):20 event.wait() # 一旦event被设定,等同于pass21 print('Worker:唉···命真苦!\r\n')22 time.sleep(1)23 event.clear()24 event.wait()25 print('Worker:OhYeah!\r\n')26 27 28 if __name__ == '__main__':29 event = threading.Event()30 threads = []31 for i in range(5):32 threads.append(Worker())33 threads.append(Boss())34 for t in threads:35 t.start()36 for t in threads:37 t.join()38 print('end')
10、信号量
信号量用来控制线程并发数的,BoundedSemaphore或Semaphore管理一个内置的计数器,每当调用acquire()时-1,调用release()时+1。计数器不能小于0,当计数器为0时,acquire()将阻塞线程至同步锁状态,直到其他线程调用release()。(类似于停车位的概念)BoundedSemaphore与Semaphore的唯一区别在于前者将在调用release()时检查计数器的值是否超过了计数器的初始值,如果超过了将抛出一个异常。
1 #!/usr/bin/env python 2 # -*- coding:utf-8 -*- 3 import threading 4 import time 5 6 7 class MyThread(threading.Thread): 8 def run(self): 9 if semaphore.acquire():10 print(self.name, '\r')11 time.sleep(5)12 semaphore.release()13 14 15 if __name__ == '__main__':16 semaphore = threading.Semaphore(5)17 threads = []18 for i in range(100):19 threads.append(MyThread())20 for t in threads:21 t.start()
11、队列(queue)
列表是不安全的数据结构:


1 #!/usr/bin/env python 2 # -*- coding:utf-8 -*- 3 import threading 4 import time 5 6 li = [1, 2, 3, 4, 5, 6, 7, 8, 9, 10] 7 8 9 def Foo():10 while li:11 try:12 last_li = li[-1]13 print(last_li)14 li.remove(last_li)15 time.sleep(1)16 except Exception as EX:17 print('错误提示:', last_li, EX)18 19 20 t1 = threading.Thread(target=Foo)21 t1.start()22 t2 = threading.Thread(target=Foo)23 t2.start()
不安全的列表
queue队列类的方法:
1 #!/usr/bin/env python 2 # -*- coding:utf-8 -*- 3 import queue # 线程队列 4 q = queue.Queue() # 创建q对象,同步实现的。队列长度可为无限或者有限。可通过Queque的构造函数的可选参数maxsize来设定队列长度。如果maxsize小于1就表示队列长度无限 5 q.put(12) # 将一个值放到队列,调用队列对象的put()方法在队尾插入一个项目。put()有两个参数,第一个item为必需的,为插入项目的值;第二个block为可选参数,默认为1.如果队列当前为空且block为1,put()方法就使调用线程暂停,直到空处一个数据单元。如果block为0,put方法将引发Full异常 6 q.put('alex') 7 q.put({"age": 15}) 8 print(q.get()) # 将一个值从队列中取出,调用队列对象的get()方法,从对头删除并返回一个实例。可选参数为block,默认为True。如果队列为空且block为True,get()就使调用线程暂停,直至有项目可用。如果队列为空且block为False,队列将引发Empty异常 9 print(q.qsize()) # 返回队列的大小10 print(q.empty()) # 判断队列是否为空,返回布尔值,True/False11 print(q.full()) # 判断队列是否已经满了,返回布尔值,True/False12 q.join() # 实际上意味着等到队列为空,再执行别的操作13 14 '''15 Queue模块的三种队列及构造函数16 1、Python Queue模块的FIFO队列,先进先出 class queue.Queue(maxsize)17 2、LIFO 类似于堆,即先进后处。 class queue.LifoQueue(maxsize)18 3、优先级队列,级别越低月先出来。 class queue.PriorityQueue(maxsize)19 '''
生产者消费者模型
为什么要使用生产者和消费者模式?
在线程世界里,生产者就是生产数据的线程,消费者就是消费数据的线程。在多线程开发中,如果生产者处理速度很快,而消费者处理速度很慢,那么生产者就必须等待消费者处理完,才能继续生产数据。同样的道理,如果消费者的处理能力大于生产者,那么消费者就必须等待生产者。为了解决这个问题于是引入了生产者和消费者模式。
什么是生产者消费者模式?
生产者和消费者模式是通过一个容器来解决生产者和消费者的强耦合问题。生产者和消费者彼此之间不直接通讯,而通过阻塞队列来进行通讯,所以生产者生产完数据之后不用等待消费者处理,直接扔给阻塞队列,消费者不找生产者要数据,而是直接从阻塞队列里取,阻塞队列就相当于一个缓冲区,平衡了生产者和消费者的处理能力。
1 #!/usr/bin/env python 2 # -*- coding:utf-8 -*- 3 import time 4 import random 5 import queue 6 import threading 7 q = queue.Queue() 8 9 10 def Producer(name):11 count = 012 while count < 10:13 print('making..')14 time.sleep(random.randrange(3))15 q.put(count)16 print('Producer [%s] has produced %s meat bun。\r' % (name, count))17 count += 118 print('ok\r')19 20 21 def Consumer(name):22 count = 023 while count < 10:24 time.sleep(random.randrange(4))25 if not q.empty():26 data = q.get()27 print('lm Consumer [%s] has eat %s meat bun。\r' % (name, data))28 else:29 print('---no meat bun anymore----\r')30 count += 131 32 33 p1 = threading.Thread(target=Producer, args=('alex',))34 c1 = threading.Thread(target=Consumer, args=('B',))35 p1.start()36 c1.start()
生产者和消费者举例
12、并发&并行
并发:指系统具有处理多个任务(动作)的能力
并行:指系统具有同时处理多个任务(动作)的能力
13、同步&异步
同步:当进程执行到一个IO(等待外部数据)的时候你等
异步:当进程执行到一个IO(等待外部数据)的时候你不等;一直等到数据接收完成,在回来处理
14、任务类型
IO密集型:Python的多线程是有意义的
计算密集型:Python的多线程就不推荐,可以采用多进程+协程
16、多进程模块( multiprocessing)
Multiprocessingmultiprocessingmultiprocessing
由于GIL的存在,Python中的多线程其实并不是真正的多线程,如果想充分地使用多核CPU的资源,在Python中大部分情况下需要使用多进程。multiprocessing包是Python中的多进程管理包。与threading.Thread类似,它可以利用multiprocessing.Process对象来创建一个进程。该进程可以运行在Python程序内部编写的函数。该Process对象与Thread对象的用法,也有start(),run(),join()的方法。此外multiprocessing包中也有Lock/Event/Semaphore/Condition类(这些对象可以像多线程那样,通过参数传递给各个进程),用以同步进程,其用法与threading包中的同名类一致。所以,multiprocessing的很大一部分与threading使用同一套API,只不过换到了多进程的情景。
调用方式一:
1 #!/usr/bin/env python 2 # -*- coding:utf-8 -*- 3 from multiprocessing import Process 4 import time 5 6 7 def Foo(name): 8 time.sleep(1) 9 print('hello', name, time.ctime())10 11 12 if __name__ == '__main__':13 p_list = []14 for i in range(200):15 p = Process(target=Foo, args=('alex',))16 p_list.append(p)17 p.start()18 for i in p_list:19 p.join()20 print('end')
方式一
调用方式二:
1 #!/usr/bin/env python 2 # -*- coding:utf-8 -*- 3 from multiprocessing import Process 4 import time 5 6 7 class MyProcess(Process): 8 def __init__(self): 9 super(MyProcess, self).__init__()10 11 def run(self):12 time.sleep(1)13 print('hello', self.name, time.ctime())14 15 16 if __name__ == '__main__':17 p_list = []18 for i in range(3):19 p = MyProcess()20 p.start()21 p_list.append(p)22 for p in p_list:23 p.join()24 print('end')
方式二
Process类
构造方法:
Process([group [, target [, name [, args [, kwargs]]]]])
group:线程组,目前还没有实现,库引用中提示必须是None
target:要执行的方法
name:进程名
args/kwargs:要传入方法的参数
实例方法:
is_alive():返回进程是否在运行
join([timeout]):阻塞当前上下文环境的进程,直到调用此方法的进程终止或到达指定的timeout(可选参数)
start():进程准备就绪,等待CPU调度
run():start()调用run方法,如果实例进程时未指定传入target,这start执行t默认run()方法
terminate():不管任务是否完成,立即停止工作进程
属性:
daemon:和线程的setDeamon功能一样
name:进程名字
pid:进程号
17、进程的通信
进程队列Queue
1 #!/usr/bin/env python 2 # -*- coding:utf-8 -*- 3 import queue 4 import multiprocessing 5 6 7 def Foo(q): 8 q.put(123) 9 q.put(456)10 11 12 if __name__ == '__main__':13 q = multiprocessing.Queue() # 注意:此处需用进程队列,不能用线程队列,即q=queue.Queue()14 p = multiprocessing.Process(target=Foo, args=(q,))15 p.start()16 print(q.get())17 print(q.get())
管道
The Pipe() function returns a pair of connection objects connected by a pipe which by default is duplex (two-way). For example:
1 #!/usr/bin/env python 2 # -*- coding:utf-8 -*- 3 from multiprocessing import Process, Pipe 4 5 6 def Foo(child_conn): 7 child_conn.send([12, {'name': 'alice'}, 'hello']) 8 response = child_conn.recv() 9 print('response:', response)10 child_conn.close()11 print('q_id2:', id(child_conn))12 13 14 if __name__ == '__main__':15 parent_conn, child_conn = Pipe()16 print('q_ID1', id(child_conn))17 p = Process(target=Foo, args=(child_conn,))18 p.start()19 print(parent_conn.recv())20 parent_conn.send('早上好!')21 p.join()
View Code
Managers
Queue和pipe只是实现了数据交互,并没实现数据共享,即一个进程去更改另一个进程的数据。
A manager object returned by Manager() controls a server process which holds Python objects and allows other processes to manipulate them using proxies.
A manager returned by Manager() will support types list, dict, Namespace, Lock, RLock, Semaphore, BoundedSemaphore, Condition, Event, Barrier, Queue, Value and Array. For example:
1 #!/usr/bin/env python 2 # -*- coding:utf-8 -*- 3 from multiprocessing import Process, Manager 4 5 6 def Foo(dic, li, i): 7 dic[i] = '1' 8 li.append(i) 9 10 11 if __name__ == '__main__':12 with Manager() as manager:13 dic = manager.dict()14 li = manager.list(range(5))15 p_list = []16 for i in range(10):17 p = Process(target=Foo, args=(dic, li, i))18 p.start()19 p_list.append(p)20 for p in p_list:21 p.join()22 print(dic)23 print(li)
View Code
进程同步
Without using the lock output from the different processes is liable to get all mixed up.
1 #!/usr/bin/env python 2 # -*- coding:utf-8 -*- 3 from multiprocessing import Process, Lock 4 5 6 def Foo(lk, i): 7 with lk: # 默认情况下,已经lk.acquire() 8 print('hello world %s' % i) 9 10 11 if __name__ == '__main__':12 lock = Lock()13 for num in range(10):14 Process(target=Foo, args=(lock, num)).start()
View Code
进程池
进程池内部维护一个进程序列,当使用时,则去进程池中获取一个进程,如果进程池序列中没有可供使用的进程,那么程序就会等待,直到进程池中有可进程为止。
进程池中两个方法:
1 #!/usr/bin/env python 2 # -*- coding:utf-8 -*- 3 from multiprocessing import Process, Pool 4 import time, os 5 6 7 def Foo(i): 8 time.sleep(1) 9 print('i = \r', i)10 11 12 def Bar(arg): # 此处arg=Foo()函数的返回值13 print('pgid-->%s\r' % os.getpid())14 print('ppid-->%s\r' % os.getppid())15 print('logger:%s\r' % arg)16 17 18 if __name__ == '__main__':19 pool = Pool(5)20 Bar(1)21 print('------------\r')22 for i in range(10):23 # pool.apply(func=Foo, args=(i,)) # 同步接口24 # pool.apply_async(func=Foo, args=(i,))25 pool.apply_async(func=Foo, args=(i,), callback=Bar) # callback-->回调函数:就是某个动作或者函数执行成功后再去执行的函数26 pool.close() 27 pool.join() # join和close位置不能反 28 print('end\r')
十三 协程
协程:又称微线程,英文名:Coroutine,本质上是一个线程
优点1:协程具有极高的执行效率。因为子程序切换不是线程切换,而是由程序自身控制。因此,没有线程切换的开销,和多线程比,线程数量越多,协程的性能优势就越明显。
优点2:不需要多线程的锁机制,因为只有一个线程,也不存在同时写变量冲突,在协程中控制共享资源不加锁,只需要判断状态就好了,所以执行效率比多线程高很多。
因为协程是一个线程执行,那怎么利用多核CPU呢?最简单的方法就是多进程+协程,即充分利用多核,又充分发挥协程的高效率,可获得极高的性能。
1 #!/usr/bin/env python 2 # -*- coding:utf-8 -*- 3 import time 4 5 6 def consumer(name): 7 print('---->ready to eat meat bun') 8 while True: 9 new_meat_bun = yield10 print('[%s] is eating meat bun %s' % (name, new_meat_bun))11 12 13 def producer():14 con1.__next__()15 con2.__next__()16 n = 017 while 1:18 time.sleep(1)19 print('\033[32;1m[producer]\033[0m is making meat bun %s and %s' % (n, n + 1))20 con1.send(n)21 con2.send(n + 1)22 n += 223 24 25 if __name__ == '__main__':26 con1 = consumer('alex')27 con2 = consumer('alice')28 producer()
yield简单的实现--->协程
Greenlet
greenlet是一个用C实现的协程模块,相比与Python自带的yield,它可以使你在任意函数之间随意切换,而不需把这个函数先声明为generator。(注:需要用pip安装包;pip install gevent)
1 from greenlet import greenlet 2 import time 3 4 5 def A(): 6 while 1: 7 print('-------A-------') 8 time.sleep(0.5) 9 g2.switch()10 11 12 def B():13 while 1:14 print('-------B-------')15 time.sleep(0.5)16 g1.switch()17 18 19 g1 = greenlet(A) # 创建协程g120 g2 = greenlet(B)21 22 g1.switch() # 跳转至协程g1
greenlet
gevent
1 import gevent 2 import requests, time # 此处requests需安装模块;pip --timeout=100 install requests 3 4 start = time.time() 5 6 7 def f(url): 8 print('GET: %s' % url) 9 resp = requests.get(url) # 爬网页的标签10 data = resp.text11 print('%d bytes received from %s.' % (len(data), url))12 13 14 gevent.joinall([15 gevent.spawn(f, 'https://www.qq.com/'),16 gevent.spawn(f, 'https://www.baidu.com/'),17 gevent.spawn(f, 'https://www.taobao.com/'),18 ])19 20 print("cost time:", time.time() - start)
gevent
十四 缓存I/O
缓存I/O又被称作标准I/O,大多数文件系统的默认I/O操作都是缓存I/O。在Linux的缓存I/O机制中,操作系统会将I/O的数据缓存在文件系统的页缓存(page cache)中,也就是说,数据会先被拷贝到操作系统内核的缓冲区中,然后才会从操作系统内的缓冲区拷贝到应用程序的地址空间。用户空间没法直接访问内核空间的,内核态到用户态的数据拷贝。
缓存I/O的缺点:数据在传输过程中需要在应用程序地址空间和内核进行多次数据拷贝操作,这些数据拷贝操作所带来的CPU以及内存开销是非常大的。
I/O发生时设计的对象和步骤:
对于一个network IO(以read举例),他会涉及到两个系统对象,一个是调用这个IO的process(or thread),另一个就是系统内核(kernel)。当一个read操作发生时,它会经历两个阶段:
1、等待数据准备(Waiting for the data to be read)
2、将数据从内核拷贝到进程中(Copying the data from the kernel to the process)
注:这两点很重要,因为这些IO Mode的区别就是在这两个阶段上各有不同的情况。
blocking IO(阻塞IO,Linux下)
在Linux中,默认情况下所有的socket都是blocking,一个典型的读操作大概流程图:
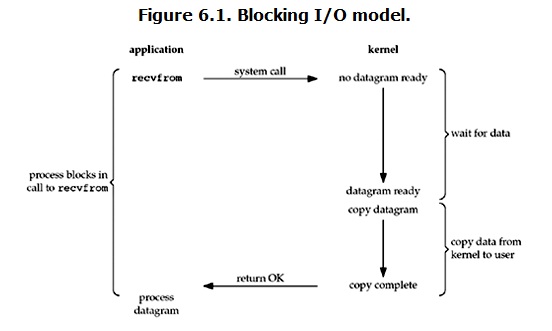
当用户进程调用了recvfrom这个系统调用,kernel就开始了IO的第一阶段:准备数据。对于network IO来说,很多时候数据在一开始还没到达(如:还没收到一个完整的UDP包),这个时候kernel就要等待足够的数据到来。而在用户进程这边,整个进程会被阻塞。当kernel一直等到数据准备好了,它就将数据从kernel中拷贝到用户内存,然后kernel。所以,blocking IO的特点就是在IO执行的两个阶段都被block了。
non-blocking IO(非阻塞IO,Linux下)
在Linux下,可以通过设置socket使其变为non-blocking。当对一个non-blocking socket执行时大概的流程:

从上图可以看出,当用户进程发出read时,如果kernel中的数据还没准备好,那么它并不会block用户进程,而是立即返回一个error。从用户进程角度讲来讲,它发起一个read操作后,并不需要等待,而是马上就得到了一个结果。用户进程判断结果是一个error时,它就知道数据还没准备好,于是它可以再次发送read操作。一旦kernel中的数据准备好了。所以,用户进程其实是需要不断的主动询问kernel数据好了没有。
1 import time 2 import socket 3 sk = socket.socket(socket.AF_INET, socket.SOCK_STREAM) 4 sk.bind(('127.0.0.1',8080)) 5 sk.listen(5) 6 sk.setblocking(False) # 设置是否阻塞,默认为True,非阻塞 7 while True: 8 try: 9 print('waiting client connection...')10 conn,addr = sk.accept() # 进程主动轮询11 print('+++',addr)12 data = sk.recv(1024)13 print(str(data,'utf8'))14 conn.close()15 except Exception as EX:16 print('错误提示:',EX)17 time.sleep(2)
非阻塞-socket-server
1 import time2 import socket3 sk = socket.socket(socket.AF_INET,socket.SOCK_STREAM)4 while True:5 sk.connect(('127.0.0.1',8080))6 print('hello')7 sk.sendall(bytes('hello','utf8'))8 time.sleep(1)9 break
非阻塞-socket-client
IO multiplexing(IO多路复用)
有些地方也称为这种IO方式为event driven IO。它的基本原理就是select/epoll这个function会不断的轮询所负责的所有socket,当某个socket有数据到达了,就通知用户进程,大概流程图:
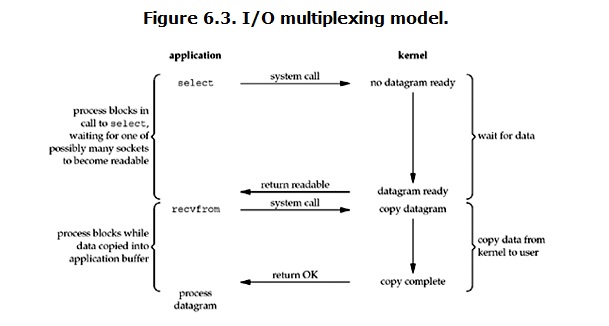
当用户进程调用了select,那么真个进程会被block。而同时,kernel会“监视”所有select负责的socket,当任何一个socket中的数据准备好了,select就会返回。这时用户进程再调用read操作,将数据从kernel拷贝到用户进程。(如果处理的连接数不是很多的话,使用select/epoll的web server不一定比使用multi-threading+blocking IO的web server性能更好,可能延迟更大;select/epoll的优势并不是对于单个连接能处理得更快,而是在于能处理更多的连接)
注:
1、select函数返回结果中如果有文件可读了,那么进程就可以同故宫调用accept()或recv()来让kernel将位于内核中准备到的数据copy到用户区。
2、select的优势在于可以处理多个连接,不适用于单个连接。
1 import socket 2 import select 3 4 sk = socket.socket(socket.AF_INET, socket.SOCK_STREAM) 5 sk.bind(('127.0.0.1', 8080)) 6 sk.listen(5) 7 inputs = [sk, ] 8 while True: 9 r, w, e = select.select(inputs, [], [], 3)10 for obj in r:11 print('obj:', obj)12 if obj == sk:13 conn, addr = obj.accept()14 print('已连接:', conn)15 inputs.append(conn)16 else:17 data_byte = obj.recv(1024)18 print(str(data_byte, 'utf8'))19 inp = input('回答[%s]号客户端>>:' % inputs.index(obj))20 obj.sendall(bytes(inp, 'utf8'))21 print('>>>', r)
多路复用-select-server
1 import socket 2 3 sk = socket.socket(socket.AF_INET, socket.SOCK_STREAM) 4 sk.connect(('127.0.0.1', 8080)) 5 6 while True: 7 inp = input(">>>>") 8 sk.sendall(bytes(inp, "utf8")) 9 data = sk.recv(1024)10 print(str(data, 'utf8'))
多路复用-select-client
Asynchronous I/O(异步IO)
流程图:
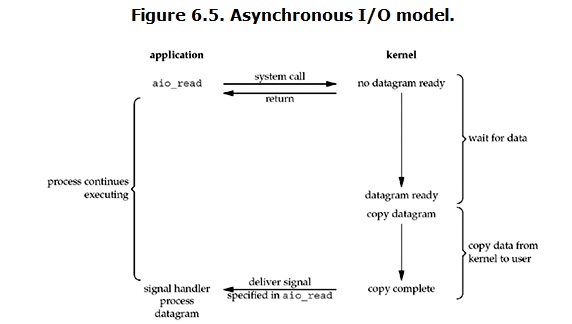
从图中可以看出,用户进程发起read操作之后,立刻就开始去做其它的事。另一方面,从kernel的角度,当他受到一个asynchronous read之后,首先它会立刻返回,所以不会对用户进程产生任何block。然后,kernel会等待数据准备完成,然后将数据拷贝到用户内存,当这一切都完成之后,kernel会给用户进程发送一个signal,告诉它read操作完成了。
selectors模块:
1 #!/usr/bin/env python 2 # -*- coding:utf-8 -*- 3 import selectors 4 import socket 5 6 sel = selectors.DefaultSelector() # 根据系统,默认选择最优IO多用户模式 7 8 9 def accept(sock, mask):10 conn, addr = sock.accept()11 print('accepted', conn, 'from', addr)12 conn.setblocking(False)13 sel.register(conn, selectors.EVENT_READ, read)14 15 16 def read(conn, mask):17 try:18 data = conn.recv(1000)19 if not data:20 raise Exception21 print('收到:', data.decode('utf8'))22 conn.send(data.upper()) # Hope it won't block23 except Exception as EX:24 print('closing:', conn)25 sel.unregister(conn) # 解除绑定26 conn.close()27 28 29 sock = socket.socket()30 sock.bind(('localhost', 8080))31 sock.listen(100)32 sock.setblocking(False)33 sel.register(sock, selectors.EVENT_READ, accept) # sock与accept绑定34 while True:35 events = sel.select() # 监听[sock,conn1,conn2....]36 for key, mask in events:37 callback = key.data38 print('>>callback:', callback)39 callback(key.fileobj, mask)
selectors模块-server
1 #!/usr/bin/env python 2 # -*- coding:utf-8 -*- 3 import socket 4 sk = socket.socket() 5 sk.connect(('127.0.0.1', 8080)) 6 while True: 7 inp = input('>>>') 8 sk.send(inp.encode('utf8')) 9 data = sk.recv(1024)10 print(data.decode('utf8'))
作者:陈彦斌
原文出处:https://www.cnblogs.com/chenyanbin/p/10406263.html
Python 之网络式编程 (上):https://www.imooc.com/article/281284
Python 之网络式编程 (中):https://www.imooc.com/article/281285
共同学习,写下你的评论
评论加载中...
作者其他优质文章