SpringBoot | 集成多CacheManager
前言
今天有网友咨询了一个问题:如何在一个工程中使用多种缓存进行差异化缓存,即实现多个
cacheManager灵活切换。原来没有遇见这种场景,今天下班抽空试了下,以下就把如何实现的简单记录下。
一点知识
在
SpringBoot中使用Spring Cache可以轻松实现缓存,是Spring框架提供的对缓存使用的抽象类,支持多种缓存,比如Redis、EHCache等,集成很方便。同时提供了多种注解来简化缓存的使用,可对方法进行缓存。具体如何集成,之前的文章已经有详细介绍了,感兴趣的同学可点击:SpringBoot | 第十一章:Redis的集成和简单使用。这里就不再阐述了,一下简单较少下cacheManager。
关于CacheMananger
针对不同的缓存技术,需要实现不同的cacheManager,Spring定义了如下的cacheManger实现。
| CacheManger | 描述 |
|---|---|
| SimpleCacheManager | 使用简单的Collection来存储缓存,主要用于测试 |
| ConcurrentMapCacheManager | 使用ConcurrentMap作为缓存技术(默认) |
| NoOpCacheManager | 测试用 |
| EhCacheCacheManager | 使用EhCache作为缓存技术,以前在hibernate的时候经常用 |
| GuavaCacheManager | 使用google guava的GuavaCache作为缓存技术 |
| HazelcastCacheManager | 使用Hazelcast作为缓存技术 |
| JCacheCacheManager | 使用JCache标准的实现作为缓存技术,如Apache Commons JCS |
| RedisCacheManager | 使用Redis作为缓存技术 |
常规的SpringBoot已经为我们自动配置了EhCache、Collection、Guava、ConcurrentMap等缓存,默认使用ConcurrentMapCacheManager。SpringBoot的application.properties配置文件,使用spring.cache前缀的属性进行配置。
application配置
spring.cache.type=#缓存的技术类型
spring.cache.cache-names=应用程序启动创建缓存的名称
spring.cache.ehcache.config=ehcache的配置文件位置
spring.cache.infinispan.config=infinispan的配置文件位置
spring.cache.jcache.config=jcache配置文件位置
spring.cache.jcache.provider=当多个jcache实现类时,指定选择jcache的实现类
这里为了演示多cacheManager实现,这里使用redis和ehcache进行集成。
集成Redis和ehcache
0.pom文件依赖
        <!-- redis cache -->
        <dependency>
            <groupId>org.springframework.boot</groupId>
            <artifactId>spring-boot-starter-data-redis</artifactId>
        </dependency>
        <!-- ehcache缓存 -->
        <dependency>
            <groupId>net.sf.ehcache</groupId>
            <artifactId>ehcache</artifactId>
        </dependency>
1.创建配置类。
CacheConfig.java
/**
*
* @ClassName   类名:CacheConfig
* @Description 功能说明:缓存配置类
* <p>
* TODO
*</p>
************************************************************************
* @date        创建日期:2019年3月7日
* @author      创建人:oKong
* @version     版本号:V1.0
*<p>
***************************修订记录*************************************
*
*   2019年3月7日   oKong   创建该类功能。
*
***********************************************************************
*</p>
*/@Configuration@EnableCachingpublic class CacheConfig {
    /**
     * cacheManager名称
     */
    public interface CacheManagerName {        /**
         * redis
         */
        String REDIS_CACHE_MANAGER = "redisCacheManager";        /**
         * ehCache
         */
        String EHCACHE_CACHE_MAANGER = "ehCacheCacheManager";
    }    /**
     *  定义 StringRedisTemplate ,指定序列号和反序列化的处理类
     * @param factory
     * @return
     */
    @Bean
    public RedisTemplate<String, String> redisTemplate(RedisConnectionFactory factory) {
        StringRedisTemplate template = new StringRedisTemplate(factory);
        Jackson2JsonRedisSerializer<Object> jackson2JsonRedisSerializer = new Jackson2JsonRedisSerializer<>(
                Object.class);
        ObjectMapper om = new ObjectMapper();
        om.setVisibility(PropertyAccessor.ALL, JsonAutoDetect.Visibility.ANY);
        om.enableDefaultTyping(ObjectMapper.DefaultTyping.NON_FINAL);
        jackson2JsonRedisSerializer.setObjectMapper(om);        //序列化 值时使用此序列化方法
        template.setValueSerializer(jackson2JsonRedisSerializer);
        template.afterPropertiesSet();        return template;
    }
    @Bean(CacheConfig.CacheManagerName.REDIS_CACHE_MANAGER)    @Primary
    public RedisCacheManager redisCacheManager(RedisTemplate<String,String> redisTemplate) {
        RedisCacheManager rcm = new RedisCacheManager(redisTemplate);        //使用前缀
        rcm.setUsePrefix(true);        //缓存分割符 默认为 ":"//        rcm.setCachePrefix(new DefaultRedisCachePrefix(":"));
        //设置缓存过期时间
        //rcm.setDefaultExpiration(60);//秒
        return rcm;
    }
    @Bean(CacheConfig.CacheManagerName.EHCACHE_CACHE_MAANGER)
    public EhCacheCacheManager EhcacheManager() {
        EhCacheCacheManager ehCacheManager = new EhCacheCacheManager();        return ehCacheManager;
    }
}注:其实就是配置多个cacheManager。但这里需要注意,要设置一个默认的cacheManager,即注解在未设置cacheManager时,自动使用此缓存管理类进行缓存,同时,因为注入了多个cacheManaager,需要在默认的管理器方法上加上@Primary注解。不然,会出现一下异常:
No CacheResolver specified, and no unique bean of type CacheManager found. Mark one as primary (or give it the name 'cacheManager') or declare a specific CacheManager to use, that serves as the default one.
至于原因。可以查看以下代码:
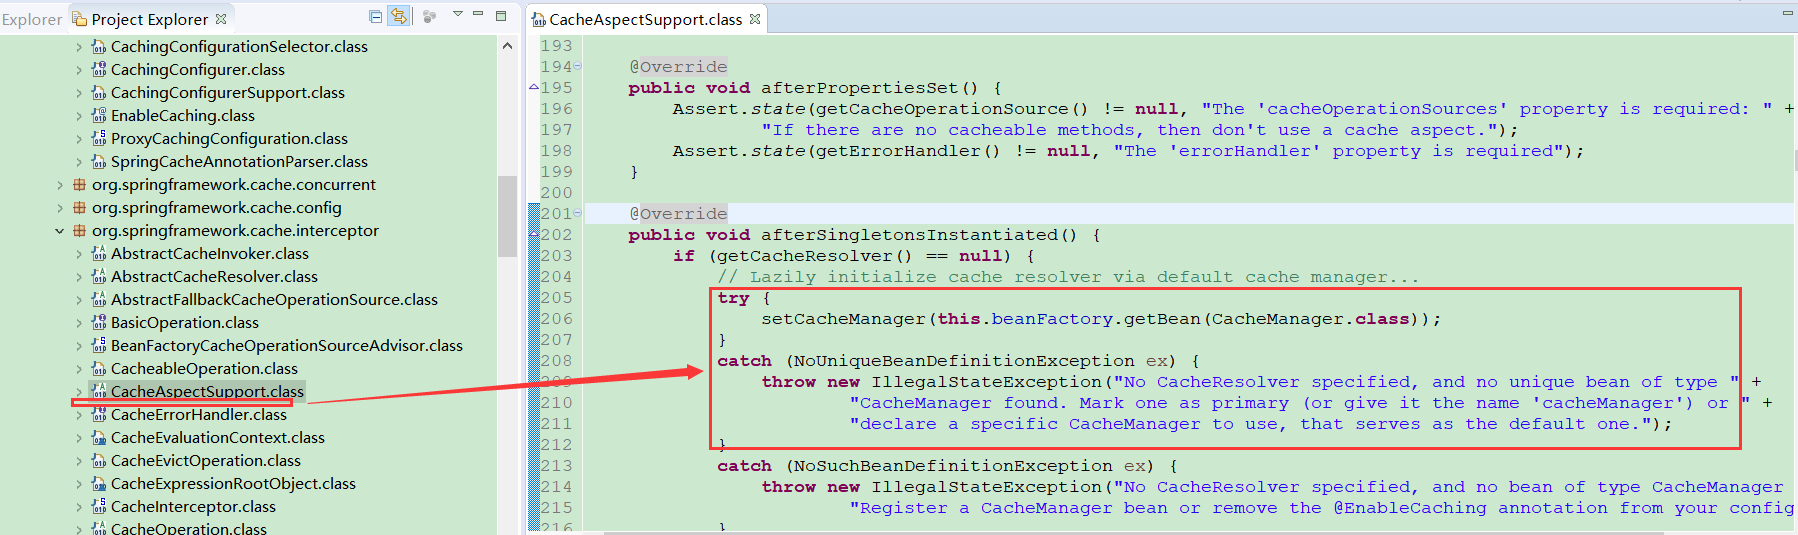
其实就是配置了多个bean,抛出了一个NoUniqueBeanDefinitionException异常。其实就是未指定一个默认的cacheManager,所以加上@Primary即可。
@Primary 优先考虑,优先考虑被注解的对象注入
2.编写测试类,默认是使用redis缓存,若想指定缓存,只需要设置cacheManager的值即可。
/**
*
* @ClassName   类名:DemoController
* @Description 功能说明:
* <p>
* TODO
*</p>
************************************************************************
* @date        创建日期:2019年3月7日
* @author      创建人:oKong
* @version     版本号:V1.0
*<p>
***************************修订记录*************************************
*
*   2019年3月7日   oKong   创建该类功能。
*
***********************************************************************
*</p>
*/@RestController@Slf4jpublic class DemoController {
    @RequestMapping("/redis/{key}")    @Cacheable(value = "redis",key="#key",cacheManager=CacheConfig.CacheManagerName.REDIS_CACHE_MANAGER)    public String cacheRedisTest(@PathVariable("key") String key) {
        log.info("redis,key={}", key);        return key;
    }
    @RequestMapping("/ehcache/{key}")    @Cacheable(value = "oKongCache",key="#key",cacheManager=CacheConfig.CacheManagerName.EHCACHE_CACHE_MAANGER)    public String cacheEhcacheTest(@PathVariable("key") String key) {
        log.info("ehcache,key={}", key);        return key;
    }
    @RequestMapping("/default/{key}")    @Cacheable(value = "default",key="#key")    public String cacheDefaultTest(@PathVariable("key") String key) {
        log.info("default,key={}", key);        return key;
    }
}
3.配置application文件,加入相关配置。
# REDIS (RedisProperties)# Redis数据库索引(默认为0)spring.redis.database=0# Redis服务器地址spring.redis.host=127.0.0.1# Redis服务器连接端口spring.redis.port=6379# Redis服务器连接密码(默认为空)spring.redis.password=# 连接池最大连接数(使用负值表示没有限制)spring.redis.pool.max-active=8# 连接池最大阻塞等待时间(使用负值表示没有限制)spring.redis.pool.max-wait=-1# 连接池中的最大空闲连接spring.redis.pool.max-idle=8# 连接池中的最小空闲连接spring.redis.pool.min-idle=0# 连接超时时间(毫秒)spring.redis.timeout=0# ehcache配置地址spring.cache.ehcache.config=ehcache.xml
配置ehcache.xml文件,设置cacheName。
<?xml version="1.0" encoding="UTF-8"?><ehcache xmlns:xsi="http://www.w3.org/2001/XMLSchema-instance"
    xsi:noNamespaceSchemaLocation="ehcache.xsd">
    <!--timeToIdleSeconds 当缓存闲置n秒后销毁 -->
    <!--timeToLiveSeconds 当缓存存活n秒后销毁 -->
    <!-- 缓存配置
        name:缓存名称。
        maxElementsInMemory:缓存最大个数。
        eternal:对象是否永久有效,一但设置了,timeout将不起作用。
        timeToIdleSeconds:设置对象在失效前的允许闲置时间(单位:秒)。仅当eternal=false对象不是永久有效时使用,可选属性,默认值是0,也就是可闲置时间无穷大。
        timeToLiveSeconds:设置对象在失效前允许存活时间(单位:秒)。最大时间介于创建时间和失效时间之间。仅当eternal=false对象不是永久有效时使用,默认是0.,也就是对象存活时间无穷大。
        overflowToDisk:当内存中对象数量达到maxElementsInMemory时,Ehcache将会对象写到磁盘中。 diskSpoolBufferSizeMB:这个参数设置DiskStore(磁盘缓存)的缓存区大小。默认是30MB。每个Cache都应该有自己的一个缓冲区。
        maxElementsOnDisk:硬盘最大缓存个数。
        diskPersistent:是否缓存虚拟机重启期数据 Whether the disk
        store persists between restarts of the Virtual Machine. The default value
        is false.
        diskExpiryThreadIntervalSeconds:磁盘失效线程运行时间间隔,默认是120秒。  memoryStoreEvictionPolicy:当达到maxElementsInMemory限制时,Ehcache将会根据指定的策略去清理内存。默认策略是
LRU(最近最少使用)。你可以设置为FIFO(先进先出)或是LFU(较少使用)。
        clearOnFlush:内存数量最大时是否清除。 -->
    <!-- 磁盘缓存位置 -->
    <diskStore path="java.io.tmpdir" />
    <!-- 默认缓存 -->
    <defaultCache
        maxElementsInMemory="10000"
        eternal="false"
        timeToIdleSeconds="120"
        timeToLiveSeconds="120"
        maxElementsOnDisk="10000000"
        diskExpiryThreadIntervalSeconds="120"
        memoryStoreEvictionPolicy="LRU">
        <persistence strategy="localTempSwap" />
    </defaultCache>

    <!-- 指定cache,即对应cacheName的值 -->
    <cache name="oKongCache"
        eternal="false"
        timeToIdleSeconds="2400"
        timeToLiveSeconds="2400"
        maxEntriesLocalHeap="10000"
        maxEntriesLocalDisk="10000000"
        diskExpiryThreadIntervalSeconds="120"
        overflowToDisk="false"
        memoryStoreEvictionPolicy="LRU">
    </cache></ehcache>
关于其属性参数,大家可自行百度下,使用的不多呀,(┬_┬)
4.启动应用。
依次访问:
http://127.0.0.1:8080/redis/okong
http://127.0.0.1:8080/ehcache/okong
http://127.0.0.1:8080/default/okong
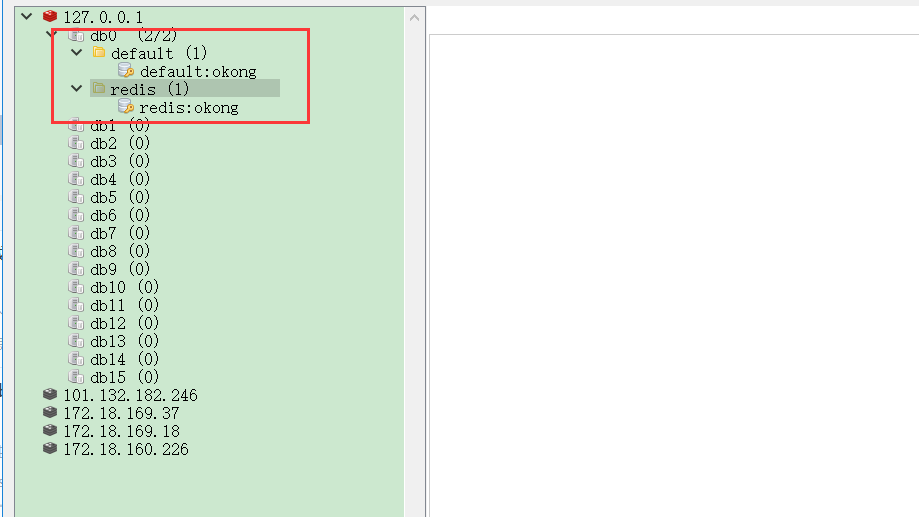
可以看看redis中已经存在相关记录了
之后多访问几次,查看控制台,是没有输出的。

参考资料
总结
本章节主要介绍了多
cacheManager的灵活切换,以便实现更加灵活的缓存使用,可以根据具体的业务需求,进行差异化操作。关于ehcache的使用,现在用的不多了,所以相关配置参数,可以自行搜索下了。
作者:oKong | 趔趄的猿
出处:https://www.cnblogs.com/okong/p/springboot-thirty-six.html
本文版权归作者和博客园共有,欢迎转载,但未经作者同意必须保留此段声明,且在文章页面明显位置给出原文连接,否则保留追究法律责任的权利。
共同学习,写下你的评论
评论加载中...
作者其他优质文章