
SpringBoot之路(4)--SpringBoot Web应用开发
使用场景
Web应用是项目开发中的主流应用,门户、新闻、博客、线上学习等使用场景都需要Web应用。使用Spring Boot,只需简单几步即可完成Web应用构建:
- 导入模板项目
- 修改pom.xml,引入项目依赖
- 编写控制器,提供服务接口
- 编写配置文件,配置项目信息
导入模板项目
Spring Boot项目基本结构都是相同的,所以我们可以使用Spring Initializr(Spring初始化器)直接生成一个模板项目,如下图: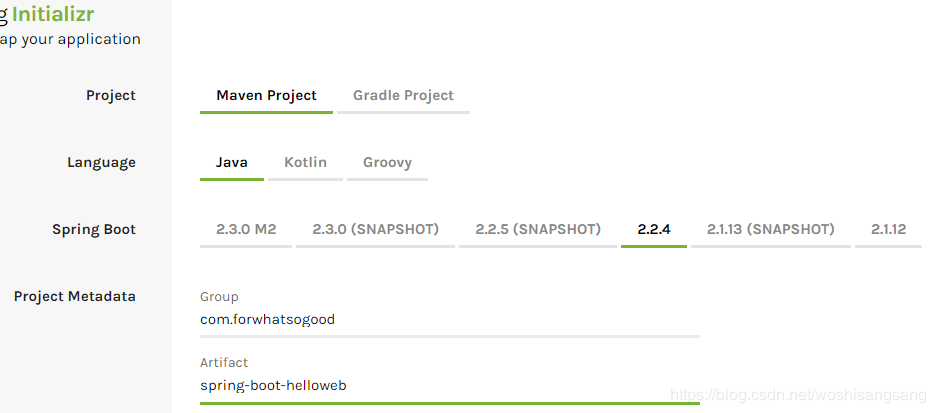
- Project选择Maven Project,表示项目基于Maven构建。
- Language选择Java,表示使用Java作为开发语言
- Spring Boot的版本我们选择了2.2.4,注意不同版本的Spring Boot在配置和开发上有所区别,此处选择比较稳定的2.2.4版本即可。
- Group用来区分开发组织,为了避免与其他公司出现重复,一般使用公司域名倒置的形式。
- Artifact是项目唯一标识,保证本公司内Artifact不重复即可。
Tips:
生成项目后直接导入Eclipse或IDEA即可,如果使用IDEA还可以使用向导创建Spring Boot项目。
修改pom.xml,引入项目依赖
Spring Boot为Web应用提供了spring-boot-starter-web,直接引入该依赖即可直接进行Web应用开发。
	 	<dependency>
			<groupId>org.springframework.boot</groupId>
			<artifactId>spring-boot-starter-web</artifactId>
		</dependency>
当Spring Boot发现pom配置中的spring-boot-starter-web后,便自动为我们配置了以下内容:
- 配置SpringMVC所需的ViewResolver/Converter/HttpMessageConverter等组件。
- 配置默认使用嵌入式tomcat作为web容器,默认使用8080端口。
- 配置src/main/resources/static为静态资源存放目录
通过自动配置,我们只需要引入一个依赖,即完成了搭建Web应用的工作。
此时,pom.xml全部代码如下:
<?xml version="1.0" encoding="UTF-8"?>
<project xmlns="http://maven.apache.org/POM/4.0.0"
	xmlns:xsi="http://www.w3.org/2001/XMLSchema-instance"
	xsi:schemaLocation="http://maven.apache.org/POM/4.0.0 https://maven.apache.org/xsd/maven-4.0.0.xsd">
	<modelVersion>4.0.0</modelVersion>
	<parent>
		<groupId>org.springframework.boot</groupId>
		<artifactId>spring-boot-starter-parent</artifactId>
		<version>2.2.4.RELEASE</version>
		<relativePath /> <!-- lookup parent from repository -->
	</parent>
	<groupId>com.forwhatsogood</groupId>
	<artifactId>spring-boot-helloweb</artifactId>
	<version>0.0.1-SNAPSHOT</version>
	<name>spring-boot-helloweb</name>
	<description>Demo project for Spring Boot</description>
	<properties>
		<java.version>1.8</java.version>
	</properties>
	<dependencies>
		<dependency>
			<groupId>org.springframework.boot</groupId>
			<artifactId>spring-boot-starter</artifactId>
		</dependency>
		<!-- 添加web开发功能 -->
		<dependency>
			<groupId>org.springframework.boot</groupId>
			<artifactId>spring-boot-starter-web</artifactId>
		</dependency>
		<dependency>
			<groupId>org.springframework.boot</groupId>
			<artifactId>spring-boot-starter-test</artifactId>
			<scope>test</scope>
			<exclusions>
				<exclusion>
					<groupId>org.junit.vintage</groupId>
					<artifactId>junit-vintage-engine</artifactId>
				</exclusion>
			</exclusions>
		</dependency>
	</dependencies>
	<build>
		<plugins>
			<plugin>
				<groupId>org.springframework.boot</groupId>
				<artifactId>spring-boot-maven-plugin</artifactId>
			</plugin>
		</plugins>
	</build>
</project>
编写控制器,提供服务接口
通过@RestController注解,将类注册为控制器,此时该类具备了响应Http请求的功能,同时会将方法的返回值序列化为JSON。通过@RequestMapping注解,设定了类和方法的访问路径。
代码如下:
@RestController//注册为控制器,可响应web请求,同时将方法返回值序列化为JSON
@RequestMapping("/hello")//类访问路径,本类下所有方法访问都需要已/hello开头
public class HelloController {
	@RequestMapping("web")//方法访问路径,此时该方法访问路径为/hello/web
	public Map web() {
		Map<String,String> map=new HashMap<String,String>();
		map.put("path","/hello/web");
		return map;
	}
}
此时直接运行启动类,启动Spring Boot项目,访问http://localhost:8080/hello/web,结果如下: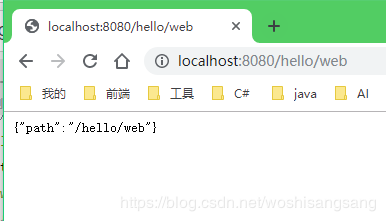
可见响应请求成功,且返回值为json格式。
Tips:
SpringBoot默认扫描启动类所在包及其子包,如果控制器不在启动类所在包及其子包,可在启动类添加@ComponentScan(basePackages = {"包1","包2"})注解手动指定扫描包。注意!此时默认扫描机制被关闭,需要逐一手工指定所有需要扫描的包。
Tips:
@RestController是组合注解,同时具备注册控制器和返回结果序列化功能。如果使用@Controller提供控制器功能,则需要在方法上添加@ResponseBody将方法返回结果序列化为JSON。
编写配置文件,配置项目信息
直接在application.properties中配置项目的启动端口及访问路径信息:
# 配置项目启动端口为8000
server.port=8000
# 配置项目访问根路径为/demo
server.servlet.context-path=/demo
重启程序,访问地址变为:
# 原访问地址 http://localhost:8080/hello/web
# 新访问地址添加了项目访问的根路径/demo
http://127.0.0.1:8000/demo/hello/web
Tips:
注意springboot2.0之前,配置访问根路径语法为server.context-path=/demo
总结
使用SpringBoot时,根据使用场景引入整合的依赖项如spring-boot-starter-web,直接将场景相关的依赖全部导入,同时自动配置相关的Bean组件,达到开箱即用的效果。
共同学习,写下你的评论
评论加载中...
作者其他优质文章


