Springboot集成Swagger2及常见配置(无坑版)
本文出自《愚公要移山》
收录于《Springboot专题》中
这种整合的文章确实已经烂大街了,写他一方面是补充我的springboot系列,另一方面确实还有一部分小伙伴没用过。最重要的是,如果你忘记了这种整合的代码。可以随时查阅。
前言
现在的开发基本上都是前后端分离,前后端交互都是通过API文档。有了API文档大家各自开发,互不干扰。
1、传统方式
传统方式是文档设计好之后,分别发给前端和后端人员。这样有个缺点,接口信息一旦变化,文档就需要重新发送给前后端人员。无法做到实时。所以浪费时间和精力。
2、swagger方式
我们的后台应用集成了swagger之后,会自动暴露出我们的接口,而且这个接口形式还是通过restful风格发布的。一旦后端的接口有变化,会立刻显示出来,因此极大地提高了效率。
OK,基本上一句话就可以总结他的好处,那就是后端写的api文档可以通过swagger的形式实时的发布出来,供前端人员查看。
3、其他方式
swagger的页面说实话长得不好看,也有一些其他的方案,不是有很多bug,就是收费。目前swagger是使用的最多的。我目前也正在做这个样的开源项目,基于swagger做出类似于其他方案的页面,而且功能更加的强大。
一、代码整合
前提条件是要新建一个springboot项目。这点就不演示了。
第一步:添加依赖
<dependency>
    <groupId>io.springfox</groupId>
    <artifactId>springfox-swagger2</artifactId>
    <version>2.9.2</version>
</dependency>
<dependency>
    <groupId>io.springfox</groupId>
    <artifactId>springfox-swagger-ui</artifactId>
    <version>2.9.2</version>
</dependency>
2.9.2的版本是用的最多的,具体的可以直接去maven的官网去搜索,找一个使用量最多的版本即可。
第二步:配置
新建config包,创建SwaggerConfig类
@EnableSwagger2
@Configuration
public class Swagger2Config {
    @Bean
    public Docket createRestApi() {
        return new Docket(DocumentationType.SWAGGER_2)
             .apiInfo(apiInfo())
             .select()
             //为当前包路径,控制器类包
             .apis(RequestHandlerSelectors.basePackage("com.fdd.controller"))
            .paths(PathSelectors.any())
             .build();
    }
    //构建 api文档的详细信息函数
    private ApiInfo apiInfo() {
        return new ApiInfoBuilder()
            //页面标题
           .title("XX平台API接口文档")
            //创建人
           .contact(new Contact("冯冬冬", "http://www.javachat.cc",
           						"3049352171@qq.com"))
           //版本号
          .version("1.0")
           //描述
          .description("系统API描述")
          .build();
    }
这里的配置也比较简单。这里有很多选项供我们去配置。如果我们的项目有多个组,只需要创建多个Docket即可。这时候扫描的包换成每个组的包路径。
第三步:controller类中配置
新建一个controller包,然后创建HelloController类
@Api("Hello控制类")
@RestController
public class HelloController {
    @GetMapping(value = "/user")
    public User getUser(){
        return new User("愚公要移山","123456");
    }
    @ApiOperation("可以指定参数的API")
    @PostMapping("/param")
    public String hello2(@ApiParam("用户名") String name){
        return "hello" + name;
    }
}
这里我们可以看出,使用注解就可以对这个类、方法、字段等等进行解释说明。其他的字段还有很多,在使用的时候会有相应的提示,可以自己试一遍:
第四步:查看效果
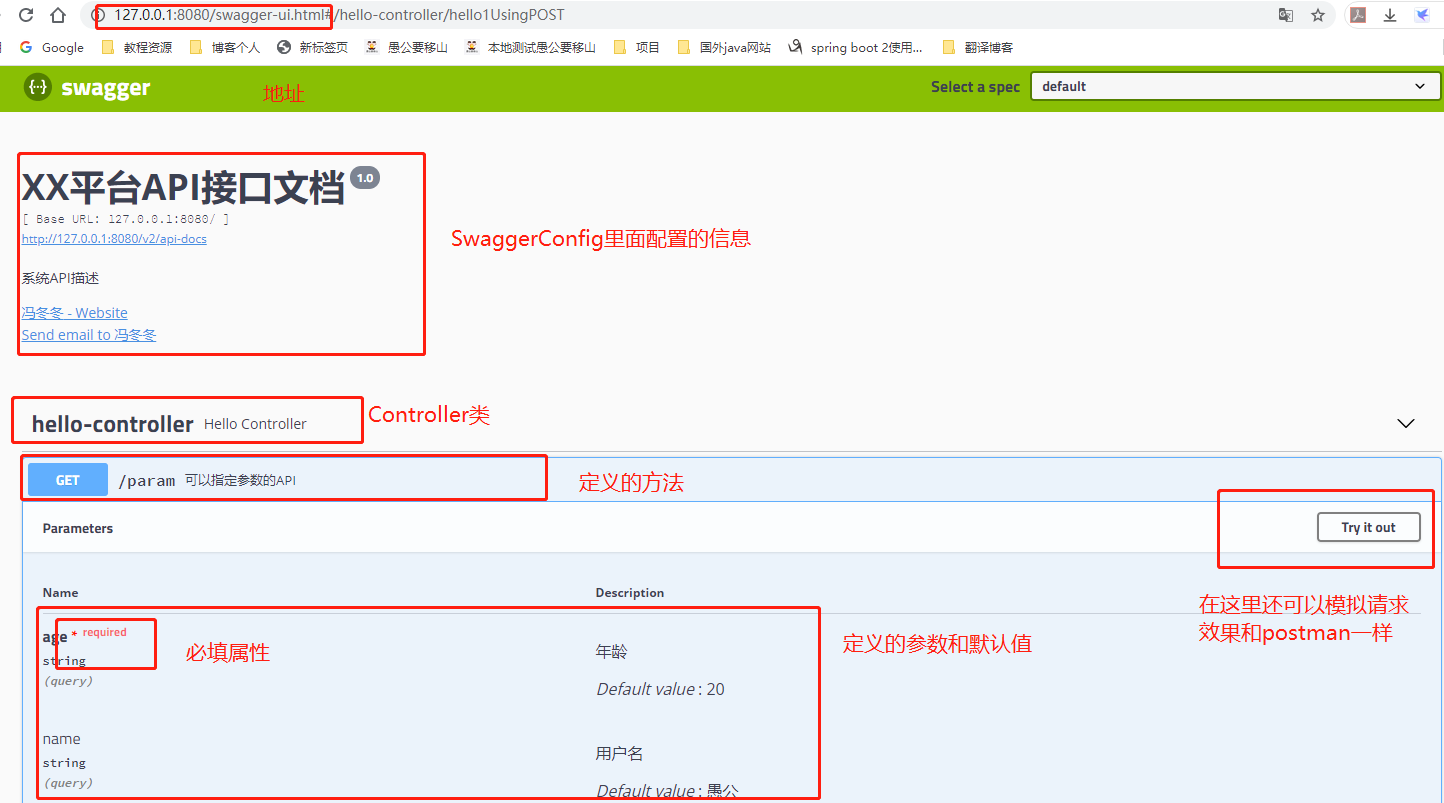
这里就是最终的展示效果。OK,到这一步基本上就集成进来了。下面说一下可能会遇到的配置。
三、常见其他问题
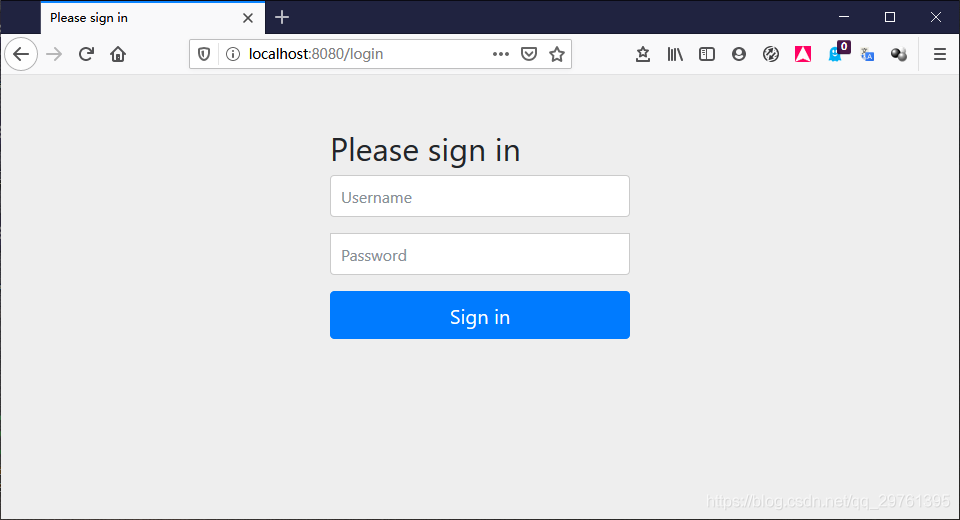
1、Spring Security - 配置免认证访问
有时候我们的Springboot集成了SpringSecurity,这时候如果访问swagger的地址会自动跳转到登录页面。这是因为SpringSecurity对其进行了拦截。为此我们只需要在我们的SpringSecurity配置一下进行放行即可。
现在配置一下,进行放行。在config包下新建一个SpringSecurityConfig类
@Configuration
@EnableWebSecurity
public class SpringSecurityConfig extends WebSecurityConfigurerAdapter {
    @Override
    protected void configure(HttpSecurity http) throws Exception {
        http
                .authorizeRequests()
                .antMatchers("/swagger-ui.html").permitAll()
                .antMatchers("/webjars/**").permitAll()
                .antMatchers("/swagger-resources/**").permitAll()
                .antMatchers("/v2/*").permitAll()
                .antMatchers("/csrf").permitAll()
                .antMatchers("/").permitAll()
                .anyRequest().authenticated()
                .and()
                .formLogin()
        ;
    }
}
此时就可以正常的访问了。
2、为swagger设置jwt
这种方式比较简单,只需要一步即可。修改我们的swaggerConfig类即可。
@EnableSwagger2
@Configuration
public class Swagger2Config {
    @Bean
    public Docket api() {
        return new Docket(DocumentationType.SWAGGER_2)
                .apiInfo(apiInfo())
                .securityContexts(Arrays.asList(securityContext()))
                .securitySchemes(Arrays.asList(apiKey()))
                .select()
                .apis(RequestHandlerSelectors.any())
                .paths(PathSelectors.any())
                .build();
    }
    //构建 api文档的详细信息函数
    private ApiInfo apiInfo() {
        return new ApiInfoBuilder()
                //页面标题
                .title("XX平台API接口文档")
                //创建人
                .contact(new Contact("冯冬冬", "http://www.javachat.cc",
                        "3049352171@qq.com"))
                //版本号
                .version("1.0")
                //描述
                .description("系统API描述")
                .build();
    }
    private ApiKey apiKey() {
        return new ApiKey("JWT", "Authorization", "header");
    }
    private SecurityContext securityContext() {
        return SecurityContext.builder().securityReferences(defaultAuth()).build();
    }

    private List<SecurityReference> defaultAuth() {
        AuthorizationScope authorizationScope
        	= new AuthorizationScope("global", "accessEverything");
        AuthorizationScope[] authorizationScopes = new AuthorizationScope[1];
        authorizationScopes[0] = authorizationScope;
        return Arrays.asList(new SecurityReference("JWT", authorizationScopes));
    }

}
加了一些token验证的代码,比较简单,关于JWT的东西,可以私下了解。这里不赘述了。
3、隐藏Endpoint
有时候自己写的controller,或者是controller里面的接口方法不想让前端人员看到,我们可以隐藏即可。
第一:隐藏整个controller
@ApiIgnore
@RestController
public class MyController {
    //方法
}
第二:隐藏某个接口方法1
@ApiIgnore
@ApiOperation(value = "描述信息")
@GetMapping("/getAuthor")
public String getAuthor() {
    return "愚公要移山";
}
第三:隐藏某个接口方法2
@ApiOperation(value = "描述信息", hidden = true)
@GetMapping("/get")
public LocalDate getDate() {
    return LocalDate.now();
}
OK,很多配置基本上就到这了。后续会继续补充。
共同学习,写下你的评论
评论加载中...
作者其他优质文章