
欢迎访问我的GitHub
内容:所有原创文章分类汇总及配套源码,涉及Java、Docker、Kubernetes、DevOPS等;
本篇概览
- 作为《DL4J》实战的第三篇,目标是在DL4J框架下创建经典的LeNet-5卷积神经网络模型,对MNIST数据集进行训练和测试,本篇由以下内容构成:
- LeNet-5简介
- MNIST简介
- 数据集简介
- 关于版本和环境
- 编码
- 验证
LeNet-5简介
- 是Yann LeCun于1998年设计的卷积神经网络,用于手写数字识别,例如当年美国很多银行用其识别支票上的手写数字,LeNet-5是早期卷积神经网络最有代表性的实验系统之一
- LeNet-5网络结构如下图所示,一共七层:C1 -> S2 -> C3 -> S4 -> C5 -> F6 -> OUTPUT
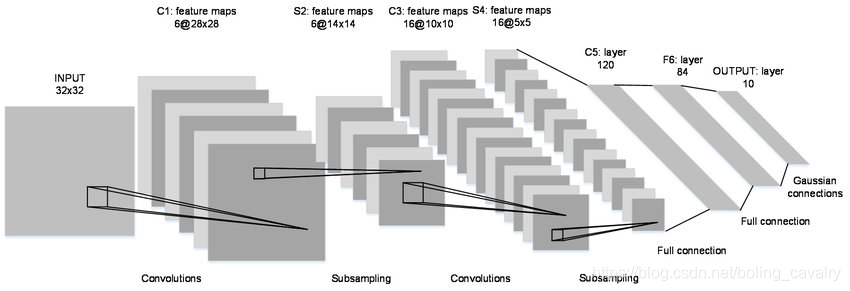
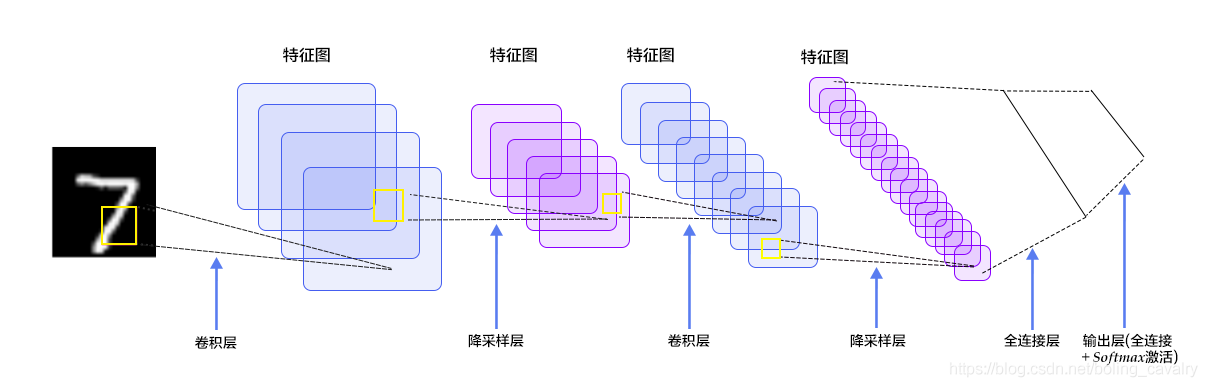
- 按照上图简单分析一下,用于指导接下来的开发:
- 每张图片都是28*28的单通道,矩阵应该是[1, 28,28]
- C1是卷积层,所用卷积核尺寸5*5,滑动步长1,卷积核数目20,所以尺寸变化是:28-5+1=24(想象为宽度为5的窗口在宽度为28的窗口内滑动,能滑多少次),输出矩阵是[20,24,24]
- S2是池化层,核尺寸2*2,步长2,类型是MAX,池化操作后尺寸减半,变成了[20,12,12]
- C3是卷积层,所用卷积核尺寸5*5,滑动步长1,卷积核数目50,所以尺寸变化是:12-5+1=8,输出矩阵[50,8,8]
- S4是池化层,核尺寸2*2,步长2,类型是MAX,池化操作后尺寸减半,变成了[50,4,4]
- C5是全连接层(FC),神经元数目500,接relu激活函数
- 最后是全连接层Output,共10个节点,代表数字0到9,激活函数是softmax
MNIST简介
- MNIST是经典的计算机视觉数据集,来源是National Institute of Standards and Technology (NIST,美国国家标准与技术研究所),包含各种手写数字图片,其中训练集60,000张,测试集 10,000张,
- MNIST来源于250 个不同人的手写,其中 50% 是高中学生, 50% 来自人口普查局 (the Census Bureau) 的工作人员.,测试集(test set) 也是同样比例的手写数字数据
- MNIST官网:http://yann.lecun.com/exdb/mnist/
数据集简介
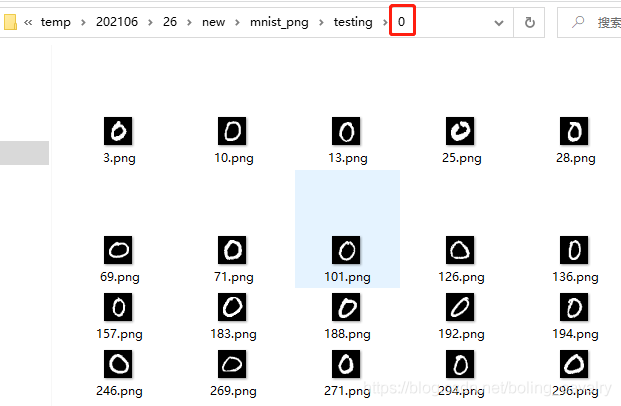
- 从MNIST官网下载的原始数据并非图片文件,需要按官方给出的格式说明做解析处理才能转为一张张图片,这些事情显然不是本篇的主题,因此咱们可以直接使用DL4J为我们准备好的数据集(下载地址稍后给出),该数据集中是一张张独立的图片,这些图片所在目录的名字就是该图片具体的数字,如下图,目录0里面全是数字0的图片:
- 上述数据集的下载地址有两个:
- 下载之后解压开,是个名为mnist_png的文件夹,稍后的实战中咱们会用到它
关于DL4J版本
- 《DL4J实战》系列的源码采用了maven的父子工程结构,DL4J的版本在父工程dlfj-tutorials中定义为1.0.0-beta7
- 本篇的代码虽然还是dlfj-tutorials的子工程,但是DL4J版本却使用了更低的1.0.0-beta6,之所以这么做,是因为下一篇文章,咱们会把本篇的训练和测试工作交给GPU来完成,而对应的CUDA库只有1.0.0-beta6
- 扯了这么多,可以开始编码了
源码下载
- 本篇实战中的完整源码可在GitHub下载到,地址和链接信息如下表所示(https://github.com/zq2599/blog_demos):
| 名称 | 链接 | 备注 |
|---|---|---|
| 项目主页 | https://github.com/zq2599/blog_demos | 该项目在GitHub上的主页 |
| git仓库地址(https) | https://github.com/zq2599/blog_demos.git | 该项目源码的仓库地址,https协议 |
| git仓库地址(ssh) | git@github.com:zq2599/blog_demos.git | 该项目源码的仓库地址,ssh协议 |
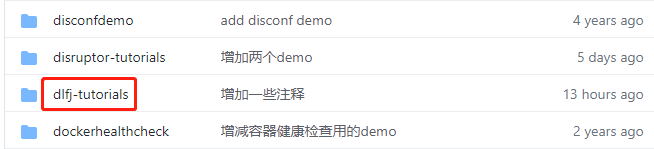
- 这个git项目中有多个文件夹,《DL4J实战》系列的源码在dl4j-tutorials文件夹下,如下图红框所示:
- dl4j-tutorials文件夹下有多个子工程,本次实战代码在simple-convolution目录下,如下图红框:
编码
- 在父工程 dl4j-tutorials下新建名为 simple-convolution的子工程,其pom.xml如下,可见这里的dl4j版本被指定为1.0.0-beta6:
<?xml version="1.0" encoding="UTF-8"?>
<project xmlns="http://maven.apache.org/POM/4.0.0"
         xmlns:xsi="http://www.w3.org/2001/XMLSchema-instance"
         xsi:schemaLocation="http://maven.apache.org/POM/4.0.0 http://maven.apache.org/xsd/maven-4.0.0.xsd">
    <parent>
        <artifactId>dlfj-tutorials</artifactId>
        <groupId>com.bolingcavalry</groupId>
        <version>1.0-SNAPSHOT</version>
    </parent>
    <modelVersion>4.0.0</modelVersion>

    <artifactId>simple-convolution</artifactId>

    <properties>
        <dl4j-master.version>1.0.0-beta6</dl4j-master.version>
    </properties>

    <dependencies>
        <dependency>
            <groupId>org.projectlombok</groupId>
            <artifactId>lombok</artifactId>
        </dependency>

        <dependency>
            <groupId>ch.qos.logback</groupId>
            <artifactId>logback-classic</artifactId>
        </dependency>

        <dependency>
            <groupId>org.deeplearning4j</groupId>
            <artifactId>deeplearning4j-core</artifactId>
            <version>${dl4j-master.version}</version>
        </dependency>

        <dependency>
            <groupId>org.nd4j</groupId>
            <artifactId>${nd4j.backend}</artifactId>
            <version>${dl4j-master.version}</version>
        </dependency>
    </dependencies>
</project>
- 接下来按照前面的分析实现代码,已经添加了详细注释,就不再赘述了:
package com.bolingcavalry.convolution;

import lombok.extern.slf4j.Slf4j;
import org.datavec.api.io.labels.ParentPathLabelGenerator;
import org.datavec.api.split.FileSplit;
import org.datavec.image.loader.NativeImageLoader;
import org.datavec.image.recordreader.ImageRecordReader;
import org.deeplearning4j.datasets.datavec.RecordReaderDataSetIterator;
import org.deeplearning4j.nn.conf.MultiLayerConfiguration;
import org.deeplearning4j.nn.conf.NeuralNetConfiguration;
import org.deeplearning4j.nn.conf.inputs.InputType;
import org.deeplearning4j.nn.conf.layers.ConvolutionLayer;
import org.deeplearning4j.nn.conf.layers.DenseLayer;
import org.deeplearning4j.nn.conf.layers.OutputLayer;
import org.deeplearning4j.nn.conf.layers.SubsamplingLayer;
import org.deeplearning4j.nn.multilayer.MultiLayerNetwork;
import org.deeplearning4j.nn.weights.WeightInit;
import org.deeplearning4j.optimize.listeners.ScoreIterationListener;
import org.deeplearning4j.util.ModelSerializer;
import org.nd4j.evaluation.classification.Evaluation;
import org.nd4j.linalg.activations.Activation;
import org.nd4j.linalg.dataset.api.iterator.DataSetIterator;
import org.nd4j.linalg.dataset.api.preprocessor.DataNormalization;
import org.nd4j.linalg.dataset.api.preprocessor.ImagePreProcessingScaler;
import org.nd4j.linalg.learning.config.Nesterovs;
import org.nd4j.linalg.lossfunctions.LossFunctions;
import org.nd4j.linalg.schedule.MapSchedule;
import org.nd4j.linalg.schedule.ScheduleType;
import java.io.File;
import java.util.HashMap;
import java.util.Map;
import java.util.Random;

@Slf4j
public class LeNetMNISTReLu {

    // 存放文件的地址,请酌情修改
//    private static final String BASE_PATH = System.getProperty("java.io.tmpdir") + "/mnist";

    private static final String BASE_PATH = "E:\\temp\\202106\\26";

    public static void main(String[] args) throws Exception {
        // 图片像素高
        int height = 28;
        // 图片像素宽
        int width = 28;
        // 因为是黑白图像,所以颜色通道只有一个
        int channels = 1;
        // 分类结果,0-9,共十种数字
        int outputNum = 10;
        // 批大小
        int batchSize = 54;
        // 循环次数
        int nEpochs = 1;
        // 初始化伪随机数的种子
        int seed = 1234;

        // 随机数工具
        Random randNumGen = new Random(seed);

        log.info("检查数据集文件夹是否存在:{}", BASE_PATH + "/mnist_png");

        if (!new File(BASE_PATH + "/mnist_png").exists()) {
            log.info("数据集文件不存在,请下载压缩包并解压到:{}", BASE_PATH);
            return;
        }

        // 标签生成器,将指定文件的父目录作为标签
        ParentPathLabelGenerator labelMaker = new ParentPathLabelGenerator();
        // 归一化配置(像素值从0-255变为0-1)
        DataNormalization imageScaler = new ImagePreProcessingScaler();

        // 不论训练集还是测试集,初始化操作都是相同套路:
        // 1. 读取图片,数据格式为NCHW
        // 2. 根据批大小创建的迭代器
        // 3. 将归一化器作为预处理器

        log.info("训练集的矢量化操作...");
        // 初始化训练集
        File trainData = new File(BASE_PATH + "/mnist_png/training");
        FileSplit trainSplit = new FileSplit(trainData, NativeImageLoader.ALLOWED_FORMATS, randNumGen);
        ImageRecordReader trainRR = new ImageRecordReader(height, width, channels, labelMaker);
        trainRR.initialize(trainSplit);
        DataSetIterator trainIter = new RecordReaderDataSetIterator(trainRR, batchSize, 1, outputNum);
        // 拟合数据(实现类中实际上什么也没做)
        imageScaler.fit(trainIter);
        trainIter.setPreProcessor(imageScaler);

        log.info("测试集的矢量化操作...");
        // 初始化测试集,与前面的训练集操作类似
        File testData = new File(BASE_PATH + "/mnist_png/testing");
        FileSplit testSplit = new FileSplit(testData, NativeImageLoader.ALLOWED_FORMATS, randNumGen);
        ImageRecordReader testRR = new ImageRecordReader(height, width, channels, labelMaker);
        testRR.initialize(testSplit);
        DataSetIterator testIter = new RecordReaderDataSetIterator(testRR, batchSize, 1, outputNum);
        testIter.setPreProcessor(imageScaler); // same normalization for better results

        log.info("配置神经网络");

        // 在训练中,将学习率配置为随着迭代阶梯性下降
        Map<Integer, Double> learningRateSchedule = new HashMap<>();
        learningRateSchedule.put(0, 0.06);
        learningRateSchedule.put(200, 0.05);
        learningRateSchedule.put(600, 0.028);
        learningRateSchedule.put(800, 0.0060);
        learningRateSchedule.put(1000, 0.001);

        // 超参数
        MultiLayerConfiguration conf = new NeuralNetConfiguration.Builder()
            .seed(seed)
            // L2正则化系数
            .l2(0.0005)
            // 梯度下降的学习率设置
            .updater(new Nesterovs(new MapSchedule(ScheduleType.ITERATION, learningRateSchedule)))
            // 权重初始化
            .weightInit(WeightInit.XAVIER)
            // 准备分层
            .list()
            // 卷积层
            .layer(new ConvolutionLayer.Builder(5, 5)
                .nIn(channels)
                .stride(1, 1)
                .nOut(20)
                .activation(Activation.IDENTITY)
                .build())
            // 下采样,即池化
            .layer(new SubsamplingLayer.Builder(SubsamplingLayer.PoolingType.MAX)
                .kernelSize(2, 2)
                .stride(2, 2)
                .build())
            // 卷积层
            .layer(new ConvolutionLayer.Builder(5, 5)
                .stride(1, 1) // nIn need not specified in later layers
                .nOut(50)
                .activation(Activation.IDENTITY)
                .build())
            // 下采样,即池化
            .layer(new SubsamplingLayer.Builder(SubsamplingLayer.PoolingType.MAX)
                .kernelSize(2, 2)
                .stride(2, 2)
                .build())
            // 稠密层,即全连接
            .layer(new DenseLayer.Builder().activation(Activation.RELU)
                .nOut(500)
                .build())
            // 输出
            .layer(new OutputLayer.Builder(LossFunctions.LossFunction.NEGATIVELOGLIKELIHOOD)
                .nOut(outputNum)
                .activation(Activation.SOFTMAX)
                .build())
            .setInputType(InputType.convolutionalFlat(height, width, channels)) // InputType.convolutional for normal image
            .build();

        MultiLayerNetwork net = new MultiLayerNetwork(conf);
        net.init();

        // 每十个迭代打印一次损失函数值
        net.setListeners(new ScoreIterationListener(10));

        log.info("神经网络共[{}]个参数", net.numParams());

        long startTime = System.currentTimeMillis();
        // 循环操作
        for (int i = 0; i < nEpochs; i++) {
            log.info("第[{}]个循环", i);
            net.fit(trainIter);
            Evaluation eval = net.evaluate(testIter);
            log.info(eval.stats());
            trainIter.reset();
            testIter.reset();
        }
        log.info("完成训练和测试,耗时[{}]毫秒", System.currentTimeMillis()-startTime);

        // 保存模型
        File ministModelPath = new File(BASE_PATH + "/minist-model.zip");
        ModelSerializer.writeModel(net, ministModelPath, true);
        log.info("最新的MINIST模型保存在[{}]", ministModelPath.getPath());
    }
}
- 执行上述代码,日志输出如下,训练和测试都顺利完成,准确率达到0.9886:
21:19:15.355 [main] INFO org.deeplearning4j.optimize.listeners.ScoreIterationListener - Score at iteration 1110 is 0.18300625613640034
21:19:15.365 [main] DEBUG org.nd4j.linalg.dataset.AsyncDataSetIterator - Manually destroying ADSI workspace
21:19:16.632 [main] DEBUG org.nd4j.linalg.dataset.AsyncDataSetIterator - Manually destroying ADSI workspace
21:19:16.642 [main] INFO com.bolingcavalry.convolution.LeNetMNISTReLu -

========================Evaluation Metrics========================
 # of classes:    10
 Accuracy:        0.9886
 Precision:       0.9885
 Recall:          0.9886
 F1 Score:        0.9885
Precision, recall & F1: macro-averaged (equally weighted avg. of 10 classes)


=========================Confusion Matrix=========================
    0    1    2    3    4    5    6    7    8    9
---------------------------------------------------
  972    0    0    0    0    0    2    2    2    2 | 0 = 0
    0 1126    0    3    0    2    1    1    2    0 | 1 = 1
    1    1 1019    2    0    0    0    6    3    0 | 2 = 2
    0    0    1 1002    0    5    0    1    1    0 | 3 = 3
    0    0    2    0  971    0    3    2    1    3 | 4 = 4
    0    0    0    3    0  886    2    1    0    0 | 5 = 5
    6    2    0    1    1    5  942    0    1    0 | 6 = 6
    0    1    6    0    0    0    0 1015    1    5 | 7 = 7
    1    0    1    1    0    2    0    2  962    5 | 8 = 8
    1    2    1    3    5    3    0    2    1  991 | 9 = 9

Confusion matrix format: Actual (rowClass) predicted as (columnClass) N times
==================================================================
21:19:16.643 [main] INFO com.bolingcavalry.convolution.LeNetMNISTReLu - 完成训练和测试,耗时[27467]毫秒
21:19:17.019 [main] INFO com.bolingcavalry.convolution.LeNetMNISTReLu - 最新的MINIST模型保存在[E:\temp\202106\26\minist-model.zip]

Process finished with exit code 0
关于准确率
-
前面的测试结果显示准确率为0.9886,这是1.0.0-beta6版本DL4J的训练结果,如果换成1.0.0-beta7,准确率可以达到0.99以上,您可以尝试一下;
-
至此,DL4J框架下的经典卷积实战就完成了,截止目前,咱们的训练和测试工作都是CPU完成的,工作中CPU使用率的上升十分明显,下一篇文章,咱们把今天的工作交给GPU执行试试,看能否借助CUDA加速训练和测试工作;
我是欣宸,期待与您一同畅游Java世界…
https://github.com/zq2599/blog_demos
点击查看更多内容
为 TA 点赞
评论
共同学习,写下你的评论
评论加载中...
作者其他优质文章
正在加载中


感谢您的支持,我会继续努力的~
扫码打赏,你说多少就多少
赞赏金额会直接到老师账户
支付方式
打开微信扫一扫,即可进行扫码打赏哦