使用PlopJs让开发变得更高效
Dear,大家好,我是“前端小鑫同学”,😇长期从事前端开发,安卓开发,热衷技术,在编程路上越走越远~
在现在的前端圈里面,大多数的框架,库都会给你配一个CLI来使用,这样就可以创建一个最小可用的程序出来。还有一些封装的比较完善的前端开源项目,比如一些管理平台时项目就会提供页面级别,组件级别的类似CLI的功能来创建基本的结构模板,因为我们知道在管理平台这种软件中页面的大致结构风格都高度一致,所以这个时候如果通过工具的完成重复的工作是相当合适的,有这么一款工具就最为推荐那就是plopjs。
Plop是一个轻量型的工具,可以按照简单的问答来生成代码也可以随着项目迭代随时更改,使得团队开发的内容保持一致,也节省的基础、重复工作所话费的时间,接下来就通过几个案例来演示一下Plop的最佳实践。
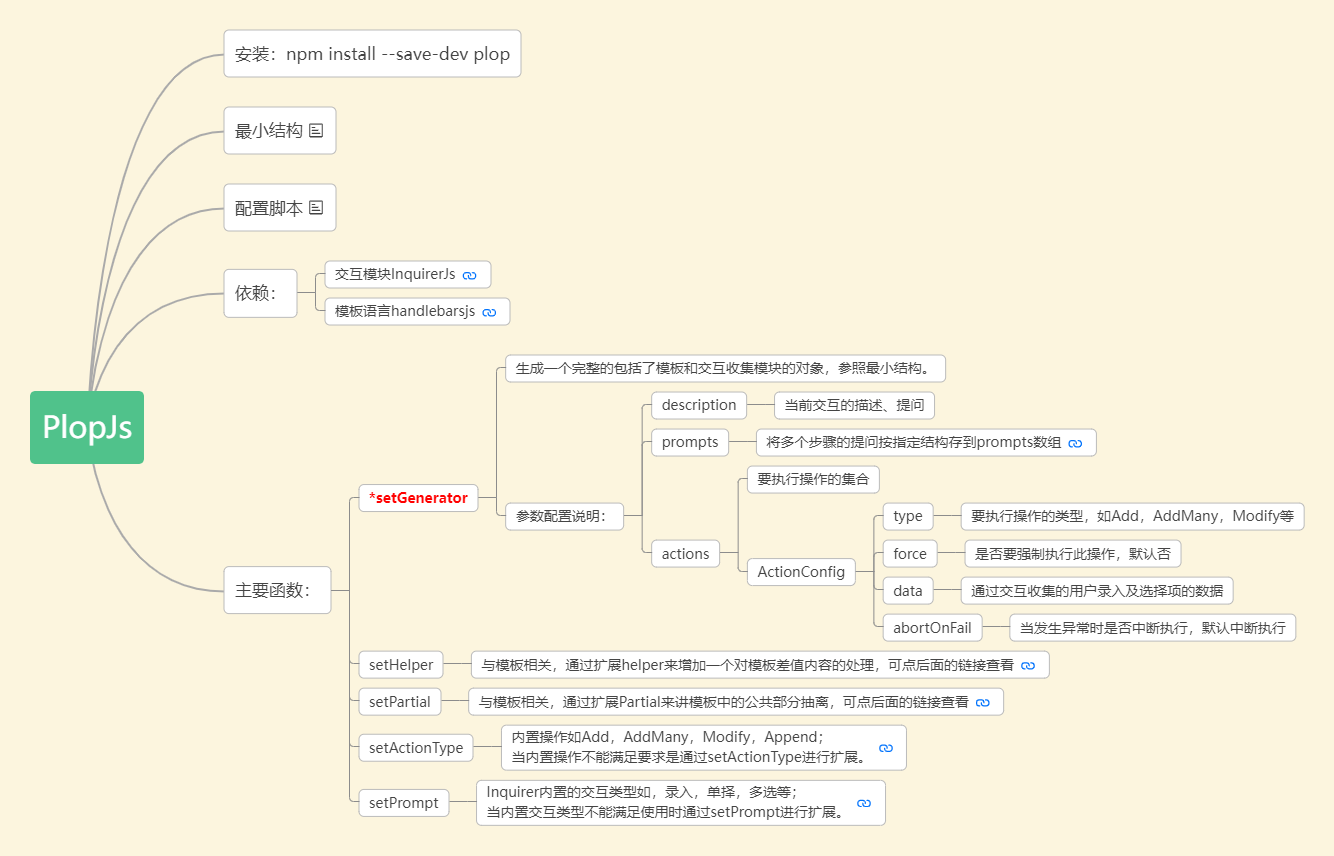
整理的参考大纲:
前置配置:
- 依赖安装:
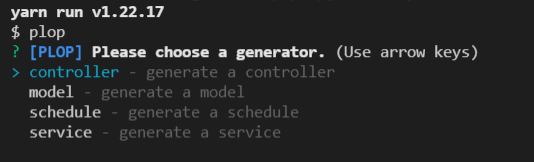
npm install --save-dev plop; - 配置scripts:
"new": "plop",使用yarn new或npm run new创建; - 项目结构:
演示项目的目录结构如下,我们将所有用到的模板放置到plop-templates文件夹,每套模板都包含一个hbs格式的模板文件和一个prompt.js的交互收集处理模块,再统一的注册到项目根目录下的plopfile.js文件:
plopjs-demo
	|-- plop-templates
  	|-- controller
    	|-- index.hbs
      |-- prompt.js
  |-- src
  	|-- controller
  |-- plopfile.js
  |-- package.json
注册模板的代码参考如下:
const controllerGenerator = require('./plop-templates/controller/prompt')

module.exports = function(plop) {
  // 将每次新建的模板导入后通过plop进行构建
  plop.setGenerator('controller', controllerGenerator)
}
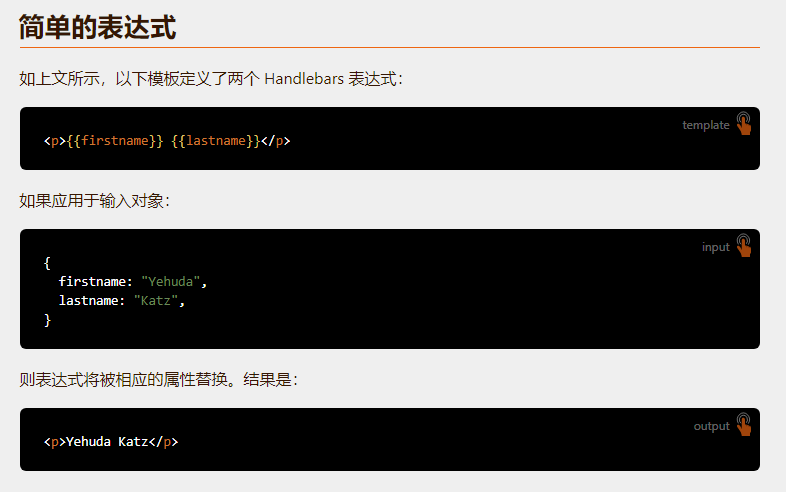
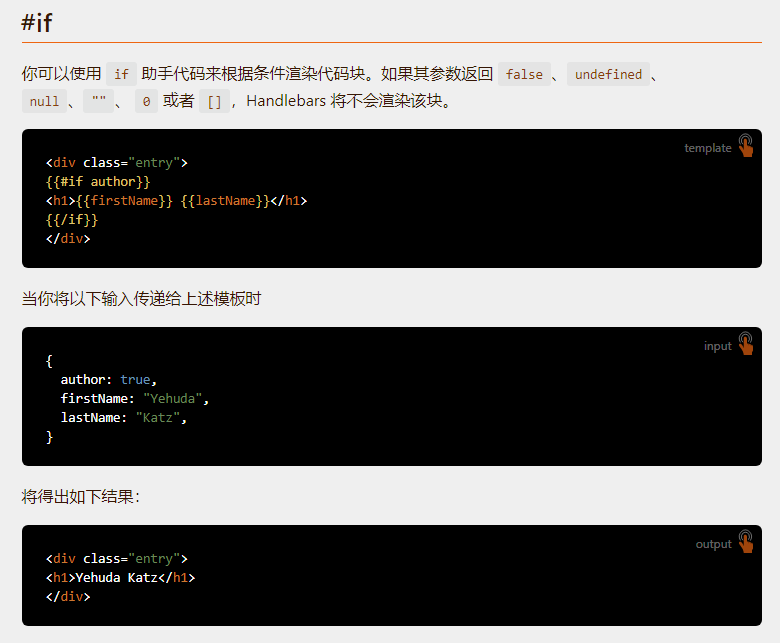
- 因为模板的定义使用到了handlebarsjs,所以这里简单的介绍两个肯定要用的,一个是模板参数另一个是条件判断,图片来自它的官网:
- 模板参数:
- 条件判断:
配置Controller模板:
需要实现的功能:
- 自定义Controller名称(必须的);
- 选择继承的Controller继承的对象;
- 输出文件:src/controller/.js;
- 输出文件的基础内容中显示当前Controller名称。
下面是两段代码是EggJs中Controller的基本示例,第二段中改变了继承的对象并实现了一些通用的数据封装,我们以此来编写Controller的.hbs文件:
'use strict';

const Controller = require('egg').Controller;

class HomeController extends Controller {
  async index() {
    const { ctx } = this;
    ctx.body = '<h3>HomeController</h3>';
  }
}

module.exports = HomeController;
'use strict';

const BaseController = require('./base');;

class HomeController extends BaseController {
  async index() {
    const { ctx } = this;
    ctx.body = '<h3>HomeController</h3>';
  }
}

module.exports = HomeController;
编写完的模板就如下面所示,有两点需要说明:
- 注意不要感觉太长就换行;
- 在使用用户输入的name是特意做了规范性的转换,其他的转换格式可参考代码下方的Case Modifiers。
'use strict';
{{#if isDefault}}
const Controller = require('egg').Controller;
{{/if}}
{{#if isBase}}
const BaseController = require('./base');
{{/if}}

class {{ properCase name }}Controller extends {{#if isDefault}}Controller{{/if}}{{#if isBase}}BaseController{{/if}} {
  async index() {
    const { ctx } = this;
    ctx.body = '<h3>{{ properCase name }}Controller</h3>';
  }
}

module.exports = {{ properCase name }}Controller;
- camelCase: changeFormatToThis
- snakeCase: change_format_to_this
- dashCase/kebabCase: change-format-to-this
- dotCase: change.format.to.this
- pathCase: change/format/to/this
- properCase/pascalCase: ChangeFormatToThis
- lowerCase: change format to this
- sentenceCase: Change format to this,
- constantCase: CHANGE_FORMAT_TO_THIS
- titleCase: Change Format To This
实现Controller的交互收集:
需要实现的功能:
- 收集Controller名称(必须的);
- 选择Controller继承类。
最小交互模块代码示例和说明:
"use strict";

module.exports = {
  // 交互开始的提示信息
  description: "generate a controller",
  prompts: [
    // 配置需要回答的问题
  ],
  actions: (data) => {
    // 当回答完毕后按如下格式返回,type为add表示我们要新增,更多的方式要参考https://plopjs.com/
    const actions = [
      {
        type: "add",
        path: `app/controller/${name}.js`,
        templateFile: "plop-templates/controller/index.hbs",
        data: {

        },
      },
    ];
    return actions;
  },
};
完整的交互模块代码:
"use strict";

module.exports = {
  description: "generate a controller",
  prompts: [
    {
      type: "input",
      name: "name",
      message: "controller name please",
      validate: (v) => {
        return !v || v.trim() === "" ? `${name} is required` : true;
      },
    },
    {
      type: "list",
      name: "baseClass",
      message: "base-class type please:",
      choices: [
        {
          name: "Choice Default",
          value: "default",
          checked: true,
        },
        {
          name: "Choice Base",
          value: "base",
          checked: false,
        },
      ],
    },
  ],
  actions: (data) => {
    const name = "{{name}}";
    const actions = [
      {
        type: "add",
        path: `src/controller/${name}.js`,
        templateFile: "plop-templates/controller/index.hbs",
        data: {
          name,
          isDefault: data.baseClass === "default",
          isBase: data.baseClass === "base",
        },
      },
    ];

    return actions;
  },
};
注册模板到plopfile.js:
当我们把项目涉及到得controller,service,model,schedule都通过模板实现后,我们再实际开发中将直接使用终端来创建项目的各个组件。
const controllerGenerator = require('./plop-templates/controller/prompt')
const modelGenerator = require('./plop-templates/model/prompt')
const scheduleGenerator = require('./plop-templates/schedule/prompt')
const serviceGenerator = require('./plop-templates/service/prompt')

module.exports = function(plop) {
  plop.setGenerator('controller', controllerGenerator)
  plop.setGenerator('model', modelGenerator)
  plop.setGenerator('schedule', scheduleGenerator)
  plop.setGenerator('service', serviceGenerator)
}
结尾说明:
此次通过最简单的演示来讲了PlopJs的使用,可能看不出来到底能带来的多大价值,我也是推荐在适合的时候来引入到项目中,不要为了引入而做一些没有价值的模板,更多复杂的功能一起去查阅文档学习呀。
共同学习,写下你的评论
评论加载中...
作者其他优质文章