
课程名称: Vue使用
课程章节:框架面试课
课程讲师: 双越
课程内容:
这次的内容不再是先出题再看知识点了,而是从Vue的使用开始,把知识点一点一点串起来
1、computed和watch
computed有缓存,data不变则不会重新计算
watch如何深度监听?
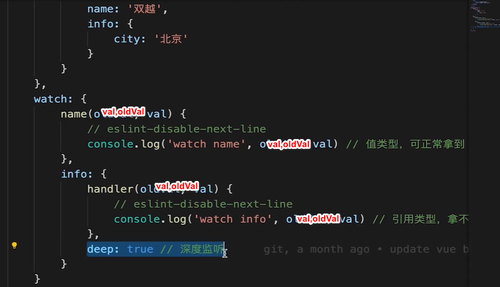
watch监听引用类型,拿不到oldVal
2、class和style
◆使用动态属性
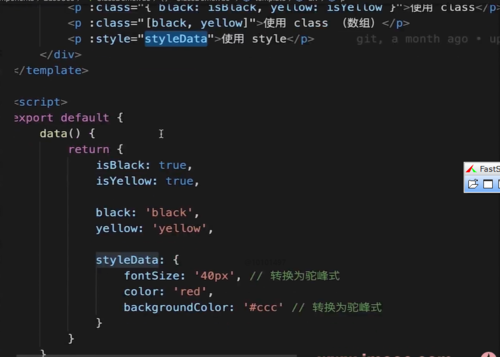
◆使用驼峰式写法
3、条件渲染
◆v-if v-else的用法,可使用变量,也可以使用===表达式
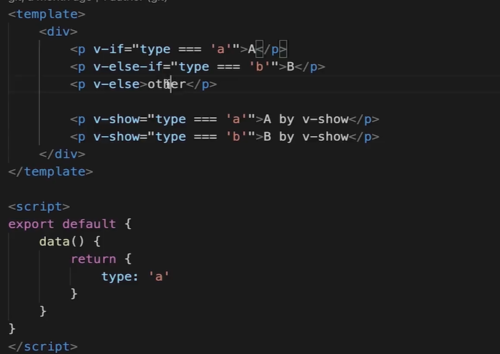
◆V-if和V-show的区别?
v-if 是dom的完整销毁和重建,v-show是css切换(display:none)
◆V-if和V-show的使用场景?
频繁切换时使用v-show,运行较少改变时用v-if
4、循环(列表)渲染
◆如何遍历对象?一也可以用V-for
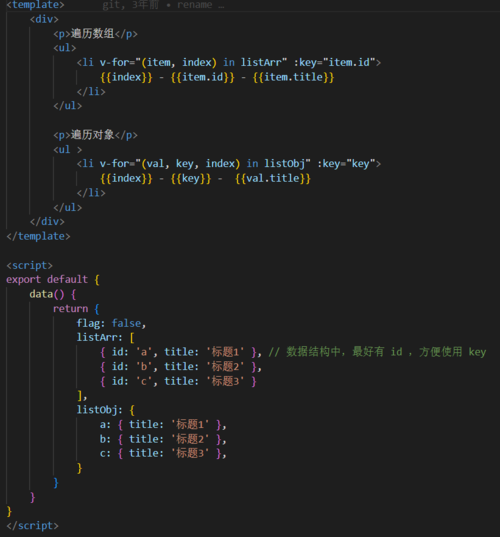
◆key的重要性。key不能乱写(如random或者index)
◆V-for和V-if不能一起使用
5、事件
event参数,自定义参数
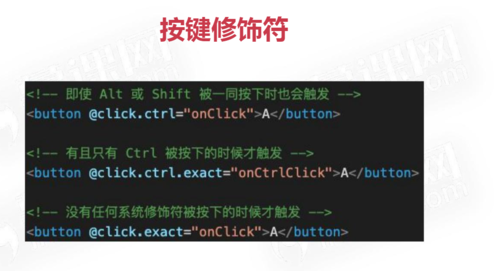
事件修饰符,按键修饰符
(观察】事件被绑定到哪里?
<template>
    <div>
        <p>{{num}}</p>
        <button @click="increment1">+1</button>
        <button @click="increment2(2, $event)">+2</button>
    </div>
</template>

<script>
export default {
    data() {
        return {
            num: 0
        }
    },
    methods: {
        increment1(event) {
            // eslint-disable-next-line
            console.log('event', event, event.__proto__.constructor) // 是原生的 event 对象
            // eslint-disable-next-line
            console.log(event.target)
            // eslint-disable-next-line
            console.log(event.currentTarget) // 注意,事件是被注册到当前元素的,和 React 不一样
            this.num++

            // 1. event 是原生的
            // 2. 事件被挂载到当前元素
            // 和 DOM 事件一样
        },
        increment2(val, event) {
            // eslint-disable-next-line
            console.log(event.target)
            this.num = this.num + val
        },
        loadHandler() {
            // do some thing
        }
    },
    mounted() {
        window.addEventListener('load', this.loadHandler)
    },
    beforeDestroy() {
        //【注意】用 vue 绑定的事件,组建销毁时会自动被解绑
        // 自己绑定的事件,需要自己销毁!!!
        window.removeEventListener('load', this.loadHandler)
    }
}
</script>
<template>
    <div>
        <p>输入框: {{name}}</p>
        <input type="text" v-model.trim="name"/>
        <input type="text" v-model.lazy="name"/>
        <input type="text" v-model.number="age"/>

        <p>多行文本: {{desc}}</p>
        <textarea v-model="desc"></textarea>
        <!-- 注意,<textarea>{{desc}}</textarea> 是不允许的!!! -->

        <p>复选框 {{checked}}</p>
        <input type="checkbox" v-model="checked"/>

        <p>多个复选框 {{checkedNames}}</p>
        <input type="checkbox" id="jack" value="Jack" v-model="checkedNames">
        <label for="jack">Jack</label>
        <input type="checkbox" id="john" value="John" v-model="checkedNames">
        <label for="john">John</label>
        <input type="checkbox" id="mike" value="Mike" v-model="checkedNames">
        <label for="mike">Mike</label>

        <p>单选 {{gender}}</p>
        <input type="radio" id="male" value="male" v-model="gender"/>
        <label for="male">男</label>
        <input type="radio" id="female" value="female" v-model="gender"/>
        <label for="female">女</label>

        <p>下拉列表选择 {{selected}}</p>
        <select v-model="selected">
            <option disabled value="">请选择</option>
            <option>A</option>
            <option>B</option>
            <option>C</option>
        </select>

        <p>下拉列表选择(多选) {{selectedList}}</p>
        <select v-model="selectedList" multiple>
            <option disabled value="">请选择</option>
            <option>A</option>
            <option>B</option>
            <option>C</option>
        </select>
    </div>
</template>

<script>
export default {
    data() {
        return {
            name: '双越',
            age: 18,
            desc: '自我介绍',

            checked: true,
            checkedNames: [],

            gender: 'male',

            selected: '',
            selectedList: []
        }
    }
}
</script>
笔记先记这么多,剩下的明天再记。
点击查看更多内容
为 TA 点赞
评论
共同学习,写下你的评论
评论加载中...
作者其他优质文章
正在加载中


感谢您的支持,我会继续努力的~
扫码打赏,你说多少就多少
赞赏金额会直接到老师账户
支付方式
打开微信扫一扫,即可进行扫码打赏哦