Mac 使用brew搭建lnmp环境笔记
背景:之前是在虚拟机上(centos7)搭建的开发环境,php + nginx + redis + memcached + mysql还有相关的PHP扩展,都是源码编译安装。现在切换了Mac之后,在物理机上用brew 管理工具搭建一套PHP开发环境。
搭建一个开发环境还是感觉docker比较方便,源码编译安装一些开发环境,有时候真的脑壳疼,但是有时候要测试一些东西还是本地比较方便。
注意事项: 一般brew安装软件目录在: /opt/homebrew/Cellar 这边注意有一个软链:/opt/homebrew/etc 软连 /opt/homebrew/Cellar
所以在配置环境变量的时候,选择哪一个路径都OK!!
brew 相关常用的相关命令,很好用方便管理、更新、启动软件。
  # 查看已经安装的软件列表
  ➜ brew list

  # 获取services列表
  ➜ brew services list

  # 启动/停止/重启 服务 serverName = {服务名称}
  ➜ brew services start/stop/restart serverName

  # 搜索可用node相关软件, name = {软件名称}
  ➜ brew search name...

  # 更新brew
  ➜ brew update

  # 清除下载的缓存
  ➜ brew cleanup

  # 诊断brew,并给出修复命令
  ➜ brew doctor
在brew中安装的软件目录与配置文件目录不在一个文件夹下,有同学有源码安装PHP、Nginx、mysql经验的同学可能知道。 这里需要注意:
- 配置文件目录:
/opt/homebrew/etc比如nginx:/opt/homebrew/etc/nginx - 软件安装目录:
/opt/homebrew/Cellar比如nginx/opt/homebrew/Cellar/nginx
安装目录这边,有一个ln关系在⚠️注意事项有标注。
安装mysql
# 查询mysql
brew search mysql

# 安装mysql5.7
brew install mysql@5.7

# 查看mysql 是否已安装完成
brew list | grep mysql

# 设置环境变量
## 设置点1
echo 'export PATH="/opt/homebrew/Cellar/mysql@5.7/5.7.42/bin:$PATH"' >> ~/.bash_profile
source ~/.bash_profile

## 设置点2 (如果不设置,重新链接时,会报错:mysql command not found)
echo 'export PATH="/opt/homebrew/Cellar/mysql@5.7/5.7.42/bin:$PATH"' >> ~/.zshrc
source ~/.zshrc

# 验证mysql服务的启动与 进入mysql
brew services list
Name      Status  User   File
mysql@5.7 started xxx ~/Library/LaunchAgents/homebrew.mxcl.mysql@5.7.plist

# 进入mysql,密码为空
mysql -uroot -p
如果本地安装了mysql相关的可视化管理工具,可以尝试连接看看,用于验证Mysql的安装是否完成。
安装PHP8.1
# 查询PHP,会列出很多个版本
➜  / brew search php
==> Formulae
brew-php-switcher           php-cs-fixer@2              phpbrew                     phpstan
php                         php@7.4                     phplint                     phpunit
php-code-sniffer            php@8.0                     phpmd                       pcp
php-cs-fixer                php@8.1                  phpmyadmin                  pup

==> Casks
eclipse-php                 phpstorm                    phpwebstudy                 pop

# 安装PHP8
brew install php@8.1

# 配置环境变量(mac会自带一个php版本,这边的默认环境变量是自带的,需要修改)
## 设置点1
### php
echo 'export PATH="/opt/homebrew/Cellar/php@8.1/8.1.18/bin:$PATH"' >> ~/.bash_profile
### php-fpm
echo 'export PATH="/opt/homebrew/Cellar/php@8.1/8.1.18/sbin:$PATH"' >> ~/.bash_profile
source ~/.bash_profile

## 设置点2
echo 'export PATH="/opt/homebrew/Cellar/php@8.1/8.1.18/bin:$PATH"' >> ~/.zshrc
echo 'export PATH="/opt/homebrew/Cellar/php@8.1/8.1.18/sbin:$PATH"' >> ~/.zshrc
source ~/.zshrc

# 验证php的版本
➜  sbin git:(stable) php -v
PHP 8.1.18 (cli) (built: Apr 14 2023 04:54:05) (NTS)
Copyright (c) The PHP Group
Zend Engine v4.1.18, Copyright (c) Zend Technologies
    with Zend OPcache v8.1.18, Copyright (c), by Zend Technologies

# 验证php-fpm是否已启动
sbin git:(stable) ps -ef | grep php-fpm
  501 60204     1   0 29 423  ??         0:03.93 php-fpm: master process (/opt/homebrew/etc/php/8.1/php-fpm.conf)
  501 60222 60204   0 29 423  ??         0:00.02 php-fpm: pool www
  501 60223 60204   0 29 423  ??         0:00.02 php-fpm: pool www

# 第二种查看方法(php服务是否已启动)
 brew services list
PHP安装完成!!!!
安装Ngnx && PHP + Nginx工作
安装Nginx
# 搜索nginx
➜  ~ brew search nginx
==> Formulae
nginx

# 安装nginx
brew install nginx

# 验证是否安装完成
浏览器:http://127.0.0.1/
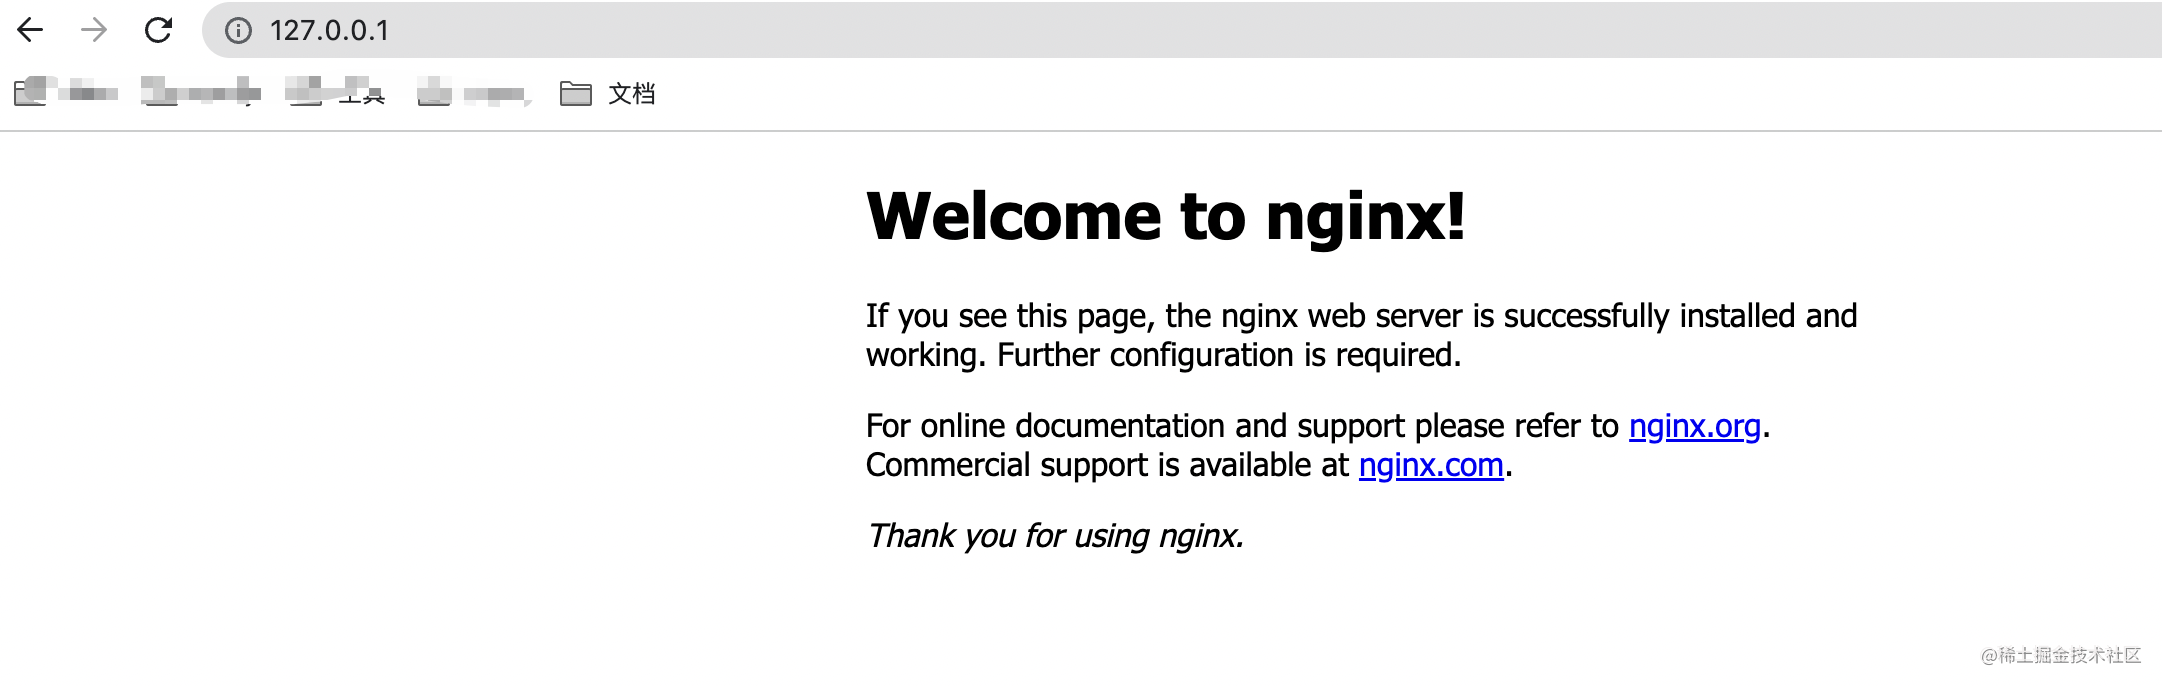
这边需要注意一些,如果访问浏览器出现:403-xxx。可能是nginx的配置监听的端口不对,修改为8080.
如果还不能访问,需要打开nginx的配置文件查看监听的端口是哪个。
   ➜ cd /opt/homebrew/etc/nginx
   ➜ cat nginx.conf
默认是监听8080端口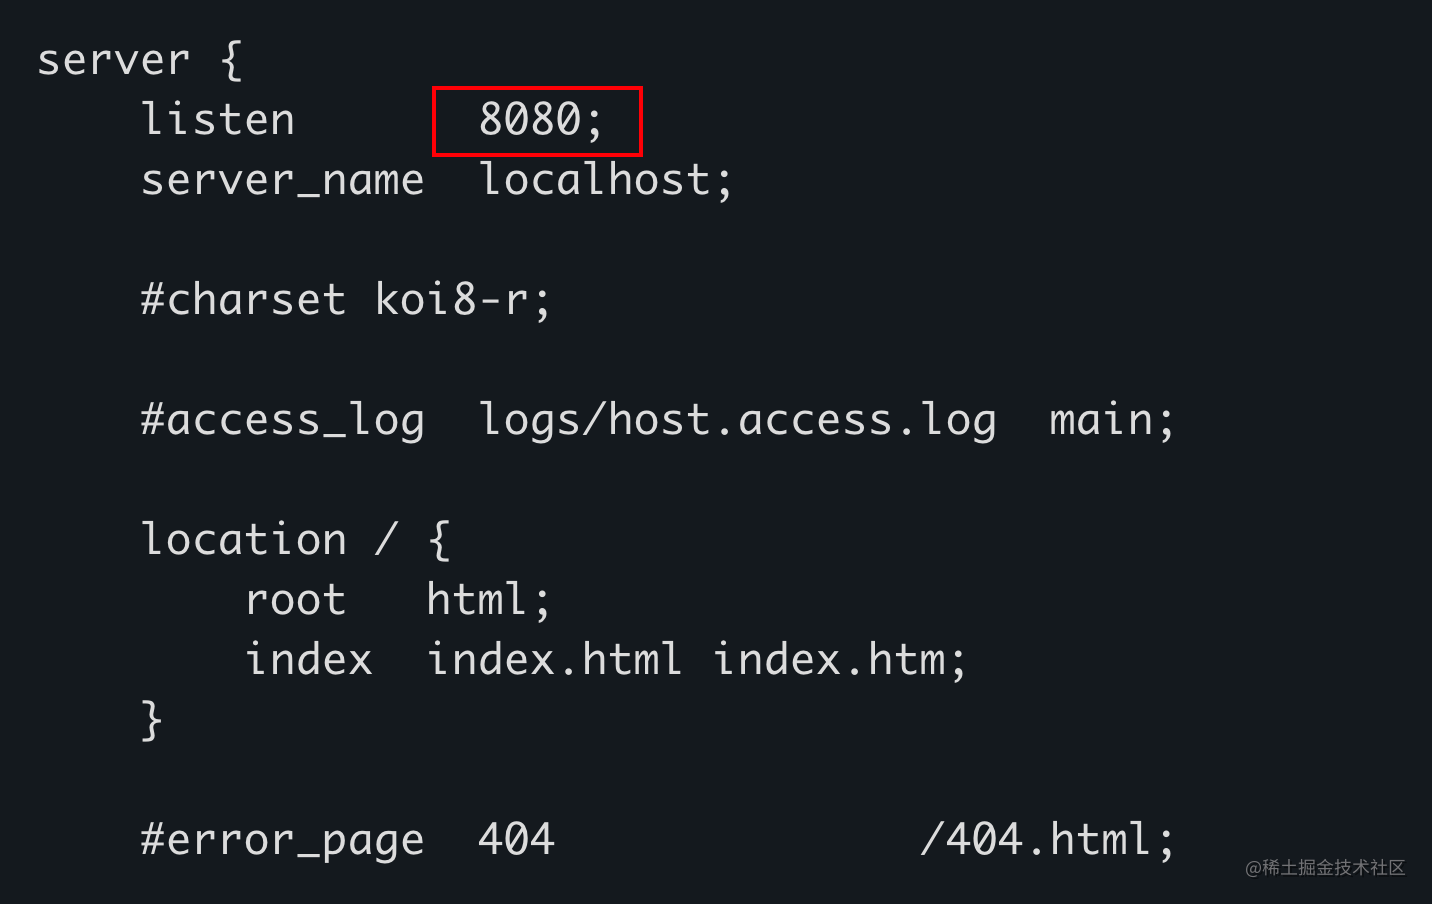
nginx相关的配置修改 && 与php-fpm通信
# 查询本机80端口的暂用情况(如果为空,表示未占用)我这边未占用,那就可以监听这个端口进行通信
vhosts git:(stable) lsof -i tcp:80
# 修改nginx配置文件的监听端口
cd /opt/homebrew/etc/nginx
# 将nginx.conf备份一份
cp ./nginx.cong ./nginx.conf.default
# nginx.conf将配置文件修改为
#user nobody;
worker_processes 1;
#error_log logs/error.log;
#error_log logs/error.log notice;
#error_log logs/error.log info;
#pid logs/nginx.pid;
events {
worker_connections 1024;
}
http {
include mime.types;
default_type text/html;
#log_format main '$remote_addr - $remote_user [$time_local] "$request" '
# '$status $body_bytes_sent "$http_referer" '
# '"$http_user_agent" "$http_x_forwarded_for"';
#access_log logs/access.log main;
access_log /opt/homebrew/var/log/nginx/access.log;
sendfile on;
#tcp_nopush on;
charset utf-8;
index index.html index.htm index.php;
#keepalive_timeout 0;
keepalive_timeout 65;
gzip on;
# 这边将service模块拆分更好管理
include vhosts/*.conf;
}
# nginx.conf同级别建立vhost文件
➜ nginx git:(stable) mkdir vhosts
➜ nginx git:(stable) cd vhosts
➜ nginx git:(stable) vi default.conf
# default.conf配置文件如下
server {
listen 80;
server_name _;
index index.html index.htm index.php;
root /opt/homebrew/Cellar/nginx/1.23.4/html;
location ~ \.php{
fastcgi_pass 127.0.0.1:9000;
}
# 访问日志
access_log /opt/homebrew/var/log/nginx/access.log;
}
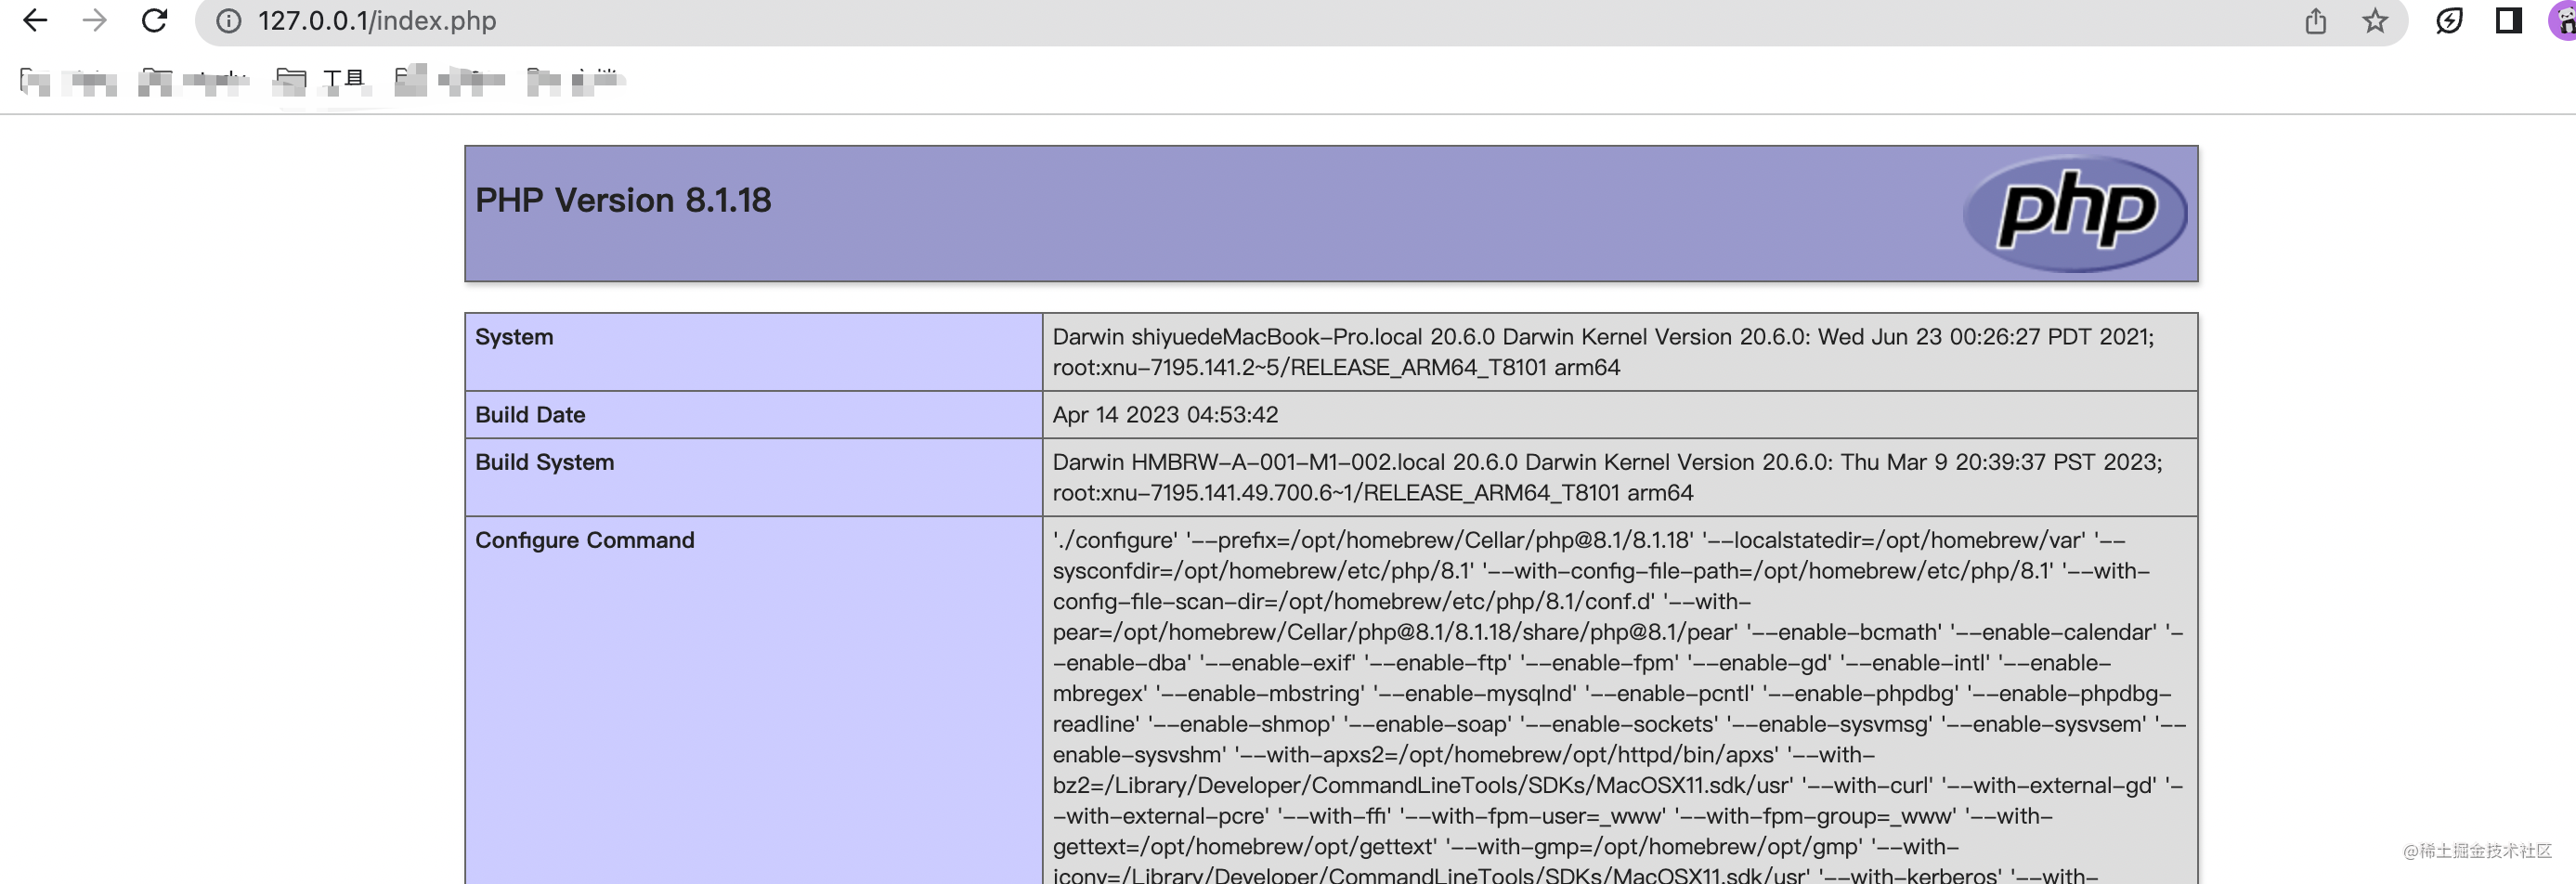
# 在/opt/homebrew/Cellar/nginx/1.23.4/html目录下新增index.php
# 验证与PHP通信(有兴趣可以看看fast-cgi)
➜ html git:(stable) cd /opt/homebrew/Cellar/nginx/1.23.4/html
➜ html git:(stable) echo "<?php phpinfo();" >> index.php
# 重启nginx
➜ vhosts git:(stable) brew services restart nginx
Stopping `nginx`... (might take a while)
==> Successfully stopped `nginx` (label: homebrew.mxcl.nginx)
==> Successfully started `nginx` (label: homebrew.mxcl.nginx)
# 打开浏览器验证
http://127.0.0.1/index.php
安装redis 与 memcached
安装这两个缓存,很简单就两个命令,然后启动就OK
  # 安装
  ➜ brew install redis
  ➜ brew install memcached

  # 查看
  ➜ brew list
  ➜ brew brew services list

  # 启动
  ➜ brew services start redis/memcached

  # 验证
  ➜ ps -ef | grep redis/memcached
安装PHP扩展
使用brew安装的PHP, 默认会安装pecl,使用pecl安装扩展比源码安装的方式更便捷,但是偶尔也会遇见一些问题。
安装redis扩展
# 查询redis扩展
➜ pecl search redis
Retrieving data...0%
Matched packages, channel pecl.php.net:
=======================================
Package Stable/(Latest) Local
redis   5.3.7 (stable)  5.3.7 PHP extension for interfacing with Redis

# 安装redis扩展
➜ pecl install redis
# 如果安装成功会提示:
Build process completed successfully
Installing '/opt/homebrew/Cellar/php@8.1/8.1.19/pecl/20210902/redis.so'

# 查看php扩展
➜ php -m | grep redis
redis
php-redis扩展,安装完成!
安装memcached扩展
# 查询memcached扩展
➜ pecl search memcached
# 安装memcached扩展
➜ pecl install memcached
安装这个扩展就遇见问题了,安装的时候会有–with相关配置选项,我是一路回车,具体问题如下:
# 问题1
checking for pkg-config... /opt/homebrew/bin/pkg-config
checking for zlib location... configure: error: memcached support requires ZLIB. Use --with-zlib-dir=<DIR> to specify the prefix where ZLIB headers and library are located

# 问题2
with-libmemcached-dir=<DIR> ....巴拉巴拉的报错

# 问题很明显就是没找到对应的路径...

# 解决方案
```shell
# 查询是否安装了支持的软件
➜ brew search libevent
➜ brew search libmemcached
➜ brew search zlib

# 安装他们
➜ brew install libevent
➜ brew install zlib
➜ brew install libmemcached

# 重新编译的时候会有--with的选项
# 这边需要找到zlib和 libmemecached的安装目录
➜ brew info zlib/libmemacached

# 问题1
with-libmemcached-dir=/opt/homebrew/opt/zlib
# 问题2
with-libmemcached-dir=/opt/homebrew/Cellar/libmemcached/1.0.18_2
# 然后其他的--enable选项默认回车就行

# 最终
Build process completed successfully
Installing '/opt/homebrew/Cellar/php@8.1/8.1.19/pecl/20210902/memcached.so'
install ok: channel://pecl.php.net/memcached-3.2.0
Extension memcached enabled in php.ini

# 查看是否安装完成扩展
➜  memcached-3.2.0 php -m | grep mem
memcached
安装rdkafka扩展
#查询rdkafka扩展
➜ pecl search rdkafka

# 安装rdkafka扩展
➜ pecl install rdkafka
.... 扒拉扒拉一大堆,然后出现这个(这里我还是回车,不处理)
configure.ac:161: the top level
librdkafka installation path? [autodetect] :

# 错误1
checking for librdkafka/rdkafka.h" in default path... not found
configure: error: Please reinstall the rdkafka distribution
ERROR: `/private/tmp/pear/temp/rdkafka/configure --with-php-config=/opt/homebrew/opt/php@8.1/bin/php-config --with-rdkafka' failed

# 错误1,解决方案(这边需要输入librdkafka的路径)
librdkafka installation path? [autodetect] : /opt/homebrew/Cellar/librdkafka/2.1.1

# 错误2
/opt/homebrew/Cellar/php@8.1/8.1.19/include/php/ext/pcre/php_pcre.h:23:10: fatal error: 'pcre2.h' file not found
#include "pcre2.h"
         ^~~~~~~~~
1 error generated.
make: *** [metadata_broker.lo] Error 1
ERROR: `make' failed

# 错误2,解决方案(需要做一个ln)
➜ ln -s /opt/homebrew/include/pcre2.h /opt/homebrew/Cellar/php@8.1/8.1.19/include/php/ext/pcre/pcre2.h

# 查看扩展
➜  2.1.1 git:(stable) php -m | grep rd
rdkafka
standard
OKK 这样的话,就把相关扩展给安装好了。
写在最后,开发环境的搭建有时候真的很头痛,对于使用mac的开发者,使用brew 搭建lnmp环境是非常方便的。
共同学习,写下你的评论
评论加载中...
作者其他优质文章