初知Dubbo
前一段时间,在一次模拟面试中,一个学长告诉我,现在的大学生还是懂一点分布式是比较好的,例如阿里巴巴的Dubbo框架,现在做项目很多公司都会使用这个框架;于是我心心念念这个框架在期末复习的空档时间看了好几次官方文档,都没有太大的作用,今天发了个狠心,决定动手试一下,就像我以前学习SSM框架是一样的,什么都不会,直接上手,所以在下文中,可能涉及到原理讲解的会比较少,很多都是做法是怎样的。
前期准备
1、安装zookeeper(百度百科):
ZooKeeper是一个分布式的,开放源码的分布式应用程序协调服务,是Google的Chubby一个开源的实现,是Hadoop和Hbase的重要组件。它是一个为分布式应用提供一致性服务的软件,提供的功能包括:配置维护、域名服务、分布式同步、组服务等。
ZooKeeper的目标就是封装好复杂易出错的关键服务,将简单易用的接口和性能高效、功能稳定的系统提供给用户。
ZooKeeper包含一个简单的原语集,[1] 提供Java和C的接口。
ZooKeeper代码版本中,提供了分布式独享锁、选举、队列的接口,代码在zookeeper-3.4.3\src\recipes。其中分布锁和队列有Java和C两个版本,选举只有Java版本。
我们下载过后把我们的Zookeeper 解压到相应的目录中,进入我们的conf文件夹下,打开 zoo.cfg配置文件:
# The number of milliseconds of each tick# zookeeper中使用的基本时间单位, 毫秒值.tickTime=2000# The number of ticks that the initial # synchronization phase can takeinitLimit=10# The number of ticks that can pass between # sending a request and getting an acknowledgementsyncLimit=5# the directory where the snapshot is stored.# do not use /tmp for storage, /tmp here is just # example sakes.# 数据目录. 可以是任意目录.dataDir=D:\Program Files\zookeeper-3.4.6\dataTmp# the port at which the clients will connect# 监听client连接的端口号.clientPort=2181# the maximum number of client connections.# increase this if you need to handle more clients#maxClientCnxns=60## Be sure to read the maintenance section of the # administrator guide before turning on autopurge.## http://zookeeper.apache.org/doc/current/zookeeperAdmin.html#sc_maintenance## The number of snapshots to retain in dataDir#autopurge.snapRetainCount=3# Purge task interval in hours# Set to "0" to disable auto purge feature#autopurge.purgeInterval=1
2、安装Tomcat(相信大家都有);
3、打包dubbo-admin的war包;
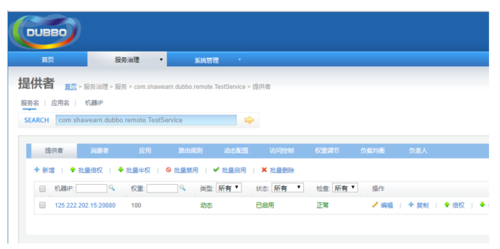
我自己用的IDE是Idea,要是也用这个IED就跟着我的脚步,把dubbo-admin解压到自己喜欢的地方,在idea中直接打开就行,我们设置好后,直接启动Tomcat服务器即可,我们 可以看到登录页面,登陆过后会看到如下我的页面:
01.png
我们的登录的用户名密码为:dubbo-admin/src/webapp/WEB-INF/dubbo-properties配置文件中
# 这里的端口号与上面Zookeeper中配置的端口号一致dubbo.registry.address=zookeeper://localhost:2181dubbo.admin.root.password=root
dubbo.admin.guest.password=guest
上述的工具和本次的测试代码我都放在了一起,可一并下载,地址为:下载地址
开始工作
我这里主要讲一下需要注意的点,全部代码在上面那个下载地址中有,我就不再讲其他没用的了;
配置文件application-consumers.xml:
<?xml version="1.0" encoding="UTF-8"?><beans xmlns="http://www.springframework.org/schema/beans"
       xmlns:xsi="http://www.w3.org/2001/XMLSchema-instance"
       xmlns:dubbo="http://code.alibabatech.com/schema/dubbo"
       xsi:schemaLocation="http://www.springframework.org/schema/beans
       http://www.springframework.org/schema/beans/spring-beans.xsd
       http://code.alibabatech.com/schema/dubbo
       http://code.alibabatech.com/schema/dubbo/dubbo.xsd">

    <!-- 配置可参考 http://dubbo.io/User+Guide-zh.htm -->

    <!-- 消费方应用名,用于计算依赖关系,不是匹配条件,不要与提供方一样 -->
    <dubbo:application  name="dubbo-consumer" owner="dubbo-consumer"/>
    <!-- 定义 zookeeper 注册中心地址及协议,这里的端口号与上面对应  -->
    <dubbo:registry address="zookeeper://127.0.0.1:2181" client="zkclient" />
    <!-- 和本地bean一样实现服务 -->
    <bean id="demoService" class="com.tao.dubbo.service.impl.TestServiceImpl" />

    <!-- 向注册中心注册暴漏服务地址,注册服务 -->
    <dubbo:service interface="com.tao.dubbo.service.TestService"
                   ref="demoService" executes="10" /></beans>
配置我们访问前端页面的端口号application.properties:
server.port=8088
主方法,DubboConsumerAppplication.class:
package com.tao.dubbo.consumer;import org.springframework.boot.SpringApplication;import org.springframework.boot.autoconfigure.SpringBootApplication;import org.springframework.context.annotation.ImportResource;@SpringBootApplication@ImportResource(value = {"classpath:application-consumers.xml"}) // 使用 consumers.xml 配置;public class DubboConsumerApplication {    public static void main(String[] args) {
        SpringApplication.run(DubboConsumerApplication.class, args);
    }
}
service接口及其实现:
package com.tao.dubbo.service;/**
 * 测试远程调用的接口;
 */public interface TestService {    String sayHello(String name);
}
package com.tao.dubbo.service.impl;import com.tao.dubbo.service.TestService;/**
* Created by Taoyongpan on 2017/12/25.
*/public class TestServiceImpl implements TestService { @Override
public String sayHello(String name) { return name;
}
}controller方法 :
package com.tao.dubbo.consumer.controller;import com.alibaba.fastjson.JSONObject;import com.tao.dubbo.service.TestService;import org.springframework.beans.factory.annotation.Autowired;import org.springframework.stereotype.Controller;import org.springframework.web.bind.annotation.PathVariable;import org.springframework.web.bind.annotation.RequestMapping;import org.springframework.web.bind.annotation.ResponseBody;/**
 * 测试用的 Controller 类;
 */@Controllerpublic class TestController {    @Autowired
    TestService testService;    /**
     * 测试 JSON 接口;
     *
     * @param name 名字;
     * @return
     */
    @ResponseBody
    @RequestMapping("/test/{name}")    public JSONObject testJson(@PathVariable("name") String name) {
        JSONObject jsonObject = new JSONObject();
        String testStr = testService.sayHello(name);
        jsonObject.put("str", testStr);        return jsonObject;
    }

}
调试运行
我们的运行顺序是,先打开Zookeeper(bin/zkServer.cmd),然后在tomcat中运行我们上面下载的dubbo-admin,然后就是运行我们上面的dubbo-consumer中的主方法,在地址栏中输入:localhost:8088/test/taoyongpan
若页面正常输出,则表示搭建成功;
作者:Taoyongpan
链接:https://www.jianshu.com/p/4546bd158b32
共同学习,写下你的评论
评论加载中...
作者其他优质文章


