Spring中的任务(异步,定时,发邮件)
一 Spring中的异步任务使用:
在Java应用中,绝大多数情况下都是通过同步的方式来实现交互处理的;但是在处理与第三方系统交互的时候,容易造成响应迟缓的情况,之前大部分都是使用多线程来完成此类任务,其实,在Spring 3.x之后,就已经内置了@Async来完美解决这个问题,使用的方法很简单,如下:
Serivce.java 和Controller.java 如下
package com.lxj.task.service;

import org.springframework.scheduling.annotation.Async;
import org.springframework.stereotype.Service;

@Service
public class AsyncService {

    @Async   //这是一个异步方法
    public void hello(){
        try {
            Thread.sleep(3000);
        } catch (InterruptedException e) {
            e.printStackTrace();
        }
        System.out.println("hello . 处理数据中 ..");
    }
package com.lxj.task.cotroller;
import com.lxj.task.service.AsyncService;
import org.springframework.beans.factory.annotation.Autowired;
import org.springframework.web.bind.annotation.GetMapping;
import org.springframework.web.bind.annotation.RestController;
@RestController
public class AsyncController {
@Autowired
AsyncService asyncService;
@GetMapping("/hello")
public String hello(){
asyncService.hello();
return "success";
}
}import org.springframework.boot.autoconfigure.SpringBootApplication;
import org.springframework.scheduling.annotation.EnableAsync;
import org.springframework.scheduling.annotation.EnableScheduling;@EnableAsync //开启异步注解功能@SpringBootApplication
public class SpringbootTaskApplication {
public static void main(String[] args) {
SpringApplication.run(Springboot10TaskApplication.class, args);
}
}这个时候我直接在浏览器输入/hello 立马就返回页面success数据,之后睡了3秒后控制台打印数据。

二 Spring中的定时任务使用:
项目开发中经常需要执行一些定时任务,比如需要在每天凌晨时候,分析一次前一天的日志信息。Spring为我们提供了异步执行任务调度的方式,提供TaskExecutor 、TaskScheduler 接口。
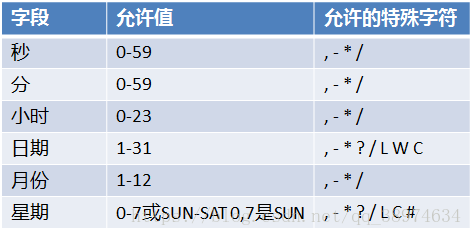
cron表达式如下,有点类似linux的crontab.

首先需要在主方法中开启支持注解的定时任务
import org.springframework.boot.SpringApplication;
import org.springframework.boot.autoconfigure.SpringBootApplication;
import org.springframework.scheduling.annotation.EnableAsync;
import org.springframework.scheduling.annotation.EnableScheduling;

@EnableScheduling //开启定时任务
@SpringBootApplication
public class Springboot10TaskApplication {
	public static void main(String[] args) {
		SpringApplication.run(Springboot10TaskApplication.class, args);
	}
}
在方法上面标注@Scheduled注解,如下:
package com.lxj.task.service;

import org.springframework.scheduling.annotation.Scheduled;
import org.springframework.scheduling.annotation.Schedules;
import org.springframework.stereotype.Service;

@Service
public class ScheduledService {

//    second(秒)   minute(分), hour(时), day of month (日), month(月) day of week(周几).
//    e.g. {@code "0 * * * * MON-FRI"}
//    【0 0/15 14,18 * * ?】 每天14点和18点每隔5分钟执行一次
//    【0 15 10 ? * 1-6】 每个月的周一到周五的10点15分执行一次
//    【0 0 2 ? * 6L】 每个月的最后一个周六凌晨2点执行一次
//    【0 0 2 LW * ?】 每个月的最后一个工作日凌晨2点执行一次
//    【0 0 2-4 ? * 1#1】 每个月的第一个周一凌晨2点到4点期间,每个整点执行一次

    @Scheduled(cron = "0-4 * * * * *")  //每分钟的前4秒会执行hello方法
    public void hello(){
        System.out.println("hello......");
    }

}
每分钟的前4秒会在控制台打印hello..............

三 SpringBoot整合邮件任务:
首先,邮件发送需要引入spring-boot-starter-mail 这个模块,然后参考SpringBoot官方文档,引入相关的模块,

pom.xml
		<dependency>
			<groupId>org.springframework.boot</groupId>
			<artifactId>spring-boot-starter-mail</artifactId>
		</dependency>
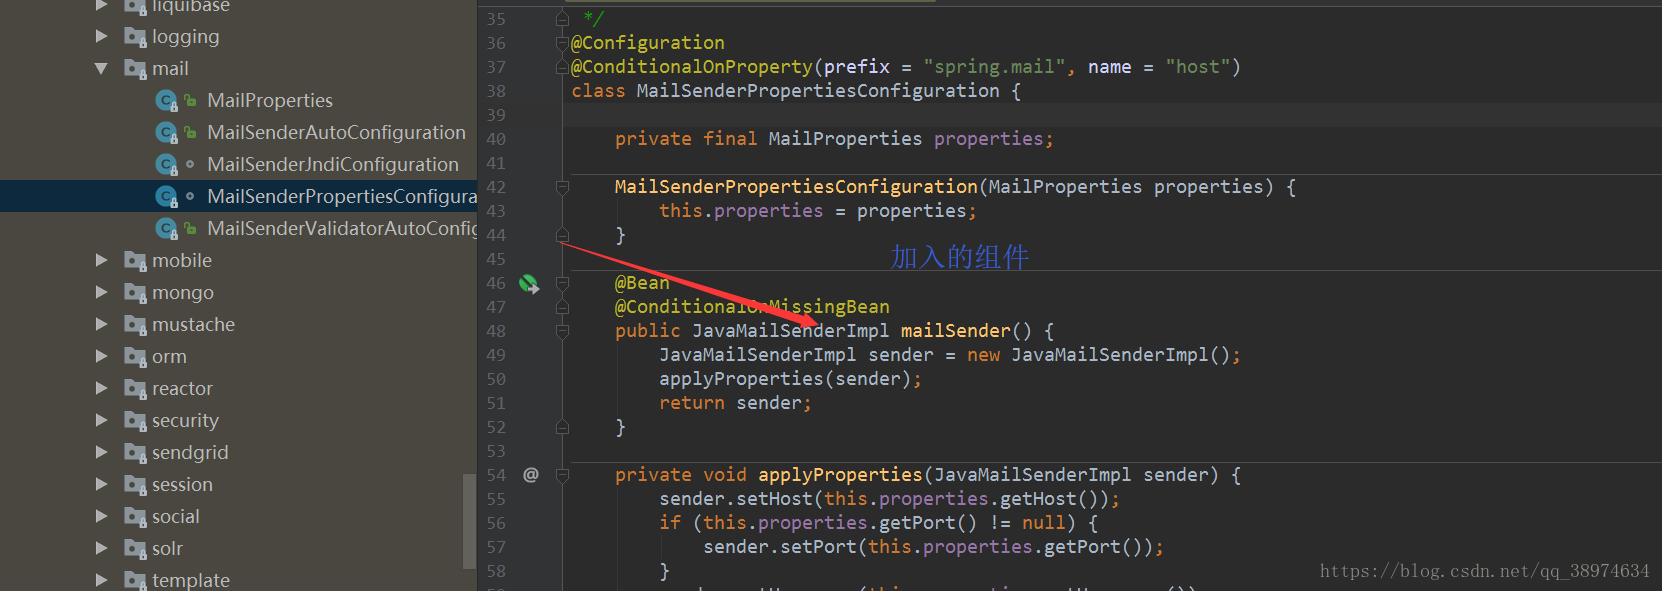
配置类代码如下:
@ConfigurationProperties(prefix = "spring.mail")
public class MailProperties {

	private static final Charset DEFAULT_CHARSET = Charset.forName("UTF-8");

	/**
	 * SMTP server host.
	 */
	private String host;

	/**
	 * SMTP server port.
	 */
	private Integer port;

	/**
	 * Login user of the SMTP server.
	 */
	private String username;

	/**
	 * Login password of the SMTP server.
	 */
	private String password;

	/**
	 * Protocol used by the SMTP server.
	 */
	private String protocol = "smtp";

	/**
	 * Default MimeMessage encoding.
	 */
	private Charset defaultEncoding = DEFAULT_CHARSET;

	/**
	 * Additional JavaMail Session properties.
	 */
	private Map<String, String> properties = new HashMap<String, String>();

	/**
	 * Session JNDI name. When set, takes precedence to others Session settings.
	 */
	private String jndiName;

	/**
	 * Test that the mail server is available on startup.
	 */
	private boolean testConnection;
根据配置类配置application.yml 或者 application.properties文件:
spring.mail.password=zcmovjdygwgthajg
spring.mail.username=1210427694@qq.com
spring.mail.host=smtp.qq.com
spring.mail.properties.mail.smtp.ssl.enable=true
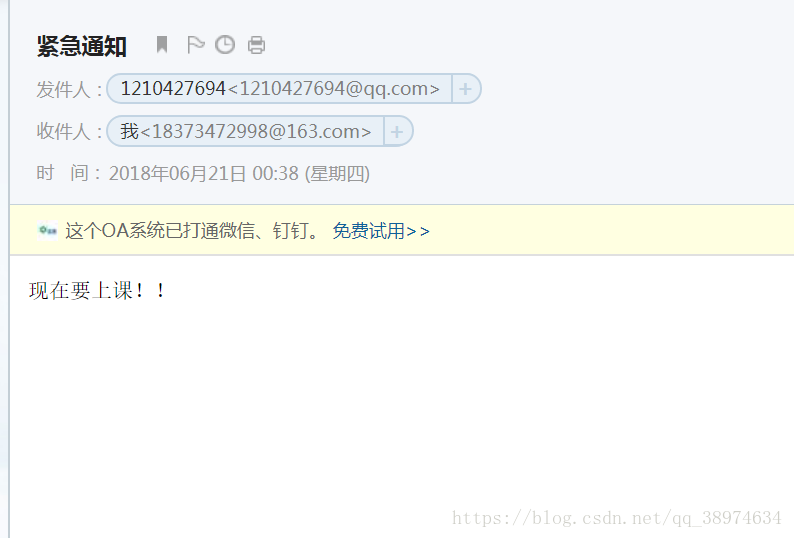
我用的是qq邮箱,测试代码如下:
	@Autowired
	JavaMailSenderImpl javaMailSender;

	@Test
	public void testSimpleMailMessage() {
		//简单邮件
		SimpleMailMessage simpleMailMessage = new SimpleMailMessage();
                simpleMailMessage.setSubject("紧急通知");
                simpleMailMessage.setText("现在要上课!!");
                simpleMailMessage.setSentDate(new Date());
                simpleMailMessage.setTo("18373472998@163.com");  //这是我网易的邮箱
		simpleMailMessage.setFrom("1210427694@qq.com");  //这里我现在的邮箱
		javaMailSender.send(simpleMailMessage);
	}
打开网易的邮箱,可以看到已经成功发送:
接着测试带文件的邮件:
	@Test
	public void testMimeMessageHelper() throws MessagingException {

		MimeMessage mimeMessage = javaMailSender.createMimeMessage();
		MimeMessageHelper mimeMessageHelper = new MimeMessageHelper(mimeMessage, true);

		mimeMessageHelper.setSubject("通知通知");
		mimeMessageHelper.setText("现在下课了!!!");
		mimeMessageHelper.setTo("18373472998@163.com");  //这是我网易的邮箱
		mimeMessageHelper.setFrom("1210427694@qq.com");  //这里我现在的邮箱

		//添加附件,上传文件
		mimeMessageHelper.addAttachment("1.jpg",new File("C:\\Users\\liuxinjian\\Desktop\\C++.txt"));
		javaMailSender.send(mimeMessage);
	}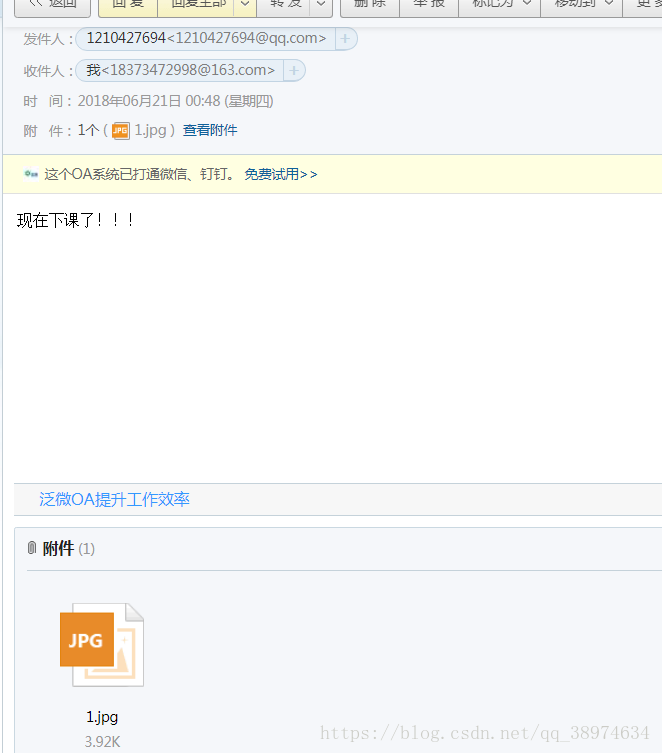
这样就成功发送邮件了。
四 总结
到此spring的异步任务、定时任务和邮件任务就结束了,欢迎关注下次的内容,感谢。
共同学习,写下你的评论
评论加载中...
作者其他优质文章