1984年,我以机械工程学位从大学毕业,开始了软件工程师的职业生涯。自学C语言之后,1985年从事了用于Unix的50,000行用户图形界面(GUI)开发。整个过程非常轻松愉快。
1985年底,我的编码工作完成了,之后我考虑开始其他的项目——或者说我认为我可以进行新的项目了。但很快我收到了一系列bug报告和新增的需求,为修正错误我开始努力阅读这50,000行代码。这个工作却非常艰难。
整个程序就像真正用卡片做成的房子一样,几乎每天都会轰然倒下。即使是最微小的变化我也要花费几个小时来恢复程序的稳定性。
可能我碰巧发现了一个重要的软件工程原则:开发阶段轻松愉快,然后项目部署后就去找下一份工作。然而,实际上我的困难源于我对面向对象(object-oriented,OO)软件开发基本原则——封装的无知。我的程序就是个大型的switch语句集合,在不同情况下调用不同的函数——这导致了代码的紧耦合以及整个软件难以适应变化。
在Java设计模式这篇文章,我会讨论策略模式,它可能是最基础的设计模式吧。如果在1984年的时候我知道策略模式的话,有很大一部分工作就可以避免了。
策略模式
在GOF的设计模式一书的第一章,作者讨论了若干条OO设计原则,这些原则包括了很多设计模式的核心。策略模式体现了这样两个原则——封装变化和对接口编程而不是对实现编程。设计模式的作者把策略模式定义如下:
Define a family of algorithms, encapsulate each one, and make them interchangeable. [The] Strategy [pattern] lets the algorithm vary independently from clients that use it.(策略模式定义了一系列的算法,并将每一个算法封装起来,而且使它们还可以相互替换。策略模式让算法独立于使用它的客户而变化。)
策略模式将整个软件构建为可互换部分的松耦合的集合,而不是单一的紧耦合系统。松耦合的软件可扩展性更好,更易于维护且重用性好。
为理解策略模式,我们首先看一下Swing如何使用策略模式绘制组件周围的边框。接着讨论Swing使用策略模式带来的好处,最后说明在你的软件中如何实现策略模式。
Swing 边框
几乎所有的Swing组件都可以绘制边框,包括面板、按钮、列表等等。Swing也提供了组件的多种边框类型:bevel(斜面边框),etched(浮雕化边框),line(线边框),titled(标题边框)以及compound(复合边框)等。Swing组件的边框使用JComponent类绘制,它是所有Swing组件的基类,实现了所有Swing组件的常用功能。
JComponent实现了paintBorder(),该方法用来绘制组件周围的边框。假如Swing的创建者使用类似示例1的方法实现paintBorder():
// A hypothetical JComponent.paintBorder methodprotected void paintBorder(Graphics g) {   switch(getBorderType()) {      case LINE_BORDER:   paintLineBorder(g);                          break;      case ETCHED_BORDER: paintEtchedBorder(g);                          break;      case TITLED_BORDER: paintTitledBorder(g);                          break;
      ...
   }
}
示例1 绘制Swing边框的错误方式
示例1中JComponent.paintBorder()方法在JComponent硬编码了边框的绘制。
如果你想实现一种新的边框类型,可以想见这样的结果——需要修改JComponent类的至少三个地方:首先,添加与新边框类型相关的新的整数值。第二,switch语句中添加case语句。第三,实现paintXXXBorder()方法,XXX表示边框类型。
很显然,扩展前面的paintBorder()吃力不讨好。你会发现不仅paintBorder()很难扩展新类型,而且JComponent类不是你首先要修改的位置,它是Swing工具包的一部分,这意味着你将不得不重新编译类和重建全部工具包。你也必须要求你的用户使用你自己的Swing版本而不是标准版,Swing下一次发布后这些工作依然要做。此外,因为你为JComponent类添加了新的边框绘制功能,无论你是否喜欢每个Swing组件都可以访问该功能的现状——你不能把你的新边框限制到具体的组件类型。
可见,如果JComponent类使用示例1中的switch语句实现其功能,Swing组件就不能被扩展。
那么运用OO思想如何实现呢?使用策略模式解耦JComponent与边框绘制的代码,这样无需修改JComponent类就实现了边框绘制算法的多样性。使用策略模式封装变化,即绘制边框方法的变化,以及对接口编程而不是对实现编程,提供一个Border接口。接下来就看看JComponent如何使用策略模式绘制边框。示例2为JComponent.paintBorder()方法:
// The actual implementation of the JComponent.paintBorder() methodprotected void paintBorder(Graphics g) {
   Border border = getBorder();   if (border != null) {
      border.paintBorder(this, g, 0, 0, getWidth(), getHeight());
   }
}
示例2 绘制Swing边框的正确方式
前面的paintBorder()方法绘制了有边框物体的边框。在这种情况下,边框对象封装了边框绘制算法,而不是JComponent类。
注意JComponent把自身的引用传递给Border.paintBorder(),这样边框对象就可以从组件获取信息,这种方式通常称为委托。通过传递自身的引用,一个对象将功能委托给另一对象。
JComponent类引用了边框对象,作为JComponent.getBorder()方法的返回值,示例3为相关的setter方法。
...private Border border;
...public void setBorder(Border border) {
   Border oldBorder = this.border;   this.border = border;
   firePropertyChange("border", oldBorder, border);   if (border != oldBorder) {      if (border == null || oldBorder == null || !(border.getBorderInsets(this).
                                    equals(oldBorder.getBorderInsets(this)))) {
         revalidate();
      }
      repaint();
   }
}
...public Border getBorder() {   return border;
}
示例3 Swing组件边框的setter和getter方法
使用JComponent.setBorder()设置组件的边框时,JComponent类触发属性改变事件,如果新的边框与旧边框不同,组件重新绘制。getBorder()方法简单返回Border引用。
图1为边框和JComponent类之间关系的类图。
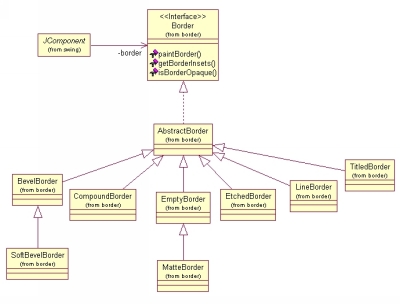
图1 Swing边框
JComponent类包含Border对象的私有引用。注意由于Border是接口不是类,Swing组件可以拥有任意类型的实现了Border接口的边框(这就是对接口编程而不是对实现编程的含义)。
我们已经知道了JComponent是如何通过策略模式实现边框绘制的,下面创建一种新边框类型来测试一下它的可扩展性。
创建新的边框类型
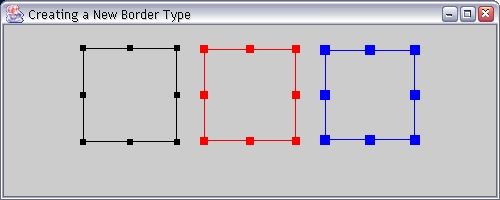
图2 新边框类型
图2显示了具有三个面板的Swing应用。每个面板设置自定义的边框,每个边框对应一个HandleBorder实例。绘图程序通常使用handleBorder对象来移动对象和改变对象大小。
示例4为HandleBorder类:
import java.awt.*;import javax.swing.*;import javax.swing.border.*;public class HandleBorder extends AbstractBorder {   protected Color lineColor;   protected int thick;   public HandleBorder() {      this(Color.black, 6);
   }   public HandleBorder(Color lineColor, int thick) {      this.lineColor = lineColor;      this.thick = thick;
   }   public void paintBorder(Component component,
                                  Graphics g, int x, int y, int w, int h) {
      Graphics copy = g.create();      if(copy != null) {         try {
            copy.translate(x,y);
            paintRectangle(component,copy,w,h);
            paintHandles(component,copy,w,h);
         }         finally {
            copy.dispose();
         }
      }
   }   public Insets getBorderInsets() {      return new Insets(thick,thick,thick,thick);
   }   protected void paintRectangle(Component c, Graphics g,                           int w, int h) {
      g.setColor(lineColor);
      g.drawRect(thick/2,thick/2,w-thick-1,h-thick-1);
   }   protected void paintHandles(Component c, Graphics g,                           int w, int h) {
      g.setColor(lineColor);
      g.fillRect(0,0,thick,thick); // upper left
      g.fillRect(w-thick,0,thick,thick); // upper right
      g.fillRect(0,h-thick,thick,thick); // lower left
      g.fillRect(w-thick,h-thick,thick,thick); // lower right
      g.fillRect(w/2-thick/2,0,thick,thick); // mid top
      g.fillRect(0,h/2-thick/2,thick,thick); // mid left
      g.fillRect(w/2-thick/2,h-thick,thick,thick); // mid bottom
      g.fillRect(w-thick,h/2-thick/2,thick,thick); // mid right
   }
}
示例4 HandleBorder类
HandleBorder类继承自javax.swing.border.AbstractBorder,覆盖paintBorder()和getBorderInsets()方法。尽管HandleBorder的实现不太重要,但是我们可以容易地创建新边框类型,因为Swing使用了策略模式绘制组件边框。
示例5为Swing应用。
import javax.swing.*;import javax.swing.border.*;import java.awt.*;import java.awt.event.*;public class Test extends JFrame {   public static void main(String[] args) {
      JFrame frame = new Test();
      frame.setBounds(100, 100, 500, 200);
      frame.setDefaultCloseOperation(JFrame.DISPOSE_ON_CLOSE);
      frame.show();
   }   public Test() {      super("Creating a New Border Type");
      Container contentPane = getContentPane();
      JPanel[] panels = { new JPanel(),
                     new JPanel(), new JPanel() };
      Border[] borders = { new HandleBorder(),                     new HandleBorder(Color.red, 8),                     new HandleBorder(Color.blue, 10) };
      contentPane.setLayout(               new FlowLayout(FlowLayout.CENTER,20,20));      for(int i=0; i < panels.length; ++i) {
         panels[i].setPreferredSize(new Dimension(100,100));
         panels[i].setBorder(borders[i]);
         contentPane.add(panels[i]);
      }
   }
}
示例5 使用handleBorder
前面的应用创建了三个面板(javax.swing.JPanel实例)和三个边框(HandleBorder实例)。注意通过调用JComponent.setBorder()可以为面板简单设置具体的边框。
回想一下示例2,当JComponent调用Border.paintBorder()时,组件引用传递给组件的边框——一种委托方式。正如我前面提到的,开发人员经常将策略模式与委托共同使用。该HandleBorder类未使用组件引用,但是其他边框会用到引用从组件获取信息。比如示例6为这种类型边框javax.swing.border.EtchedBorder的paintBorder()方法:
// The following listing is from// javax.swing.border.EtchedBorderpublic void paintBorder(Component component, Graphics g, int x, int y,
                         int width, int height) {   int w = width;   int h = height;

   g.translate(x, y);

   g.setColor(etchType == LOWERED? getShadowColor(component) : getHighlightColor(component));
   g.drawRect(0, 0, w-2, h-2);

   g.setColor(etchType == LOWERED? getHighlightColor(component) : getShadowColor(component));
   g.drawLine(1, h-3, 1, 1);
   g.drawLine(1, 1, w-3, 1);

   g.drawLine(0, h-1, w-1, h-1);
   g.drawLine(w-1, h-1, w-1, 0);

   g.translate(-x, -y);
}
示例6 从组件获取信息的Swing边框
javax.swing.border.EtchedBorder.paintBorder()方法使用它的组件引用获取组件的阴影和高亮颜色信息。
实现策略模式
策略模式相对比较简单,在软件中容易实现:
为你的策略对象定义
Strategy接口编写
ConcreteStrategy类实现Strategy接口在你的
Context类中,保持对“`Strategy“对象的私有引用。在你的
Context类中,实现Strategy对象的settter和getter方法。
Strategy接口定义了Strategy对象的行为;比如Swing边框的Strategy接口为javax.swing.Border接口。
具体的ConcreteStrategy类实现了Strategy接口;比如,Swing边框的LineBorder和EtchedBorder类为ConcreteStrategy类。Context类使用Strategy对象;比如JComponent类为Context对象。
你也可以检查一下你现有的类,看看它们是否是紧耦合的,这时可以考虑使用策略对象。通常情况下,这些包括switch语句的需要改进的地方与我在文章开头讨论的非常相似。
作业
一些Swing组件的渲染和编辑条件比其他的更加复杂。讨论如何在列表类(javax.swing.JList)使用策略模式渲染列表项。
上一次的作业
上一次的作业要求重新实现TableBubbleSortDecorator。在“装饰你的代码”一文首先讨论了JDK内建的对代理模式的支持。
简单来说,我创建了抽象类Decorator实现java.lang.reflect.InvocationHandler接口。Decorator类引用了装饰对象(或者说代理模式中的真实对象)。示例1H为Decorator类。
import java.lang.reflect.InvocationHandler;public abstract class Decorator implements InvocationHandler {   // The InvocationHandler interface defines one method:
   // invoke(Object proxy, Method method, Object[] args). That
   // method must be implemented by concrete (meaning not
   // abstract) extensions of this class.
   private Object decorated;   protected Decorator(Object decorated) {      this.decorated = decorated;
   }   protected synchronized Object getDecorated() {      return decorated;
   }   protected synchronized void setDecorated(Object decorated) {      this.decorated = decorated;
   }
}
示例1H 抽象装饰器类
尽管Decorator类实现了InvocationHandler接口,但是它没有实现该接口的唯一方法invoke(Object proxy, Method method, Object[] methodArguments)。因为Decorator类是抽象的,Decorator的扩展是具体类的话必须实现invoke()方法。
Decorator类是所有装饰器的基类。示例2H为Decorator类的扩展,具体的表排序装饰器。注意TableSortDecorator没有实现invoke()方法,它是抽象的。
import javax.swing.table.TableModel;import javax.swing.event.TableModelListener;public abstract class TableSortDecorator
                                 extends Decorator
                                 implements TableModelListener {   // Concrete extensions of this class must implement
   // tableChanged from TableModelListener
   abstract public void sort(int column);   public TableSortDecorator(TableModel realModel) {      super(realModel);
   }
}
示例2H 修正的TableSortDecorator
现在可以使用JDK内建的对代理模式的支持实现TableBubbleSortDecorator:
import java.lang.reflect.Method;import javax.swing.table.TableModel;import javax.swing.event.TableModelEvent;public class TableBubbleSortDecorator extends TableSortDecorator {   private int indexes[];   private static String GET_VALUE_AT = "getValueAt";   private static String SET_VALUE_AT = "setValueAt";   public TableBubbleSortDecorator(TableModel model) {      super(model);
      allocate();
   }   // tableChanged is defined in TableModelListener, which
   // is implemented by TableSortDecorator.
   public void tableChanged(TableModelEvent e) {
      allocate();
   }   // invoke() is defined by the java.lang.reflect.InvocationHandler
   // interface; that interface is implemented by the
   // (abstract) Decorator class. Decorator is the superclass
   // of TableSortDecorator.
   public Object invoke(Object proxy, Method method,
                                         Object[] args) {
      Object result = null;
      TableModel model = (TableModel)getDecorated();      if(GET_VALUE_AT.equals(method.getName())) {
         Integer row = (Integer)args[0],
                 col = (Integer)args[1];
         result = model.getValueAt(indexes[row.intValue()],
                                           col.intValue());
      }      else if(SET_VALUE_AT.equals(method.getName())) {
         Integer row = (Integer)args[1],
                 col = (Integer)args[2];
         model.setValueAt(args[0], indexes[row.intValue()],
                                   col.intValue());
      }      else {         try {
            result = method.invoke(model, args);
         }         catch(Exception ex) {
            ex.printStackTrace(System.err);
         }
      }      return result;
   }   // The following methods perform the bubble sort ...
   public void sort(int column) {
      TableModel model = (TableModel)getDecorated();      int rowCount = model.getRowCount();      for(int i=0; i < rowCount; i++) {         for(int j = i+1; j < rowCount; j++) {            if(compare(indexes[i], indexes[j], column) < 0) {
               swap(i,j);
            }
         }
      }
   }   private void swap(int i, int j) {      int tmp = indexes[i];
      indexes[i] = indexes[j];
      indexes[j] = tmp;
   }   private int compare(int i, int j, int column) {
      TableModel realModel = (TableModel)getDecorated();
      Object io = realModel.getValueAt(i,column);
      Object jo = realModel.getValueAt(j,column);      int c = jo.toString().compareTo(io.toString());      return (c < 0) ? -1 : ((c > 0) ? 1 : 0);
   }   private void allocate() {
      indexes = new int[((TableModel)getDecorated()).
                          getRowCount()];      for(int i=0; i < indexes.length; ++i) {
         indexes[i] = i;
      }
   }
}
示例3H 修正的TableBubbleSortDecorator
使用JDK内建的对代理模式的支持和设计良好的基类,通过继承Decorator及实现invoke()方法很容易实现装饰器。
邮件
给我的一封邮件里这样写到:
根据我在树上选择的节点工具栏要显示特定的按钮。我创建了工具栏装饰器,它的构造函数参数为JToolBar工具栏。装饰器包含一个showButtonForNode()方法根据节点改变按钮。我调用在树的选择监听器的valueChanged()方法中调用showButtonForNode()方法。
这样使用装饰器模式正确吗?
很多设计模式可以达到功能扩展的目的;比如在Java设计模式中,你已经知道如何使用代理模式,装饰器模式和策略模式来扩展功能。由于他们都可以实现相同的目标(功能扩展),在具体情况下使用哪个模式就很难判断。
装饰器模式的主要解决问题的点在于:在运行时结合多种行为;比如理解代理设计模式一文的“上一次得作业”部分,我展示了Swing表格排序和过滤相结合的方法。
TableSortDecorator sortDecorator = new TableBubbleSortDecorator(table.getModel());
TableFilterDecorator filterDecorator = new TableHighPriceFilter(sortDecorator);
table.setModel(filterDecorator);
前面的代码中,过滤装饰器装饰了排序装饰器,排序装饰器装饰了表格模型;结果表格模型可以排序和过滤数据。
对于邮件中的问题,使用工具栏按钮与其他行为组合不太合适,所以装饰器模式可能不合适。这种情况代理模式看来更好,在编译阶段而不是运行时就可以获取代理和真实对象的关系,从而扩展功能。
共同学习,写下你的评论
评论加载中...
作者其他优质文章