aiohttp是一个基于Python 3.4+ asyncio模块的HTTP工具包。它包括:
高低层级的服务器区别在于高层级服务器提供了:
路由
信号(启动、loop可用、关闭)
中间件
安装次级应用(类似但不同于Flask的blueprints)
低层级服务器仍然允许使用高层级的请求、响应和websocket对象,并不是低到让你直接处理TCP套接字。
在本指南中,我们将构建一个简单的Todo应用程序来上手高级服务器。在未来,我希望涵盖更复杂的应用,但目前待办事项列表已经成为网络编程的最佳选择。
安装
你至少需要Python 3.6。aiohttp确实可以运行在Python 3.4上,但我更倾向于Python 3.5引入的
async和await。至于3.6是因为在该版引入的acync列表推导,除此之外,Python 3.5以上都没有问题。在确定Python版本后,我们使用虚拟环境安装aiohttp
python3.6 -m venv asynctodosource asynctodo/bin/activate
python -m pip install aiohttp==2.0.7  # current version as 2017-04-16
基本应用
我们从简单的开始:一个存储在内存中的列表(由字典组成)以及展示该列表和其中单个项目的路由。由于该列表是一个内存中的对象,我们会重启服务器几次(aiohttp不附带reloader重载器但我稍后会介绍)。新建
aiotodo.py添加如下内容:
from aiohttp import web

TODOS = [
    {        'name': 'Start this tutorial',        'finished': True
    },
    {        'name': 'Finish this tutorial',        'finished': False
    }
]def get_all_todos(request):
    return web.json_response([
        {'id': idx, **todo} for idx, todo in enumerate(TODOS)
    ])def get_one_todo(request):
    id = int(request.match_info['id'])    if id >= len(TODOS):        return web.json_response({'error': 'Todo not found'}, status=404)    return web.json_response({'id': id, **TODOS[id]})def app_factory(args=()):
    app = web.Application()
    app.router.add_get('/todos/', get_all_todos, name='all_todos')
app.router.add_get('/todos/{id:\d+}', get_one_todo, name='one_todo') return appaiohttp.web包含所有高层级应用服务器组件。它提供了诸如应用程序类,请求和响应类以及像json_response这样的帮助方法(json_response是创建application/json响应的快捷方式,而不需要你手动转换对象)。get_all_todos和get_one_todo是我们的路由处理器。(你会注意到它们不是异步的——这是正确的,因为同步和异步程序服务器都能应对)。处理器应该以Django风格接受请求,但与Django和Flask不同(不过显然类似于Pyramid),通过request.match_info映射来访问url参数。请求对象包含与特定请求相关的所有内容,包括对生成它的应用程序的引用。
补充:nerdwaller评论指出路由处理器应该总是异步的来鼓励你以协程思考。这里我保留了原始代码来保持文本的一致性,然而,将上述内容转换为协程只需要将
def替换为async def。我必须同意,即使在将列表转储到json的简单情况下,使用async def也提供了与其它路由处理器的良好对称性。
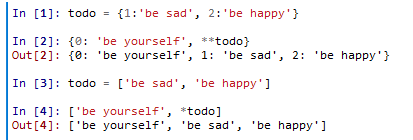
{'id': id, **todo}语法在3.5引入,详见PEP 448,简单效果如下:
app_factory不仅具有将所有应用构建组合在一起的好处,而且我们需要它来调用aiohttp dev服务器以及用于gunicorn aiohttp workers。你会注意到它还接收参数args,当从命令行执行时,aiohttp入口点所不能解析的参数都会被传到这里——我们稍后会用到。最终,应用路由像是Flask和Django的混合。它使用
{name:pattern}({名称:模式})的形式来捕获URL参数,在request.match_info字典中获取该参数,模式部分应用正则表达式。然而,虽然它与Flask(实际上是Werkzeug)路由模式相似,但没有一个转换器的概念,所以转换必须在路由中手动完成。
小贴士
即使
aiohttp.Application能够使用同步路由处理器,你也应当小心,永远不要做长时间阻塞事件循环处理器的事——包括同步IO和CPU密集型任务。在URL参数的模式匹配部分,任何没有配对的
{或者}字符都会导致将导致路由器拒绝建立路由并抛出异常。但是,使用配对的{}(如\d{2})可以工作。(详见Issue 1778)aiohttp的默认路由器不执行任何类型的自动尾斜杠重定向,所以
/todos和/todos/是不同的。如果你期望它处理尾斜杠/,请小心。此外,上面的关于参数正则表达式匹配的注意事项仅适用于aiohttp的默认路由器。它还有其他的实现(事实上,库的维护者鼓励你尝试它们)。
运行应用
既然我们建好了基本应用,我们可以用aiohttp开发服务器运行它。在
aiotodo.py同级目录与虚拟环境(source asynctodo/bin/activate)下运行:
python -m aiohttp.web -P 8080 aiotodo:app_factory
你将看到:
======== Running on http://localhost:8080 ========(Press CTRL+C to quit)
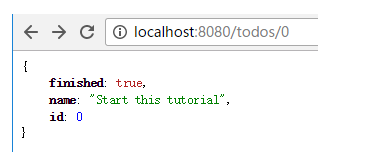
然后打开浏览器访问localhost:8080/todos/(注意尾斜杠),会看到我们放在列表中的两个初始项目以及它们的id。访问localhost:8080/todos/0和localhost:8080/todos/1(没有尾斜杠)查看单个项目。
增加修改删除Todos
为了与代办事项列表进行交互,我们需要更多的处理器。先添加新建功能:
async def create_todo(request):
    data = await request.json()    if 'name' not in data:        return web.json_response({'error': '"name" is a required field'})

    name = data.get('name')    if not isinstance(name, str) or not len(name):        return web.json_response(
            {'error': '"name" must be a string with at least one character'})

    data['finished'] = bool(data.get('finished', False))
    TODOS.append(data)
    new_id = len(TODOS) - 1

    return web.Response(
        headers={            'Location': str(request.app.router['one_todo'].url_for(id=new_id))
        },
        status=303
    )
大部分代码是自解释的(希望是)。我们需要
awaitrequest.json函数,因为它包含io操作。其它 - [Benchmark of Python JSON libraries](http://artem.krylysov.com/blog/2015/09/29/benchmark-python-json-libraries/)
我们返回了一个303重定向,Location头设为重定向地址。request.app.router[...].url_for()用于构建通向其他路由处理器的URL——对router的字典查找对应路由构造(add_get等方法)的name='...'参数。这里假设客户端会自动处理重定向,访问新创建的todo。如果不是(如
curl),它们需要读取Location并手动处理。更新和删除也是类似的:
async def update_todo(request):
    id = int(request.match_info['id'])    if id >= len(TODOS):        return web.json_response({'error': 'Todo not found'}, status=404)

    data = await request.json()    if 'finished' not in data:        return web.json_response(
            {'error': '"finished" is a required key'}, status=400)

    TODOS[id]['finished'] = bool(data['finished'])    return web.Response(status=204)def remove_todo(request):
    id = int(request.match_info['id'])    if id >= len(TODOS):        return web.json_response({'error': 'Todo not found'})    del TODOS[id]    return web.Response(status=204)
这里没有什么特别的。就是直接从列表中删除项目有点问题——我们可以用
None替换被删除项,并对两个get方法稍作修改。增加和修改删除的最大不同在于,增加返回重定向到新建的项目页,而修改删除返回无内容204。原因在于访客不知道新创建的项目的位置,而对于修改和删除旧项目,他们已经知道旧项目的地址了,否则就无法操作。对于删除,这里的实现为地址简单地顺移到下一个项目或者越界。
现在,让我们添加路由:
def app_factory(args=()):
    app = web.Application()
    app.router.add_get('/todos/', get_all_todos, name='all_todos')
    app.router.add_post('/todos/', create_todo, name='create_todo',
                        expect_handler=web.Request.json)
    app.router.add_get('/todos/{id:\d+}', get_one_todo, name='one_todo')
    app.router.add_patch('/todos/{id:\d+}', update_todo, name='update_todo')
    app.router.add_delete('/todos/{id:\d+}', remove_todo, name='remove_todo')    return app
重启服务器,开始测试吧。使用requests测试POST:
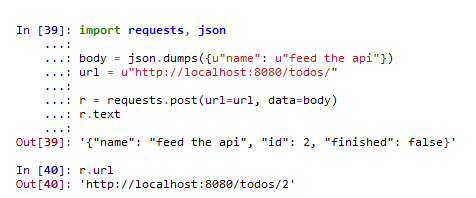
import requests, json#body = json.dumps({u"name": u"feed the api"})
url = u"http://localhost:8080/todos/"#r = requests.post(url=url, data=body)
r.content
可以看到,requests帮我们处理了重定向,成功访问到新建的项目:
其它请自行尝试。
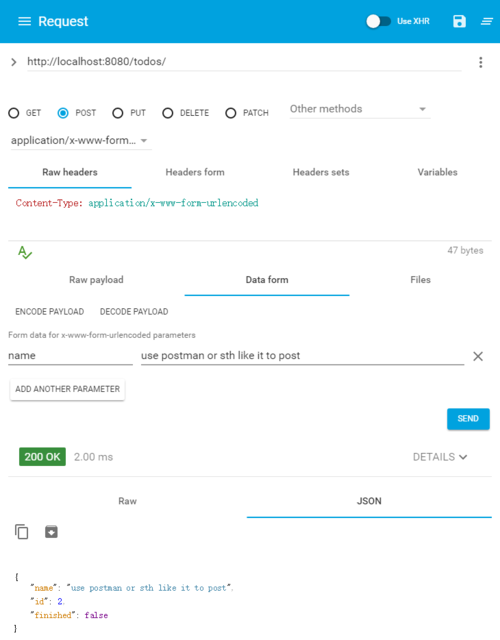
若使用postman类似工具测试可对代码稍作修改。
持久化
我们需要安装psycopg2、aiopg和sqlalchemy,在虚拟环境下
python -m pip install psycopg2 aiopg sqlalchemy
你可能会问为什么选择aiopg而不是asyncpg,asyncpg可是要快上3倍。因为应用速度不是一切,我还重视在应用程序运行时编写和维护代码的时间。最重要的是,编写原始SQL可能很乏味。如果我确定aiopg是瓶颈,并且asyncpg会解决它,那我才会使用asyncpg。
此外,老实说,如果我真的重视应用程序的速度,我不会在Python中编写它。
启动数据库
windows下安装好后,开始菜单 > PostgreSQL > PSQL 进入SQL命令行
CREATE ROLE aiotodo LOGIN PASSWORD '12345' NOINHERIT CREATEDB;
CREATE DATABASE aiotodo;
简单测试:
import psycopg2#conn = psycopg2.connect("dbname=aiotodo user=aiotodo password=12345")
cur = conn.cursor()
cur.execute("DROP TABLE IF EXISTS test")
cur.execute("CREATE TABLE test (id serial PRIMARY KEY, num integer, data varchar);")
cur.execute("INSERT INTO test (num, data) VALUES (%s, %s)", (100, "abc'def"))
cur.execute("SELECT * FROM test;")
print(cur.fetchone())
conn.commit()
cur.close()
conn.close()除了自己安装环境,也可使用Postgres docker镜像:
mkdir -p tmp/pgdata
docker run -d --name postgres -p 5432:5432 \
    -v $(pwd)/tmp/pgdata:/var/lib/postgres/data \
    -e POSTGRES_USER=aiotodo -e POSTGRES_PASSWORD=12345 -e POSTGRES_DB=aiotodo \
    postgres
将应用程序连接到数据库
让我们连接数据库并创建表,同时创建表的SQLAlchemy视图。
from aiopg.sa import create_engineimport sqlalchemy as sa# 表的SQLAlchemy视图metadata = sa.MetaData()
todos_tbl = sa.Table(    'todos', metadata,
    sa.Column('id', sa.Integer, primary_key=True),
    sa.Column('name', sa.String(255), unique=True, nullable=False),
    sa.Column('finished', sa.Boolean(), default=False, nullable=False)
)# 创建表async def create_table(engine):
    async with engine.acquire() as conn:        await conn.execute('DROP TABLE IF EXISTS todos')        await conn.execute('''CREATE TABLE todos (
            id SERIAL PRIMARY KEY,
            name VARCHAR(255) NOT NULL UNIQUE,
            finished BOOLEAN NOT NULL DEFAULT FALSE
)''')你最后一次亲手写DDL-数据库定义语言是什么时候?有不少方法可以将这个应用挂接上alembic来帮助我们管理创建表,不过暂时不讨论这个问题。
在SQLAlchemy中,原始SQL和ORM 之间还有一个核心层,正是我们使用的:
async def attach_db(app):
    app['db'] = await create_engine(        ' '.join([            # 或改为你的数据库配置
            'host=localhost',            'port=5432',            'dbname=aiotodo',            'user=aiotodo',            'password=12345'
        ])
    )async def teardown_db(app):
    app['db'].close()    await app['db'].wait_closed()
    app['db'] = Noneasync def populate_initial_values(engine):
    async with engine.acquire() as conn:        await conn.execute(todos_tbl.insert().values({'name': 'Start this tutorial', 'finished': True}))        await conn.execute(todos_tbl.insert().values({'name': 'Finish this tutorial', 'finished': False}))async def setup_todo_table(app):
    await create_table(app['db'])    await populate_initial_values(app['db'])
上述函数会作为应用中的信号处理器(在应用中有四种可以集成的默认信号)。它们都接收应用对象作为唯一的参数:
on_loop_available:当loop以同步方式可用时被触发,因此任何异步工作都要显式地使用应用loop。这是(当前)唯一的同步处理程序。on_startup:在应用程序开始之前触发,这对于设置后台任务(如长轮询任务)非常有用。on_teardown:在应用程序收到来自呼叫者的关闭信号且请求完成后触发。在这里,我们应该拆除我们建立的任何东西,并关闭到远程服务的长连接。on_cleanup:在拆卸(teardown)完成后启动,允许最终的清理步骤运行,例如拆卸因为组件之间的依赖关系而无法在拆卸步骤清理的对象。我发现
on_startup和on_teardown是我最常用的,但我也碰到过一两次有必要使用on_loop_available的时候(如一个集成zeep到aiohttp的应用,启动时要使用loop执行工作而不是await)。要将这些信号处理程序挂接到应用上,我们只需把它们附加到相应的信号上。另外,我们在应用工厂中添加一个可选参数,该参数决定是否执行表的创建和初始化。
def app_factory(args=()):
    app = web.Application()

    app.on_startup.append(attach_db)    # app.on_teardown.append(teardown_db)
    # 原文为on_teardown但实测windows下aiohttp(2.0.7)会报错,改为
    app.on_shutdown.append(teardown_db)    if '--make-table' in args:
        app.on_startup.append(setup_todo_table)

    app.router.add_get('/todos/', get_all_todos, name='all_todos')
    app.router.add_post('/todos/', create_todo, name='create_todo',
                        expect_handler=web.Request.json)
    app.router.add_get('/todos/{id:\d+}', get_one_todo, name='one_todo')
    app.router.add_patch('/todos/{id:\d+}', update_todo, name='update_todo')
    app.router.add_delete('/todos/{id:\d+}', remove_todo, name='remove_todo')    return app
让我们重新运行应用并使用新命令创建表:
python -m aiohttp.web -P 8080 --make-table aiotodo:app_factory
如果一切正常,新表已被创建,虽然现在所有代办事项还是从内存中获取,但是我们已经成功地将应用连接上了数据库。当我们取消服务时也不会有任何警告和异常。
要注意,
--make-table的每次使用都会先删除旧表,如果它存在的话。
在路由处理器中操作数据库
从数据库中检索,更新,插入和删除Todos是非常简单的。因为我们接收的请求能够访问应用所具有的连接池,所以可以简单地将列表操作替换为
async with块。以下代码并不是性能最好的或者说适用生产环境,但作为第一次尝试它也不差。我们先做简单的,从数据库获取数据:
async def get_all_todos(request):
    async with request.app['db'].acquire() as conn:
        todos = [dict(row.items()) async for row in conn.execute(todos_tbl.select().order_by(todos_tbl.c.id))]        return web.json_response(todos)async def get_one_todo(request):
    id = int(request.match_info['id'])    async with request.app['db'].acquire() as conn:
        result = await conn.execute(
            todos_tbl.select().where(todos_tbl.c.id == id))
        row = await result.fetchone()    if not row:        return web.json_response({'error': 'Todo not found'}, status=404)    return web.json_response(dict(row.items()))
上面的函数应当覆盖之前的版本。最大的变化是
get_one_todo,首先,我们获取查询结果集,然后从中得到第一个结果。最终,我们检查结果是否为空,并相应返回。我们也可以像get_all_todos里一样迭代查询结果,但使用fetchone显得我们的目的更明确,即只要一个结果。
async with
如果您熟悉上下文管理器,例如
with语句,async with就是异步上下文管理器。最大的区别在于我们使用async def __aenter__和async def __aexit__而不是def __enter__和def __exit__。这意味着我们可以异步等待代码块的初始化和收尾工作。在这里,async with被用来获取数据库连接,最后终止它。你可能看见过
with await something(或者3.4的with (yield from something))结构,这是完全不同的,因为它表示一个返回上下文管理器的协程。
async for
results = []async for x in things:
    results.append(x)
限制在于你只能在协程中使用它们。列表推导式中等待协程也是支持的。还支持异步生成器表达式。
更新和删除
这些也很简单,只需用数据库连接替换原始列表操作:
async def remove_todo(request):
    id = int(request.match_info['id'])    async with request.app['db'].acquire() as conn:
        result = await conn.execute(todos_tbl.delete().where(todos_tbl.c.id == id))    if not result.rowcount:        return web.json_response({'error': 'Todo not found'}, status=404)    return web.Response(status=204)async def update_todo(request):
    id = int(request.match_info['id'])
    data = await request.json()    if 'finished' not in data:        return web.json_response({'error': '"finished" is a required key'}, status=400)    async with request.app['db'].acquire() as conn:
        result = await conn.execute(
            todos_tbl.update().where(todos_tbl.c.id == id).values({                'finished': bool(data['finished'])
            })
        )    if result.rowcount == 0:        return web.json_response({'error': 'Todo not found'}, status=404)    return web.Response(status=204)
在更新指定id的项目后通过检查结果的
rowcount属性来判断是否真的更新。要注意的是,
rowcount返回查询匹配的行数,而不是有多少行被改变。
插入数据
from sqlalchemy import sqlasync def create_todo(request):
    data = await request.json()    if 'name' not in data:        return web.json_response({'error': '"name" is a required field'})

    name = data['name']    if not name or not isinstance(name, str):        return web.json_response({'error': '"name" must be a string with at least one character'})

    todo = {'name': name, 'finished': bool(data.get('finished', False))}    async with request.app['db'].acquire() as conn:        async with conn.begin():            await conn.execute(todos_tbl.insert().values(todo))
            result = await conn.execute(
                sql.select([sql.func.max(todos_tbl.c.id).label('id')])
            )
            new_id = await result.fetchone()    return web.Response(
        status=303,
        headers={            'Location': str(request.app.router['one_todo'].url_for(id=new_id.id))
        }
    )
这里的插入没有返回新项目的id,因为
aiopg.sa没有实现SQLAlchemy核心层所包含的inserted_primary_key属性,所以需要再次查询数据库,从表中获取最大的id。我们在一次交易中完成上述操作来防止竞态——两个人同时提交一个新的todo,且被重定向到同一个todo项目。
进一步
类视图用于组织具有多个HTTP方法的路由。
Websockets用于多个客户端同步状态。例如你添加了一个新项目时我收到了通知。
aiohttp-devtools用于自动重加载应用代码。
pytest-asyncio用于测试。
代码 - (py3.5.2)
from aiohttp import webfrom aiopg.sa import create_engineimport sqlalchemy as safrom sqlalchemy import sql# 表的SQLAlchemy视图metadata = sa.MetaData()
todos_tbl = sa.Table(    'todos', metadata,
    sa.Column('id', sa.Integer, primary_key=True),
    sa.Column('name', sa.String(255), unique=True, nullable=False),
    sa.Column('finished', sa.Boolean(), default=False, nullable=False)
)# -----------------------------------路由处理器----------------------------------# 使用 async with request.app['db'].acquire() as conn 连接数据库async def get_all_todos(request):
    '''
    获取所有代办事项
    '''
    async with request.app['db'].acquire() as conn:
        todos = []        async for row in conn.execute(
            todos_tbl.select().order_by(todos_tbl.c.id)
        ):
            todos.append(
                dict(row.items()))        return web.json_response(todos)async def get_one_todo(request):
    '''
    根据路由中的id参数获取指定代办事项
    '''
    id = int(request.match_info['id'])    async with request.app['db'].acquire() as conn:
        result = await conn.execute(
            todos_tbl.select().where(todos_tbl.c.id == id))
        row = await result.fetchone()    if not row:        return web.json_response({'error': 'Todo not found'}, status=404)    return web.json_response(dict(row.items()))async def create_todo(request):
    '''
    创建一个新的代办事项
    '''
    data = await request.json()    if 'name' not in data:        return web.json_response({'error': '"name" is a required field'})

    name = data['name']    if not name or not isinstance(name, str):        return web.json_response(
            {'error': '"name" must be a string with at least one character'})

    todo = {'name': name, 'finished': bool(data.get('finished', False))}    async with request.app['db'].acquire() as conn:        async with conn.begin():            await conn.execute(todos_tbl.insert().values(todo))
            result = await conn.execute(
                sql.select([sql.func.max(todos_tbl.c.id).label('id')])
            )
            new_id = await result.fetchone()    return web.Response(
        status=303,
        headers={            'Location': str(
                request.app.router['one_todo'].url_for(id=new_id.id))
        }
    )async def remove_todo(request):
    '''
    清除指定代办事项
    '''
    id = int(request.match_info['id'])    async with request.app['db'].acquire() as conn:
        result = await conn.execute(
            todos_tbl.delete().where(todos_tbl.c.id == id))    if not result.rowcount:        return web.json_response({'error': 'Todo not found'}, status=404)    return web.Response(status=204)async def update_todo(request):
    '''
    更新某一条待办事项
    '''
    id = int(request.match_info['id'])
    data = await request.json()    if 'finished' not in data:        return web.json_response(
            {'error': '"finished" is a required key'}, status=400)    async with request.app['db'].acquire() as conn:
        result = await conn.execute(
            todos_tbl.update().where(todos_tbl.c.id == id).values({                'finished': bool(data['finished'])
            })
        )    if result.rowcount == 0:        return web.json_response({'error': 'Todo not found'}, status=404)    return web.Response(status=204)# -----------------------------数据库连接初始化相关操作-----------------------------async def attach_db(app):
    '''
    连接数据库并附加到app
    '''
    app['db'] = await create_engine(        ' '.join([            # 或改为你的数据库配置
            'host=localhost',            'port=5432',            'dbname=aiotodo',            'user=aiotodo',            'password=12345'
        ])
    )async def teardown_db(app):
    '''
    关闭与数据库的连接
    '''
    app['db'].close()    await app['db'].wait_closed()
    app['db'] = Noneasync def create_table(engine):
    '''
    在数据库中创建新表
    '''
    async with engine.acquire() as conn:        await conn.execute('DROP TABLE IF EXISTS todos')        await conn.execute('''CREATE TABLE todos (
            id SERIAL PRIMARY KEY,
            name VARCHAR(255) NOT NULL UNIQUE,
            finished BOOLEAN NOT NULL DEFAULT FALSE
        )''')async def populate_initial_values(engine):
    '''
    初始化数据库的内容
    '''
    async with engine.acquire() as conn:        await conn.execute(todos_tbl.insert().values(
            {'name': 'Start this tutorial', 'finished': True}))        await conn.execute(todos_tbl.insert().values(
            {'name': 'Finish this tutorial', 'finished': False}))async def setup_todo_table(app):
    '''
    创建表并初始化内容,只需执行一次
    '''
    await create_table(app['db'])    await populate_initial_values(app['db'])# -----------------------------app工厂 - 设置信号与路由处理器----------------------------def app_factory(args=()):
    app = web.Application()

    app.on_startup.append(attach_db)
    app.on_shutdown.append(teardown_db)    if '--make-table' in args:
        app.on_startup.append(setup_todo_table)

    app.router.add_get('/todos/', get_all_todos, name='all_todos')
    app.router.add_post('/todos/', create_todo, name='create_todo',
                        expect_handler=web.Request.json)
    app.router.add_get('/todos/{id:\d+}', get_one_todo, name='one_todo')
    app.router.add_patch('/todos/{id:\d+}', update_todo, name='update_todo')
    app.router.add_delete('/todos/{id:\d+}', remove_todo, name='remove_todo')    return app# 本文件命名为 aiotodo.py# python -m aiohttp.web -P 8080 --make-table aiotodo:app_factory 初始化数据库并运行# python -m aiohttp.web -P 8080 aiotodo:app_factory 正常运行# --------------------------------测试-----------------------------------------# import requests# import json# # 增加# body = json.dumps({u"name": u"feed the api"})# url = u"http://localhost:8080/todos/"# r = requests.post(url=url, data=body)# print(u'增加', r.content)# # 修改# body = json.dumps({u"name": u"feed the api", u"finished": u"true"})# url = u"http://localhost:8080/todos/2"# r = requests.patch(url=url, data=body)# print(u'修改', r.status_code)# # 获取# url = u"http://localhost:8080/todos/"# r = requests.get(url=url)# print(u'所有代办事项为', r.content)# # 删除# url = u"http://localhost:8080/todos/2"# r = requests.delete(url=url)# r.status_code# print(u'删除', r.status_code)
作者:treelake
链接:https://www.jianshu.com/p/83badc8028bd
共同学习,写下你的评论
评论加载中...
作者其他优质文章