无奈接手了一个旧项目,上一个老哥在Angular项目中大量使用了JQuery来操作DOM,真的是太不讲究了。那么如何优雅的使用Angular的方式来操作DOM呢?
获取元素
1、ElementRef --- A wrapper around a native element inside of a View.
在组件的 constructor中注入ElementRef,可以获取到整个组件元素的包裹。
@Component({
  selector: 'app-test-page',
  templateUrl: './test-page.component.html',
  styleUrls: ['./test-page.component.scss']
})
export class TestPageComponent implements OnInit {

  constructor(    private el: ElementRef
  ) { }

  ngOnInit() {
  }

  getDomTest() {
    console.dir(this.el);
  }
}
ElementRef中的nativeElement即是组件最外层的DOM元素。再通过原生的DOM定位方式,即可获取到指定的selector元素。
  getDomTest() {
    console.dir(this.el.nativeElement.querySelector('.test-get-dom')); // 获取指定的子元素
  }
2、@viewChild() --- You can use ViewChild to get the first element or the directive matching the selector from the view DOM.
@viewChild可以获取指定的元素, 指定的方式可以是本地变量或者组件类型;
// HTML<div class="tip-test-wrapper"> // 本地变量绑定button按钮 <button class="test-get-dom" #testdom (click)="getDomTest()">测试获取DOM</button> </div> // Dialog组件<app-dialog></app-dialog> // tsimport { DialogComponent } from './../../common/components/dialog/dialog.component'; @Component({ selector: 'app-test-page', templateUrl: './test-page.component.html', styleUrls: ['./test-page.component.scss']})export class TestPageComponent implements OnInit { // 通过本地变量获取元素 可通过read来指定获取的元素类型 @ViewChild('testdom' , { read: ViewContainerRef }) viewcontainer: ViewContainerRef; @ViewChild('testdom') viewelement: ElementRef; // 通过组件类型来获取 @ViewChild(DialogComponent) viewcontent: DialogComponent; constructor( private el: ElementRef ) { } ngOnInit() { } getDomTest() { // console.dir(this.el.nativeElement.querySelector('.test-get-dom')); console.dir(this.viewcontainer); console.dir(this.viewelement); console.dir(this.viewcontent); }} |
备注:ElementRef或者 @viewChild 获取元素,一定要在 ngAfterViewInit 周期之后再使用。
3、@viewChildren -- You can use ViewChildren to get the {@link QueryList} of elements or directives from theview DOM.
@viewChild会返回符合条件的第一个元素,如果需要获取多个符合条件的元素呢?@viewChildren会返回所有符合条件的元素的list。指定selector的方式与@viewChild一致。
// 复制一个元素
  <div class="tip-test-wrapper">
    <button class="test-get-dom" #testdom (click)="getDomTest()">测试获取DOM</button>
  </div>
  <div class="tip-test-wrapper">
    <button class="test-get-dom" #testdom (click)="getDomTest()">测试获取DOM</button>
  </div>
</div>
<app-dialog></app-dialog>
<app-dialog></app-dialog>// tsimport { DialogComponent } from './../../common/components/dialog/dialog.component';


@Component({
  selector: 'app-test-page',
  templateUrl: './test-page.component.html',
  styleUrls: ['./test-page.component.scss']
})
export class TestPageComponent implements OnInit {

  @ViewChild('testdom' , { read: ViewContainerRef }) viewcontainer: ViewContainerRef;
  @ViewChild('testdom') viewelement: ElementRef;  @ViewChildren('testdom') viewelements: QueryList<any>;
@ViewChild(DialogComponent) viewcontent: DialogComponent; @ViewChildren(DialogComponent) viewcontents: QueryList<DialogComponent>;
constructor( private el: ElementRef
) { }
ngOnInit() {
}
getDomTest() { // console.dir(this.el.nativeElement.querySelector('.test-get-dom')); // console.dir(this.viewcontainer);
console.dir(this.viewelement);
console.dir(this.viewelements);
console.dir(this.viewcontent);
console.dir(this.viewcontents);
}
操作DOM --- Renderer2
在获取dom之后,如何对dom进行操作呢?原生的domAPI是一种选择,但是Angular提供了更好的跨平台方式 Renderer2。
引入 Renderer2 , 然后在construct中注入。
import { Component, OnInit , ViewContainerRef , ElementRef , ViewChild, <strong> Renderer2</strong> , ViewChildren, QueryList} from '@angular/core'; import { DialogComponent } from './../../common/components/dialog/dialog.component'; @Component({ selector: 'app-test-page', templateUrl: './test-page.component.html', styleUrls: ['./test-page.component.scss']})export class TestPageComponent implements OnInit { @ViewChild('testdom' , { read: ViewContainerRef }) viewcontainer: ViewContainerRef; @ViewChild('testdom') viewelement: ElementRef; @ViewChildren('testdom') viewelements: QueryList<any>; @ViewChild(DialogComponent) viewcontent: DialogComponent; @ViewChildren(DialogComponent) viewcontents: QueryList<DialogComponent>; constructor(<strong> private render: Renderer2,</strong> private el: ElementRef ) { } ngOnInit() { } getDomTest() {<br> <strong>// 修改元素颜色</strong> <strong>this.render.setStyle(this.viewelement.nativeElement , 'color' , 'red');</strong> }} |
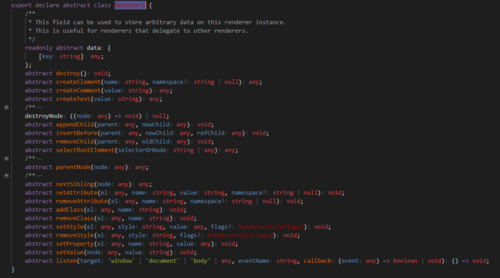
renderer2提供了丰富的API供使用,如下:
总结
通过elementRef或者@viewChild @viewChildren获取元素,再通过renderer2提供的API来操作元素。不过记得在不要在 ngAfterViewInit 周期之前使用。通过Angular提供的方式,可以满足大部分的操作DOM的需求了。如果有特殊的场景,当然还是原生DOM撸起来呀
共同学习,写下你的评论
评论加载中...
作者其他优质文章


