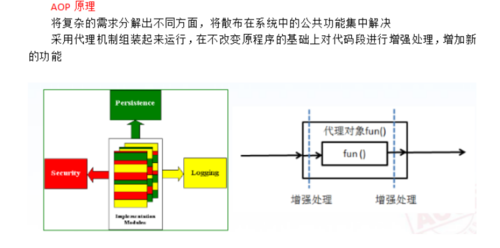
AOP:面向切面编程
AOP的主要作用:是为了程序员更好的关注"业务",专心"做事"
加上双引号的意思:所谓业务,是指他的核心,各行业中需要处理的核心事务,核心啊
像日志的记录,事务的管理,权限分配等这些交叉业务,同一个项目中使用多次,直接提取出来成为公共的比较好,再用面向切面的方式,进行代码的编辑,业务的实现
AOP的原理
入门案例:
用最基本的方式模拟一道日志的记录和最后执行完业务的操作
DAO层(一个接口,一个他的实现类,模拟操作修改数据库)

package cn.dawn.day04aop.dao;/**
 * Created by Dawn on 2018/3/5. *//*dao层接口*/public interface IHellowDAO {    /*aop入门案例*/
    public void doSome();
}
package cn.dawn.day04aop.dao.impl;import cn.dawn.day04aop.dao.IHellowDAO;/**
 * Created by Dawn on 2018/3/5. *//*dao层实现类*/public class HellowDAOImpl implements IHellowDAO{    public void doSome() {
        System.out.println("数据已经成功写入到DB");
    }
}
service层(也是一个接口,一个实现类,主要做的aop的增强操作,操作的是service层,业务逻辑处理层操作的)
package cn.dawn.day04aop.service;/**
 * Created by Dawn on 2018/3/5. *//*service层接口*/public interface IHellowService {    /*aop入门案例*/
    public void doSome();
}
package cn.dawn.day04aop.service.impl;import cn.dawn.day04aop.dao.IHellowDAO;import cn.dawn.day04aop.service.IHellowService;/**
 * Created by Dawn on 2018/3/5. *//*service层实现类 */public class HellowServiceImpl implements IHellowService {
    IHellowDAO dao;    public void doSome() {
        dao.doSome();
    }    public IHellowDAO getDao() {        return dao;
    }    public void setDao(IHellowDAO dao) {        this.dao = dao;
    }
}
新开多的一层,叫aop层,他就存放了增强的操作(也就是交叉业务,例如日志记录等),此处我放了俩个类,一个执行前置增强,一个后置增强
package cn.dawn.day04aop.aop;import org.springframework.aop.MethodBeforeAdvice;import java.lang.reflect.Method;/**
 * Created by Dawn on 2018/3/5. *//*前置增强*/public class LoggerBefore implements MethodBeforeAdvice {    public void before(Method method, Object[] objects, Object o) throws Throwable {
        System.out.println("日志记录");
    }
}package cn.dawn.day04aop.aop;import org.springframework.aop.AfterReturningAdvice;import java.lang.reflect.Method;/**
 * Created by Dawn on 2018/3/5. *//*后置增强*/public class LoggerAfter implements AfterReturningAdvice {    public void afterReturning(Object o, Method method, Object[] objects, Object o1) throws Throwable {
        System.out.println("===============after==================");
    }
}
前置增强,需要实现MethodBeforeAdvice,后置增强,需要实现AfterReturningAdvice
接下来就是书写大配置xml文件
有个注意的点,由于我用的idea,他会自动生成上面的beans的 xmlns和xsi,如果你不是用idea的话,手动配置一道吧
1 <?xml version="1.0" encoding="UTF-8"?> 2 <beans xmlns="http://www.springframework.org/schema/beans" 3 xmlns:xsi="http://www.w3.org/2001/XMLSchema-instance" xmlns:aop="http://www.springframework.org/schema/aop" 4 xsi:schemaLocation="http://www.springframework.org/schema/beans http://www.springframework.org/schema/beans/spring-beans.xsd http://www.springframework.org/schema/aop http://www.springframework.org/schema/aop/spring-aop.xsd"> 5 6 <!--aop入门案例起--> 7 <!--dao--> 8 <bean id="dao" class="cn.dawn.day04aop.dao.impl.HellowDAOImpl"></bean> 9 <!--service-->10 <bean id="service" class="cn.dawn.day04aop.service.impl.HellowServiceImpl">11 <property name="dao" ref="dao"></property>12 </bean>13 <!--通知-->14 <bean id="afterAdvice" class="cn.dawn.day04aop.aop.LoggerAfter"></bean>15 <bean id="beforeAdvice" class="cn.dawn.day04aop.aop.LoggerBefore"></bean>16 <!--aop-->17 <aop:config>18 <!--切点-->19 <aop:pointcut id="mypointcut" expression="execution(* *..service.*.*(..))"></aop:pointcut>20 <!--<aop:pointcut id="mypointcut" expression="execution(public void cn.dawn.day04aop.service.IHellowService.doSome())"></aop:pointcut>-->21 <!--<aop:pointcut id="mypointcut" expression="execution(* *..service.*.*(..))">-->22 <!--顾问,织入-->23 <aop:advisor advice-ref="beforeAdvice" pointcut-ref="mypointcut"></aop:advisor>24 <aop:advisor advice-ref="afterAdvice" pointcut-ref="mypointcut"></aop:advisor>25 </aop:config>26 <!--aop入门案例完毕-->27 </beans>
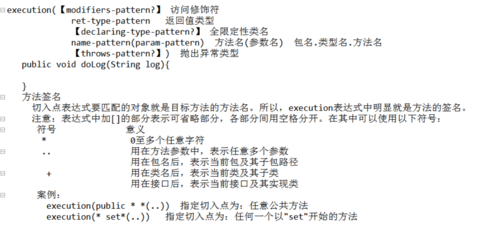
这儿有一个切点pointcut,我说一下他的expression的属性吧,他就是里面放一个匹配的(可以说叫公式?)方法的公式
他的使用规则我放在下面
接下来单测方法
package cn.dawn.day04aop;import cn.dawn.day03printer.printer.Printer;import cn.dawn.day04aop.service.IHellowService;import org.junit.Test;import org.springframework.context.ApplicationContext;import org.springframework.context.support.ClassPathXmlApplicationContext;/**
 * Created by Dawn on 2018/3/3. */public class test20180305 {
    @Test    /*aop入门案例*/
    public void t01(){
        ApplicationContext context=new ClassPathXmlApplicationContext("ApplicationContext-day04aop.xml");
        IHellowService service = (IHellowService) context.getBean("service");
        service.doSome();
    }
}
运行结果如下:

04.Spring的DI的构造注入,P命名注入,和集合注入
DI和IOC相比,DI更偏向于实现
DI的set方式注入在前面入门案例里有写,所以此处不多啰嗦,直接开搞,先说构造注入和P命名注入
构造方式,理所当然要有带参构造,这儿值得注意的是,你最好再补全一个无参构造,因为你写了带参构造,系统就不再会为你默认补全一个无参构造了,当你在不经意或者不知情的情况下被调用了,就会报错
P命名则有注意的是那个头文件 xmlns xsi需要你去配置一道,我下面有,你直接copy就可以
package cn.dawn.day05diup;/**
 * Created by Dawn on 2018/3/5. */public class Car {    private String color;    private String type;    public String getColor() {        return color;
    }    public void setColor(String color) {        this.color = color;
    }    public String getType() {        return type;
    }    public void setType(String type) {        this.type = type;
    }
}
package cn.dawn.day05diup;/**
 * Created by Dawn on 2018/3/5. *///student类public class Student {
    private String name;    private Integer age;    private Car car;    //带参构造
    public Student(String name, Integer age, Car car) {        this.name = name;        this.age = age;        this.car = car;
    }    //无参构造
    public Student() {
    }    public String getName() {        return name;
    }    public void setName(String name) {        this.name = name;
    }    public Integer getAge() {        return age;
    }    public void setAge(Integer age) {        this.age = age;
    }    public Car getCar() {        return car;
    }    public void setCar(Car car) {        this.car = car;
    }
}
在大配置xml文件中
<?xml version="1.0" encoding="UTF-8"?>
<beans xmlns="http://www.springframework.org/schema/beans"
       xmlns:xsi="http://www.w3.org/2001/XMLSchema-instance" xmlns:p="http://www.springframework.org/schema/p"
       xsi:schemaLocation="http://www.springframework.org/schema/beans http://www.springframework.org/schema/beans/spring-beans.xsd ">

    <bean id="car" class="cn.dawn.day05diup.Car">
        <property name="color" value="黑色"></property>
        <property name="type" value="奥迪"></property>
    </bean>
    <!--di构造注入-->
    <!--<bean id="student" class="cn.dawn.day05diup.Student">
        <constructor-arg index="0" value="孟六"></constructor-arg>
        <constructor-arg index="1" value="20"></constructor-arg>
        <constructor-arg index="2" ref="car"></constructor-arg>
    </bean>-->

    <!--p命名注入-->
    <bean id="student" class="cn.dawn.day05diup.Student" p:name="孟小六" p:age="8" p:car-ref="car"></bean>

</beans>
没有什么好讲的,带参构造的注入方法,index索引从0开始,对应的是那个带参构造的index
单测方法:
@Test    /*diP命名注入*/
    public void t02(){
        ApplicationContext context=new ClassPathXmlApplicationContext("ApplicationContext-day05diup.xml");
        Student student = (Student) context.getBean("student");
        System.out.println("学生"+student.getName()+"开着"+student.getCar().getColor()+"的"+student.getCar().getType());
    }


    @Test    /*di构造注入*/
    public void t01(){
        ApplicationContext context=new ClassPathXmlApplicationContext("ApplicationContext-day05diup.xml");
        Student student = (Student) context.getBean("student");
        System.out.println("学生"+student.getName()+"开着"+student.getCar().getColor()+"的"+student.getCar().getType());
    }
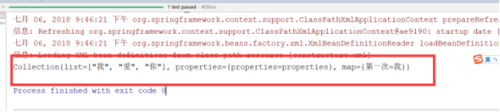
集合注入:
数组,List,Set,Map,Properties
实体类
package cn.dawn.day05diup;import java.util.*;/**
 * Created by Dawn on 2018/3/5. */public class MyCollection {    private String[] array;    private List<String> list;    private Set<String> set;    private Map<String,String> map;    private Properties properties;

    @Override    public String toString() {        return "MyCollection{" +
                "array=" + Arrays.toString(array) +
                ", list=" + list +
                ", set=" + set +
                ", map=" + map +
                ", properties=" + properties +
                '}';
    }    public String[] getArray() {        return array;
    }    public void setArray(String[] array) {        this.array = array;
    }    public List<String> getList() {        return list;
    }    public void setList(List<String> list) {        this.list = list;
    }    public Set<String> getSet() {        return set;
    }    public void setSet(Set<String> set) {        this.set = set;
    }    public Map<String, String> getMap() {        return map;
    }    public void setMap(Map<String, String> map) {        this.map = map;
    }    public Properties getProperties() {        return properties;
    }    public void setProperties(Properties properties) {        this.properties = properties;
    }
}
大配置中的bean节点
 <!--di的集合注入-->
    <bean id="mycollection" class="cn.dawn.day05diup.MyCollection">
        <!--数组注入-->
        <property name="array">
            <array>
                <value>孟六</value>
                <value>孟六十六</value>
                <value>孟六百六十六</value>
            </array>
        </property>
        <!--list集合注入-->
        <property name="list">
            <list>
                <value>奥迪</value>
                <value>奥小迪</value>
                <value>奥迪迪</value>
            </list>
        </property>
        <!--set集合注入-->
        <property name="set">
            <set>
                <value>set1</value>
                <value>set2</value>
                <value>set3</value>
            </set>
        </property>
        <!--map集合注入-->
        <property name="map">
            <map>
                <entry key="姓名">
                    <value>孟五</value>
                </entry>
                <entry key="年龄">
                    <value>555</value>
                </entry>
            </map>
        </property>
        <!--properties-->
        <property name="properties">
            <props>
                <prop key="key1">v1</prop>
                <prop key="key2">v2</prop>
                <prop key="key3">v3</prop>
            </props>
        </property>
    </bean>
单测
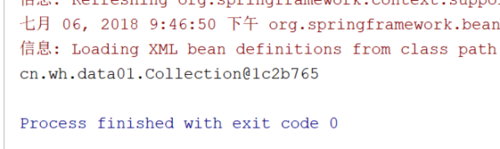
  @Test
    /*di集合注入*/
    public void t03(){
        ApplicationContext context=new ClassPathXmlApplicationContext("ApplicationContext-day05diup.xml");
        MyCollection mycollection = (MyCollection) context.getBean("mycollection");
        System.out.println(mycollection);
    }
由于重写了toString,可以直接一览无余
这里我扩充一下 java 中的tostring();
toString()方法 相信大家都用到过,一般用于以字符串的形式返回对象的相关数据。
翻译一下官方解释:
1、返回一个对于这个Object 简明的、可读的 的字符串
2、Object类的子类被鼓励去重写这个方法来提供一个实现用于描述对象的类型和数据
自己的理解
写这个方法的用途就是为了方便操作,所以在文件操作里面可用可不用
就是一个类中有集合 当你输出这个集合时它会以
这种可以直接换算成字符串 十分的方便
如果没有 toString() 将会打印出来内存地址
更方便咱们程序员
原文出处:https://www.cnblogs.com/wh1520577322/p/9379873.html
共同学习,写下你的评论
评论加载中...
作者其他优质文章