1.前言
上回说了组件(vue组件开发练习--焦点图切换)的一个练习项目,这次换下口味,说下vue的插件练手的项目。相对于现在之前的焦点图切换的组件,这个可能就更简单了,基本就是熟悉下插件开发的步骤就可以了!这个项目,我更建议大家动手练习了,这个弹窗比之前的焦点图更加的实用性,也更常用。同时也能让大家熟悉下vue的插件开发的流程。代码同样,我会上传到github(ec-dialog),需要的可以直接去看代码!
建议
1.下面的步骤,最好在自己本地上跑起来,根据文章的步骤,逐步完成,如果只看代码,很容易懵逼的。
2.如果不清楚哪个代码有什么作用,可能自己调试下,把代码去掉后,看下有什么影响,就很容易想出代码有什么作用了!
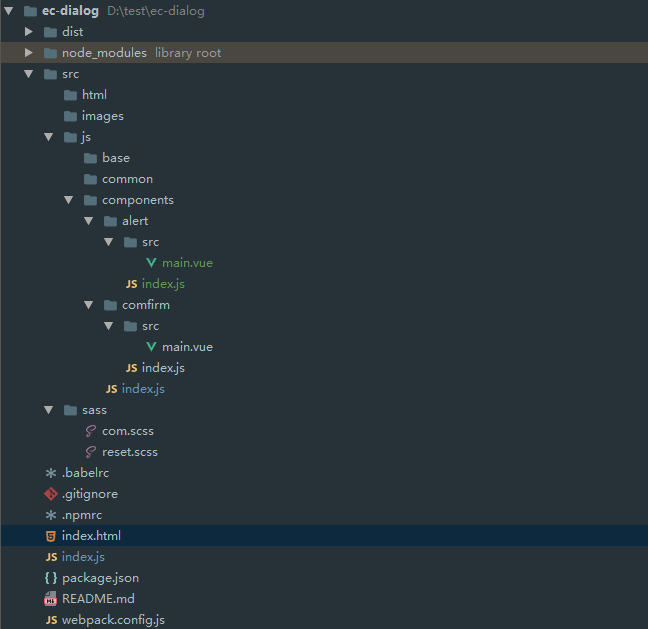
2.项目目录
还是一个很简单的目录,各个目录不知道有什么用的,可以移步去看我上一篇文章。和组件开发的目录相比,区别就在于src/js/components这个文件夹上。
3.开发过程
3-1.把项目跑起来
首先,先弄src/js/components/alert这个组件。还是一样,,先在src/js/components/alert/src/main.vue。输出‘守候’。代码如下
<template> <transition name="ec"> <div class="ec"> 守候 </div> </transition> </template> <script> export default { data () { return { name: 'ec-alert', } }, computed: {}, mounted () { }, methods: { } } </script>然后来到'alert/index.js'。这个术语叫什么什么文件,我不太清楚,暂时就叫,插件配置文件吧!代码如下(注意看注释)
import Vue from 'vue' import AlertComponent from './src/main.vue' //合并对象函数,这个方法是会改变,第一个参数的值的 function merge(target) { for (let i = 1, j = arguments.length; i < j; i++) { let source = arguments[i] || {}; for (let prop in source) { if (source.hasOwnProperty(prop)) { let value = source[prop]; if (value !== undefined) { target[prop] = value; } } } } return target; }; let instance; //extend 是构造一个组件的语法器.传入参数,返回一个组件 let AlertConstructor = Vue.extend(AlertComponent); let initInstance = ()=>{ //实例化ConfirmConstructor组件 instance = new AlertConstructor({ el: document.createElement('div') }); //添加到boby document.body.appendChild(instance.$el); } let Alert = (options={}) => { //初始化 initInstance(); // 将单个 confirm instance 的配置合并到默认值(instance.$data,就是main.vue里面的data)中 merge(instance.$data, options); //返回Promise return new Promise((resolve, reject)=>{ instance.show = true; let success = instance.success; let cancel = instance.cancel; instance.success = () => { //先执行instance.success(main.vue里面的success函数) success(); //再执行自定义函数 resolve('ok'); } }); } export default Alert;然后来到components/js/index.js这个文件,配置组件和API,代码如下
import alert from './alert/index.js' const install = function(Vue) { //注册全局组件 Vue.component(alert.name, alert) //添加全局API Vue.prototype.$alert = alert } export default install然后在模板文件,index.html里面设置一个div,方便挂载测试
<!DOCTYPE html> <html> <meta name="viewport" content="width=device-width, user-scalable=no, minimum-scale=1.0, maximum-scale=1.0"> <head> <meta charset="UTF-8"> <title>Title</title> </head> <body> <div id="app"> </div> </body> </html>
然后在入口文件index.js里面,使用插件
require("./index.html"); //引入sass require("./src/sass/com.scss"); import Vue from 'vue' import dialog from './src/js/components/index'; Vue.use(dialog) let App = new Vue({ el: '#app', data(){ return { 'name': 'index' } }, mounted(){ this.$alert(); } });然后,命令行 $ npm run dev,结果完美
3-2.样式修改
完成了上一步,这个插件的一大半就算完成了!剩下的工作主要开发的就是在components/../main.vue这文件开发。
首先,先别急写代码,想一下,一个弹窗大概需要什么字段。
参考上面,发现有一个标题,一个内容,一个按钮文字。最后还需要一个变量,控制弹窗是否显示。然后一个点击按钮的操作函数。然后还有样式,大概如下
样式这个不多说,其他的字段,一个萝卜一个坑的填进去就好,代码如下
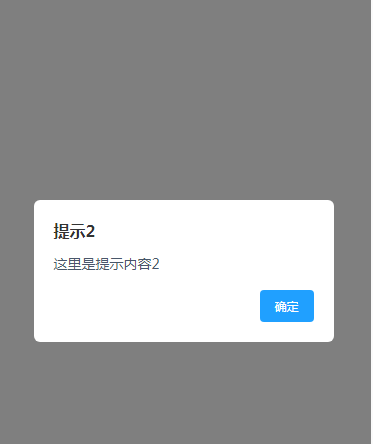
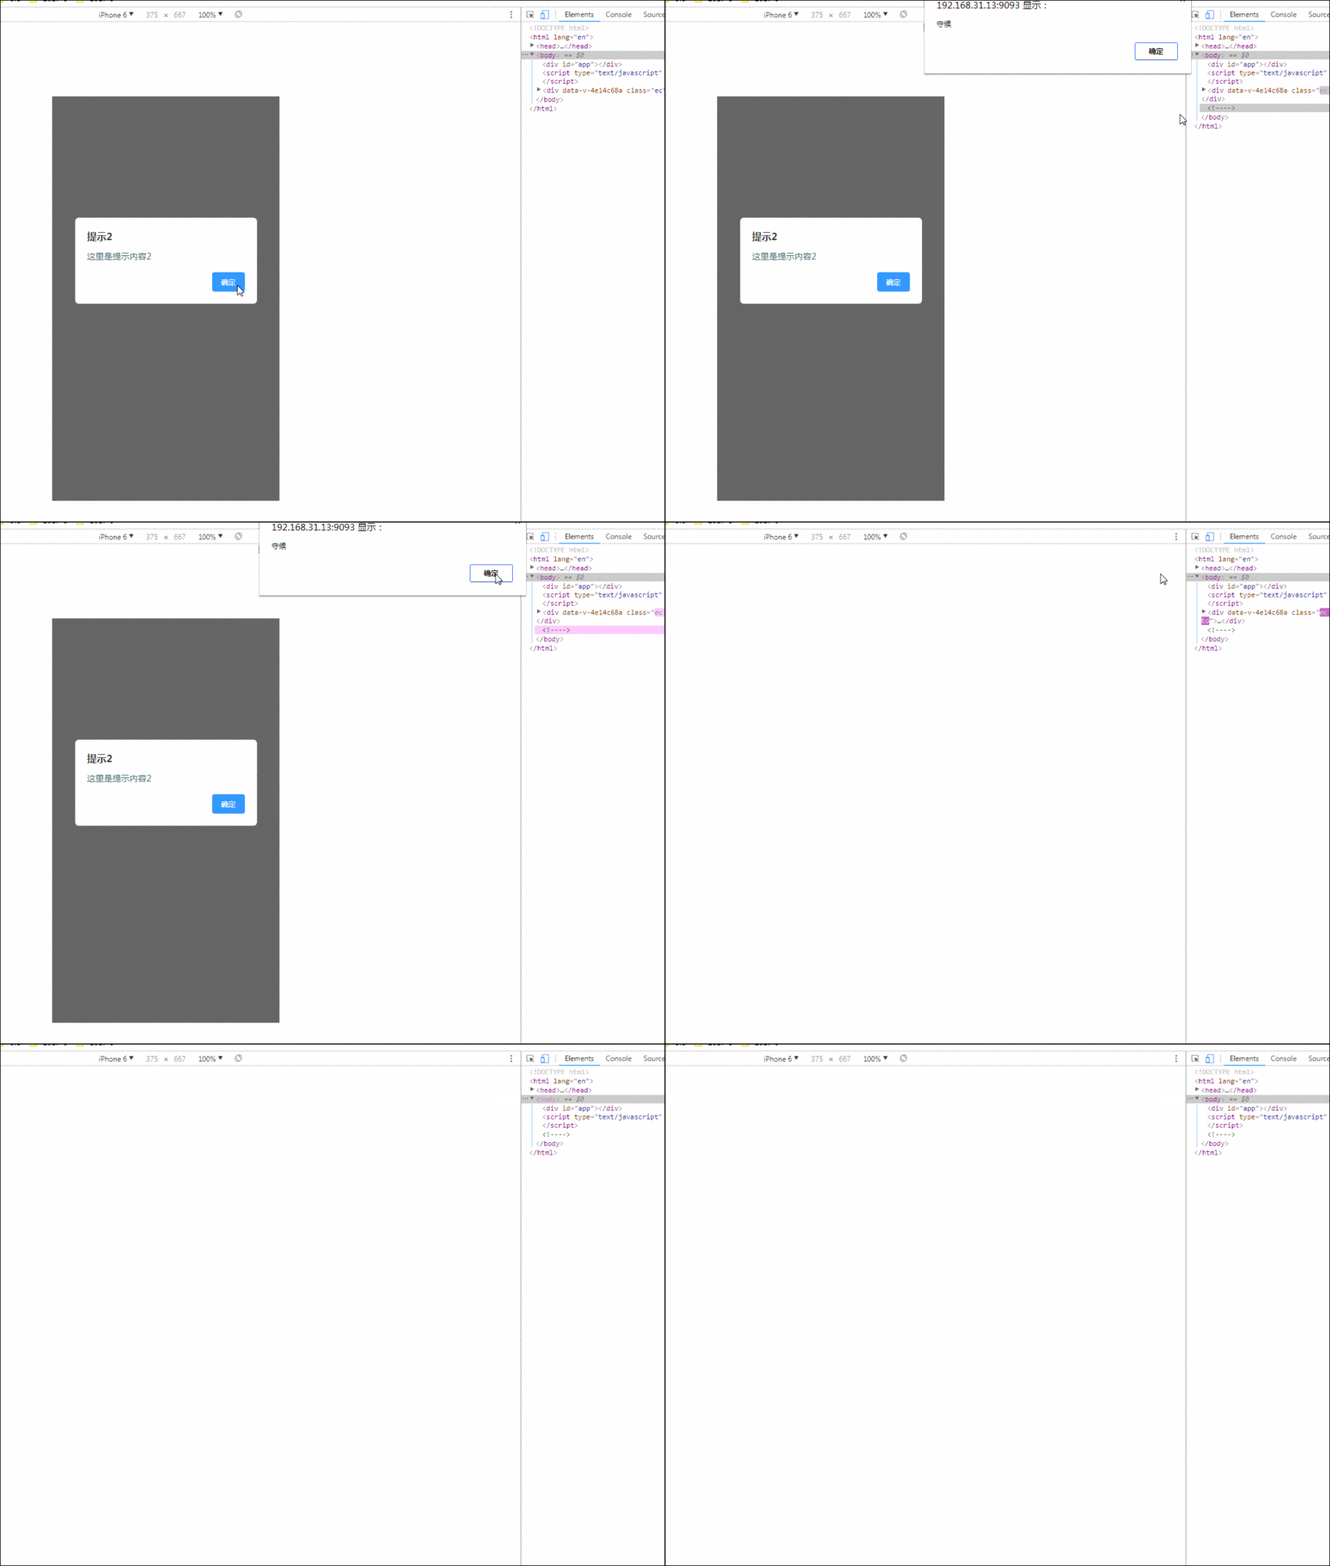
<template> <transition name="ec"> <div v-if="show" class="ec"> <div class="ec-box"> <div class="ec-box-inner"> <div class="ec-title" v-if="title">{{title}}</div> <div class="ec-content">{{content}}</div> </div> <div class="ec-box-buttons"> <span class="ec-btn-success" @click="success">{{submitText}}</span> </div> </div> </div> </transition> </template> <script> export default { data () { return { name:'ec-alert', show: false, title: '提示', content: '', submitText: '确定', cancelText: '取消' } }, computed: {}, mounted () { }, methods: { success () { this.show = false; } } } </script> <style scoped> .ec { background: rgba(00, 00, 00, .5); position: fixed; left: 0; top: 0; width: 100%; height: 100%; .ec-box { width: 80%; max-width: 400px; top: 200px; position: absolute; left: 0; right: 0; margin: auto; background: #fff; box-sizing: border-box; padding: 20px; border-radius: 6px; } .ec-title { padding-left: 0; margin-bottom: 0; font-size: 16px; font-weight: 700; height: 18px; color: #333; } .ec-content { padding: 14px 0; line-height: 24px; color: #48576a; font-size: 14px; } .ec-box-buttons { text-align: right; } .ec-btn-success { background: #20a0ff; border-color: #20a0ff; display: inline-block; line-height: 1; white-space: nowrap; cursor: pointer; color: #fff; margin: 0; padding: 10px 15px; border-radius: 4px; } .ec-btn-cancel { display: inline-block; line-height: 1; white-space: nowrap; cursor: pointer; background: #fff; border: 1px solid #c4c4c4; color: #1f2d3d; margin: 0; padding: 10px 15px; border-radius: 4px; } } .ec-enter { opacity: 0; .ec-box { transform:scale(0); } } .ec-enter-active { transition: opacity .4s; .ec-box { transition: transform .4s; } } .ec-leave-active{ transition: opacity .2s; .ec-box { transition: transform .2s; } } .ec-leave-active { opacity: 0; } </style>运行效果
3-3.使用插件
大家知道,在前面步骤,'alert/index.js'这里就已经返回的一个Promise。所以,用法就是像Promise那样使用!
所以在入口文件,index.js里面直接写
mounted(){ this.$alert({ title:'提示2', content:'这里是提示内容2' }).then(()=>{ this.name='守候' alert(this.name) }) }运行效果
4.其它弹窗
还是那句话,程序员不会满足于现状,只有一种弹窗,怎么够,下面我再增加一种,和上面那个基本一样,就是多了一个取消按钮而已。
这里我就再讲一个简单的栗子,至于弹窗的样式,太多了,我在这里就不展开说了,大家需要的可进行拓展。
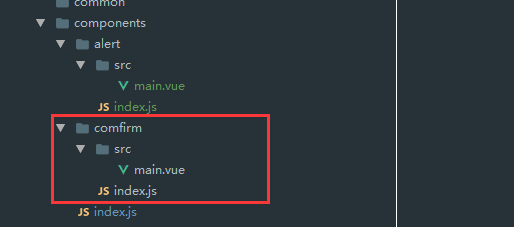
首先,创建这个目录(可以直接把alert那个目录拷贝过来,然后再修改几下就完事了)
然后,针对comfirm/src/main.vue文件,添加下面的代码(下面的代码基本就是从alert/src/main.vue拷贝过来的,就是增加一个取消按钮的对应一个字段和操作函数)
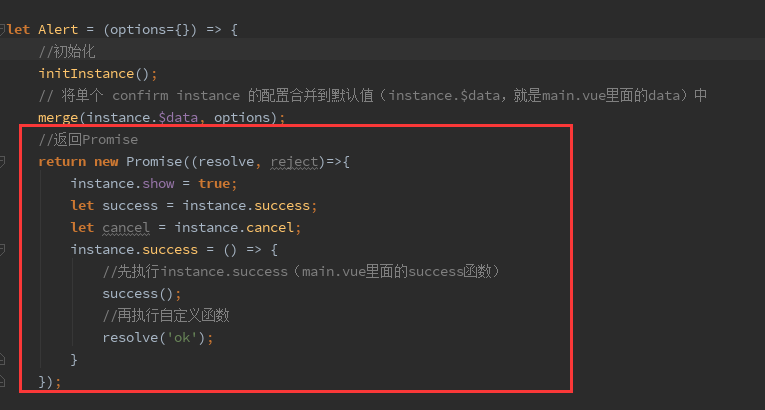
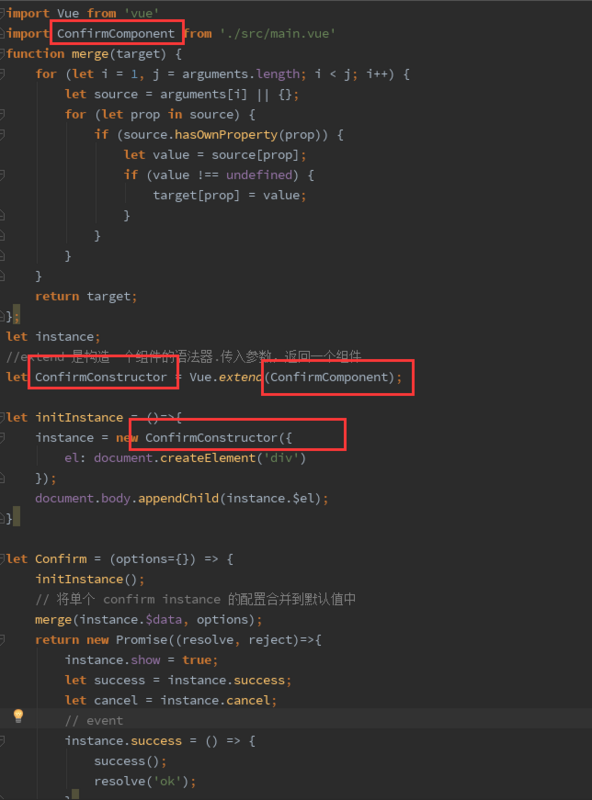
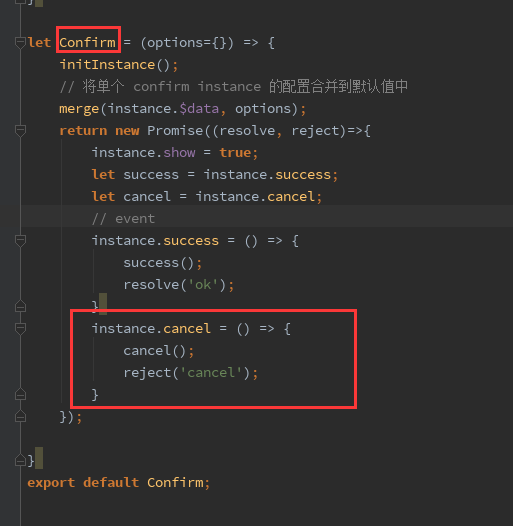
<template> <transition name="ec"> <div v-if="show" class="ec"> <div class="ec-box"> <div class="ec-box-inner"> <div class="ec-title" v-if="title">{{title}}</div> <div class="ec-content">{{content}}</div> </div> <div class="ec-box-buttons"> <span class="ec-btn-success" @click="success">{{submitText}}</span> <span class="ec-btn-cancel" @click="cancel">{{cancelText}}</span> </div> </div> </div> </transition> </template> <script> export default { data () { return { name:'ec-comfirm', show: false, title: '提示', content: '', submitText: '确定', cancelText: '取消' } }, computed: {}, mounted () { }, methods: { success () { this.show = false; }, cancel () { this.show = false; } } } </script> <style scoped> .ec { background: rgba(00, 00, 00, .5); position: fixed; left: 0; top: 0; width: 100%; height: 100%; z-index: 9999; .ec-box { width: 80%; max-width: 400px; top: 200px; position: absolute; left: 0; right: 0; margin: auto; background: #fff; box-sizing: border-box; padding: 20px; border-radius: 6px; } .ec-title { padding-left: 0; margin-bottom: 0; font-size: 16px; font-weight: 700; height: 18px; color: #333; } .ec-content { padding: 14px 0; line-height: 24px; color: #48576a; font-size: 14px; } .ec-box-buttons { text-align: right; } .ec-btn-success { background: #20a0ff; border-color: #20a0ff; display: inline-block; line-height: 1; white-space: nowrap; cursor: pointer; color: #fff; margin: 0; padding: 10px 15px; border-radius: 4px; } .ec-btn-cancel { display: inline-block; line-height: 1; white-space: nowrap; cursor: pointer; background: #fff; border: 1px solid #c4c4c4; color: #1f2d3d; margin: 0; padding: 10px 15px; border-radius: 4px; } } .ec-enter { opacity: 0; .ec-box { transform:scale(0); } } .ec-enter-active { transition: opacity .4s; .ec-box { transition: transform .4s; } } .ec-leave-active{ transition: opacity .2s; .ec-box { transition: transform .2s; } } .ec-leave-active { opacity: 0; } </style>然后就是comfirm/index.js(也是基本拷贝的,我就截图,告诉大家改哪里吧,这个得稍微细看才知道改哪里)
然后components/index.js
import comfirm from './comfirm/index.js' import alert from './alert/index.js' const install = function(Vue) { //注册全局组件 Vue.component(comfirm.name, comfirm) Vue.component(alert.name, alert) //添加全局API Vue.prototype.$confirm = comfirm Vue.prototype.$alert = alert } export default install最后在入口文件,index.js使用
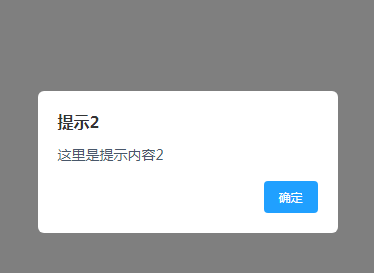
require("./index.html"); //引入sass require("./src/sass/com.scss"); import Vue from 'vue' import dialog from './src/js/components/index'; Vue.use(dialog) let App = new Vue({ el: '#app', data(){ return { 'name': 'index' } }, mounted(){ this.$confirm({ title:'提示', content:'这里是提示内容', submitText:'提交', cancelText:'返回' }).then(()=>{ this.$alert({ title:'提示2', content:'这里是提示内容2' }).then(()=>{ this.name='守候' alert(this.name) }) }).catch((err)=>{ alert(err) }) } });运行结果,就是这样
5.小结
一个简单的弹窗就到这里了,很简单,但是在我开发那里还是能用,能暂时满足。但是这个肯定是需要维护的,毕竟很多的项目都需要弹窗。大家也根据自己的需要进行拓展!以上的案例也很简单,容易懂。基本都是记流程。但是这个我很建议大家边动手,边看文章。这个可以让自己练习下基于vue开发插件,是一个不错的练习,希望能帮到大家学习到新的知识!最后,如果觉得文章那里写的不好或者写错了,欢迎指出!
共同学习,写下你的评论
评论加载中...
作者其他优质文章


