一 概述
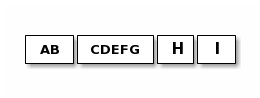
在基于流的传输里比如TCP/IP,接收到的数据会先被存储到一个socket接收缓冲里。不幸的是,基于流的传输并不是一个数据包队列,而是一个字节队列。即使你发送了2个独立的数据包,操作系统也不会作为2个消息处理而仅仅是作为一连串的字节而言。因此这是不能保证你远程写入的数据就会准确地读取。举个例子,让我们假设操作系统的TCP/TP协议栈已经接收了3个数据包:

由于基于流传输的协议的这种普通的性质,在你的应用程序里读取数据的时候会有很高的可能性被分成下面的片段。
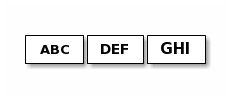
因此,一个接收方不管他是客户端还是服务端,都应该把接收到的数据整理成一个或者多个更有意思并且能够让程序的业务逻辑更好理解的数据。在上面的例子中,接收到的数据应该被构造成下面的格式:
这就是经常会发生的粘包的问题。
二 例子
下面举一个例子:
首先客户端向服务端分别发送了3条数据,在服务端将收到的信息打印出来,会发现数据都是连在一起的:
Client.java
package com.lxj.netty;

import io.netty.bootstrap.Bootstrap;
import io.netty.buffer.Unpooled;
import io.netty.channel.ChannelFuture;
import io.netty.channel.ChannelInitializer;
import io.netty.channel.ChannelOption;
import io.netty.channel.EventLoopGroup;
import io.netty.channel.nio.NioEventLoopGroup;
import io.netty.channel.socket.SocketChannel;
import io.netty.channel.socket.nio.NioSocketChannel;

/*
 * BootStrap和ServerBootstrap类似,不过他是对非服务端的channel而言,比如客户端或者无连接传输模式的channel。
       如果你只指定了一个EventLoopGroup,那他就会即作为一个‘boss’线程,也会作为一个‘workder’线程,尽管客户端不需要使用到‘boss’线程。
     代替NioServerSocketChannel的是NioSocketChannel,这个类在客户端channel被创建时使用。
     不像在使用ServerBootstrap时需要用childOption()方法,因为客户端的SocketChannel没有父channel的概念。
     我们用connect()方法代替了bind()方法。
 */
public class Client {

	public static void main(String[] args) throws Exception {
        EventLoopGroup workerGroup = new NioEventLoopGroup();
        try {
            Bootstrap b = new Bootstrap(); // (1)
            b.group(workerGroup); // (2)
            b.channel(NioSocketChannel.class); // (3)
            b.option(ChannelOption.SO_KEEPALIVE, true); // (4)
            b.handler(new ChannelInitializer<SocketChannel>() {
                @Override
                public void initChannel(SocketChannel ch) throws Exception {
                    ch.pipeline().addLast(new ClientHandler());
                }
            });

            ChannelFuture f = b.connect("127.0.0.1", 9999).sync(); // (5)

            f.channel().writeAndFlush(Unpooled.copiedBuffer("Hello Server".getBytes()));
            f.channel().writeAndFlush(Unpooled.copiedBuffer("Hello Server".getBytes()));
            f.channel().writeAndFlush(Unpooled.copiedBuffer("Hello Server".getBytes()));

            f.channel().closeFuture().sync();
        } finally {
            workerGroup.shutdownGracefully();
        }
    }
}
client.java中writeAndFlush了3条数据。
Server.java
package com.lxj.netty;

import io.netty.bootstrap.ServerBootstrap;
import io.netty.channel.ChannelFuture;
import io.netty.channel.ChannelInitializer;
import io.netty.channel.ChannelOption;
import io.netty.channel.EventLoopGroup;
import io.netty.channel.nio.NioEventLoopGroup;
import io.netty.channel.socket.SocketChannel;
import io.netty.channel.socket.nio.NioServerSocketChannel;

public class Server {
	public static void main(String[] args) throws Exception {
		EventLoopGroup bossGroup = new NioEventLoopGroup();
        EventLoopGroup workerGroup = new NioEventLoopGroup();
        try {
            ServerBootstrap b = new ServerBootstrap();
            b.group(bossGroup, workerGroup)
             .channel(NioServerSocketChannel.class)
             .childHandler(new ChannelInitializer<SocketChannel>() {
                 @Override
                 public void initChannel(SocketChannel ch) throws Exception {
                     ch.pipeline().addLast(new ServerHandler());
                 }
             })
             .option(ChannelOption.SO_BACKLOG, 128)
             .childOption(ChannelOption.SO_KEEPALIVE, true);
            // 绑定端口号
            ChannelFuture f = b.bind(9999).sync();

            //等待直到服务器关闭
            f.channel().closeFuture().sync();
        } finally {
            workerGroup.shutdownGracefully();
            bossGroup.shutdownGracefully();
        }
	}

}
ServerHandler.java
package com.lxj.netty;

import io.netty.buffer.ByteBuf;
import io.netty.buffer.Unpooled;
import io.netty.channel.ChannelFuture;
import io.netty.channel.ChannelFutureListener;
import io.netty.channel.ChannelHandlerAdapter;
import io.netty.channel.ChannelHandlerContext;
import io.netty.util.CharsetUtil;

/*
 * 处理一个服务器的通道
 */
public class ServerHandler extends ChannelHandlerAdapter{

	@Override
	public void channelRead(ChannelHandlerContext ctx, Object msg) throws Exception {
		ByteBuf byteBuf = (ByteBuf)msg;
		System.out.println(byteBuf.toString(CharsetUtil.US_ASCII));
		ctx.writeAndFlush(Unpooled.copiedBuffer(new String("Hello Client").getBytes()));
		ctx.writeAndFlush(Unpooled.copiedBuffer(new String("Hello Client").getBytes()));
		ctx.writeAndFlush(Unpooled.copiedBuffer(new String("Hello Client").getBytes()));
	}


	@Override
	public void exceptionCaught(ChannelHandlerContext ctx, Throwable cause) throws Exception {
		//打印异常信息
		cause.printStackTrace();
		ctx.close();
	}

}
Server端也回应客户端3条数据
ClientHandler.java
package com.lxj.netty;

import java.util.Date;

import io.netty.buffer.ByteBuf;
import io.netty.channel.ChannelHandlerAdapter;
import io.netty.channel.ChannelHandlerContext;
import io.netty.util.CharsetUtil;

public class ClientHandler extends ChannelHandlerAdapter {


	@Override
	public void handlerAdded(ChannelHandlerContext ctx) {
		System.out.println("handlerAdded");
	}

	@Override
	public void handlerRemoved(ChannelHandlerContext ctx) {
		System.out.println("handlerRemoved");
	}

	@Override
	public void channelRead(ChannelHandlerContext ctx, Object msg) {
		  ByteBuf byteBuf = (ByteBuf)msg;
		  try {
			  System.out.println(byteBuf.toString(CharsetUtil.US_ASCII));
		  }finally {
			  byteBuf.release();
		  }
	}

	@Override
	public void exceptionCaught(ChannelHandlerContext ctx, Throwable cause) {
		cause.printStackTrace();
		ctx.close();
	}
}
看下运行结果
Server端为:
Hello ServerHello ServerHello Server
Client端为:
handlerAdded
Hello ClientHello ClientHello Client
会发现数据都粘贴到一起了。
第一个办法就是每发送一条信息都sleep一下:
            f.channel().writeAndFlush(Unpooled.copiedBuffer("Hello Server".getBytes()));
            Thread.sleep(1000);
            f.channel().writeAndFlush(Unpooled.copiedBuffer("Hello Server".getBytes()));
            Thread.sleep(1000);
            f.channel().writeAndFlush(Unpooled.copiedBuffer("Hello Server".getBytes()));
再看结果:
Client:
handlerAdded
Hello Client
Hello Client
Hello Client
Server:
Hello Server
Hello Server
Hello Server
这样问题是解决了,但是每次都sleep一下速度肯定慢。
三 解决方案
有如下三种方案:
1.消息定长,例如每个报文的大小固定为多少字节,如果不够,就空格补充
2 在包尾部增加特殊的字符进行分隔,例如$
3 将消息分为消息头和消息体,在消息头中包含表示消息总长度的字段,然后就行业务逻辑的处理
1 采用分隔符类解决:
修改上述例子的initChannel方法,增加自定义的分隔符
@Override
                public void initChannel(SocketChannel ch) throws Exception {
                	//以$为分隔符
                	ByteBuf buf = Unpooled.copiedBuffer("$".getBytes());
                    ch.pipeline().addLast(new DelimiterBasedFrameDecoder(1024, buf))
                    			 .addLast(new StringDecoder())
                                 .addLast(new ClientHandler());
                }
ServerHandler.java
	@Override
	public void channelRead(ChannelHandlerContext ctx, Object msg) throws Exception {
		String byteBuf = (String)msg;
		System.out.println(byteBuf);
		ctx.writeAndFlush(Unpooled.copiedBuffer(new String("Hello Client$Hello Client2$").getBytes()));
	}
ClientHandler.java
	@Override
	public void channelRead(ChannelHandlerContext ctx, Object msg) {
		  String byteBuf = (String)msg;
		  try {
			  System.out.println(byteBuf);
		  }finally {
			  ReferenceCountUtil.release(msg);
		  }
	}
客户端发送的数据为:
f.channel().writeAndFlush(Unpooled.copiedBuffer("Hello $".getBytes()));
            f.channel().writeAndFlush(Unpooled.copiedBuffer("Hello Server$".getBytes()));
            f.channel().writeAndFlush(Unpooled.copiedBuffer("Hello Server !!!!!$".getBytes()));
测试结果:
Server:
Hello
Hello Server
Hello Server !!!!!
Client:
handlerAdded
Hello Client
Hello Client2
Hello Client
Hello Client2
Hello Client
Hello Client2
2 采用定长解决:
将DelimiterBasedFrameDecoder 改成 new FixedLengthFrameDecoder(10)即可
@Override
                public void initChannel(SocketChannel ch) throws Exception {
                	//以$为分隔符
                	ByteBuf buf = Unpooled.copiedBuffer("$".getBytes());
                    ch.pipeline().addLast(new FixedLengthFrameDecoder(10))
                    			 //.addLast(new DelimiterBasedFrameDecoder(1024,buf))
                                 .addLast(new StringDecoder())
                                 .addLast(new ClientHandler());
                }
将按10个字节的长度进行分隔
结果为:
Server:
Hello $Hel
lo Server$
Hello Serv
Client:
handlerAdded
Hello Clie
nt$Hello C
lient2$Hel
lo Client$
Hello Clie
nt2$Hello
Client$Hel
lo Client2
共同学习,写下你的评论
评论加载中...
作者其他优质文章