配合 BottomNavigationView
创建 Bottom Navigation Activity
BottomNavigationView 以更简洁的方式来实现过去的 BottomNavigationBar 的样式。Android Studio 中创建一个 Bottom Navigation Activity,自动生成 Activity。
class BottomNavigationActivity : AppCompatActivity() {

    private val mOnNavigationItemSelectedListener = BottomNavigationView.OnNavigationItemSelectedListener { item ->
        when (item.itemId) {
            R.id.navigation_home -> {
                message.setText(R.string.title_home)
                return@OnNavigationItemSelectedListener true
            }
            R.id.navigation_dashboard -> {
                message.setText(R.string.title_dashboard)
                return@OnNavigationItemSelectedListener true
            }
            R.id.navigation_notifications -> {
                message.setText(R.string.title_notifications)
                return@OnNavigationItemSelectedListener true
            }
        }
        false
    }

    override fun onCreate(savedInstanceState: Bundle?) {
        super.onCreate(savedInstanceState)
        setContentView(R.layout.activity_bottom_navigation)

        navigation.setOnNavigationItemSelectedListener(mOnNavigationItemSelectedListener)
    }
}
<!-- activity_bottom_navigation.xml -->
<?xml version="1.0" encoding="utf-8"?>
<android.support.constraint.ConstraintLayout xmlns:android="http://schemas.android.com/apk/res/android"
    xmlns:app="http://schemas.android.com/apk/res-auto"
    xmlns:tools="http://schemas.android.com/tools"
    android:id="@+id/container"
    android:layout_width="match_parent"
    android:layout_height="match_parent"
    tools:context=".navigation.BottomNavigationActivity">

    <TextView
        android:id="@+id/message"
        android:layout_width="wrap_content"
        android:layout_height="wrap_content"
        android:layout_marginStart="@dimen/activity_horizontal_margin"
        android:layout_marginLeft="@dimen/activity_horizontal_margin"
        android:layout_marginTop="@dimen/activity_vertical_margin"
        android:text="@string/title_home"
        app:layout_constraintLeft_toLeftOf="parent"
        app:layout_constraintTop_toTopOf="parent" />

    <android.support.design.widget.BottomNavigationView
        android:id="@+id/navigation"
        android:layout_width="0dp"
        android:layout_height="wrap_content"
        android:layout_marginStart="0dp"
        android:layout_marginEnd="0dp"
        android:background="?android:attr/windowBackground"
        app:layout_constraintBottom_toBottomOf="parent"
        app:layout_constraintLeft_toLeftOf="parent"
        app:layout_constraintRight_toRightOf="parent"
        app:menu="@menu/navigation" />

</android.support.constraint.ConstraintLayout>
<!-- menu/navigation.xml -->
<?xml version="1.0" encoding="utf-8"?>
<menu xmlns:android="http://schemas.android.com/apk/res/android">

    <item
        android:id="@+id/navigation_home"
        android:icon="@drawable/ic_home_black_24dp"
        android:title="@string/title_home" />

    <item
        android:id="@+id/navigation_dashboard"
        android:icon="@drawable/ic_dashboard_black_24dp"
        android:title="@string/title_dashboard" />

    <item
        android:id="@+id/navigation_notifications"
        android:icon="@drawable/ic_notifications_black_24dp"
        android:title="@string/title_notifications" />

</menu>
创建 Fragment
在 res/navigation 文件夹右击选择 New -> Navigation resource file,创建 bottom_nav_graph.xml 文件。在 design 视图下连续 Create blank destination 三次创建三个 Fragment。
<!-- bottom_nav_graph.xml -->
<?xml version="1.0" encoding="utf-8"?>
<navigation xmlns:android="http://schemas.android.com/apk/res/android"
    xmlns:app="http://schemas.android.com/apk/res-auto"
    xmlns:tools="http://schemas.android.com/tools"
    android:id="@+id/bottom_nav_graph"
    app:startDestination="@id/homeFragment">

    <fragment
        android:id="@+id/homeFragment"
        android:name="pot.ner347.androiddemo.HomeFragment"
        android:label="fragment_home"
        tools:layout="@layout/fragment_home" />
    <fragment
        android:id="@+id/dashboardFragment"
        android:name="pot.ner347.androiddemo.DashboardFragment"
        android:label="fragment_dashboard"
        tools:layout="@layout/fragment_dashboard" />
    <fragment
        android:id="@+id/notificationFragment"
        android:name="pot.ner347.androiddemo.NotificationFragment"
        android:label="fragment_notification"
        tools:layout="@layout/fragment_notification" />
</navigation>
修改三个 Fragment 里面的 TextView,以区分三者。
BottomNavigationView 引起 Fragment 切换
bottom_nav_graph.xml 中 fragment 的 id 必须和 menu 中 item 的 id 保持一致。修改 menu/navigation.xml 中的三个 id。
<?xml version="1.0" encoding="utf-8"?>
<menu xmlns:android="http://schemas.android.com/apk/res/android">

    <item
        android:id="@id/homeFragment"
        android:icon="@drawable/ic_home_black_24dp"
        android:title="@string/title_home" />

    <item
        android:id="@id/dashboardFragment"
        android:icon="@drawable/ic_dashboard_black_24dp"
        android:title="@string/title_dashboard" />

    <item
        android:id="@id/notificationFragment"
        android:icon="@drawable/ic_notifications_black_24dp"
        android:title="@string/title_notifications" />

</menu>
实际发现这个 id 用 @+id 也行。
在 BottomNavigationActivity 的 xml 里添加一个 fragment
<fragment
    android:id="@+id/nav_fragment"
    android:name="androidx.navigation.fragment.NavHostFragment"
    app:defaultNavHost="true"
    app:navGraph="@navigation/bottom_nav_graph"
    ... />
代码关联
val navHostFragment = nav_fragment as NavHostFragment
NavigationUI.setupWithNavController(navigation, navHostFragment.navController)
**遇到的一个坑:**无法切换 Fragment,看源码
public static void setupWithNavController(
        @NonNull final BottomNavigationView bottomNavigationView,
        @NonNull final NavController navController) {
    bottomNavigationView.setOnNavigationItemSelectedListener(
            new BottomNavigationView.OnNavigationItemSelectedListener() {
                @Override
                public boolean onNavigationItemSelected(@NonNull MenuItem item) {
                    return onNavDestinationSelected(item, navController, true);
                }
            });
    navController.addOnNavigatedListener(new NavController.OnNavigatedListener() {
        @Override
        public void onNavigated(@NonNull NavController controller,
                @NonNull NavDestination destination) {
            Menu menu = bottomNavigationView.getMenu();
            for (int h = 0, size = menu.size(); h < size; h++) {
                MenuItem item = menu.getItem(h);
                if (matchDestination(destination, item.getItemId())) {
                    item.setChecked(true);
                }
            }
        }
    });
}
发现对 BottomNavigationView 加了切换监听去切换 Fragment,也对 Fragment 加了监听,能够自动切换 BottomNavigationView 的 item,互相监听变化。
而自动创建 Bottom Navigation Activity 时生成的代码里有一句 navigation.setOnNavigationItemSelectedListener(mOnNavigationItemSelectedListener),我又放在后面调用,相当于里面设置的监听被覆盖了,才导致无法切换

Fragment 切换改变 BottomNavigationView 的 item
在 destination 上随便拖了几个 action,如下图
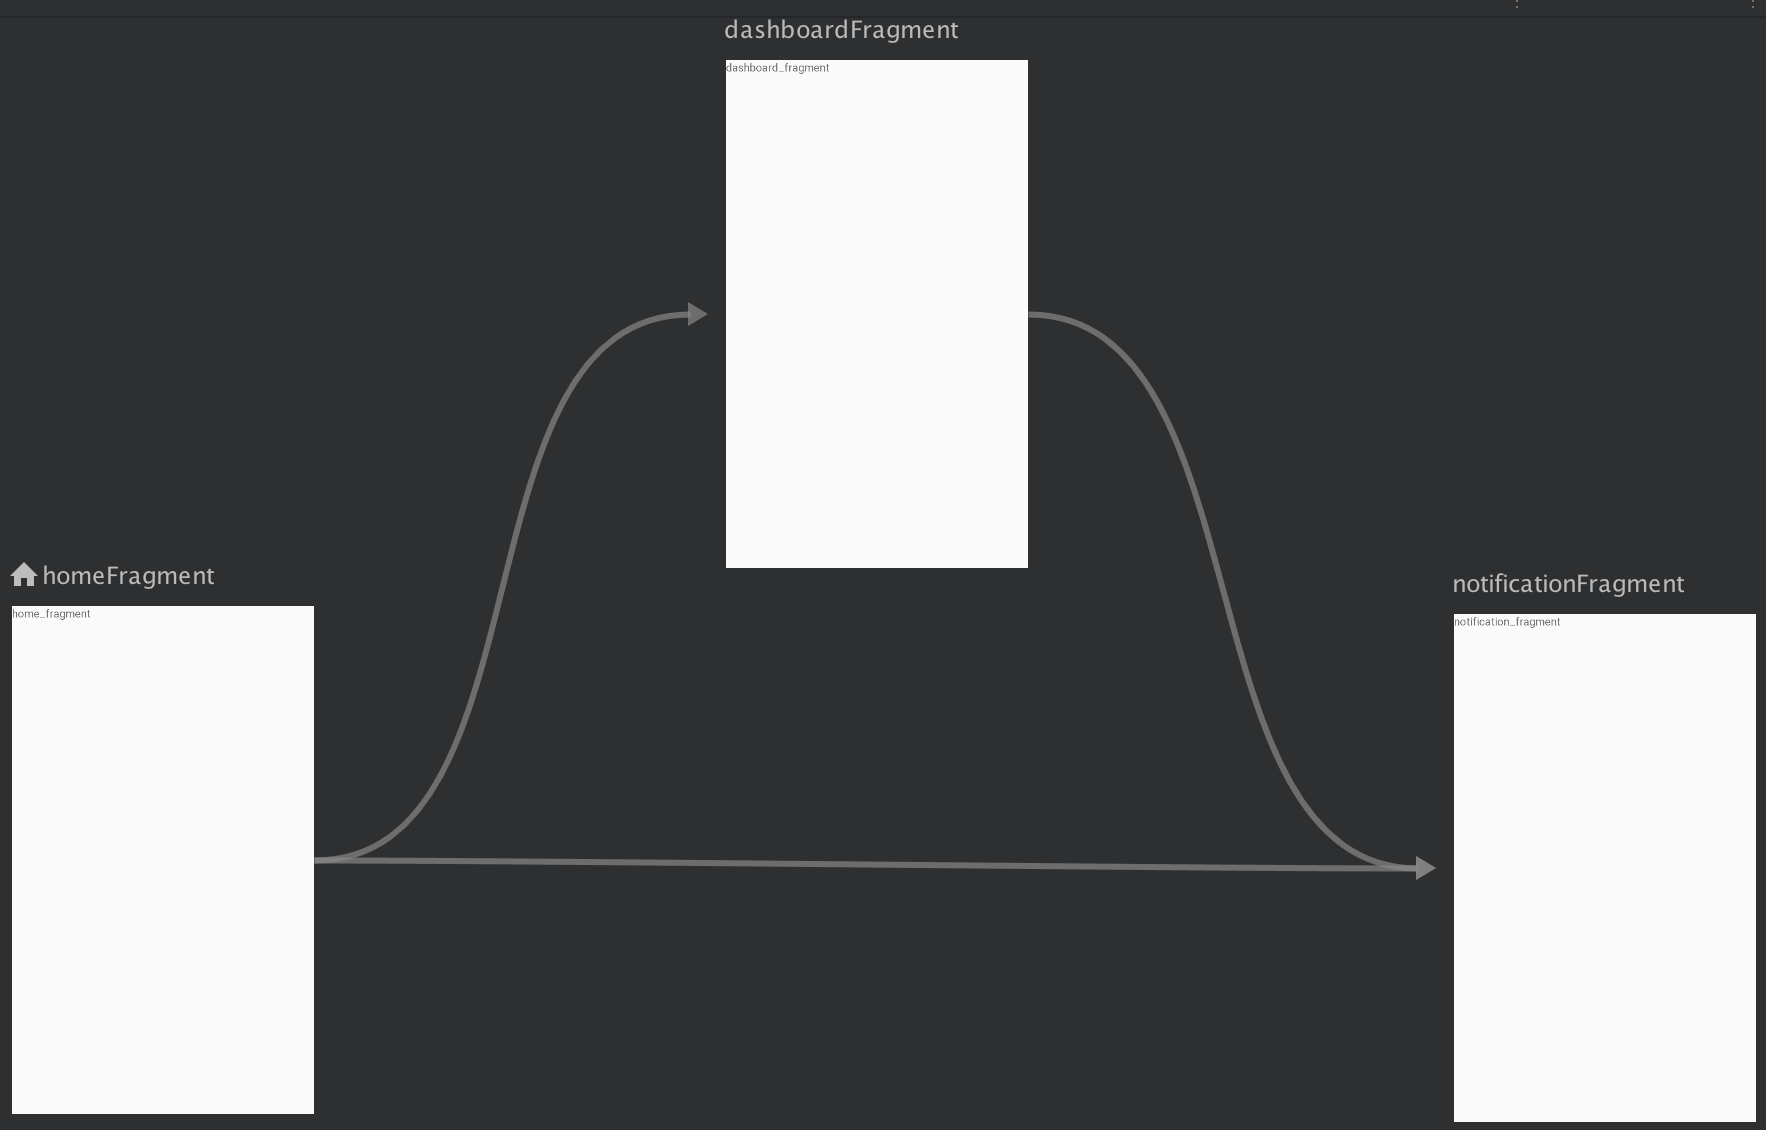
生成代码多了几个 action
<?xml version="1.0" encoding="utf-8"?>
<navigation xmlns:android="http://schemas.android.com/apk/res/android"
    xmlns:app="http://schemas.android.com/apk/res-auto"
    xmlns:tools="http://schemas.android.com/tools"
    android:id="@+id/bottom_nav_graph"
    app:startDestination="@id/homeFragment">

    <fragment
        android:id="@+id/homeFragment"
        android:name="pot.ner347.androiddemo.navigation.HomeFragment"
        android:label="fragment_home"
        tools:layout="@layout/fragment_home" >
        <action
            android:id="@+id/action_homeFragment_to_notificationFragment"
            app:destination="@id/notificationFragment" />
        <action
            android:id="@+id/action_homeFragment_to_dashboardFragment"
            app:destination="@id/dashboardFragment" />
    </fragment>
    <fragment
        android:id="@+id/dashboardFragment"
        android:name="pot.ner347.androiddemo.navigation.DashboardFragment"
        android:label="fragment_dashboard"
        tools:layout="@layout/fragment_dashboard" >
        <action
            android:id="@+id/action_dashboardFragment_to_notificationFragment"
            app:destination="@id/notificationFragment" />
    </fragment>
    <fragment
        android:id="@+id/notificationFragment"
        android:name="pot.ner347.androiddemo.navigation.NotificationFragment"
        android:label="fragment_notification"
        tools:layout="@layout/fragment_notification" />
</navigation>
然后修改 Fragment 的代码:
<!-- fragment_home.xml -->
<?xml version="1.0" encoding="utf-8"?>
<LinearLayout xmlns:android="http://schemas.android.com/apk/res/android"
    xmlns:tools="http://schemas.android.com/tools"
    android:layout_width="match_parent"
    android:layout_height="match_parent"
    android:orientation="vertical"
    tools:context=".navigation.HomeFragment">

    <TextView
        android:layout_width="wrap_content"
        android:layout_height="wrap_content"
        android:text="home_fragment" />

    <Button
        android:id="@+id/homeToDashboard"
        android:layout_width="wrap_content"
        android:layout_height="wrap_content"
        android:textAllCaps="false"
        android:text="to dashboard"/>

    <Button
        android:id="@+id/homeToNotification"
        android:layout_width="wrap_content"
        android:layout_height="wrap_content"
        android:textAllCaps="false"
        android:text="to notification"/>
</LinearLayout>
class HomeFragment : Fragment() {

    override fun onCreateView(inflater: LayoutInflater, container: ViewGroup?,
                              savedInstanceState: Bundle?): View? {
        return inflater.inflate(R.layout.fragment_home, container, false)
    }

    override fun onViewCreated(view: View, savedInstanceState: Bundle?) {
        super.onViewCreated(view, savedInstanceState)

        homeToDashboard.onClick {
            NavHostFragment.findNavController(this@HomeFragment) // NavHostFragment 方式获取 NavController
                    .navigate(R.id.dashboardFragment) // 根据 fragment 的 id 跳转
        }
        homeToNotification.onClick {
            Navigation.findNavController(view) // Navigation 方式获取 NavController
                    .navigate(R.id.action_homeFragment_to_notificationFragment) // 根据 action 的 id 跳转
        }
    }

}
<!-- fragment_dashboard.xml -->
<?xml version="1.0" encoding="utf-8"?>
<LinearLayout xmlns:android="http://schemas.android.com/apk/res/android"
xmlns:tools="http://schemas.android.com/tools"
android:layout_width="match_parent"
android:layout_height="match_parent"
android:orientation="vertical"
tools:context=".navigation.HomeFragment">
<TextView
android:layout_width="wrap_content"
android:layout_height="wrap_content"
android:text="dashboard_fragment" />
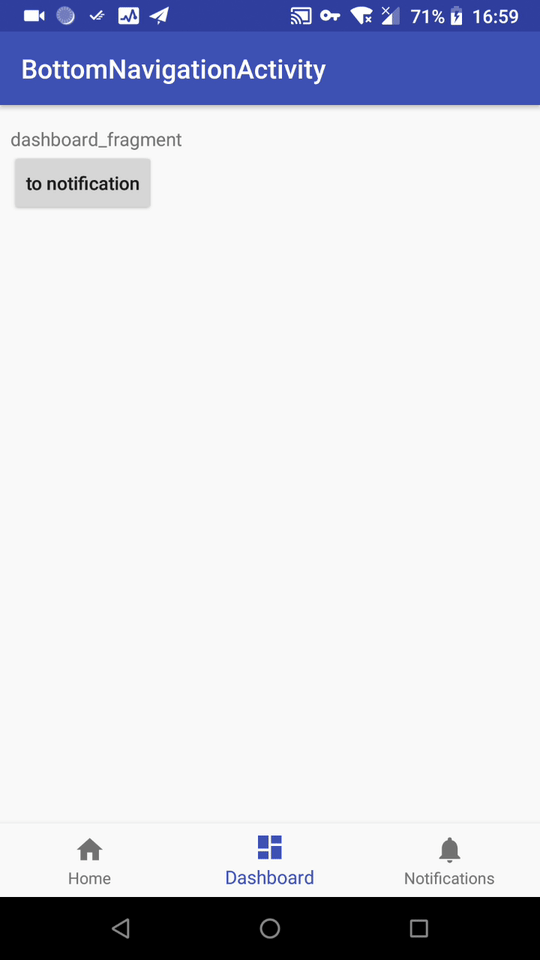
<Button
android:id="@+id/dashboardToNotification"
android:layout_width="wrap_content"
android:layout_height="wrap_content"
android:textAllCaps="false"
android:text="to notification"/>
</LinearLayout>
class DashboardFragment : Fragment() {

    override fun onCreateView(inflater: LayoutInflater, container: ViewGroup?,
                              savedInstanceState: Bundle?): View? {
        return inflater.inflate(R.layout.fragment_dashboard, container, false)
    }

    override fun onViewCreated(view: View, savedInstanceState: Bundle?) {
        super.onViewCreated(view, savedInstanceState)
        dashboardToNotification.onClick {
            Navigation.findNavController(view).navigate(R.id.notificationFragment)
        }
    }
}
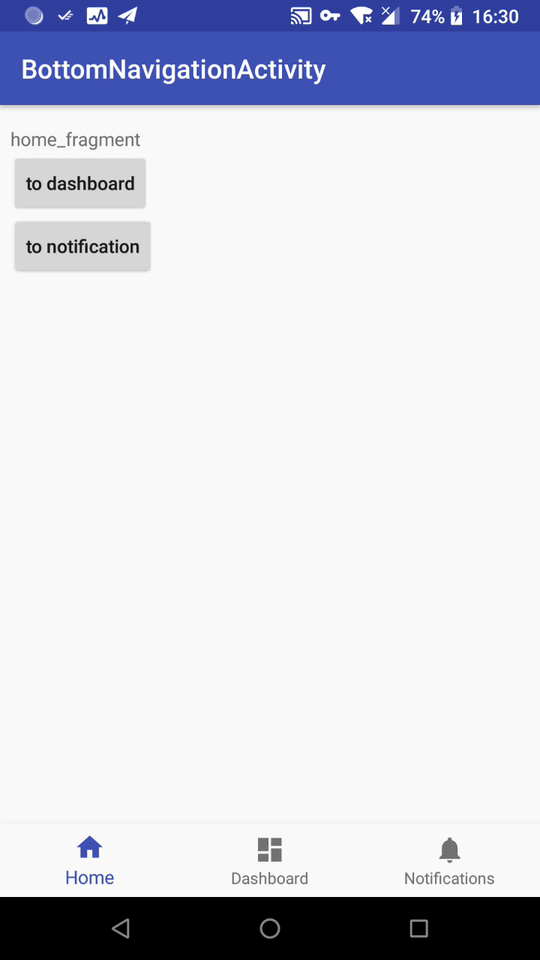
下面的 item 跟着切换。
返回
Activity 中 defaultNavHost 设为 true,默认的按返回键就是按进入栈的顺序退出。
可以通过 NavController 的 navigateUp 方法主动退出。
修改 fragment_notification.xml 为
<?xml version="1.0" encoding="utf-8"?>
<LinearLayout xmlns:android="http://schemas.android.com/apk/res/android"
    xmlns:tools="http://schemas.android.com/tools"
    android:layout_width="match_parent"
    android:layout_height="match_parent"
    android:orientation="vertical"
    tools:context=".navigation.HomeFragment">

    <TextView
        android:layout_width="wrap_content"
        android:layout_height="wrap_content"
        android:text="notification_fragment" />

    <Button
        android:id="@+id/back"
        android:layout_width="wrap_content"
        android:layout_height="wrap_content"
        android:textAllCaps="false"
        android:text="back"/>

</LinearLayout>
在 NotificationFragment 里添加如下方法:
override fun onViewCreated(view: View, savedInstanceState: Bundle?) {
    super.onViewCreated(view, savedInstanceState)
    back.onClick {
        Navigation.findNavController(view).navigateUp()
    }
}
执行效果是从哪个 Fragment 跳转过去,就是返回到哪个。
navigateUp 看源码可知如果栈里有多个页面,调用 popBackStack,如果只有一个,是调用了所依附的 Activity 的 finish 方法。
public boolean popBackStack(@IdRes int destinationId, boolean inclusive)
popBackStack 的另一个重载方法,可以指定回到哪个 Fragment,即可以一次关闭多个页面。inclusive 表示 destinationId 这个页面是否也要弹出关闭。
NotificationFragment 中再添加两个 Button
<Button
    android:id="@+id/backToHome"
    android:layout_width="wrap_content"
    android:layout_height="wrap_content"
    android:textAllCaps="false"
    android:text="backToHome"/>

<Button
    android:id="@+id/backToHomeInclusive"
    android:layout_width="wrap_content"
    android:layout_height="wrap_content"
    android:textAllCaps="false"
    android:text="backToHomeInclusive"/>
backToHome.onClick {
    Navigation.findNavController(view).popBackStack(R.id.homeFragment, false)
}
backToHomeInclusive.onClick {
    Navigation.findNavController(view).popBackStack(R.id.homeFragment, true)
}
然后从 Home 到 Dashboard,从 Dashboard 再到 Notification,即 NotificationFragment 下面还有两个 Fragment。结果效果一样,都是回到了 HomeFragment,但是看栈有区别。修改代码为
class NotificationFragment : Fragment() {

    lateinit var navController : NavController

    override fun onCreateView(inflater: LayoutInflater, container: ViewGroup?,
                              savedInstanceState: Bundle?): View? {
        navController = NavHostFragment.findNavController(this@NotificationFragment)
        return inflater.inflate(R.layout.fragment_notification, container, false)
    }

    override fun onViewCreated(view: View, savedInstanceState: Bundle?) {
        super.onViewCreated(view, savedInstanceState)
        back.onClick { Navigation.findNavController(view).navigateUp() }
        backToHome.onClick { pop(false) }
        backToHomeInclusive.onClick { pop(true) }
    }

    fun pop(inclusive : Boolean) {
        printBackStack("inclusive=$inclusive before pop -----")
        navController.popBackStack(R.id.homeFragment, inclusive)
        printBackStack("inclusive=$inclusive after pop ------")
    }

    fun printBackStack(pre : String) {
        val mBackStack : Deque<NavDestination> = NavController::class.java.getDeclaredField("mBackStack").apply {
            isAccessible = true
        }.get(navController) as Deque<NavDestination>
        mBackStack.log(pre)
    }

    fun Deque<NavDestination>.log (pre : String) {
        if (this.isEmpty()) {
            Log.e("OMG", "$pre back stack size 0")
        } else {
            this.forEach {
                Log.e("OMG", "$pre ${it.label},id:${it.id}")
            }
        }
    }
}
日志显示:
2018-09-05 18:32:15.869 17142-17142/pot.ner347.androiddemo E/OMG: inclusive=false before pop ----- null,id:2131230766
2018-09-05 18:32:15.869 17142-17142/pot.ner347.androiddemo E/OMG: inclusive=false before pop ----- fragment_home,id:2131230946
2018-09-05 18:32:15.870 17142-17142/pot.ner347.androiddemo E/OMG: inclusive=false before pop ----- fragment_dashboard,id:2131230909
2018-09-05 18:32:15.870 17142-17142/pot.ner347.androiddemo E/OMG: inclusive=false before pop ----- fragment_notification,id:2131230990
2018-09-05 18:32:15.917 17142-17142/pot.ner347.androiddemo E/OMG: inclusive=false after pop ------ null,id:2131230766
2018-09-05 18:32:15.917 17142-17142/pot.ner347.androiddemo E/OMG: inclusive=false after pop ------ fragment_home,id:2131230946
2018-09-05 18:32:25.387 17142-17142/pot.ner347.androiddemo E/OMG: inclusive=true before pop ----- null,id:2131230766
2018-09-05 18:32:25.388 17142-17142/pot.ner347.androiddemo E/OMG: inclusive=true before pop ----- fragment_home,id:2131230946
2018-09-05 18:32:25.388 17142-17142/pot.ner347.androiddemo E/OMG: inclusive=true before pop ----- fragment_dashboard,id:2131230909
2018-09-05 18:32:25.388 17142-17142/pot.ner347.androiddemo E/OMG: inclusive=true before pop ----- fragment_notification,id:2131230990
2018-09-05 18:32:25.425 17142-17142/pot.ner347.androiddemo E/OMG: inclusive=true after pop ------ back stack size 0}
看栈,当 inclusive 为 true 时确实把自己也弹出了,之所以还能看到 HomeFragment,应该是 Activity 的布局问题,一开始就显示了 NavHostFragment。
修改 start destination
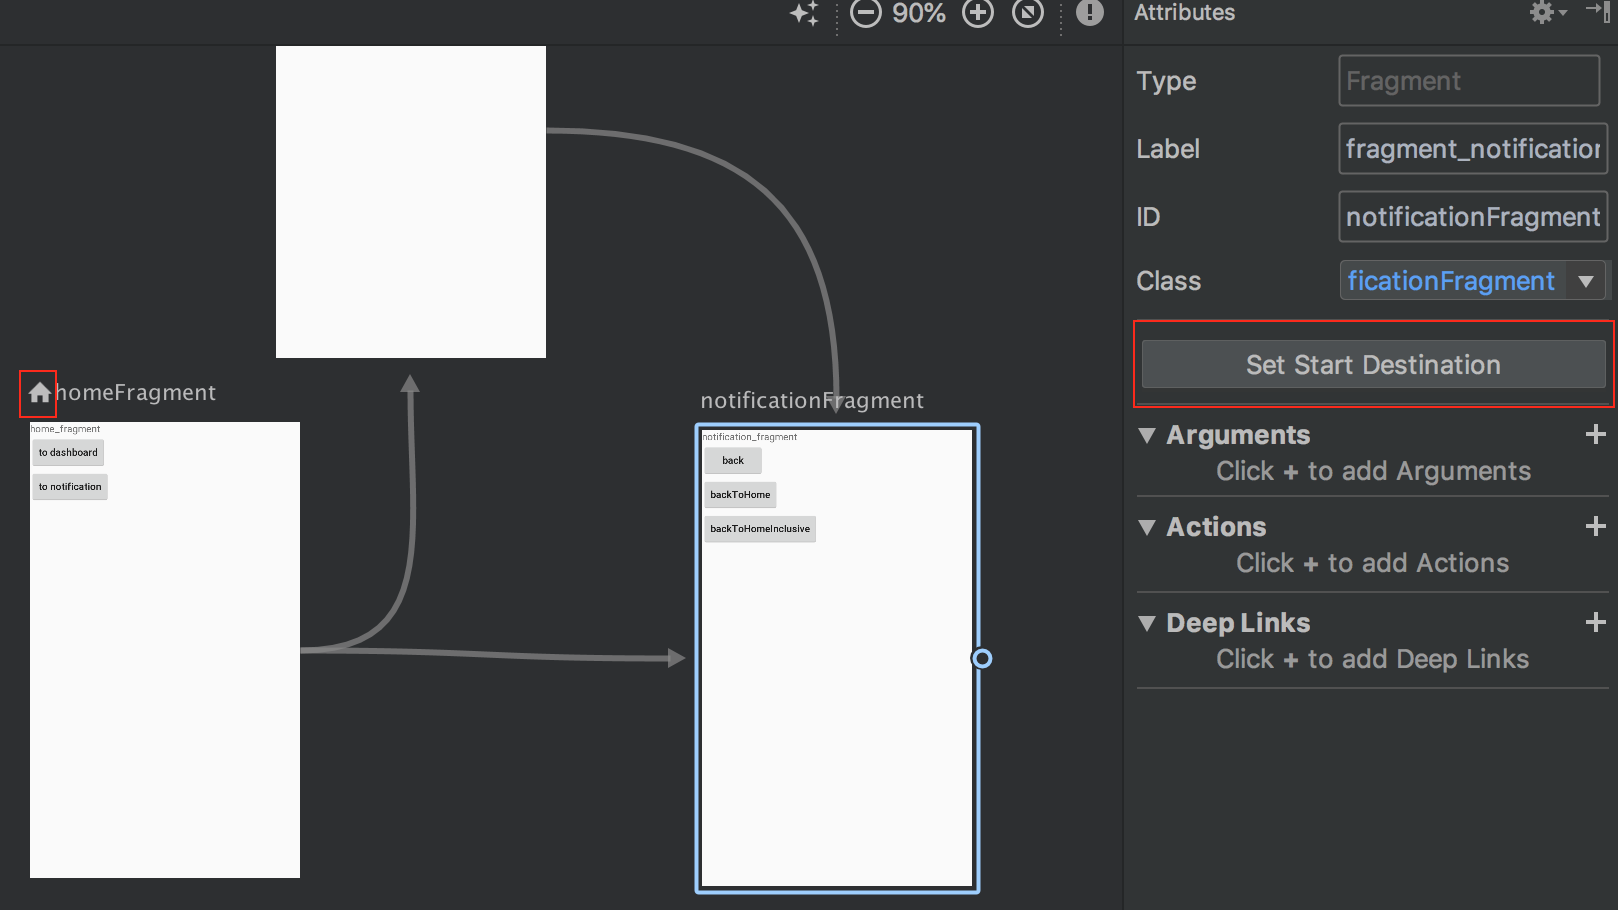
start destination 的名字前有个小房子,如果要修改,可以点击 destination,然后点击右侧的 Set Start Destination。看代码 app:startDestination 已经变了。
比如把 NotificationFragment 设为 start destination,进入 Activity,点击下面的 Item 切换到 HomeFragment,然后再到 NotificationFragment,执行返回:
2018-09-05 18:44:43.776 19162-19162/pot.ner347.androiddemo E/OMG: inclusive=true before pop ----- null,id:2131230766
2018-09-05 18:44:43.776 19162-19162/pot.ner347.androiddemo E/OMG: inclusive=true before pop ----- fragment_notification,id:2131230990
2018-09-05 18:44:43.776 19162-19162/pot.ner347.androiddemo E/OMG: inclusive=true before pop ----- fragment_home,id:2131230946
2018-09-05 18:44:43.777 19162-19162/pot.ner347.androiddemo E/OMG: inclusive=true before pop ----- fragment_dashboard,id:2131230909
2018-09-05 18:44:43.777 19162-19162/pot.ner347.androiddemo E/OMG: inclusive=true before pop ----- fragment_notification,id:2131230990
2018-09-05 18:44:43.798 19162-19162/pot.ner347.androiddemo E/OMG: inclusive=true after pop ------ null,id:2131230766
2018-09-05 18:44:43.798 19162-19162/pot.ner347.androiddemo E/OMG: inclusive=true after pop ------ fragment_notification,id:2131230990
参考:
共同学习,写下你的评论
评论加载中...
作者其他优质文章