一、引子
在Spring中,事务有两种实现方式:
编程式事务管理: 编程式事务管理使用TransactionTemplate可实现更细粒度的事务控制。
申明式事务管理: 基于Spring AOP实现。其本质是对方法前后进行拦截,然后在目标方法开始之前创建或者加入一个事务,在执行完目标方法之后根据执行情况提交或者回滚事务。
申明式事务管理不需要入侵代码,通过@Transactional就可以进行事务操作,更快捷而且简单(尤其是配合spring boot自动配置,可以说是精简至极!),且大部分业务都可以满足,推荐使用。
其实不管是编程式事务还是申明式事务,最终调用的底层核心代码是一致的。本章分别从编程式、申明式入手,再进入核心源码贯穿式讲解。
二、事务源码
2.1 编程式事务TransactionTemplate
全路径名是:org.springframework.transaction.support.TransactionTemplate。看包名也知道了这是spring对事务的模板类。(spring动不动就是各种Template...),看下类图先:
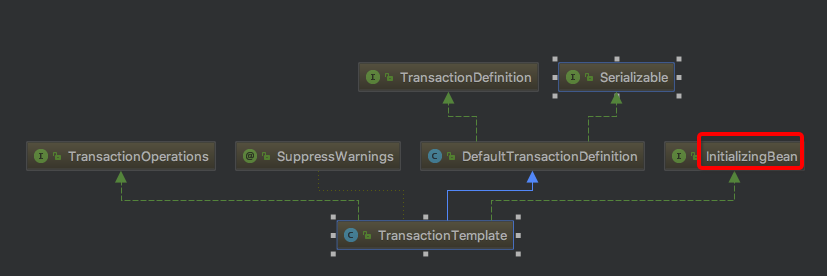
一看,哟西,实现了TransactionOperations、InitializingBean这2个接口(熟悉spring源码的知道这个InitializingBean又是老套路),我们来看下接口源码如下:

 1 public interface TransactionOperations { 2
 3     /** 4      * Execute the action specified by the given callback object within a transaction. 5      * <p>Allows for returning a result object created within the transaction, that is, 6      * a domain object or a collection of domain objects. A RuntimeException thrown 7      * by the callback is treated as a fatal exception that enforces a rollback. 8      * Such an exception gets propagated to the caller of the template. 9      * @param action the callback object that specifies the transactional action10      * @return a result object returned by the callback, or {@code null} if none11      * @throws TransactionException in case of initialization, rollback, or system errors12      * @throws RuntimeException if thrown by the TransactionCallback13      */14     <T> T execute(TransactionCallback<T> action) throws TransactionException;15
16 }17
18 public interface InitializingBean {19
20     /**21      * Invoked by a BeanFactory after it has set all bean properties supplied22      * (and satisfied BeanFactoryAware and ApplicationContextAware).23      * <p>This method allows the bean instance to perform initialization only24      * possible when all bean properties have been set and to throw an25      * exception in the event of misconfiguration.26      * @throws Exception in the event of misconfiguration (such27      * as failure to set an essential property) or if initialization fails.28      */29     void afterPropertiesSet() throws Exception;30
31 }
如上图,TransactionOperations这个接口用来执行事务的回调方法,InitializingBean这个是典型的spring bean初始化流程中(飞机票:Spring IOC(四)总结升华篇)的预留接口,专用用来在bean属性加载完毕时执行的方法。
回到正题,TransactionTemplate的2个接口的方法做了什么?
 1     @Override 2     public void afterPropertiesSet() { 3         if (this.transactionManager == null) { 4             throw new IllegalArgumentException("Property 'transactionManager' is required"); 5         } 6     } 7
 8
 9     @Override10     public <T> T execute(TransactionCallback<T> action) throws TransactionException {
       // 编程式事务11         if (this.transactionManager instanceof CallbackPreferringPlatformTransactionManager) {12             return ((CallbackPreferringPlatformTransactionManager) this.transactionManager).execute(this, action);13         }// 声明式事务14         else {// 1.获取事务状态15             TransactionStatus status = this.transactionManager.getTransaction(this);16             T result;17             try {// 2.执行业务逻辑18                 result = action.doInTransaction(status);19             }20             catch (RuntimeException ex) {21                 // 应用运行时异常 -> 回滚22                 rollbackOnException(status, ex);23                 throw ex;24             }25             catch (Error err) {26                 // Error异常 -> 回滚27                 rollbackOnException(status, err);28                 throw err;29             }30             catch (Throwable ex) {31                 // 未知异常 -> 回滚32                 rollbackOnException(status, ex);33                 throw new UndeclaredThrowableException(ex, "TransactionCallback threw undeclared checked exception");34             }// 3.事务提交35             this.transactionManager.commit(status);36             return result;37         }38     }
如上图所示,实际上afterPropertiesSet只是校验了事务管理器不为空,execute()才是核心方法,execute主要步骤:
1.getTransaction()获取事务,源码见3.3.1
2.doInTransaction()执行业务逻辑,这里就是用户自定义的业务代码。如果是没有返回值的,就是doInTransactionWithoutResult()。
3.commit()事务提交:调用AbstractPlatformTransactionManager的commit,rollbackOnException()异常回滚:调用AbstractPlatformTransactionManager的rollback(),事务提交回滚,源码见3.3.3
2.2 申明式事务@Transactional
1.AOP相关概念
申明式事务使用的是spring AOP,即面向切面编程。(什么你不知道什么是AOP...一句话概括就是:把业务代码中重复代码做成一个切面,提取出来,并定义哪些方法需要执行这个切面。其它的自行百度吧...)AOP核心概念如下:
通知(Advice):定义了切面(各处业务代码中都需要的逻辑提炼成的一个切面)做什么what+when何时使用。例如:前置通知Before、后置通知After、返回通知After-returning、异常通知After-throwing、环绕通知Around.
连接点(Joint point):程序执行过程中能够插入切面的点,一般有多个。比如调用方式时、抛出异常时。
切点(Pointcut):切点定义了连接点,切点包含多个连接点,即where哪里使用通知.通常指定类+方法 或者 正则表达式来匹配 类和方法名称。
切面(Aspect):切面=通知+切点,即when+where+what何时何地做什么。
引入(Introduction):允许我们向现有的类添加新方法或属性。
织入(Weaving):织入是把切面应用到目标对象并创建新的代理对象的过程。
2.申明式事务
由于采用申明式@Transactional这种注解的方式,那么我们从springboot 容器启动时的自动配置载入(spring boot容器启动详解)开始看。在/META-INF/spring.factories中配置文件中查找,如下图:
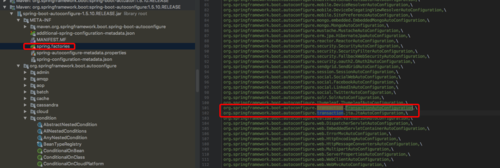
载入2个关于事务的自动配置类:
org.springframework.boot.autoconfigure.transaction.TransactionAutoConfiguration,
org.springframework.boot.autoconfigure.transaction.jta.JtaAutoConfiguration,
jta咱们就不看了,看一下TransactionAutoConfiguration这个自动配置类:
1 @Configuration 2 @ConditionalOnClass(PlatformTransactionManager.class) 3 @AutoConfigureAfter({ JtaAutoConfiguration.class, HibernateJpaAutoConfiguration.class, 4 DataSourceTransactionManagerAutoConfiguration.class, 5 Neo4jDataAutoConfiguration.class }) 6 @EnableConfigurationProperties(TransactionProperties.class) 7 public class TransactionAutoConfiguration { 8 9 @Bean10 @ConditionalOnMissingBean11 public TransactionManagerCustomizers platformTransactionManagerCustomizers(12 ObjectProvider<List<PlatformTransactionManagerCustomizer<?>>> customizers) {13 return new TransactionManagerCustomizers(customizers.getIfAvailable());14 }15 16 @Configuration17 @ConditionalOnSingleCandidate(PlatformTransactionManager.class)18 public static class TransactionTemplateConfiguration {19 20 private final PlatformTransactionManager transactionManager;21 22 public TransactionTemplateConfiguration(23 PlatformTransactionManager transactionManager) {24 this.transactionManager = transactionManager;25 }26 27 @Bean28 @ConditionalOnMissingBean29 public TransactionTemplate transactionTemplate() {30 return new TransactionTemplate(this.transactionManager);31 }32 }33 34 @Configuration35 @ConditionalOnBean(PlatformTransactionManager.class)36 @ConditionalOnMissingBean(AbstractTransactionManagementConfiguration.class)37 public static class EnableTransactionManagementConfiguration {38 39 @Configuration40 @EnableTransactionManagement(proxyTargetClass = false)41 @ConditionalOnProperty(prefix = "spring.aop", name = "proxy-target-class", havingValue = "false", matchIfMissing = false)42 public static class JdkDynamicAutoProxyConfiguration {43 44 }45 46 @Configuration47 @EnableTransactionManagement(proxyTargetClass = true)48 @ConditionalOnProperty(prefix = "spring.aop", name = "proxy-target-class", havingValue = "true", matchIfMissing = true)49 public static class CglibAutoProxyConfiguration {50 51 }52 53 }54 55 }
TransactionAutoConfiguration这个类主要看:
1.2个类注解
@ConditionalOnClass(PlatformTransactionManager.class)即类路径下包含PlatformTransactionManager这个类时这个自动配置生效,这个类是spring事务的核心包,肯定引入了。
@AutoConfigureAfter({ JtaAutoConfiguration.class, HibernateJpaAutoConfiguration.class, DataSourceTransactionManagerAutoConfiguration.class, Neo4jDataAutoConfiguration.class }),这个配置在括号中的4个配置类后才生效。
2. 2个内部类
TransactionTemplateConfiguration事务模板配置类:
@ConditionalOnSingleCandidate(PlatformTransactionManager.class)当能够唯一确定一个PlatformTransactionManager bean时才生效。
@ConditionalOnMissingBean如果没有定义TransactionTemplate bean生成一个。
EnableTransactionManagementConfiguration开启事务管理器配置类:
@ConditionalOnBean(PlatformTransactionManager.class)当存在PlatformTransactionManager bean时生效。
@ConditionalOnMissingBean(AbstractTransactionManagementConfiguration.class)当没有自定义抽象事务管理器配置类时才生效。(即用户自定义抽象事务管理器配置类会优先,如果没有,就用这个默认事务管理器配置类)
EnableTransactionManagementConfiguration支持2种代理方式:
1.JdkDynamicAutoProxyConfiguration:
@EnableTransactionManagement(proxyTargetClass = false),即proxyTargetClass = false表示是JDK动态代理支持的是:面向接口代理。
@ConditionalOnProperty(prefix = "spring.aop", name = "proxy-target-class", havingValue = "false", matchIfMissing = false),即spring.aop.proxy-target-class=false时生效,且没有这个配置不生效。
2.CglibAutoProxyConfiguration:
@EnableTransactionManagement(proxyTargetClass = true),即proxyTargetClass = true标识Cglib代理支持的是子类继承代理。
@ConditionalOnProperty(prefix = "spring.aop", name = "proxy-target-class", havingValue = "true", matchIfMissing = true),即spring.aop.proxy-target-class=true时生效,且没有这个配置默认生效。
注意了,默认没有配置,走的Cglib代理。说明@Transactional注解支持直接加在类上。
好吧,看了这么多配置类,终于到了@EnableTransactionManagement这个注解了。
1 @Target(ElementType.TYPE) 2 @Retention(RetentionPolicy.RUNTIME) 3 @Documented 4 @Import(TransactionManagementConfigurationSelector.class) 5 public @interface EnableTransactionManagement { 6 7 //proxyTargetClass = false表示是JDK动态代理支持接口代理。true表示是Cglib代理支持子类继承代理。 8 boolean proxyTargetClass() default false; 9 10 //事务通知模式(切面织入方式),默认代理模式(同一个类中方法互相调用拦截器不会生效),可以选择增强型AspectJ11 AdviceMode mode() default AdviceMode.PROXY;12 13 //连接点上有多个通知时,排序,默认最低。值越大优先级越低。14 int order() default Ordered.LOWEST_PRECEDENCE;15 16 }
重点看类注解@Import(TransactionManagementConfigurationSelector.class)
TransactionManagementConfigurationSelector类图如下:
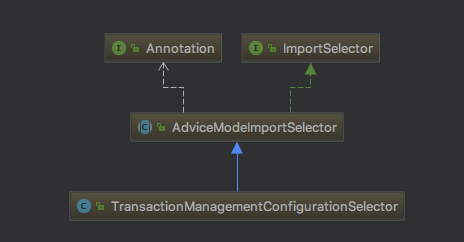
如上图所示,TransactionManagementConfigurationSelector继承自AdviceModeImportSelector实现了ImportSelector接口。
1 public class TransactionManagementConfigurationSelector extends AdviceModeImportSelector<EnableTransactionManagement> { 2 3 /** 4 * {@inheritDoc} 5 * @return {@link ProxyTransactionManagementConfiguration} or 6 * {@code AspectJTransactionManagementConfiguration} for {@code PROXY} and 7 * {@code ASPECTJ} values of {@link EnableTransactionManagement#mode()}, respectively 8 */ 9 @Override10 protected String[] selectImports(AdviceMode adviceMode) {11 switch (adviceMode) {12 case PROXY:13 return new String[] {AutoProxyRegistrar.class.getName(), ProxyTransactionManagementConfiguration.class.getName()};14 case ASPECTJ:15 return new String[] {TransactionManagementConfigUtils.TRANSACTION_ASPECT_CONFIGURATION_CLASS_NAME};16 default:17 return null;18 }19 }20 21 }
如上图,最终会执行selectImports方法导入需要加载的类,我们只看proxy模式下,载入了AutoProxyRegistrar、ProxyTransactionManagementConfiguration2个类。
AutoProxyRegistrar:
给容器中注册一个 InfrastructureAdvisorAutoProxyCreator 组件;利用后置处理器机制在对象创建以后,包装对象,返回一个代理对象(增强器),代理对象执行方法利用拦截器链进行调用;ProxyTransactionManagementConfiguration:就是一个配置类,定义了事务增强器。
AutoProxyRegistrar
先看AutoProxyRegistrar实现了ImportBeanDefinitionRegistrar接口,复写registerBeanDefinitions方法,源码如下:
1 public void registerBeanDefinitions(AnnotationMetadata importingClassMetadata, BeanDefinitionRegistry registry) { 2 boolean candidateFound = false; 3 Set<String> annoTypes = importingClassMetadata.getAnnotationTypes(); 4 for (String annoType : annoTypes) { 5 AnnotationAttributes candidate = AnnotationConfigUtils.attributesFor(importingClassMetadata, annoType); 6 if (candidate == null) { 7 continue; 8 } 9 Object mode = candidate.get("mode");10 Object proxyTargetClass = candidate.get("proxyTargetClass");11 if (mode != null && proxyTargetClass != null && AdviceMode.class == mode.getClass() &&12 Boolean.class == proxyTargetClass.getClass()) {13 candidateFound = true;14 if (mode == AdviceMode.PROXY) {//代理模式15 AopConfigUtils.registerAutoProxyCreatorIfNecessary(registry);16 if ((Boolean) proxyTargetClass) {//如果是CGLOB子类代理模式17 AopConfigUtils.forceAutoProxyCreatorToUseClassProxying(registry);18 return;19 }20 }21 }22 }23 if (!candidateFound) {24 String name = getClass().getSimpleName();25 logger.warn(String.format("%s was imported but no annotations were found " +26 "having both 'mode' and 'proxyTargetClass' attributes of type " +27 "AdviceMode and boolean respectively. This means that auto proxy " +28 "creator registration and configuration may not have occurred as " +29 "intended, and components may not be proxied as expected. Check to " +30 "ensure that %s has been @Import'ed on the same class where these " +31 "annotations are declared; otherwise remove the import of %s " +32 "altogether.", name, name, name));33 }34 }
代理模式:AopConfigUtils.registerAutoProxyCreatorIfNecessary(registry);
最终调用的是:registerOrEscalateApcAsRequired(InfrastructureAdvisorAutoProxyCreator.class, registry, source);基础构建增强自动代理构造器
 1 private static BeanDefinition registerOrEscalateApcAsRequired(Class<?> cls, BeanDefinitionRegistry registry, Object source) { 2         Assert.notNull(registry, "BeanDefinitionRegistry must not be null");
       //如果当前注册器包含internalAutoProxyCreator 3         if (registry.containsBeanDefinition(AUTO_PROXY_CREATOR_BEAN_NAME)) {//org.springframework.aop.config.internalAutoProxyCreator内部自动代理构造器 4             BeanDefinition apcDefinition = registry.getBeanDefinition(AUTO_PROXY_CREATOR_BEAN_NAME); 5             if (!cls.getName().equals(apcDefinition.getBeanClassName())) {//如果当前类不是internalAutoProxyCreator 6                 int currentPriority = findPriorityForClass(apcDefinition.getBeanClassName()); 7                 int requiredPriority = findPriorityForClass(cls); 8                 if (currentPriority < requiredPriority) {//如果下标大于已存在的内部自动代理构造器,index越小,优先级越高,InfrastructureAdvisorAutoProxyCreator index=0,requiredPriority最小,不进入 9                     apcDefinition.setBeanClassName(cls.getName());10                 }11             }12             return null;//直接返回13         }//如果当前注册器不包含internalAutoProxyCreator,则把当前类作为根定义14         RootBeanDefinition beanDefinition = new RootBeanDefinition(cls);15         beanDefinition.setSource(source);16         beanDefinition.getPropertyValues().add("order", Ordered.HIGHEST_PRECEDENCE);//优先级最高17         beanDefinition.setRole(BeanDefinition.ROLE_INFRASTRUCTURE);18         registry.registerBeanDefinition(AUTO_PROXY_CREATOR_BEAN_NAME, beanDefinition);19         return beanDefinition;20     }
如上图,APC_PRIORITY_LIST列表如下图:
1 /** 2 * Stores the auto proxy creator classes in escalation order. 3 */ 4 private static final List<Class<?>> APC_PRIORITY_LIST = new ArrayList<Class<?>>(); 5 6 /** 7 * 优先级上升list 8 */ 9 static {10 APC_PRIORITY_LIST.add(InfrastructureAdvisorAutoProxyCreator.class);11 APC_PRIORITY_LIST.add(AspectJAwareAdvisorAutoProxyCreator.class);12 APC_PRIORITY_LIST.add(AnnotationAwareAspectJAutoProxyCreator.class);13 }
如上图,由于InfrastructureAdvisorAutoProxyCreator这个类在list中第一个index=0,requiredPriority最小,不进入,所以没有重置beanClassName,啥都没做,返回null.
那么增强代理类何时生成呢?
InfrastructureAdvisorAutoProxyCreator类图如下:
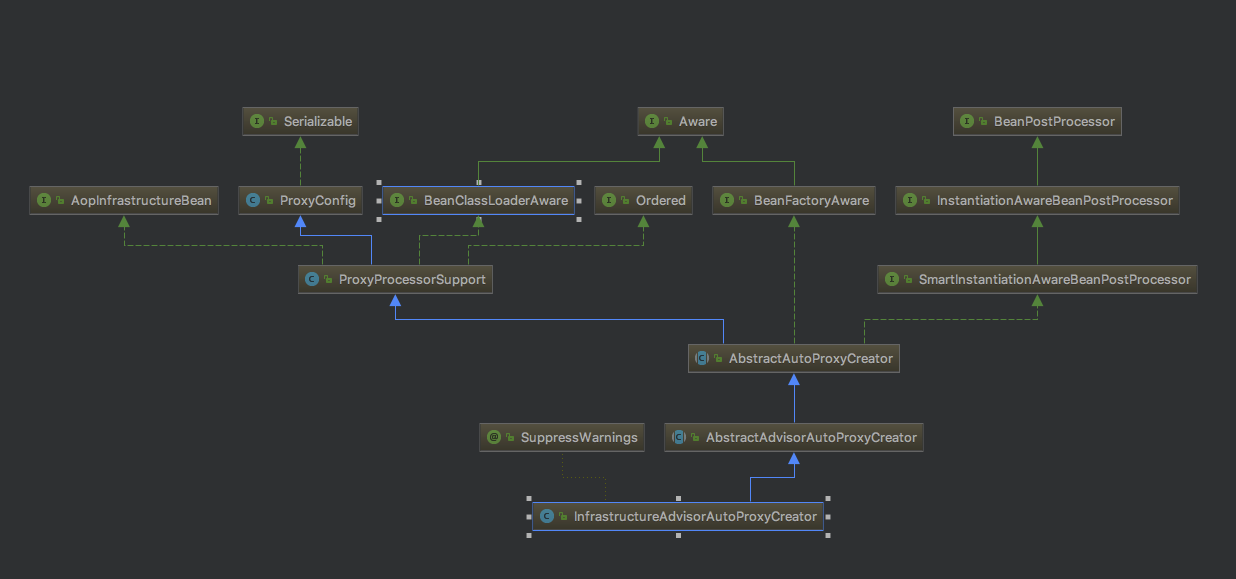
如上图所示,核心接口:BeanPostProcessor的2个方法:postProcessBeforeInstantiation实例化前+postProcessAfterInitialization实例化后。关于spring bean生命周期飞机票:Spring IOC(四)总结升华篇
1 @Override 2 public Object postProcessBeforeInstantiation(Class<?> beanClass, String beanName) throws BeansException { 3 Object cacheKey = getCacheKey(beanClass, beanName); 4 5 if (beanName == null || !this.targetSourcedBeans.contains(beanName)) { 6 if (this.advisedBeans.containsKey(cacheKey)) {//如果已经存在直接返回 7 return null; 8 }//是否基础构件(基础构建不需要代理):Advice、Pointcut、Advisor、AopInfrastructureBean这四类都算基础构建 9 if (isInfrastructureClass(beanClass) || shouldSkip(beanClass, beanName)) {10 this.advisedBeans.put(cacheKey, Boolean.FALSE);//添加进advisedBeans ConcurrentHashMap<k=Object,v=Boolean>标记是否需要增强实现,这里基础构建bean不需要代理,都置为false,供后面postProcessAfterInitialization实例化后使用。11 return null;12 }13 }14 15 // TargetSource是spring aop预留给我们用户自定义实例化的接口,如果存在TargetSource就不会默认实例化,而是按照用户自定义的方式实例化,咱们没有定义,不进入18 if (beanName != null) {19 TargetSource targetSource = getCustomTargetSource(beanClass, beanName);20 if (targetSource != null) {21 this.targetSourcedBeans.add(beanName);22 Object[] specificInterceptors = getAdvicesAndAdvisorsForBean(beanClass, beanName, targetSource);23 Object proxy = createProxy(beanClass, beanName, specificInterceptors, targetSource);24 this.proxyTypes.put(cacheKey, proxy.getClass());25 return proxy;26 }27 }28 29 return null;30 }
通过追踪,由于InfrastructureAdvisorAutoProxyCreator是基础构建类,
advisedBeans.put(cacheKey, Boolean.FALSE)
添加进advisedBeans ConcurrentHashMap<k=Object,v=Boolean>标记是否需要增强实现,这里基础构建bean不需要代理,都置为false,供后面postProcessAfterInitialization实例化后使用。
我们再看postProcessAfterInitialization源码如下:
 1     @Override 2     public Object postProcessAfterInitialization(Object bean, String beanName) throws BeansException { 3         if (bean != null) { 4             Object cacheKey = getCacheKey(bean.getClass(), beanName); 5             if (!this.earlyProxyReferences.contains(cacheKey)) { 6                 return wrapIfNecessary(bean, beanName, cacheKey); 7             } 8         } 9         return bean;10     }11 12     protected Object wrapIfNecessary(Object bean, String beanName, Object cacheKey) {
       // 如果是用户自定义获取实例,不需要增强处理,直接返回13         if (beanName != null && this.targetSourcedBeans.contains(beanName)) {14             return bean;15         }// 查询map缓存,标记过false,不需要增强直接返回16         if (Boolean.FALSE.equals(this.advisedBeans.get(cacheKey))) {17             return bean;18         }// 判断一遍springAOP基础构建类,标记过false,不需要增强直接返回19         if (isInfrastructureClass(bean.getClass()) || shouldSkip(bean.getClass(), beanName)) {20             this.advisedBeans.put(cacheKey, Boolean.FALSE);21             return bean;22         }23 24         // 获取增强List<Advisor> advisors25         Object[] specificInterceptors = getAdvicesAndAdvisorsForBean(bean.getClass(), beanName, null);
       // 如果存在增强26         if (specificInterceptors != DO_NOT_PROXY) {27             this.advisedBeans.put(cacheKey, Boolean.TRUE);// 标记增强为TRUE,表示需要增强实现
          // 生成增强代理类28             Object proxy = createProxy(29                     bean.getClass(), beanName, specificInterceptors, new SingletonTargetSource(bean));30             this.proxyTypes.put(cacheKey, proxy.getClass());31             return proxy;32         }33      // 如果不存在增强,标记false,作为缓存,再次进入提高效率,第16行利用缓存先校验34         this.advisedBeans.put(cacheKey, Boolean.FALSE);35         return bean;36     }
下面看核心方法createProxy如下:
 1     protected Object createProxy( 2             Class<?> beanClass, String beanName, Object[] specificInterceptors, TargetSource targetSource) { 3      // 如果是ConfigurableListableBeanFactory接口(咱们DefaultListableBeanFactory就是该接口的实现类)则,暴露目标类 4         if (this.beanFactory instanceof ConfigurableListableBeanFactory) {
          //给beanFactory->beanDefinition定义一个属性:k=AutoProxyUtils.originalTargetClass,v=需要被代理的bean class 5             AutoProxyUtils.exposeTargetClass((ConfigurableListableBeanFactory) this.beanFactory, beanName, beanClass); 6         } 7  8         ProxyFactory proxyFactory = new ProxyFactory(); 9         proxyFactory.copyFrom(this);10      //如果不是代理目标类11         if (!proxyFactory.isProxyTargetClass()) {//如果beanFactory定义了代理目标类(CGLIB)12             if (shouldProxyTargetClass(beanClass, beanName)) {13                 proxyFactory.setProxyTargetClass(true);//代理工厂设置代理目标类14             }15             else {//否则设置代理接口(JDK)16                 evaluateProxyInterfaces(beanClass, proxyFactory);17             }18         }19      //把拦截器包装成增强(通知)20         Advisor[] advisors = buildAdvisors(beanName, specificInterceptors);21         proxyFactory.addAdvisors(advisors);//设置进代理工厂22         proxyFactory.setTargetSource(targetSource);23         customizeProxyFactory(proxyFactory);//空方法,留给子类拓展用,典型的spring的风格,喜欢处处留后路24      //用于控制代理工厂是否还允许再次添加通知,默认为false(表示不允许)25         proxyFactory.setFrozen(this.freezeProxy);26         if (advisorsPreFiltered()) {//默认false,上面已经前置过滤了匹配的增强Advisor27             proxyFactory.setPreFiltered(true);28         }29         //代理工厂获取代理对象的核心方法30         return proxyFactory.getProxy(getProxyClassLoader());31     }
最终我们生成的是CGLIB代理类.到此为止我们分析完了代理类的构造过程。
ProxyTransactionManagementConfiguration
下面来看ProxyTransactionManagementConfiguration:
1 @Configuration 2 public class ProxyTransactionManagementConfiguration extends AbstractTransactionManagementConfiguration { 3 4 @Bean(name = TransactionManagementConfigUtils.TRANSACTION_ADVISOR_BEAN_NAME) 5 @Role(BeanDefinition.ROLE_INFRASTRUCTURE)//定义事务增强器 6 public BeanFactoryTransactionAttributeSourceAdvisor transactionAdvisor() { 7 BeanFactoryTransactionAttributeSourceAdvisor j = new BeanFactoryTransactionAttributeSourceAdvisor(); 8 advisor.setTransactionAttributeSource(transactionAttributeSource()); 9 advisor.setAdvice(transactionInterceptor());10 advisor.setOrder(this.enableTx.<Integer>getNumber("order"));11 return advisor;12 }13 14 @Bean15 @Role(BeanDefinition.ROLE_INFRASTRUCTURE)//定义基于注解的事务属性资源16 public TransactionAttributeSource transactionAttributeSource() {17 return new AnnotationTransactionAttributeSource();18 }19 20 @Bean21 @Role(BeanDefinition.ROLE_INFRASTRUCTURE)//定义事务拦截器22 public TransactionInterceptor transactionInterceptor() {23 TransactionInterceptor interceptor = new TransactionInterceptor();24 interceptor.setTransactionAttributeSource(transactionAttributeSource());25 if (this.txManager != null) {26 interceptor.setTransactionManager(this.txManager);27 }28 return interceptor;29 }30 31 }
核心方法:transactionAdvisor()事务织入
定义了一个advisor,设置事务属性、设置事务拦截器TransactionInterceptor、设置顺序。核心就是事务拦截器TransactionInterceptor。
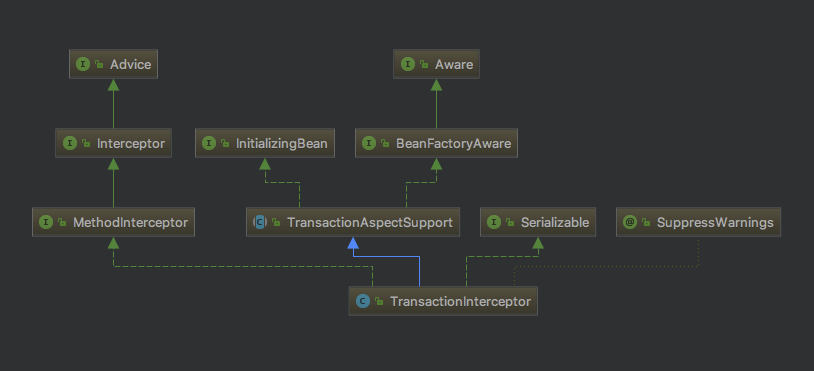
TransactionInterceptor使用通用的spring事务基础架构实现“声明式事务”,继承自TransactionAspectSupport类(该类包含与Spring的底层事务API的集成),实现了MethodInterceptor接口。spring类图如下:
事务拦截器的拦截功能就是依靠实现了MethodInterceptor接口,熟悉spring的同学肯定很熟悉MethodInterceptor了,这个是spring的方法拦截器,主要看invoke方法:
1 @Override 2 public Object invoke(final MethodInvocation invocation) throws Throwable { 3 // Work out the target class: may be {@code null}. 4 // The TransactionAttributeSource should be passed the target class 5 // as well as the method, which may be from an interface. 6 Class<?> targetClass = (invocation.getThis() != null ? AopUtils.getTargetClass(invocation.getThis()) : null); 7 8 // 调用TransactionAspectSupport的 invokeWithinTransaction方法 9 return invokeWithinTransaction(invocation.getMethod(), targetClass, new InvocationCallback() {10 @Override11 public Object proceedWithInvocation() throws Throwable {12 return invocation.proceed();13 }14 });15 }
如上图TransactionInterceptor复写MethodInterceptor接口的invoke方法,并在invoke方法中调用了父类TransactionAspectSupport的invokeWithinTransaction()方法,源码如下:
1 protected Object invokeWithinTransaction(Method method, Class<?> targetClass, final InvocationCallback invocation) 2 throws Throwable { 3 4 // 如果transaction attribute为空,该方法就是非事务(非编程式事务) 5 final TransactionAttribute txAttr = getTransactionAttributeSource().getTransactionAttribute(method, targetClass); 6 final PlatformTransactionManager tm = determineTransactionManager(txAttr); 7 final String joinpointIdentification = methodIdentification(method, targetClass, txAttr); 8 // 标准声明式事务:如果事务属性为空 或者 非回调偏向的事务管理器 9 if (txAttr == null || !(tm instanceof CallbackPreferringPlatformTransactionManager)) {10 // Standard transaction demarcation with getTransaction and commit/rollback calls.11 TransactionInfo txInfo = createTransactionIfNecessary(tm, txAttr, joinpointIdentification);12 Object retVal = null;13 try {14 // 这里就是一个环绕增强,在这个proceed前后可以自己定义增强实现15 // 方法执行16 retVal = invocation.proceedWithInvocation();17 }18 catch (Throwable ex) {19 // 根据事务定义的,该异常需要回滚就回滚,否则提交事务20 completeTransactionAfterThrowing(txInfo, ex);21 throw ex;22 }23 finally {//清空当前事务信息,重置为老的24 cleanupTransactionInfo(txInfo);25 }//返回结果之前提交事务26 commitTransactionAfterReturning(txInfo);27 return retVal;28 }29 // 编程式事务:(回调偏向)30 else {31 final ThrowableHolder throwableHolder = new ThrowableHolder();32 33 // It's a CallbackPreferringPlatformTransactionManager: pass a TransactionCallback in.34 try {35 Object result = ((CallbackPreferringPlatformTransactionManager) tm).execute(txAttr,36 new TransactionCallback<Object>() {37 @Override38 public Object doInTransaction(TransactionStatus status) {39 TransactionInfo txInfo = prepareTransactionInfo(tm, txAttr, joinpointIdentification, status);40 try {41 return invocation.proceedWithInvocation();42 }43 catch (Throwable ex) {// 如果该异常需要回滚44 if (txAttr.rollbackOn(ex)) {45 // 如果是运行时异常返回46 if (ex instanceof RuntimeException) {47 throw (RuntimeException) ex;48 }// 如果是其它异常都抛ThrowableHolderException49 else {50 throw new ThrowableHolderException(ex);51 }52 }// 如果不需要回滚53 else {54 // 定义异常,最终就直接提交事务了55 throwableHolder.throwable = ex;56 return null;57 }58 }59 finally {//清空当前事务信息,重置为老的60 cleanupTransactionInfo(txInfo);61 }62 }63 });64 65 // 上抛异常66 if (throwableHolder.throwable != null) {67 throw throwableHolder.throwable;68 }69 return result;70 }71 catch (ThrowableHolderException ex) {72 throw ex.getCause();73 }74 catch (TransactionSystemException ex2) {75 if (throwableHolder.throwable != null) {76 logger.error("Application exception overridden by commit exception", throwableHolder.throwable);77 ex2.initApplicationException(throwableHolder.throwable);78 }79 throw ex2;80 }81 catch (Throwable ex2) {82 if (throwableHolder.throwable != null) {83 logger.error("Application exception overridden by commit exception", throwableHolder.throwable);84 }85 throw ex2;86 }87 }88 }
如上图,我们主要看第一个分支,申明式事务,核心流程如下:
1.createTransactionIfNecessary():如果有必要,创建事务
2.InvocationCallback的proceedWithInvocation():InvocationCallback是父类的内部回调接口,子类中实现该接口供父类调用,子类TransactionInterceptor中invocation.proceed()。回调方法执行
3.异常回滚completeTransactionAfterThrowing()最终调用AbstractPlatformTransactionManager的rollback(),提交事务commitTransactionAfterReturning()最终调用AbstractPlatformTransactionManager的commit(),源码见3.3.3
1.createTransactionIfNecessary():
1 protected TransactionInfo createTransactionIfNecessary( 2 PlatformTransactionManager tm, TransactionAttribute txAttr, final String joinpointIdentification) { 3 4 // 如果还没有定义名字,把连接点的ID定义成事务的名称 5 if (txAttr != null && txAttr.getName() == null) { 6 txAttr = new DelegatingTransactionAttribute(txAttr) { 7 @Override 8 public String getName() { 9 return joinpointIdentification;10 }11 };12 }13 14 TransactionStatus status = null;15 if (txAttr != null) {16 if (tm != null) {17 status = tm.getTransaction(txAttr);18 }19 else {20 if (logger.isDebugEnabled()) {21 logger.debug("Skipping transactional joinpoint [" + joinpointIdentification +22 "] because no transaction manager has been configured");23 }24 }25 }26 return prepareTransactionInfo(tm, txAttr, joinpointIdentification, status);27 }
核心就是:
1)getTransaction(),根据事务属性获取事务TransactionStatus,大道归一,都是调用PlatformTransactionManager.getTransaction(),源码见3.3.1。
2)prepareTransactionInfo(),构造一个TransactionInfo事务信息对象,绑定当前线程:ThreadLocal<TransactionInfo>。
2.invocation.proceed()回调业务方法:
最终实现类是ReflectiveMethodInvocation,类图如下:
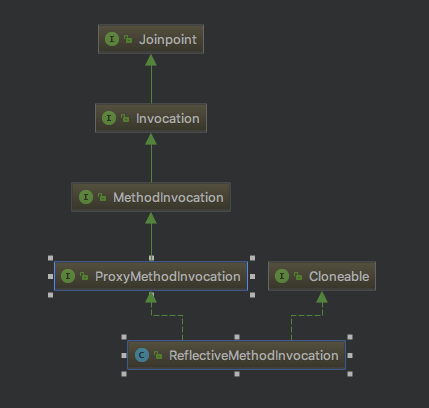
如上图,ReflectiveMethodInvocation类实现了ProxyMethodInvocation接口,但是ProxyMethodInvocation继承了3层接口...ProxyMethodInvocation->MethodInvocation->Invocation->Joinpoint
Joinpoint:连接点接口,定义了执行接口:Object proceed() throws Throwable; 执行当前连接点,并跳到拦截器链上的下一个拦截器。
Invocation:调用接口,继承自Joinpoint,定义了获取参数接口: Object[] getArguments();是一个带参数的、可被拦截器拦截的连接点。
MethodInvocation:方法调用接口,继承自Invocation,定义了获取方法接口:Method getMethod(); 是一个带参数的可被拦截的连接点方法。
ProxyMethodInvocation:代理方法调用接口,继承自MethodInvocation,定义了获取代理对象接口:Object getProxy();是一个由代理类执行的方法调用连接点方法。
ReflectiveMethodInvocation:实现了ProxyMethodInvocation接口,自然就实现了父类接口的的所有接口。获取代理类,获取方法,获取参数,用代理类执行这个方法并且自动跳到下一个连接点。
下面看一下proceed方法源码:
1 @Override 2 public Object proceed() throws Throwable { 3 // 启动时索引为-1,唤醒连接点,后续递增 4 if (this.currentInterceptorIndex == this.interceptorsAndDynamicMethodMatchers.size() - 1) { 5 return invokeJoinpoint(); 6 } 7 8 Object interceptorOrInterceptionAdvice = 9 this.interceptorsAndDynamicMethodMatchers.get(++this.currentInterceptorIndex);10 if (interceptorOrInterceptionAdvice instanceof InterceptorAndDynamicMethodMatcher) {11 // 这里进行动态方法匹配校验,静态的方法匹配早已经校验过了(MethodMatcher接口有两种典型:动态/静态校验)13 InterceptorAndDynamicMethodMatcher dm =14 (InterceptorAndDynamicMethodMatcher) interceptorOrInterceptionAdvice;15 if (dm.methodMatcher.matches(this.method, this.targetClass, this.arguments)) {16 return dm.interceptor.invoke(this);17 }18 else {19 // 动态匹配失败,跳过当前拦截,进入下一个(拦截器链)21 return proceed();22 }23 }24 else {25 // 它是一个拦截器,所以我们只调用它:在构造这个对象之前,切入点将被静态地计算。27 return ((MethodInterceptor) interceptorOrInterceptionAdvice).invoke(this);28 }29 }
咱们这里最终调用的是((MethodInterceptor) interceptorOrInterceptionAdvice).invoke(this);就是TransactionInterceptor事务拦截器回调 目标业务方法(addUserBalanceAndUser)。
总结:
可见不管是编程式事务,还是声明式事务,最终源码都是调用事务管理器的PlatformTransactionManager接口的3个方法:
getTransaction
commit
rollback
下一节我们就来看看这个事务管理如何实现这3个方法。
共同学习,写下你的评论
评论加载中...
作者其他优质文章