
3-2 Spring Bean装配之Bean的生命周期
Spring Bean装配之Bean的生命周期
1、Bean的定义:XML文件中的<bean>标签的配置。
2、Bean的初始化:IOC容器(ApplicationContext)加载配置文件,并生成Bean的实例。
3、Bean的使用:通过getBean()方法获得Bean的实例,并使用Bean。
4、Bean的销毁:在IOC容器销毁前,销毁所有由该容器创建的Bean的实例。
Bean的初始化和销毁(针对某一个Bean)
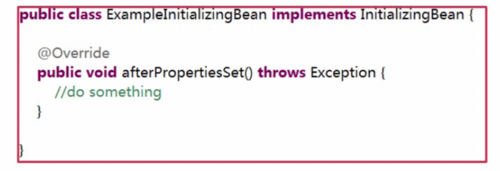
Bean的初始化(两种方式):
1、实现org.springframework.beans.factory.InitializingBean接口,覆盖afterPropertiesSet方法。
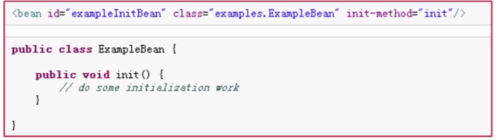
2、配置<bean>标签时,添加init-method属性。
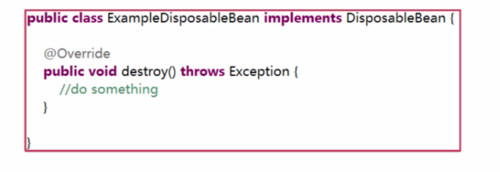
Bean的销毁(两种方式)
1、实现org.springframework.beans.factory.DisposableBean接口,覆盖destroy方法(比如:释放一些连接池)。
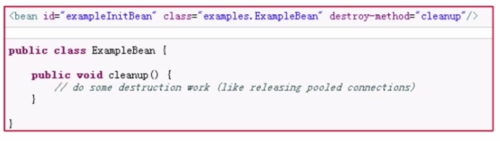
2、配置<bean>标签的destroy-method属性。
Bean的初始化和销毁(针对所有Bean,在XML配置文件的描述中添加default-init-method="init",default-destroy-method="destroy",注意:默认的初始化配置属性,当Bean里没有该方法时,也不会报错)
注意:当同时使用Bean的属性配置、实现接口的配置,会先执行实现接口初始化和销毁方式、再执行配置初始化和销毁方式,默认属性配置不会生效,也就是说一个Bean没使用init-method属性和实现接口,那么这个默认属性配置则可以使用。
7-3 Advice扩展
Advice扩展
一、给advice传递参数
【a】方式一:在通知注解里写参数,通过&& args(参数名,..)传入参数,该参数可以是自己定义的类型,也可以为String等类型。(通常获取参数,进行一些判断或者日志的记录)

【a】方式二:切入点和通知分开写的方式,在切入点注解里写参数,在通知注解里引用切入点注解的方法名。
 【b】运行时,生效的一个注解,这两个注解修饰在方法上,在通知注解里通过&& @annotation(运行时注解修饰的方法名,首字母小写),如果某个方法使用了运行时注解,则一定会给value()附一个值,在通知方法里可以通过方法参数,调用该方法得到该值(一般记录该注解用了哪些方法,或者用在判断该方法上是否加了某注解,后者判断获取到的值是哪值)

7-2 Advice定义及实例
Advice定义及实例(AspectJ中advice的定义)
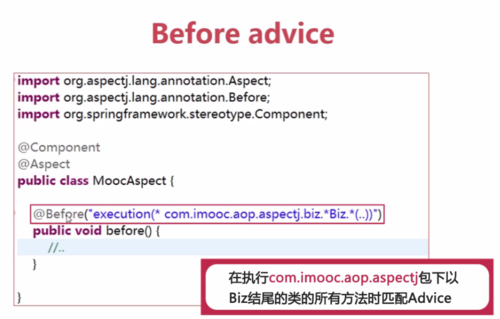
一、Before advice:对于切面类使用@Aspect修饰类,相当于<aop:aspect>配置,在方法上添加@Before(“execution(* com.imooc.aop.aspectj.biz.*Biz.*(..))”),相当于<aop:before>标签,@Component修饰类,省略了配置<bean>标签。
案例(前置通知):
步骤1:业务方法
public class MoocBiz {
public void print(){
System.out.println("业务方法执行了");
}
}
步骤2:切面方法
@Aspect
public class MoocAspect {
@Before("execution(* *Biz.*(..))")
public void beforeAdvice(){
System.out.println("前置通知方法执行了");
}
}
XML配置:
<?xml version="1.0" encoding="UTF-8"?>
<beans xmlns="http://www.springframework.org/schema/beans"
xmlns:xsi="http://www.w3.org/2001/XMLSchema-instance"
xmlns:context="http://www.springframework.org/schema/context"
xmlns:aop="http://www.springframework.org/schema/aop"
xsi:schemaLocation="http://www.springframework.org/schema/beans
http://www.springframework.org/schema/beans/spring-beans.xsd
http://www.springframework.org/schema/context
http://www.springframework.org/schema/context/spring-context.xsd
http://www.springframework.org/schema/aop
http://www.springframework.org/schema/aop/spring-aop.xsd">
<context:component-scan base-package="src"></context:component-scan>
<bean id="moocBiz" class="MoocBiz"></bean>
<bean id="moocAspect" class="MoocAspect"></bean>
<aop:aspectj-autoproxy></aop:aspectj-autoproxy>
</beans>
测试:
@Test
public void testMooc(){
ApplicationContext ac=new ClassPathXmlApplicationContext("spring-ioc2.xml");
MoocBiz mb=(MoocBiz) ac.getBean("moocBiz");
mb.print();
}
结果:
前置通知方法执行了
业务方法执行了
可以定义共享的pointcut(一个方法上使用@Pointcut("execution(* com.imooc.aop.aspectj.biz.*Biz.*(..))"),然后@Before("pointcut()")修饰另一个方法上
@Aspect
public class MoocAspect {
@Pointcut("execution(* *Biz.*(..))")
public void pointcut(){
}
@Before("pointcut()")
public void beforeAdvice(){
System.out.println("前置通知方法执行了");
}
}
二、After returning advice
和前置通知相似。
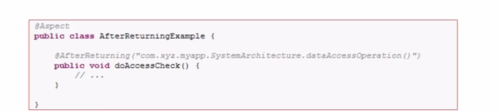
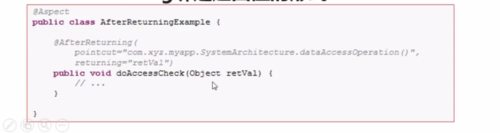
有时候需要在通知体内得到返回的实际值,可以使用@AfterReturning绑定返回值的形式,如果知道返回值类型可以写类型,如果不知道,可以写Object。
 后置通知案例:
public class MoocBiz {
public void print(){
System.out.println("业务方法执行了");
}
}
@Aspect
public class MoocAspect {
@Pointcut("execution(* *Biz.*(..))")
public void pointcut(){
}
@Before("pointcut()")
public void beforeAdvice(){
System.out.println("前置通知方法执行了");
}
@AfterReturning(pointcut="pointcut()",returning="o")
public void afterAdvice(Object o){
System.out.println("AfterReturning:"+o);
}
}
<context:component-scan base-package="src"></context:component-scan>
<bean id="moocBiz" class="MoocBiz"></bean>
<bean id="moocAspect" class="MoocAspect"></bean>
<aop:aspectj-autoproxy></aop:aspectj-autoproxy>
结果:
前置通知方法执行了
业务方法执行了
AfterReturning:null
三、After throwing advice
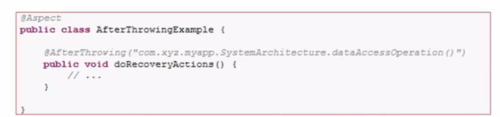
有时候需要在通知体内得到异常的实际值,可以使用@AfterReturning绑定返回值的形式
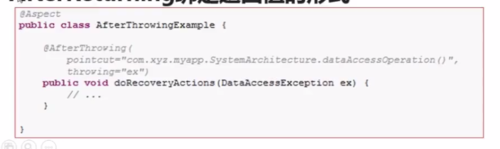
案例:
@AfterThrowing(pointcut="pointcut()",throwing="t")
public void afterThrowAdvice(RuntimeException t){
System.out.println("异常:"+t.getMessage());
}
public class MoocBiz {
public void print(){
System.out.println("业务方法执行了");
throw new RuntimeException("运行时异常");
}
}
结果:
前置通知方法执行了
业务方法执行了
异常:运行时异常
四、After(finally)advice
最终通知必须准备处理正常和异常两种返回情况,它通常用于释放资源。(类似于try-catch中finally的功能)
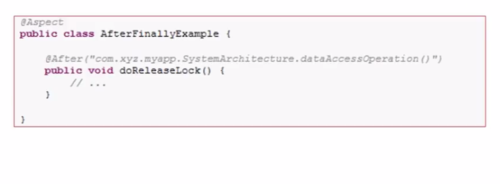
@After("pointcut()")
public void afterAdvice(){
System.out.println("后置通知执行了");
}
前置通知方法执行了
业务方法执行了
后置通知执行了
异常:运行时异常
五、环绕通知(Around Advice)
1、环绕通知使用@Around注解来声明,通知方法的第一个参数必须是ProceedingJoinPoint类型
2、在通知方法内部会调用ProceedingJoinPoint的proceed()方法会导致执行真正的方法,同时可以传入一个Object[]对象,数组中的值将被作为参数传递给方法。
案例:
@Around("pointcut()")
public Object aroundAdvice(ProceedingJoinPoint pjp) throws Throwable{
System.out.println("环绕前置通知方法执行了========");
Object o=pjp.proceed();
System.out.println("环绕后置通知方法执行了========");
return o;
}
结果:
环绕前置通知方法执行了========
前置通知方法执行了
业务方法执行了
环绕后置通知方法执行了========
后置通知执行了
AfterReturning:null
7-1 AspectJ介绍及Pointcut注解应用
AspectJ介绍及Pointcut注解应用
1、@AspectJ的风格类似纯java注解的普通java类。
2、Spring可以使用AspectJ来做切入点解析。
3、AOP的运行时仍旧是纯的SpringAOP,对AspectJ的编译器或者织入无依赖性。
Spring中配置@AspectJ
1、对@AspectJ支持可以使用XML或者Java注解类型的配置(@EnableAspectJAutoProxy使用AspectJ进行自动代理)

2、前提:确保AspectJ的aspectjweaver.jar库包含在应用程序(版本1.6.8或更高版本)的classpath中,以Spring4.0.5为基准的,其他版本可能不一样(可以根据具体情况查找Spring具体文档)。
aspect注解的具体使用
1、@AspectJ切面使用@Aspect注解配置,拥有@Aspect的任何bean将被Spring自动识别并应用。
2、@Aspect注解的类可以有方法和字段,他们也可能包括切入点(pointcut),通知(Advice)和引入(introduction)声明。
3、@Aspect注解是不能够通过类路径自动检测发现的,所以需要配合使用@Component注释或者在xml配置bean(@Aspect注解的类配置在xml中)。
4、一个类中的@Aspect注解标识它为一个切面,并且将自己从自动代理中排出。

如何定义一个切入点
1、一个切入点通过一个普通的方法定义来提供,并且切入点表达式使用@Pointcut注解,方法返回类型必须为void
2、定义一个名为'anyOldTransfer',这个切入点将匹配任何名为“transfer”的方法的执行。

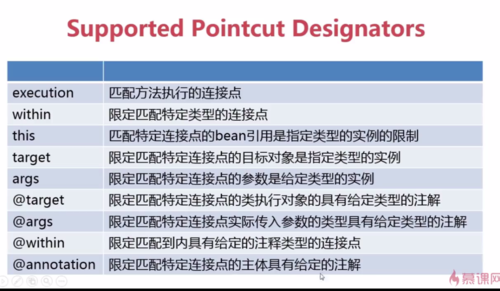
切入点支持哪些定义方式
 组合Pointcut
1、切入点表达式可以通过&&、||和!进行组合,也可以通过名字引用切入点表达式。
2、通过组合,可以建立更加复杂的切入点表达式。
 如何定义良好的pointcuts
1、AspectJ是编译期的AOP
2、检查代码并匹配连接点与切入点的代价是昂贵的。
3、一个好的切入点应该包括以下几点
【a】选择特定类型的连接点,如:execution,get,set,call,handler。
【b】确定连接点范围,如:within,withincode。
【c】匹配上下文信息,如:this,target,@annotation。
6-3 ProxyFactoryBean及相关内容(下)
ProxyFactoryBean及相关内容(下)
Proxying classes
1、前面的例子中如果没有Person(BizLogic)接口,这种情况下Spring会使用CGLIB代理,而不是JDK动态代理。
2、可以强制使用CGLIB,即使有接口的情况下。
3、CGLIB代理的工作原理是在运行时生成目标类的子类,Spring配置这个生成的子类委托方法调用到原来的目标
4、子类是用来实现Decorator模式,织入通知
5、CGLIB的代理对用户是透明的,需要注意:
【1】final方法不能被通知,因为它们不能被覆盖。
【2】不用把CGLIB添加到classpath中,在Spring3.2中,CGLIB被重新包装并包含在Spring核心JAR(即基于CGLIB的AOP就像JDK动态代理一样“开箱即用”,也就是说不用手动引入CGLIB这个包)
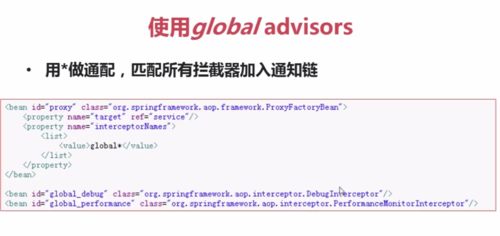
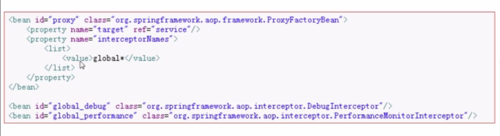
使用global advisors:使*做通配符,匹配所有拦截器加入通知链

实现了MethodInterceptor这个类似的方式,才可以使用通配符的方式。
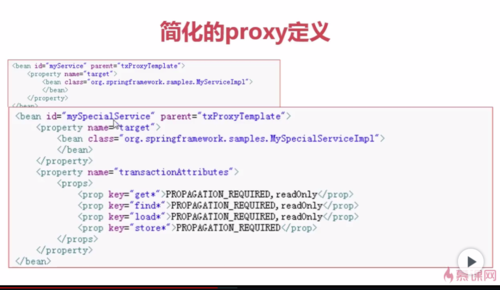
简化的proxy定义
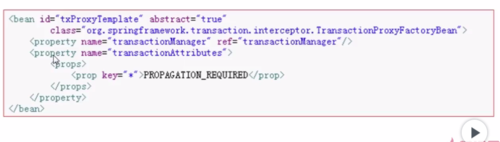
1、Spring中支持父子bean定义的方式,以及内部bean定义,可以带来更简洁的代理定义(抽象属性标记父bean定义为抽象的这样它不能被实例化)
Spring官方文档给出的例子(TransactionProxyFactoryBean是基于事物的代理Bean)通过getBean获得的是TransactionProxyFactoryBean的实例
 使用ProxyFactory的好处:
1、使用SpringAOP而不必依赖于SpringIOC

2、大多数情况下最佳实践是用IoC容器创建AOP代理。
3、虽然可以硬编码方式实现,但是Spring推荐使用配置或注解方式实现。
使用auto-proxy
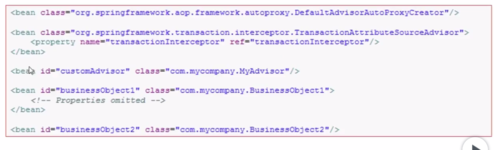
1、Spring也允许使用“自动代理”的bean定义,它可以自动代理选定的bean,这是建立在Spring的“bean post processor”功能基础上的(在加载bean的时候就可以修改)
2、主要通过BeanNameAutoProxyCreator实现(自动代理所有以jdk开始的Bean,也包括onlyJdk这种Bean)
 3、DefaultAdvisorAutoProxyCreator,当前IoC容器中自动应用,来达到创建动态代理的效果,不用显示声明引用advisor的bean定义
6-3 ProxyFactoryBean及相关内容(下)
ProxyFactoryBean及相关内容(下)
Proxying classes
1、前面的例子中如果没有Person(BizLogic)接口,这种情况下Spring会使用CGLIB代理,而不是JDK动态代理。
2、可以强制使用CGLIB,即使有接口的情况下。
3、CGLIB代理的工作原理是在运行时生成目标类的子类,Spring配置这个生成的子类委托方法调用到原来的目标
4、子类是用来实现Decorator模式,织入通知
5、CGLIB的代理对用户是透明的,需要注意:
【1】final方法不能被通知,因为它们不能被覆盖。
【2】不用把CGLIB添加到classpath中,在Spring3.2中,CGLIB被重新包装并包含在Spring核心JAR(即基于CGLIB的AOP就像JDK动态代理一样“开箱即用”,也就是说不用手动引入CGLIB这个包)
使用global advisors:使*做通配符,匹配所有拦截器加入通知链
6-2 ProxyFactoryBean及相关内容(上)
ProxyFactoryBean及相关内容(上)
1、通过Spring API创建Spring AOP代理的基本方法是使用org.springframework.aop.framework.ProxyFactoryBean
2、ProxyFactoryBean可以完全控制切入点和通知(advice)以及他们的顺序。(和其它工厂Bean实现方式是一样的,都引入了一个中间层)
假如有这样一种情况:定义了一个Bean的Id为foo的ProxyFactoryBean,那么引用foo这个对象,看到的将不是ProxyFactoryBean本身,而是ProxyFactoryBean这个类通过getObject()方法创建的对象。
getObject():将创建一个AOP代理包装一个目标对象。(ProxyFactoryBean通过这种方式达到代理的目的)
3、使用ProxyFactoryBean或者其它IoC相关类来创建AOP代理的最重要好处是因为通知和切入点也可以由IoC来管理。
4、当被代理类没有实现任何接口,使用CGLIB代理,否则使用JDK代理。
5、通过设置proxyTargetClass为true,可强制使用CGLIB代理(无论代理类是否实现接口)
6、如果目标类实现了一个(或者多个)接口,那么创建代理的类型将依赖ProxyFactoryBean的配置。(因为ProxyFactoryBean里有一个ProxyInterfaces属性,该属性可以查看该类实现了哪些接口)
7、如果ProxyFactoryBean的proxyInterfaces属性被设置为一个或者多个全限定接口名(包括包名、类名、完整的名称),基于JDK的代理将被创建。
8、如果ProxyFactoryBean的proxyInterfaces属性没有被设置,但是目标类实现了一个(或者更多)接口,那么ProxyFactoryBean将自动检测到这个目标类已经实现了至少一个接口,创建一个基于JDK的代理。
例子:创建基于接口的代理
ProxyFactoryBean工作原理:首先,定义了一个Id为personTarget的Bean,又定义了一个Id为myAdvisor的Bean,定义了一个Id为debugInterceptor的Bean,重点在接下来的定义,定义了一个Id为person的Bean,但是对应的并不是Person类,而是Spring提供的ProxyFactoryBean这个类,并且这个Bean配置里有一个属性名为proxyInterfaces的<property>配置,并且它的value值为Person的路径,另外一个<property>标签属性名称为targer并且指向personTarget(这个类是Person的具体实现类),当我们get()Id为person这个Bean时,返回的并不是ProxyFactoryBean的对象,而是ProxyFactoryBean里的getObject()返回的对象,它返回的是属性名为target指向的personTarget的对象,通过ProxyFactoryBean创建代理的时候,可以指定它的interceptor,interceptorNames属性,是一个集合,可以通过List、Value指定它的具体内容。

案例:(通过Spring API实现通知)
各种通知的类前面已经写好了,所以主要进行XML配置。
public interface BizLogic {
String save();
}
public class BizLogicImpl implements BizLogic {
@Override
public String save() {
System.out.println("BizLogicImpl: BizLogicImpl save");
return "BizLogicImpl save";
}
}
XML配置:
<?xml version="1.0" encoding="UTF-8"?>
<beans xmlns="http://www.springframework.org/schema/beans"
xmlns:xsi="http://www.w3.org/2001/XMLSchema-instance"
xsi:schemaLocation="http://www.springframework.org/schema/beans
http://www.springframework.org/schema/beans/spring-beans.xsd"
default-autowire="constructor">
<bean id="afterReturningAdvice" class="springAPI.MoocAfterReturningAdvice" ></bean>
<bean id="beforeAdvice" class="springAPI.MoocBeforeAdvice" ></bean>
<bean id="methodInterceptor" class="springAPI.MoocMethodInterceptor" ></bean>
<bean id="throwsAdvice" class="springAPI.MoocThrowsAdvice" ></bean>
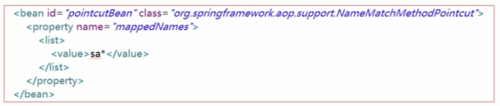
<bean id="pointcutBean" class="org.springframework.aop.support.NameMatchMethodPointcut">
<property name="mappedNames">
<list>
<value>sa*</value>
</list>
</property>
</bean>
<bean id="defaultAdvisor" class="org.springframework.aop.support.DefaultPointcutAdvisor">
<property name="advice" ref="beforeAdvice"></property>
<property name="pointcut" ref="pointcutBean"></property>
</bean>
<bean id="bizLogicImplTarget" class="springAPI.BizLogicImpl"></bean>
<bean id="bizLogicImpl" class="org.springframework.aop.framework.ProxyFactoryBean">
<property name="target"><ref bean="bizLogicImplTarget"/></property>
<property name="interceptorNames">
<list>
<value>afterReturningAdvice</value>
<value>beforeAdvice</value>
<value>methodInterceptor</value>
<!-- <value>throwsAdvice</value>
-->
</list>
</property>
</bean>
</beans>
测试:
@Test
public void testApi(){
ApplicationContext ac=new ClassPathXmlApplicationContext("spring-ioc.xml");
BizLogic bl=(BizLogic)ac.getBean("bizLogicImpl");
bl.save();
}
结果:
前置通知的方法:save springAPI.BizLogicImpl
环绕前通知实现了
BizLogicImpl: BizLogicImpl save
环绕后通知实现了
返回后通知方法执行了save springAPI.BizLogicImpl null
6-1 Spring AOP API的Pointcut、advice概念及应用
Spring的API实现AOP功能
1、这是Spring1.2的历史用法,现在Spring4.0仍然支持。
2、这是SpringAOP的基础
使用Spring的API实现AOP的原因:Schema-based(配置文件)和AspectJ实现AOP完全可以满足我们使用AOP的功能,使用API是因为这是SpringAOP的基础,可以加深我们应用和了解SpringAOP的理解(无论是注解方式、还是XML配置文件的方式,最终实现的基础都是和API密切关系的)。
3、现在SpringAOP的用法也是基于历史的,只是更简便了(在Spring1.2时配置文件很多,还需要了解各种配置)。
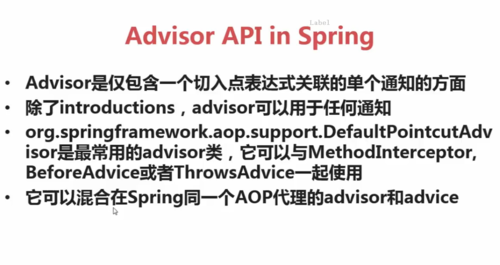
Spring的API
一、Pointcut(作为一个接口,有几个实现类)
1、Pointcut接口的实现类之一:NameMatchMethodPointcut,根据方法名字进行匹配。
2、该类有一个成员变量:mappedNames(它是一个集合,存放用于匹配的方法的名称),匹配方法的集合。
配置文件的例子:(sa开头的所有方法进行切入)
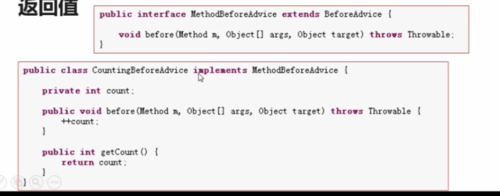
 二、Before advice(原理:单独写一个前置通知的类,并实现MethodBeforeAdvice接口,并实现该接口的方法,)
1、一个简单的通知类型。
2、执行逻辑方法前被调用,不需要MethodInvocation对象。
3、前置通知可以在连接点执行之前插入自定义行为,但不能改变返回值。
 案例:(会使用到后面的知识,暂时编写这些)
public class MoocBeforeAdvice implements MethodBeforeAdvice {
@Override
public void before(Method method, Object[] object, Object target) throws Throwable {
System.out.println("前置通知的方法:" + method.getName() + " " + target.getClass().getName());
}
}
三、Throws advice
1、如果连接点(执行的业务方法)出现异常,throws advice在方法返回后被调用。
2、如果throws-advice的方法抛出异常,那么它将覆盖原有异常。
3、接口org.springframework.aop.ThrowAdvice不包含任何方法,仅仅是一个声明,其实现类一定要实现类似这样的方法,void afterThrowing([Method, args, target],ThrowableSubclass);
Throws advice发生异常的说明
public void afterThrowing(Exception ex);//只有一个异常。
public void afterThrowing(RemoteException ex);//另外一种类型的异常。
public void afterThrowing(Method method,Object[] args(目标参数),Object target(对象),Exception ex);
public void afterThrowing(Method method,Object[] args(目标参数),Object target(对象),ServletException ex(其他类型的异常));
结论:异常通知(如上)方法参数里必须有异常,其他参数可有可无的。
抛出异常通知案例:
public class MoocThrowsAdvice implements ThrowsAdvice{
public void afterThrows(Exception ex){
System.out.println("抛出异常通知执行了");
}
public void afterThrows(Method method,Object[] object,Object target,Exception ex){
System.out.println("抛出异常通知执行了");
}
}
四、After Returning advice
1、返回后通知必须实现org.springframework.aop.AfterReturningAdvice接口(它和基于配置文件的配置方式是一样的)
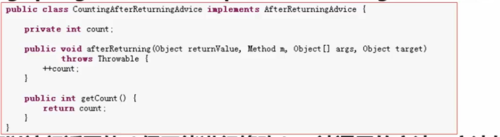 2、可以访问返回值(但不能修改返回值)、被调用的方法、方法的参数和目标。
3、如果抛出异常,将会抛出拦截器链,替代返回值。
返回后通知案例
public class MoocAfterReturningAdvice implements AfterReturningAdvice {
@Override
public void afterReturning(Object returnValue, Method method, Object[] args, Object target) throws Throwable {
System.out.println("返回后通知方法执行了"+method.getName()+" "+target.getClass().getName()+" "+returnValue);
}
}
五、Interception around advice(环绕通知)
1、Spring的切入点模型使得切入点可以独立与advice重用,以针对不同的advice可以使用相同的切入点(和之前基于XML配置文件的AOP实现方式是一样的,切入点可以放在外面单独地去定义,通过Point reference,在每一个业务逻辑方法中都可以引用相同的切入点,当然,每个Advice也可以定义自己的Point cut)。
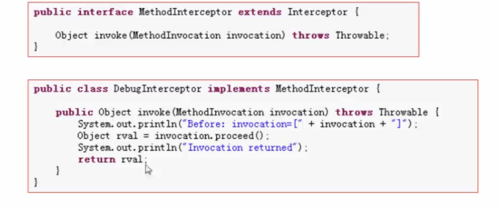
案例:
public class MoocMethodInterceptor implements MethodInterceptor {
@Override
public Object invoke(MethodInvocation invocation) throws Throwable {
Object obj = null;
System.out.println("环绕前通知实现了");
obj = invocation.proceed();
System.out.println("环绕后通知实现了");
return null;
}
}
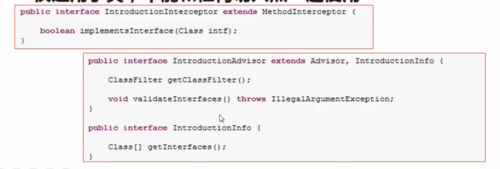
六、Introduction advice(和XML配置中的Introduction advice一样的功能)
1、Spring把引入通知作为一种特殊的拦截通知。
2、如果使用API实现AOP,则需要IntroductionAdvisor和IntroductionInterceptor这两个接口。
3、Introduction advice仅适用于类,不能和任何其它切入点一起使用。
如下为基于XML配置的Introduction advice内容
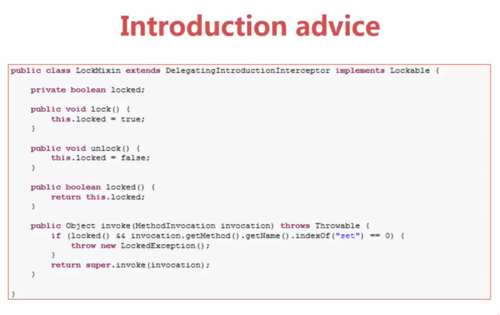
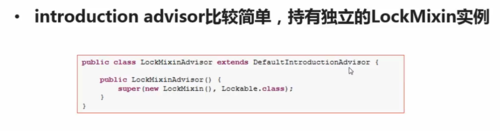
一个Spring test suite的例子
1、如果调用lock()方法,希望所有的setter方法抛出LockedException异常(使用场景:如使物体不可变,AOP典型例子)
2、需要完成繁重任务的IntroductionInterceptor,不是去实现该接口,而是使用org.springframework.aop.support.DelegatingIntroductionInterceptor
3-5 Spring Bean装配之Resource
Resources:针对资源文件的统一接口,通过Spring加载一些资源文件的时候,可以通过它去控制。
——UrlResource:URL对应的资源,根据一个URL地址即可构建Resources。
——ClassPathResoure:获取类路径下的资源文件(相对路径)。
——FileSystemResource:获取文件系统里面的资源(绝对路径)。
——ServletContextResource:ServletContext封装的资源,用于访问ServletContext环境下的资源。(和Web相关的资源文件的入口)
——InputStreamResource:针对于输入流封装的资源。(构建它需要InputStream)
——ByteArrayResource:针对于字节数组封装的资源。(构建它需要ByteArray)
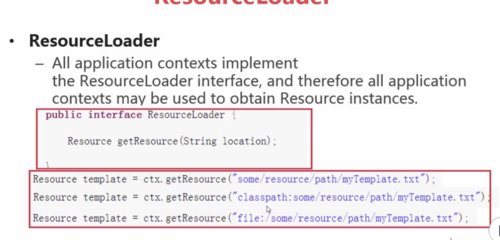
ResourceLoader:对Resource加载的一个类,在SpringIOC容器中,所有的ApplicationContext都实现了ResourceLoader接口,所有的ApplicationContext都可以用来获取Resource实例,所以可以通过getResource(String location)方法获取资源Resource。
ResourceLoader接口的声明(有个方法,输入为文件的位置,返回的是Resource的实例)
ResourceLoader注入参数时前缀的几种类型
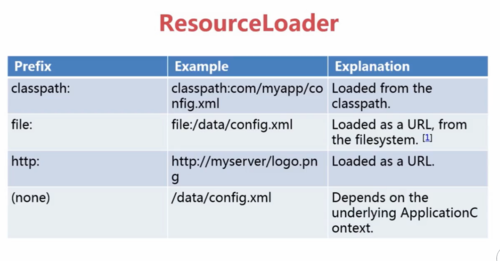
ResourceLoader前缀:classpath:(相对路径,加载文件)
file:(绝对路径,加载文件)
url: http(web路径、加载文件)
(none):直接输入路径,依赖ApplicationContext
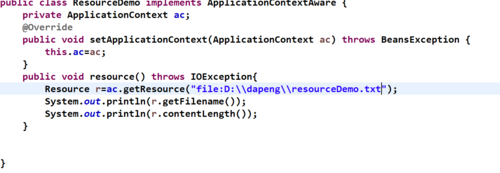
案例:(Bean通过实现ApplicationContext接口,间接的实现了ResourceLoader接口(加载Resource实例),就可以使用getResource()获取Resource的实例,Resource拥有一系列的方法,比如获取文件名称(getFilename()和获取文件长度contentLength())
步骤1:
public class ResourceDemo implements ApplicationContextAware {
private ApplicationContext ac;
@Override
public void setApplicationContext(ApplicationContext ac) throws BeansException {
this.ac=ac;
}
public void resource() throws IOException{
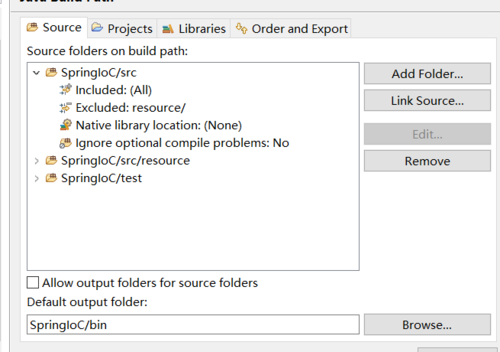
Resource r=ac.getResource("classpath:resourceDemo.txt");(直接写文件,而不写全路径,是因为Java build path 配置了source,所以这里是相对路径)
System.out.println(r.getFilename());
System.out.println(r.contentLength());
}
}
步骤2:
<bean id="resourceDemo" class="ResourceDemo" ></bean>
步骤3:
@Test
public void testBean() throws IOException{
ApplicationContext ac=new ClassPathXmlApplicationContext("spring-ioc.xml");
ResourceDemo rd=(ResourceDemo)ac.getBean("resourceDemo");
rd.resource();
}
测试:
@Test
public void testBean() throws IOException{
ApplicationContext ac=new ClassPathXmlApplicationContext("spring-ioc.xml");
ResourceDemo rd=(ResourceDemo)ac.getBean("resourceDemo");
rd.resource();
}
结果:(文件:resourceDemo.txt,在src——>resource文件夹下)

resourceDemo.txt
6
案例:file方式
案例:url方式

3-4 Spring Bean装配之自动装配
xml方式的Bean自动注入(<beans>标签的属性default-autowire=byName)
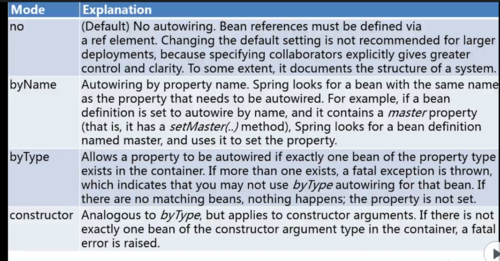
No:不做任何操作,默认选项。
byname:根据setXXX()方法的set后的名称进行自动注入(首字母不区分大小写)。查找xml中有没有<bean>标签id的名称与属性完全一致的,如果有则自动注入,并且执行set方法,基于set方法,如果没有不报错,该属性置为NULL,并且不执行set()。
byType:根据类型自动注入,如果容器中存在一个与指定属性类型相同的bean,那么该属性自动注入;如果存在多个该类型bean,那么抛出异常,并指出不能使用byType方式进行自动装配,如果没有找到相匹配的bean,则什么事都不发生,该属性置为null基于set方法。
Constructor:与byType方式类似,不同之处在于它应用于构造器参数。如果容器中没有找到与构造器参数类型一个bean,那么抛出异常。
Spring官方文档对自动注入属性的四种类型解释
案例:(原理:IOC容器加载XML配置文件,由于设置了自动按名称进行注入,所以当获取Bean1的实例时,查找XML文件中有没有Id为set方法后的名称(去掉set,并且不区分大小写),如果有则进行自动注入)
步骤1:
编写两个类,并在其中一个类中引用其他类作为自己的属性,而且必须提供set方法。
步骤2:
编写xml文件
<beans>标签添加 default-autowire="byName"
并且对着两个类进行<bean>配置。
代码:
public class Bean1{
private Bean2 bean2;
public Bean2 getBean3() {
return bean2;
}
public void setBean3(Bean2 bean2) {
this.bean2 = bean2;
}
}
xml:
<beans xmlns="http://www.springframework.org/schema/beans"
xmlns:xsi="http://www.w3.org/2001/XMLSchema-instance"
xsi:schemaLocation="http://www.springframework.org/schema/beans
http://www.springframework.org/schema/beans/spring-beans.xsd"
default-autowire="byName">
<bean id="bean1" class="main.java.com.imooc.Bean1"></bean>
<bean id="bean3" class="main.java.com.imooc.Bean2"></bean>
</beans>
结果:
Bean1 [bean2=main.java.com.imooc.Bean2@2ec5f45d]
当default-autowire="byType"时:则会根据属性的类型查找xml中是否有和它相同的类型的<bean>(也就是class),如果有以一个则进行注入,如果一个以上则报异常,没有则为null。
通过构造方法实现自动注入:
步骤1:提供构造方法为属性赋值。
代码:
public class Bean1{
private Bean2 bean2;
public Bean1(Bean2 bean2) {
super();
this.bean2 = bean2;
}
步骤2:xml中设置default-autowired="constructor”,并且提供和有参构造函数的参数相同类型的一个<bean>标签。
代码:
<beans xmlns="http://www.springframework.org/schema/beans"
xmlns:xsi="http://www.w3.org/2001/XMLSchema-instance"
xsi:schemaLocation="http://www.springframework.org/schema/beans
http://www.springframework.org/schema/beans/spring-beans.xsd"
default-autowire="constructor">
<bean id="bean1" class="main.java.com.imooc.Bean1"></bean>
<bean class="main.java.com.imooc.Bean2"></bean>
</beans>
结果:
Bean2@5c5766b1


举报