我正在获取原始RGB帧,将它们编码为h264,然后将其解码回原始RGB帧。[RGB frame] ------ encoder ------> [h264 stream] ------ decoder ------> [RGB frame] ^ ^ ^ ^ encoder_write encoder_read decoder_write decoder_read我想尽快检索解码的帧。但是,无论等待多长时间,似乎总会有一帧延迟。¹ 在此示例中,我每 2 秒向编码器提供一帧:$ python demo.py 2>/dev/nulltime=0 frames=1 encoder_writetime=2 frames=2 encoder_writetime=2 frames=1 decoder_read <-- decoded output is delayed by extra frametime=4 frames=3 encoder_writetime=4 frames=2 decoder_readtime=6 frames=4 encoder_writetime=6 frames=3 decoder_read...我想要的:$ python demo.py 2>/dev/nulltime=0 frames=1 encoder_writetime=0 frames=1 decoder_read <-- decode immediately after encodetime=2 frames=2 encoder_writetime=2 frames=2 decoder_readtime=4 frames=3 encoder_writetime=4 frames=3 decoder_readtime=6 frames=4 encoder_writetime=6 frames=4 decoder_read...编码器和解码器 ffmpeg 进程使用以下参数运行:encoder: ffmpeg -f rawvideo -pix_fmt rgb24 -s 224x224 -i pipe: \ -f h264 -tune zerolatency pipe:decoder: ffmpeg -probesize 32 -flags low_delay \ -f h264 -i pipe: \ -f rawvideo -pix_fmt rgb24 -s 224x224 pipe:下面是完整的可重现示例。无需外部视频文件。只需复制,粘贴并运行!python demo.py 2>/dev/null¹ 我做了一些测试,似乎解码器在解码当前帧之前正在等待下一帧的NAL标头(十六进制)。人们会希望前缀就足够了,但它也会等待接下来的两个字节!00 00 00 01 41 8800 00 00 01
1 回答
慕姐4208626
TA贡献1852条经验 获得超7个赞
添加到解码器参数中。-probesize 32
将解码器命令设置为:
cmd = "ffmpeg -probesize 32 -f h264 -i pipe: -f rawvideo -pix_fmt rgb24 -s 224x224 pipe:"
我在这里找到了解决方案:如何使用FFmpeg最大限度地减少实时流中的延迟。
根据FFmpeg StreamingGuide:
此外,将 -probesize 和 -analyzeduration 设置为低值可能有助于您的流更快地启动。
添加参数后,我得到了9行...而不是大约120行。-probesize 32Decoder written 862 bytes
更新:
我找不到解决方案,但我设法形成了一个简单的问题演示。
代码示例不使用两个子进程和 4 个线程,而是使用一个子进程,而不使用 Python 线程。
该示例使用以下“筛选器图”:
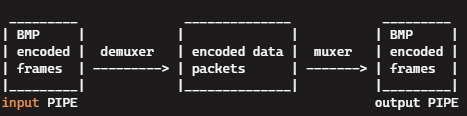
请参见: 流复制章节
我发现,要将第一帧从输入“推送”到输出,我们需要从第二帧的开头至少写入额外的字节。4112
下面是代码示例:
import cv2
import numpy as np
import subprocess as sp
width, height, n_frames, fps = 256, 256, 10, 1 # 10 frames, resolution 256x256, and 1 fps
def make_bmp_frame_as_bytes(i):
""" Build synthetic image for testing, encode as BMP and convert to bytes sequence """
p = width//50
img = np.full((height, width, 3), 60, np.uint8)
cv2.putText(img, str(i+1), (width//2-p*10*len(str(i+1)), height//2+p*10), cv2.FONT_HERSHEY_DUPLEX, p, (255, 30, 30), p*2) # Blue number
# BMP Encode img into bmp_img
_, bmp_img = cv2.imencode(".BMP", img)
bmp_img_bytes = bmp_img.tobytes()
return bmp_img_bytes
# BMP in, BMP out:
process = sp.Popen(f'ffmpeg -debug_ts -probesize 32 -f bmp_pipe -framerate {fps} -an -sn -dn -i pipe: -f image2pipe -codec copy -an -sn -dn pipe:', stdin=sp.PIPE, stdout=sp.PIPE)
# Build image (number -1) before the loop.
bmp_img_bytes = make_bmp_frame_as_bytes(-1)
# Write one BMP encoded image before the loop.
process.stdin.write(bmp_img_bytes)
process.stdin.flush()
for i in range(n_frames):
# Build image (number i) before the loop.
bmp_img_bytes = make_bmp_frame_as_bytes(i)
# Write 4112 first bytes of the BMP encoded image.
# Writing 4112 "push" forward the previous image (writing less than 4112 bytes hals on the first frame).
process.stdin.write(bmp_img_bytes[0:4112])
process.stdin.flush()
# Read output BMP encoded image from stdout PIPE.
buffer = process.stdout.read(width*height*3 + 54) # BMP header is 54 bytes
buffer = np.frombuffer(buffer, np.uint8)
frame = cv2.imdecode(buffer, cv2.IMREAD_COLOR) # Decode BMP image (using OpenCV).
# Display the image
cv2.imshow('frame', frame)
cv2.waitKey(1000)
# Write the next bytes of the BMP encoded image (from byte 4112 to the end).
process.stdin.write(bmp_img_bytes[4112:])
process.stdin.flush()
process.stdin.close()
buffer = process.stdout.read(width*height*3 + 54) # Read last image
process.stdout.close()
# Wait for sub-process to finish
process.wait()
cv2.destroyAllWindows()
我不知道为什么是字节。
我使用的是4.2.2版本,在Windows 10下静态链接()。
我没有检查其他版本/平台的字节是否持久。4112FFmpegffmpeg.exe4112我怀疑“延迟问题”是Demuxers固有的。
FFmpeg我找不到任何参数/标志来防止这个问题。
rawvideo demuxer是唯一一个没有增加延迟的解复用器(我发现)。
我希望更简单的示例代码有助于找到延迟问题的解决方案...
更新:
H.264 流示例:
该示例使用以下“筛选器图”:
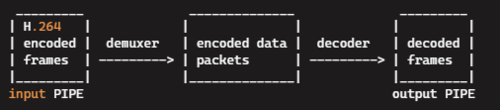
代码示例在写入每个编码帧后写入 AUD NAL 单元。
AUD(访问单元分隔符)是可选的 NAL 单元,位于编码帧的开头。
显然,在写入编码帧后写入AUD会将编码帧从解复用器“推送”到解码器。
下面是一个代码示例:
import cv2
import numpy as np
import subprocess as sp
import json
width, height, n_frames, fps = 256, 256, 100, 1 # 100 frames, resolution 256x256, and 1 fps
def make_raw_frame_as_bytes(i):
""" Build synthetic "raw BGR" image for testing, convert the image to bytes sequence """
p = width//60
img = np.full((height, width, 3), 60, np.uint8)
cv2.putText(img, str(i+1), (width//2-p*10*len(str(i+1)), height//2+p*10), cv2.FONT_HERSHEY_DUPLEX, p, (255, 30, 30), p*2) # Blue number
raw_img_bytes = img.tobytes()
return raw_img_bytes
# Build input file input.264 (AVC encoded elementary stream)
################################################################################
process = sp.Popen(f'ffmpeg -y -video_size {width}x{height} -pixel_format bgr24 -f rawvideo -r {fps} -an -sn -dn -i pipe: -f h264 -g 1 -pix_fmt yuv444p -crf 10 -tune zerolatency -an -sn -dn input.264', stdin=sp.PIPE)
#-x264-params aud=1
#Adds [ 0, 0, 0, 1, 9, 16 ] to the beginning of each encoded frame
aud_bytes = b'\x00\x00\x00\x01\t\x10' #Access Unit Delimiter
#process = sp.Popen(f'ffmpeg -y -video_size {width}x{height} -pixel_format bgr24 -f rawvideo -r {fps} -an -sn -dn -i pipe: -f h264 -g 1 -pix_fmt yuv444p -crf 10 -tune zerolatency -x264-params aud=1 -an -sn -dn input.264', stdin=sp.PIPE)
for i in range(n_frames):
raw_img_bytes = make_raw_frame_as_bytes(i)
process.stdin.write(raw_img_bytes) # Write raw video frame to input stream of ffmpeg sub-process.
process.stdin.close()
process.wait()
################################################################################
# Execute FFprobe and create JSON file (showing pkt_pos and pkt_size for every encoded frame):
sp.run('ffprobe -print_format json -show_frames input.264', stdout=open('input_probe.json', 'w'))
# Read FFprobe output to dictionary p
with open('input_probe.json') as f:
p = json.load(f)['frames']
# Input PIPE: H.264 encoded video, output PIPE: decoded video frames in raw BGR video format
process = sp.Popen(f'ffmpeg -probesize 32 -flags low_delay -f h264 -framerate {fps} -an -sn -dn -i pipe: -f rawvideo -s {width}x{height} -pix_fmt bgr24 -an -sn -dn pipe:', stdin=sp.PIPE, stdout=sp.PIPE)
f = open('input.264', 'rb')
process.stdin.write(aud_bytes) # Write AUD NAL unit before the first encoded frame.
for i in range(n_frames-1):
# Read H.264 encoded video frame
h264_frame_bytes = f.read(int(p[i]['pkt_size']))
process.stdin.write(h264_frame_bytes)
process.stdin.write(aud_bytes) # Write AUD NAL unit after the encoded frame.
process.stdin.flush()
# Read decoded video frame (in raw video format) from stdout PIPE.
buffer = process.stdout.read(width*height*3)
frame = np.frombuffer(buffer, np.uint8).reshape(height, width, 3)
# Display the decoded video frame
cv2.imshow('frame', frame)
cv2.waitKey(1)
# Write last encoded frame
h264_frame_bytes = f.read(int(p[n_frames-1]['pkt_size']))
process.stdin.write(h264_frame_bytes)
f.close()
process.stdin.close()
buffer = process.stdout.read(width*height*3) # Read the last video frame
process.stdout.close()
# Wait for sub-process to finish
process.wait()
更新:
额外帧延迟的原因是 h264 基本流没有“帧结束”信号,并且 NAL 单元标头中没有“有效负载大小”字段。
检测帧何时结束的唯一方法是查看下一帧的开始位置。
请参见: 检测 H.264 视频流中帧的结尾。
以及如何知道H.264流中代表图片的NAL单位的数量。
为了避免等待下一帧的开始,必须使用“传输流”层或视频容器格式。
传输流和少量容器格式允许接收器(解复用器)进行“帧尾”检测。
我尝试使用MPEG-2传输流,但它增加了一帧的延迟。
[我没有尝试RTSP协议,因为它不适用于管道]。
使用 Flash 视频 (FLV) 容器可将延迟降低到单个帧。
FLV 容器在数据包标头中有一个“有效负载大小”字段,允许解复用器避免等待下一帧。
用于使用 FLV 容器和 H.264 编解码器的命令:
cmd = (
"ffmpeg "
"-f rawvideo -pix_fmt rgb24 -s 224x224 "
"-i pipe: "
"-vcodec libx264 "
"-f flv "
"-tune zerolatency "
"pipe:"
)
encoder_process = subprocess.Popen(
cmd.split(), stdin=subprocess.PIPE, stdout=subprocess.PIPE
)
cmd = (
"ffmpeg "
"-probesize 32 "
"-flags low_delay "
"-f flv "
"-vcodec h264 "
"-i pipe: "
"-f rawvideo -pix_fmt rgb24 -s 224x224 "
"pipe:"
)
decoder_process = subprocess.Popen(
cmd.split(), stdin=subprocess.PIPE, stdout=subprocess.PIPE
)
在上面的命令中,FFmpeg 将 FLV 多路复用器用于编码器进程,将 FLV 解复用器用于解码器进程。
输出结果:
time=0 frames=1 encoder_write
time=0 frames=1 decoder_read psnr=49.0
time=2 frames=2 encoder_write
time=2 frames=2 decoder_read psnr=48.3
time=4 frames=3 encoder_write
time=4 frames=3 decoder_read psnr=45.8
time=6 frames=4 encoder_write
time=6 frames=4 decoder_read psnr=46.7
如您所见,没有额外的帧延迟。
其他也有效的容器是:AVI和MKV。
添加回答
举报
0/150
提交
取消