


 马超老师 ·
文件存储
Android 提供了很多种存储的数据的方式,比如“Shared Preferenced”、“文件”、“SQLite”、“远端”等等。其中最直接的就是文件存储,本节就来看看如果通过文件的方式持久化我们的数据。
1. 文件存储的特点
文件存储是最好理解的一种方式,类似“新建文件夹”然后“创建文件”,最后直接把数据写到对应文件中即可。考虑到文件的安全性,Android 为每个 App 都分配了一个私有文件读取权限,也就是每个 App 创建的私有文件只有自己的 App 才有权限访问,就极大的保护了用户的隐私安全。
2. 文件存储的相关方法
文件操作基本上就是做文件 I/O,围绕输入输出主要提供了以下方法:
- openFileInput(String fileName):
打开文件输入流,获取文件中的信息 - openFileOutput(String fileName, int mode):
以某种模式打开文件输出流,将信息输出到文件中 - getDir(String fileName, int mode):
创建或者获取(取决于是否存在)文件名为 fileName 的文件,并存储在 App 的私有目录(data目录)下 - getFileDir():
获取 App 私有目录(data目录)文件对应的绝对路径 - deleteFile(String fileName):
不必多解释,删除目录 - String[] fileList():
获取目录下的全部文件,返回全部文件列表
3. 文件 I/O 操作
3.1 文件输出
通过调用openFileOutput()来获取一个文件输出流,然后将数据写入输出流从而最终保存到对应的文件中。在第 2 小节提到过,openFileOutput()有一个 mode 参数,它可以设置成
MODE_PRIVATE:私有文件,仅支持当前 App 访问MODE_WORLD_READABLE:除了当前 App,仅支持可读权限MODE_WORLD_WRITEABLE:其他 App 可写MODE_APPEND:文件内容追加,默认是会覆盖
该方法返回一个文件输出流实例,之后便可以通过输入流实例来向文件写数据了,代码示例如下:
FileOutputStream out = openFileOutput("file name here",MODE_WORLD_READABLE);
String str = "data";
out.write(str.getBytes());
out.close();
3.2 文件输入
通过openFileInput()可以读取我们刚刚创建的文件,和FileOutputStream方法类似,该方法返回一个输入流,接着我们可以从输入流里读取数据,代码示例如下:
FileInputStream in = openFileInput(file);
int c;
String temp="";
// 挨个读取字符
while( (c = in.read()) != -1){
   temp = temp + Character.toString((char)c);
}

// temp就是从文件中读取的内容
in.close();
4. 文件读取示例
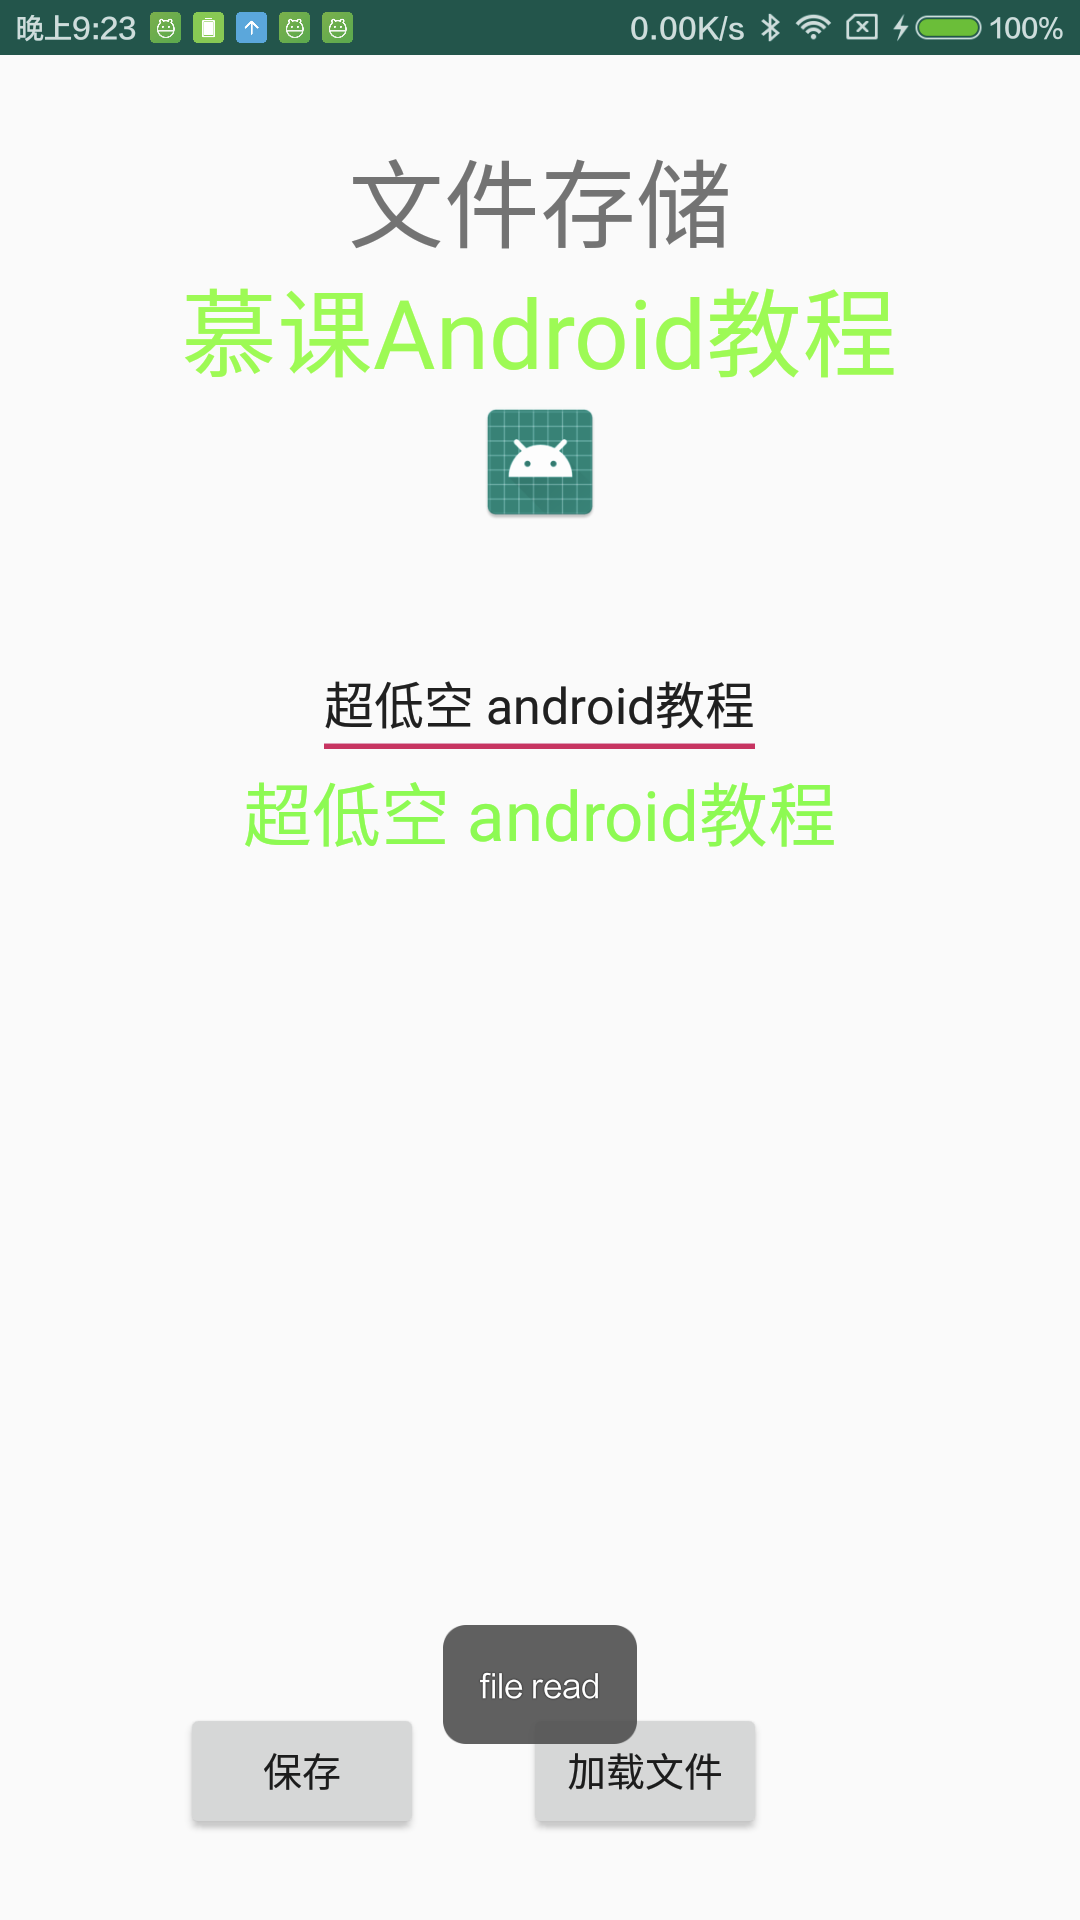
前面提到过,对于文件的操作主要就是输入和输出,所以我们就围绕这两个操作来做一个示例。下面一起编写一段代码,通过输入一段字符串然后保存到文件中,后续可以任意杀掉进程退出 App,再点击“读取”即可获取到前面输入的字符串内容,完成一个文件的保存和读取。
4.1 布局文件
首先我们来编写布局文件,核心内容很简单,主要有四个元素:
- 输入框: 接收需要保存的数据
- 数据文本: 展示从文件中读取的数据
- 保存/加载: 点击触发数据的输入和输入
布局代码如下:
<?xml version="1.0" encoding="utf-8"?>
<RelativeLayout xmlns:android="http://schemas.android.com/apk/res/android"
    xmlns:tools="http://schemas.android.com/tools"
    android:layout_width="match_parent"
    android:layout_height="match_parent"
    android:padding="30dp"
    tools:context=".MainActivity">

    <TextView
        android:id="@+id/title"
        android:layout_width="wrap_content"
        android:layout_height="wrap_content"
        android:layout_alignParentTop="true"
        android:layout_centerHorizontal="true"
        android:text="文件存储"
        android:textSize="35sp" />

    <TextView
        android:id="@+id/textView"
        android:layout_width="wrap_content"
        android:layout_height="wrap_content"
        android:layout_below="@+id/title"
        android:layout_centerHorizontal="true"
        android:text="慕课Android教程"
        android:textColor="#ff7aff24"
        android:textSize="35sp" />

    <Button
        android:id="@+id/save"
        android:layout_width="wrap_content"
        android:layout_height="wrap_content"
        android:layout_alignStart="@+id/textView"
        android:layout_alignParentBottom="true"
        android:text="保存" />

    <EditText
        android:id="@+id/editText"
        android:layout_width="wrap_content"
        android:layout_height="wrap_content"
        android:layout_below="@+id/imageView"
        android:layout_centerHorizontal="true"
        android:layout_marginTop="42dp"
        android:hint="输入要保存的内容"
        android:textColorHighlight="#ff7eff15"
        android:textColorHint="#ffff25e6" />

    <ImageView
        android:id="@+id/imageView"
        android:layout_width="wrap_content"
        android:layout_height="wrap_content"
        android:layout_below="@+id/textView"
        android:layout_centerHorizontal="true"
        android:src="@mipmap/ic_launcher" />

    <Button
        android:id="@+id/load"
        android:layout_width="wrap_content"
        android:layout_height="wrap_content"
        android:layout_alignTop="@+id/save"
        android:layout_alignEnd="@+id/editText"
        android:text="加载文件" />

    <TextView
        android:id="@+id/content"
        android:layout_width="wrap_content"
        android:layout_height="wrap_content"
        android:layout_below="@+id/editText"
        android:layout_centerHorizontal="true"
        android:textColor="#ff5bff1f"
        android:textSize="25sp" />

</RelativeLayout>
4.2 I/O 逻辑编写
我们在 MainActivity 中给几个核心元素增加事件处理,其中两个 Button 的 onClick 事件就分别对应这文件的“输入”、“输出”操作,代码如下:
package com.emercy.myapplication;

import android.app.Activity;
import android.os.Bundle;
import android.view.View;
import android.widget.Button;
import android.widget.EditText;
import android.widget.TextView;
import android.widget.Toast;

import java.io.FileInputStream;
import java.io.FileOutputStream;
import java.nio.charset.StandardCharsets;

public class MainActivity extends Activity {

    Button save, load;
    TextView content;
    EditText input;

    String data;
    private String file = "MC_data";

    @Override
    protected void onCreate(Bundle savedInstanceState) {
        super.onCreate(savedInstanceState);
        setContentView(R.layout.activity_main);

        save = findViewById(R.id.save);
        load = findViewById(R.id.load);

        input = findViewById(R.id.editText);
        content = findViewById(R.id.content);
        save.setOnClickListener(new View.OnClickListener() {

            @Override
            public void onClick(View v) {
                data = input.getText().toString();
                try {
                    FileOutputStream fOut = openFileOutput(file, MODE_WORLD_READABLE);
                    fOut.write(data.getBytes(StandardCharsets.UTF_8));
                    fOut.close();
                    Toast.makeText(getBaseContext(), "文件保存成功", Toast.LENGTH_SHORT).show();
                } catch (Exception e) {
                    e.printStackTrace();
                }
            }
        });

        load.setOnClickListener(new View.OnClickListener() {

            @Override
            public void onClick(View v) {
                try {
                    FileInputStream fin = openFileInput(file);
                    byte[] buf = new byte[1024];
                    int count;
                    StringBuilder temp = new StringBuilder();
                    while ((count = fin.read(buf)) > 0) {
                        temp.append(new String(buf, 0, count, StandardCharsets.UTF_8));
                    }
                    content.setText(temp.toString());
                    Toast.makeText(getBaseContext(), "文件加载成功", Toast.LENGTH_SHORT).show();
                } catch (Exception e) {
                    e.printStackTrace();
                }
            }
        });
    }
}
save 的 onCilck 事件里的就是文件输出,比较简单;而 load 里面的 onClick 事件所做的事就是文件输入,这里有一段核心代码我们单独看看:
 FileInputStream fin = openFileInput(file);
                    byte[] buf = new byte[1024];
                    int count;
                    StringBuilder temp = new StringBuilder();
                    while ((count = fin.read(buf)) > 0) {
                        temp.append(new String(buf, 0, count, StandardCharsets.UTF_8));
                    }
这里我们先创建一个大数据——buf[1024],然后调用“inputStream”的read(buf)方法,此方法会尽可能的从输入流中读取数据到 buf 数组中,并返回真实读取的数据。此时判断读取的数据是否大于0,如果不大于 0 则表示文件已到末尾,就可以跳出循环结束读取。
编译之后,在文本输入框输入任意字符,之后可以杀进程、关手机等等操作,再次进入 App,点击“加载”依然可读取到之前输入的内容。效果如下:
5. 小结
本节讲述了一种 Android 数据持久化最直接的方式,我们通过openFileOutput打开一个文件输出流,然后往输出流里 write 数据,就可以在 SD 卡上创建一个文件;而后通过openFileInput打开一个文件输入流,接着从输入流里拿到文件内容就可以还原原始数据,完成一个数据的持久化操作

 2024 imooc.com All Rights Reserved |