


 马超老师 ·
本节学习一个可折叠的 ListView,可以用在一些需要分类的场景下。通过 ExpandableListView 我们可以首先在 ListView 上展示大的分类,当点击某个类别的时候再将 ListView 做一个展开,展示该类下的所有子类供用户选择。它与 ListView 的不同主要是 ExpandableListView 提供了两级列表,可以方便的做伸展和收缩。
1. ExpandableListView 的特性
ExpandableListView 继承自 ListView,这意味着它拥有 ListView 的所有属性,是 ListView 的升级版。它在 ListView 的基础上增加了子列表,当我们点击某个列表项的时候,它会展开显示所有的子 item;当我们再次点击该列表项的时候,它会收缩隐藏所有的子 item,其中子 item 相当于是一个 ListView,我们可以给它设置不同的列表样式及点击事件,通常适用于有两级分类并且子类比较多的列表场景。
2. ExpandableListView 的基本使用方法
2.1 常用属性
- android:childDivider:
设置子列表项的分割线样式,可以通过 drawable 或者 color 资源的方式进行配置 - android:childIndicator:
设置显示在子列表项旁边的 View,一般用作该列表项的指示标注 - android:childIndicatorEnd:
设置子列表指示View的终止位置边界 - android:childIndicatorLeft:
设置子列表指示View的左边界 - android:childIndicatorRight:
设置子列表指示View的右边界 - android:childIndicatorStart:
设置子列表指示View的起始位置边界 - android:groupIndicator:
当前分类组旁边的指示 View - android:indicatorEnd:
指示 View 的终止位置边界 - android:indicatorLeft:
指示 View 的左边界 - android:indicatorRight:
指示 View 的右边界 - android:indicatorStart:
指示 View 的起始位置边界
2.2 常用 API
- setChildIndicator(Drawable):
设置展示在子列表项旁边的指示 View 的样式资源 - setGroupIndicator(Drawable) :
设置展示在主列表项旁边的指示 View 的样式资源,这个不会因为主列表项的伸展或者收缩而改变 - getGroupView():
返回这一组列表的头 View - getChildView():
返回列表的子列表项
2.3 事件监听器
-
ExpandableListView.OnChildClickListener:
该接口当中只有一个回调方法:public boolean onChildClick(ExpandableListView parent, View v, int groupPosition, int childPosition, long id)当我们点击一个子列表项的时候会回调此方法,参数解析
- ExpandableListView parent:被点击的 ExpandableListView 对象
- View v:被点击的具体 item 对象
- int groupPosition:被点击的 item 所在组在主列表的位置
- int childPosition:被点击的 item 在当前组内的位置
-
ExpandableListView.OnGroupClickListener:
接口中只有一个回调方法:public boolean onGroupClick(ExpandableListView parent, View v, int groupPosition, long id)
该方法监听某个组的点击事件,当该组内有任意 item 被点击是回调,参数详情参见onGroupClick方法的解析
- ExpandableListView.OnGroupCollapseListener:
只需要实现一个方法:
public void onGroupCollapse(int groupPosition)
当某个组被折叠收缩的时候会回调此方法,参数表示被收缩的组在整个主列表中的位置
- ExpandableListView.OnGroupExpandListener:
该接口同样是需要实现一个方法:public void onGroupExpand(int groupPosition)
当某个组被展开的时候回调此方法
3. ExpandableListView 示例
ExpandableListView 主要是在 ListView 的基础之上加上了折叠的分类效果,所以本节就通过 ExpandableListView 实现对数据的二级分类列表效果,大类就用大家比较熟悉的某竞技游戏里面的英雄分类,而子类就是该类别里面的几个英雄。
PS:英雄分类仁者见仁智者见智,青铜选手求各位骨灰玩家轻拍
3.1 编写 Activity 的布局文件
和前几节的例子一样,我们仅需要在根布局中防止一个 ExpandableListView 即可,然后设置上相应的属性,如下:
<ExpandableListView xmlns:android="http://schemas.android.com/apk/res/android"
    android:id="@+id/expandableListView"
    android:layout_width="match_parent"
    android:layout_height="match_parent"
    android:divider="@android:color/darker_gray"
    android:dividerHeight="0.5dp"
    android:indicatorLeft="?android:attr/expandableListPreferredItemIndicatorLeft"
    android:padding="30dp" />
3.2 编写列表布局
列表布局类似 ListView 里面的 item 布局,但是由于 ExpandableListView 有主类和子类区分,所以这里需要提供两套布局以适应主列表和展开后的子列表:
- 主列表布局 list_group.xml :
 <TextView xmlns:android="http://schemas.android.com/apk/res/android"
  android:id="@+id/listTitle"
  android:layout_width="fill_parent"
  android:layout_height="wrap_content"
  android:paddingLeft="?android:attr/expandableListPreferredItemPaddingLeft"
  android:paddingTop="10dp"
  android:paddingBottom="10dp"
  android:textColor="@android:color/black" />
为了突出大分类,字体设置为黑体。
- 子列表布局 list_item.xml :
<?xml version="1.0" encoding="utf-8"?>
<TextView xmlns:android="http://schemas.android.com/apk/res/android"
  android:id="@+id/expandedListItem"
  android:layout_width="fill_parent"
  android:layout_height="wrap_content"
  android:paddingLeft="?android:attr/expandableListPreferredChildPaddingLeft"
  android:paddingTop="10dp"
  android:paddingBottom="10dp" />
3.3 编写数据集合
本节数据会相对较多,并且有两级分类,为了代码结构清晰这里将数据单独抽离出来,与 Activity 的业务代码隔离开,新建一个数据集类 DataCollection.java:
package com.emercy.myapplication;

import java.util.ArrayList;
import java.util.HashMap;
import java.util.List;

public class DataCollection {

    // 通过map存放每一个大类,key是大类类别名,value是子类List
    private static HashMap<String, List<String>> mExpandableListData = new HashMap<>();

    private static final String MASTER = "法师";
    private static final String ASSASSINATOR = "刺客";
    private static final String SHOOTER = "射手";
    private static final String TANK = "对抗";
    private static final String ASSIST = "辅助";

    // 类加载的时候初始化数据
    static {
        // 创建子类列表,存放在List当中
        List<String> master = new ArrayList<>();
        master.add("安琪拉");
        master.add("西施");
        master.add("沈梦溪");
        master.add("嫦娥");
        master.add("上官婉儿");
        master.add("不知火舞");

        List<String> assassinator = new ArrayList<>();
        assassinator.add("马超");
        assassinator.add("镜");
        assassinator.add("兰陵王");
        assassinator.add("孙悟空");
        assassinator.add("娜可露露");
        assassinator.add("元歌");

        List<String> shooter = new ArrayList<>();
        shooter.add("狄仁杰");
        shooter.add("伽罗");
        shooter.add("蒙犽");
        shooter.add("鲁班七号");
        shooter.add("孙尚香");
        shooter.add("后羿");

        List<String> tank = new ArrayList<>();
        // 咦?为什么马超出现了两次?
        // 因为作者就叫马超
        tank.add("马超");
        tank.add("盖伦");
        tank.add("芈月");
        tank.add("铠");
        tank.add("典韦");

        List<String> assist = new ArrayList<>();
        assist.add("蔡文姬");
        assist.add("小明");
        assist.add("庄周");
        assist.add("鲁班");
        assist.add("东皇太一");

        // 将所有的子类List作为Value存放到大类中
        mExpandableListData.put(MASTER, master);
        mExpandableListData.put(ASSASSINATOR, assassinator);
        mExpandableListData.put(SHOOTER, shooter);
        mExpandableListData.put(TANK, tank);
        mExpandableListData.put(ASSIST, assist);
    }

    static HashMap<String, List<String>> getData() {
        return mExpandableListData;
    }
}
该类是一个静态工具类,里面只有一个静态成员变量,用一个 map 来保存所有的列表项。map 的 key 是大类的类别名称,value 是子类的 List;子类通过一个 List 来存储所有的子类 item,最后通过getData()接口对外暴露数据集合。
3.4 编写 Adapter
ExpandableListView 的 Adapter 有些不一样,因为它需要区分主类别和子类别,会多一个 group 的概念,这里采用的是 BaseExpandableListAdapter。相比前几节使用的 baseAdapter 大体上的回调方法都类似,只是多了一些对 group 的处理。
比如 baseAdapter 的getView在 BaseExpandableListAdapter 里面分成了getGroupView和getChildView分别用来设置主类别的 item 和子类别的 item。结合 BaseAdapter 的回调方法不难理解 BaseExpandableListAdapter,代码如下:
package com.emercy.myapplication;

import android.content.Context;
import android.graphics.Typeface;
import android.view.LayoutInflater;
import android.view.View;
import android.view.ViewGroup;
import android.widget.BaseExpandableListAdapter;
import android.widget.TextView;

import java.util.HashMap;
import java.util.List;

public class MyExpandableListAdapter extends BaseExpandableListAdapter {

    private Context mContext;
    private List<String> mHeroCategory;
    private HashMap<String, List<String>> mHeroName;

    public MyExpandableListAdapter(Context context, List<String> expandableListTitle,
                                   HashMap<String, List<String>> expandableListDetail) {
        mContext = context;
        mHeroCategory = expandableListTitle;
        mHeroName = expandableListDetail;
    }

    @Override
    public Object getChild(int groupPosition, int childPosition) {
        return mHeroName.get(mHeroCategory.get(groupPosition)).get(childPosition);
    }

    @Override
    public long getChildId(int groupPosition, int childPosition) {
        return childPosition;
    }

    @Override
    public View getChildView(int groupPosition, final int childPosition,
                             boolean isLastChild, View convertView, ViewGroup parent) {
        final String expandedListText = (String) getChild(groupPosition, childPosition);
        if (convertView == null) {
            LayoutInflater layoutInflater = (LayoutInflater) mContext.getSystemService(Context.LAYOUT_INFLATER_SERVICE);
            convertView = layoutInflater.inflate(R.layout.list_item, null);
        }
        TextView expandedListTextView = convertView.findViewById(R.id.expandedListItem);
        expandedListTextView.setText(expandedListText);
        return convertView;
    }

    @Override
    public int getChildrenCount(int groupPosition) {
        return mHeroName.get(mHeroCategory.get(groupPosition)).size();
    }

    @Override
    public Object getGroup(int groupPosition) {
        return mHeroCategory.get(groupPosition);
    }

    @Override
    public int getGroupCount() {
        return mHeroCategory.size();
    }

    @Override
    public long getGroupId(int listPosition) {
        return listPosition;
    }

    @Override
    public View getGroupView(int groupPosition, boolean isExpanded,
                             View convertView, ViewGroup parent) {
        String listTitle = (String) getGroup(groupPosition);
        if (convertView == null) {
            LayoutInflater layoutInflater = (LayoutInflater) mContext.getSystemService(Context.LAYOUT_INFLATER_SERVICE);
            convertView = layoutInflater.inflate(R.layout.list_group, null);
        }
        TextView listTitleTextView = convertView
                .findViewById(R.id.listTitle);
        listTitleTextView.setTypeface(null, Typeface.BOLD);
        listTitleTextView.setText(listTitle);
        return convertView;
    }

    @Override
    public boolean hasStableIds() {
        return false;
    }

    @Override
    public boolean isChildSelectable(int groupPosition, int childPosition) {
        return true;
    }
}
如果有对这些回调接口的实现不太理解的,可以回顾一下第24节中讲 ListView 的时候对 BaseAdapter 做的详细讲解。
3.5 编写 MainActivity
前面已经实现了布局、数据、适配器等模块的编写,整个 ExpandableListView 的框架就已经搭建完毕了。虽然本节的示例比较简单,代码量也比较少,但是也希望大家在学习过程中能够注重模块的编写顺序,循序渐进的培养自己搭建一个更完整的更大型架构的能力。
框架搭建完毕就可以进入业务代码的编写了,在MainActivity中我们主要做以下4件事:
- 设置布局文件并从布局文件中拿到 ExpandableListView 实例;
- 获取数据集(实际使用中可能是从网络获取或者本地读取);
- 创建适配器,并为 ExpandableListView 实例设置适配器;
- 为 ExpandableListView 添加相应的事件监听器,并实现监听器接口中的回调方法。
按照以上 4 步来做即可,代码如下:
package com.emercy.myapplication;

import android.app.Activity;
import android.os.Bundle;
import android.view.View;
import android.widget.ExpandableListAdapter;
import android.widget.ExpandableListView;
import android.widget.Toast;

import java.util.ArrayList;
import java.util.HashMap;
import java.util.List;

public class MainActivity extends Activity {

    HashMap<String, List<String>> expandableListDetail;

    @Override
    protected void onCreate(Bundle savedInstanceState) {
        super.onCreate(savedInstanceState);
        // 1.设置布局文件并从布局文件中拿到 ExpandableListView 实例;
        setContentView(R.layout.activity_main);
        ExpandableListView listView = findViewById(R.id.expandableListView);
        // 2. 获取数据集(实际使用中可能是从网络获取或者本地读取)
        expandableListDetail = DataCollection.getData();
        final List<String> heroCategory = new ArrayList<>(expandableListDetail.keySet());
        // 3. 创建适配器,并为 ExpandableListView 实例设置适配器
        ExpandableListAdapter adapter = new MyExpandableListAdapter(this, heroCategory, expandableListDetail);
        listView.setAdapter(adapter);
        // 4. 为 ExpandableListView 添加相应的事件监听器,并实现监听器接口中的回调方法
        listView.setOnGroupExpandListener(new ExpandableListView.OnGroupExpandListener() {

            @Override
            public void onGroupExpand(int groupPosition) {
                Toast.makeText(getApplicationContext(), heroCategory.get(groupPosition)
                                + " 列表展开", Toast.LENGTH_SHORT).show();
            }
        });

        listView.setOnGroupCollapseListener(new ExpandableListView.OnGroupCollapseListener() {

            @Override
            public void onGroupCollapse(int groupPosition) {
                Toast.makeText(getApplicationContext(), heroCategory.get(groupPosition)
                                + " 列表折叠", Toast.LENGTH_SHORT).show();

            }
        });

        listView.setOnChildClickListener(new ExpandableListView.OnChildClickListener() {
            @Override
            public boolean onChildClick(ExpandableListView parent, View v, int groupPosition, int childPosition, long id) {
                Toast.makeText(getApplicationContext(), heroCategory.get(groupPosition)
                        + " -> " + expandableListDetail.get(heroCategory.get(groupPosition))
                        .get(childPosition), Toast.LENGTH_SHORT
                ).show();
                return false;
            }
        });
    }
}
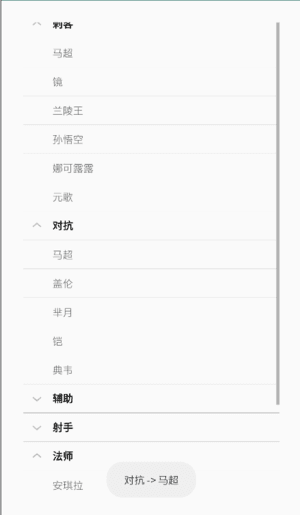
编译运行之后,界面上会展示一个 5 大英雄类别的 ListView,点击每个类别系统会回调onGroupExpand方法,我们在当中打印出当前被展开的类别名;然后会弹出该类下的英雄名称,点击英雄名称系统会回调onChildClick方法,我们在方法中打印出被点击的英雄名称;最后我们可以点击已经展开的英雄类别,系统会将点击的类别恢复折叠状态同时回调onGroupCollapse方法,在其中我们打印出被折叠的类别名称,最终效果如下:
4. 小结
本节学习了 ListView 的升级版,ExpandableListView 继承自 ListView,在 ListView 的基础之上加上了二级分类,所以引入了 group 的概念。在布局文件中除了正常的列表 item 外还需要有一个 group 的布局;
ExpandableListAdapter 也多了一些针对 group 的处理;数据也需要分主类别和子类别,我们先将英雄分为 5 大类,接着在 5 个大类下分别列举了一些该类的英雄名称,最终通过 ExpandableListAdapter 实现了一个英雄分类的示例 App。

 2026 imooc.com All Rights Reserved |