


 马超老师 ·
表格布局 TableLayout
学完了 Android 两个经典布局,是不是觉得已经可以应对大多数场景了?我记得当我学完 LinearLayout 和 RelativeLayout 之后,我觉得 UI 布局已经可以出师了,在本人从事了多年的 Android 研究之后,可以很负责任的告诉你,的确可以出师了。
大多数场景都可以通过这两个布局方式组合出来,不过光靠这两招出师可能会走不少弯路,因为 Google 还为我们提供了很多实用的 Layout,比如今天要学的 TableLayout,它是一种表格样式,在很多 App 里面都会用到。当然你完全可以用 LinearLayout + RelativeLayout 实现,不过学完本节你就会发现,用 TableLayout 实现表格布局是多么简单的一件事情!
1. TableLayout 的特性
和其他 Layout 一样,TableLayout 也派生自 ViewGroup,它可以将内部的 View 或者 Layout 整齐的排成几行几列,按照表格的形式摆放。我用使用<TableRow/>标签标识一行,在标签内的 View 或者 Layout 都将摆放在同一行中。
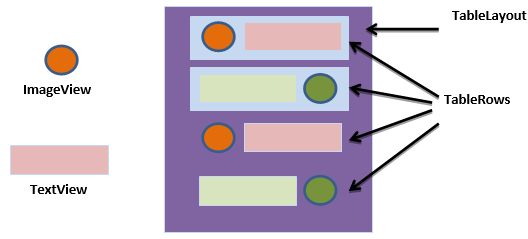
注:看到行标签,大家可以想到,TableLayout 是不需要注明表格列的数量的,因为 Android 系统会自动根据我们声明在<TableRow/>中的元素推算出最终表格的列数
2. 关键属性的用法
刚刚提到,我们用<TableRow/>来声明表格的一行,而很多属性都是作用于<TableRow/>内部 View 的,这个也是和其他 Layout 不太一样的地方,需要注意,下面就分别介绍一下 TableLayout 中这两类属性。
2.1 作用于 TableLayout 的属性
- android:stretchColumns:
当表格的某些列宽度比较窄的时候,你可以通过给 TableLayout 设置stretchColumns属性来设置某些列向行方向伸展,最多可占据一整行。该属性的参数直接填入需要拉伸的列的序号即可(从 0 开始),另外支持多输入,各个列序号通过“,”分隔。如果需要对所有列拉伸,可以直接用“*”表示,如下:<!-- 针对所有列做拉伸 --> android:stretchColumns="*" <!-- 针对第1列、4列、13列做拉伸 --> android:stretchColumns="0,3,12" - android:shrinkColumns:
这是与 stretchColumns 相对的属性,如果某些列的所占的空间太大,那么可以通过该属性设置可收缩的列。当该列子控件的内容太多(比如 TextView 中文本太长),已经挤满所在行,那么该子控件的内容将往列方向显示(TextView 折行显示)。
注:虽然从名字上讲,一个是扩展,一个是收缩,但二者并不冲突。一个列可以同时具备stretchColumns及shrinkColumns属性。若此,那么当该列的内容过多时,将“多行”显示其内容。当然这里不是真正的多行,而是系统根据需要自动调节该行的 layout_height。
- android:collapseColumns:
隐藏部分列的内容,使用方法和上述两个属性一样,直接填入列的序号即可,支持多个列。
这 3 个属性的用法示例如下:
<?xml version="1.0" encoding="utf-8"?>
<TableLayout xmlns:android="http://schemas.android.com/apk/res/android"
    xmlns:tools="http://schemas.android.com/tools"
    android:layout_width="match_parent"
    android:layout_height="match_parent"
    android:shrinkColumns="0"
    android:stretchColumns="1,2"
    android:collapseColumns="3"
    tools:context=".MainActivity">

    <TableRow>

        <TextView
            android:id="@+id/center"
            android:layout_width="wrap_content"
            android:layout_height="wrap_content"
            android:background="#EE0D0D"
            android:text="column1, Emercy Android Study"
            android:textSize="20sp" />

        <TextView
            android:layout_width="wrap_content"
            android:layout_height="wrap_content"
            android:background="#DBEE14"
            android:text="column2"
            android:textSize="20sp" />

        <TextView
            android:layout_width="wrap_content"
            android:layout_height="wrap_content"
            android:background="#7492CC"
            android:text="column3"
            android:textSize="20sp" />

        <TextView
            android:layout_width="wrap_content"
            android:layout_height="wrap_content"
            android:background="#09A234"
            android:text="column4"
            android:textSize="20sp" />
    </TableRow>

    <TableRow>

        <TextView
            android:layout_width="wrap_content"
            android:layout_height="wrap_content"
            android:background="#FF80AB"
            android:text="row2"
            android:textSize="20sp" />
    </TableRow>
</TableLayout>
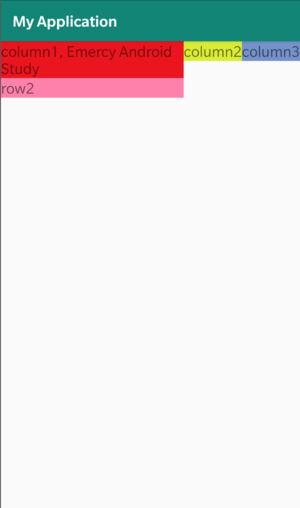
示例中定义另一个两行的表格,根据元素最多的行可以计算出表格的列数,然后设置了shrinkColumns为第一行,stretchColumns为第二、三行,最后collapseColumns为最后一行,最终显示的效果如下:
2.2 作用于 TableRow 内部 View 的属性
- android:layout_span:
通常情况下,一个 View 只会占据一列的宽度,但是如果对某个 View 设置了layout_span=n,那么该 View 会超出所在列,占据 n 个列。 - android:layout_column:
设置 View 在第几列显示。
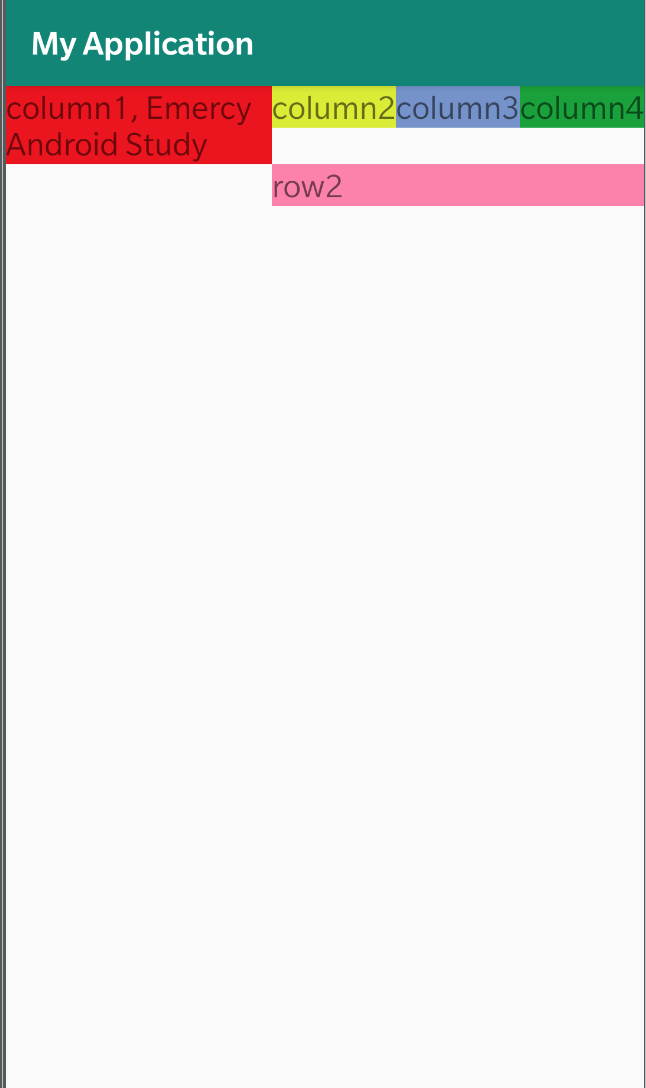
这两个属性比较好理解,我们直接在上面的例子中,在第二行加上这两个参数:
<TableRow>

        <TextView
            android:layout_column="1"
            android:layout_span="3"
            android:layout_width="wrap_content"
            android:layout_height="wrap_content"
            android:background="#FF80AB"
            android:text="row2"
            android:textSize="20sp" />
    </TableRow>
设置当前 TextView 在第 2 列显示,并占 3 列的宽度,效果如下:
3. TableLayout 的注意点
可以看到,用 TableLayout 去完成一个表格样式是非常容易的,关于 TableLayout 有 3 点需要注意:
<TableRow/>标签是不需要设置layout_width和layout_height的,系统会自动给这两个属性分别赋值为match_parent及wrap_content。也就是说,我们的每一行一定是占满 TableLayout 的宽度,而高度则由内部的 View 来决定;- TableLayout 表格的列数,由元素最多的
<TableRow/>的元素数量决定; - 表格每一列的宽度就是该列最大的 View 宽度。
4. 小结
TableLayout 的功能比较简单,属性也很好理解,就是用来完成一个列表形式的布局,虽然形式比较单一,但是在相应场景中会有事半功倍的效果,相信在学会 LinearLayout 和 RelativeLayout 之后的你应该能够完全掌握。
注:大家学完之后可以思考一下本节中的所有 UI 样式如果用 LinearLayout 和 RelativeLayout 如何实现?

 2026 imooc.com All Rights Reserved |