


 马超老师 ·
FrameLayout 应该说是 Android 常用UI布局里面最简单的一种,顾名思义,它的布局方式就是将 View 一帧一帧的叠加到一起,有点类似 Photoshop 里面的图层的概念。在学习 FrameLayout 的过程中,你会发现基于它可以设计出很多有意思的 Android UI。那么接下来,我们来一起一探究竟。
1. FrameLayout 的特性
FrameLayout 是最简单且最高效的布局形式,不过 FrameLayout 的使用频率相比其他的 Layout 来讲要更少很多,主要是因为很多时候它只是作为一个容器来显示单个 View 或者多个 View 重叠的场景。
用过 Photoshop 的朋友对“图层”的概念应该比较熟悉,我们可以插入很多个图层,后添加的图层会挡住先添加的图层,然后针对每个图层我们可以任意的设置它在整个图片中的位置。同样的,我们可以设置 FrameLayout 内部 View 所处的位置,与 RelativeLayout 相似,可以设置放置在上下左右,同样也可以设置边距。如果放置了多个 View,那么他们会按照放置的顺序依次叠加,后加入 View 的会挡住前面加入的 View。
2. FrameLayout 的常用设置
在第 1 小节我们提到过,FrameLayout 可以设置内部 View 所在的位置,那么这几个属性和 RelativeLayout 一样,这里不再重复,主要介绍一下 FrameLayout 特有又常用的两个属性:android:foreground和android:foregroundGravity。
2.1 前景图像
android:foreground: 设置 FrameLayout 的前景图像
前景图像会置于 FrameLayout 内部所有 View 的层级之上,直接设置图片的资源 id 即可,如下:
android:foreground="@drawable/emercy"
2.2 前景位置
android:foregroundGravity: 设置 FrameLayout 前景图片的摆放位置,设置方式与 RelativeLayout 中的 View 一样,如:
android:foregroundGravity="bottom|right"
3. 通过 XML 完成一个 FrameLayout
我们的 FrameLayout 需要满足以下要求:
- 一个图片,作为 FrameLayout 的前景;
- 一个 Android Logo 图片资源(ImageView);
- 一个文本资源,和 Logo 重叠,可以看到后添加的 View 会挡住前面添加的 View;
- 一个文本资源,和前景图片重叠,可以看到前景图片时钟会在内部 View 之上显示。
完成以上功能的布局代码比较简单:
<?xml version="1.0" encoding="utf-8"?>
<FrameLayout xmlns:android="http://schemas.android.com/apk/res/android"
    android:layout_width="match_parent"
    android:layout_height="match_parent"
    android:foreground="@drawable/emercy"
    android:foregroundGravity="bottom|right"
    android:orientation="vertical">

    <ImageView
        android:layout_width="wrap_content"
        android:layout_height="wrap_content"
        android:scaleType="centerCrop"
        android:src="@mipmap/ic_launcher" />

    <TextView
        android:layout_width="match_parent"
        android:layout_height="wrap_content"
        android:layout_marginTop="40dp"
        android:background="#4C374A"
        android:padding="10dp"
        android:text="Welcome to iMooc"
        android:textColor="#FFFFFF"
        android:textSize="20sp" />

    <TextView
        android:layout_width="wrap_content"
        android:layout_height="wrap_content"
        android:layout_gravity="left|bottom"
        android:background="#1E64D8"
        android:padding="10dp"
        android:text="Emercy Android"
        android:textColor="#FFFFFF"
        android:textSize="18sp" />
</FrameLayout>
效果如下:
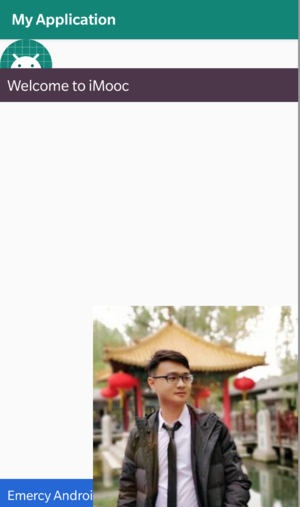
这就是 FrameLayout 的基本用法。
4. FrameLayout 的适用场景
到这里,基本上你已经掌握了 FrameLayout 的用法,可能你会有所疑惑,看起来 FrameLayout 也没有什么特别好的地方,似乎完全可以被 RelativeLayout 替代,所以很多人在开发过程中,往往会忘记还有这么个 Layout。其实越是往后学你越会发现,FrameLayout 的简单不仅仅体现在使用上,更大的优势是在于其性能。当你的屏幕上控件不太多时,比如 Android 的桌面 Widget,或者 Home 应用,大多都是直接采用 FrameLayout 完成的布局。
事实上,还有一处是 FrameLayout 用的最多的地方,也是一个非常隐蔽的地方。如果我们打开 Hierarchy Viewer 或者类似的 View 分析工具,我们可以看到Android的每一个页面都是在一个 FrameLayout 中完成的布局,也就是无论你定义的布局有多复杂,最终都会被放到一个 FrameLayout 当中显示,这也体现了 FrameLayout 的强大,在今后的学习工作中,希望大家一定不要忽视了 FrameLayout,在此为大家埋下一个伏笔。
5. 小结
这里需要再次强调:FrameLayout 是最简单,最高效的布局方式。它的布局方式很容易理解,我们通过它可以将内部的 View 防止到任意的方位,如果内部有多个 View,那么按照防止顺序,后加入的View会挡住前面加入的 View。

 2026 imooc.com All Rights Reserved |